
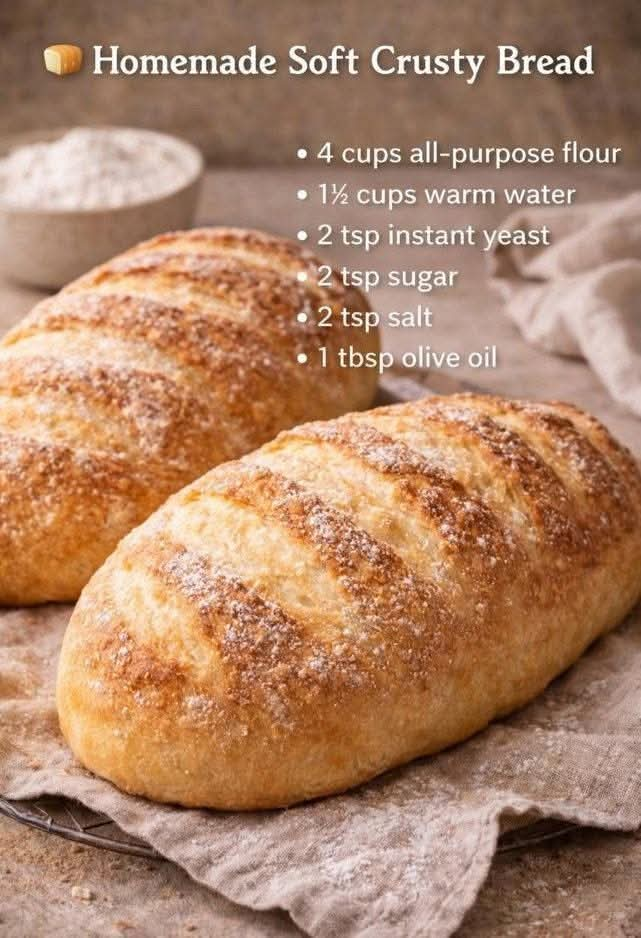
Homemade Soft Crusty Bread
Introduction
There is something wonderfully comforting about a loaf of homemade bread fresh from the oven. The aroma of yeast, warm flour, and olive oil fills the kitchen, while the finished loaf develops a beautiful golden crust and a soft, tender interior. This homemade soft crusty bread is simple enough for a beginner but satisfying enough to become a regular family recipe.
The outside is crisp and lightly crunchy, while the inside remains soft, airy, and pleasantly chewy. It is delicious served warm with butter, olive oil, soup, stew, eggs, cheese, or your favorite sandwich fillings.
This recipe uses everyday ingredients and does not require complicated equipment. The most important ingredients are patience and proper rising time. Allowing the dough to ferment and rise gives the bread its structure, flavor, and texture.
Ingredients
For the Bread
- 4 cups all-purpose flour
- 1 1/2 cups warm water
- 2 teaspoons instant yeast
- 2 teaspoons granulated sugar
- 2 teaspoons salt
- 1 tablespoon olive oil
Optional for the Crust
- 1 tablespoon water for brushing the loaf
- A little flour for dusting
- Extra olive oil for lightly greasing the bowl
Instructions
Step 1: Prepare the Yeast
Pour the warm water into a small bowl. Add the yeast and sugar and stir gently.
Let the mixture stand for approximately 5 to 10 minutes. It should become slightly foamy or active-looking. The water should be warm rather than hot because very hot water can damage the yeast.
If using instant yeast, this activation step is not strictly necessary, but it can help confirm that the yeast is active before continuing.
Step 2: Mix the Dough
Place the flour and salt in a large mixing bowl. Stir them together to distribute the salt evenly.
Pour in the yeast mixture and add the olive oil. Mix with a wooden spoon, sturdy spatula, or your hands until the flour is incorporated.
The dough should be soft and somewhat sticky at this stage. Avoid adding a large amount of extra flour immediately, because a dough that is too dry can produce a dense loaf.
Step 3: Knead the Dough
Transfer the dough to a lightly floured work surface.
Knead for approximately 8 to 10 minutes. Push the dough forward with the heel of your hand, fold it back toward you, rotate it, and repeat.
As you knead, the dough should gradually become smoother, more elastic, and easier to handle.
If the dough is extremely sticky, add a small amount of flour at a time. Do not add too much, as the goal is a soft dough.
Step 4: First Rise
Lightly oil a clean bowl and place the dough inside. Turn it once so the surface is lightly coated with oil.
Cover the bowl with a clean kitchen towel or plastic wrap.
Place it in a warm, draft-free area and allow it to rise for approximately 1 to 1 1/2 hours, or until it has roughly doubled in size.
The exact rising time can vary depending on the temperature of your kitchen. A cooler room may require additional time.
Step 5: Shape the Loaf
Once the dough has doubled, gently press it down to release some of the excess air.
Transfer it to a lightly floured surface and shape it into your preferred form.
You can make one large round boule, an oval loaf, or a traditional loaf shape.
Try to create a smooth surface by gently pulling the dough underneath itself as you shape it. This helps create tension on the outside of the loaf.
Place the shaped dough on a parchment-lined baking sheet.
Step 6: Second Rise
Cover the shaped loaf loosely with a clean towel.
Allow it to rest and rise for approximately 30 to 45 minutes.
Meanwhile, preheat the oven to 425°F (220°C).
For an especially crisp crust, place a heavy baking sheet, baking stone, or suitable oven-safe pan in the oven while it preheats.
Step 7: Score the Bread
When the second rise is complete, lightly dust the loaf with flour if desired.
Using a sharp knife or bread lame, make one or several shallow cuts across the surface.
Scoring gives the expanding bread a controlled place to open during baking and also creates the attractive appearance associated with artisan-style bread.
Step 8: Bake
Place the loaf in the fully preheated oven.
Bake for approximately 25 to 30 minutes, or until the bread is deeply golden brown and the crust feels firm.
The loaf should sound hollow when gently tapped on the bottom.
If the top begins browning too quickly, you can loosely cover it with foil during the final portion of baking.
Step 9: Cool Completely
Remove the bread from the oven and transfer it to a wire rack.
Allow it to cool completely before slicing.
Although it may be tempting to cut into the loaf immediately, cooling allows the interior to finish setting. Slicing too early can cause the crumb to become gummy or compressed.
Once cooled, use a serrated bread knife to cut clean slices.
Method
The overall method for this bread follows five important stages: mixing, kneading, fermentation, shaping, and baking.
First, the flour is combined with the yeast mixture, salt, and olive oil to create a soft dough. Kneading develops gluten, which provides the elasticity needed for the loaf to hold its shape and create a pleasant crumb.
The first rise gives the yeast time to ferment the dough. During this stage, the yeast consumes available sugars and produces carbon dioxide, which becomes trapped within the developing gluten network. This is what allows the dough to expand.
After the first rise, the dough is shaped and given a second, shorter rise. This improves the final texture and helps the loaf become lighter.
Finally, the bread is baked at a high temperature. The heat causes the dough to expand rapidly at the beginning of baking while the surface dries and develops a golden, crisp crust.
The History of Homemade Bread
Bread is one of the oldest prepared foods in human history. Early forms of bread were made from simple mixtures of crushed grains and water and were cooked on hot stones or other heated surfaces.
Over thousands of years, bread-making developed across many civilizations. The discovery and use of fermentation allowed bakers to produce lighter and more airy loaves instead of flat breads.
Yeast became an important part of traditional bread-making, while different regions developed their own styles according to available grains, climate, cooking methods, and cultural traditions.
The basic principles remain remarkably similar today. Flour is combined with liquid, yeast or another leavening agent is used to create structure and lift, the dough is allowed to develop, and heat transforms it into bread.
Homemade crusty bread represents this simple tradition particularly well because it relies on a small number of basic ingredients while producing a loaf with impressive flavor and texture.
Formation and Texture
The formation of this bread begins with gluten development.
When flour comes into contact with water, proteins within the flour begin forming gluten. Kneading strengthens this network, allowing the dough to stretch without breaking.
During fermentation, yeast produces carbon dioxide. The gluten network traps these gases, creating pockets throughout the dough.
The first rise gives the dough most of its initial volume. The second rise allows the shaped loaf to become lighter before entering the oven.
When the bread reaches the hot oven, the gases inside the dough expand. This produces the final increase in volume, often called oven spring.
At the same time, the outer surface loses moisture and undergoes browning reactions that create the characteristic golden crust and toasted flavor.
The result is a loaf with a crisp exterior and a soft, airy interior.
Tips for Success
Use the Correct Water Temperature
The water should feel warm but not hot. Excessively hot water can interfere with yeast activity.
Measure Flour Carefully
Too much flour can produce a heavy loaf. If possible, weigh the flour for the most consistent results. If using measuring cups, spoon the flour into the cup and level it rather than packing it down.
Do Not Over-Flour the Dough
A slightly sticky dough can become beautifully soft after kneading and fermentation. Add flour gradually rather than trying to make the dough completely dry.
Give the Dough Enough Time
Bread dough does not always rise according to an exact clock. Temperature affects fermentation, so look at the dough itself. A properly risen dough should have increased substantially in volume.
Preheat the Oven Properly
A thoroughly preheated oven helps the loaf rise quickly and encourages a crisp crust.
Create Steam for a Crisper Crust
Steam helps keep the surface of the dough flexible during the beginning of baking, allowing better expansion before the crust sets. A preheated baking stone or heavy baking surface can also help produce a more artisan-style crust.
Let the Bread Cool
Cooling is an important part of the baking process. Give the loaf enough time to cool before slicing so the interior can finish setting.
Serving Ideas
Fresh homemade bread can be served in countless ways.
Serve warm slices with butter for a simple breakfast or snack. For a savory option, dip pieces into olive oil seasoned with herbs, garlic, salt, or black pepper.
The bread also works beautifully alongside soups, stews, pasta, roasted vegetables, grilled meats, eggs, and salads.
For sandwiches, allow the bread to cool completely and slice it into medium-thick pieces. It can be filled with cheese, vegetables, chicken, tuna, eggs, or other favorite ingredients.
For breakfast, toasted slices can be topped with butter, jam, honey, eggs, avocado, or soft cheese.
Storage
Once completely cooled, store the bread at room temperature in a bread bag, paper bag, or loosely covered container.
For the best crust, avoid storing fresh bread in the refrigerator because refrigeration can cause bread to stale more quickly.
If you cannot eat the loaf within a few days, slice it and freeze the portions in an airtight freezer-safe bag. Individual slices can then be removed as needed and toasted or warmed.
Conclusion
Homemade Soft Crusty Bread is a simple recipe that demonstrates how a few basic ingredients can become something wonderfully satisfying. With flour, water, yeast, sugar, salt, and a little olive oil, you can create a loaf with a golden crust and soft, flavorful center.
The key is not complicated technique but careful attention to kneading, rising, shaping, baking, and cooling. Once you become comfortable with the process, this recipe can become a dependable foundation for many other homemade bread variations.
There is a special pleasure in slicing into a loaf that you made yourself. Whether served beside dinner, toasted for breakfast, or simply enjoyed with butter while still slightly warm, homemade bread brings a comforting, traditional feeling to the table.
For Bread Lovers
For anyone who loves the smell of freshly baked bread, this recipe is a wonderful place to begin. It is approachable, economical, and versatile, making it suitable for everyday meals as well as family gatherings.
Bread lovers can experiment with the basic dough by adding dried herbs, roasted garlic, seeds, grated cheese, or different seasonings. You can also shape the dough into smaller rolls instead of one large loaf.
The beauty of homemade bread is that every loaf can become a little different. With practice, you can adjust the crust, crumb, shape, and baking time to create the style of bread you enjoy most.
Final Method Summary
- Combine warm water, yeast, and sugar.
- Let the mixture stand for 5 to 10 minutes.
- Combine flour and salt in a large bowl.
- Add the yeast mixture and olive oil.
- Mix into a soft dough.
- Knead for 8 to 10 minutes.
- Cover and allow the dough to rise for 1 to 1 1/2 hours.
- Gently deflate and shape the dough.
- Allow the shaped loaf to rise for another 30 to 45 minutes.
- Preheat the oven to 425°F (220°C).
- Score the top of the loaf.
- Bake for 25 to 30 minutes until golden and crusty.
- Transfer to a wire rack.
- Cool completely before slicing.
- Serve and enjoy with your favorite toppings or alongside your favorite meal.
This is a classic homemade loaf that rewards patience with a beautiful crust, tender crumb, and the unmistakable aroma of freshly baked bread.