
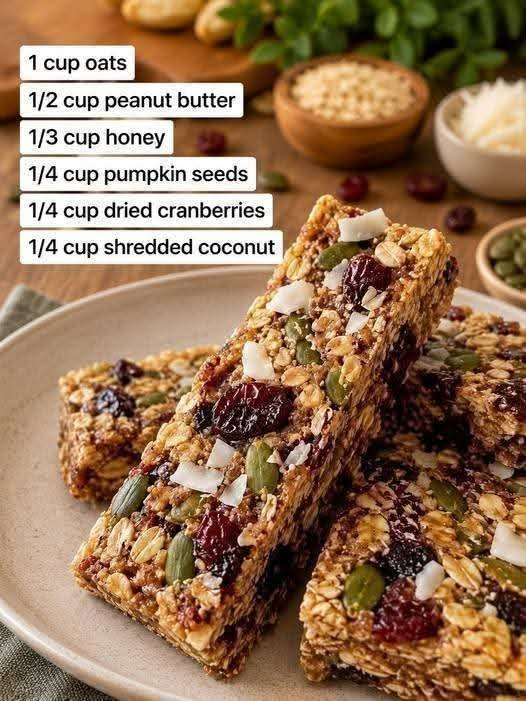
Homemade High-Protein Oat, Peanut Butter and Cranberry Snack Bars
Introduction
Homemade snack bars are one of the easiest ways to prepare a convenient treat that can be enjoyed for breakfast, after a workout, during a busy afternoon, or whenever you need something satisfying between meals. These peanut butter and cranberry oat bars combine hearty rolled oats, creamy peanut butter, dried cranberries, nuts, and seeds into a chewy snack with a naturally sweet, nutty flavor.
Unlike many packaged snack bars, homemade bars allow you to control the ingredients and sweetness. You can choose honey or maple syrup, add your favorite nuts and seeds, include coconut for extra texture, or leave out the chocolate chips if you prefer a simpler version.
The combination of oats and peanut butter gives these bars a satisfying texture, while cranberries add small bursts of fruity sweetness. They are simple to prepare, easy to customize, and convenient to keep on hand for the whole family.
Ingredients
Main Ingredients
- 2 cups rolled oats
- 1 cup creamy peanut butter
- 1/2 cup honey or pure maple syrup
- 1 teaspoon vanilla extract
- 1/2 teaspoon salt
- 3/4 cup dried cranberries
- 1/2 cup chopped nuts, such as almonds, walnuts, or peanuts
- 1/4 cup sunflower seeds or pumpkin seeds, optional
- 1/4 cup shredded coconut, optional
- 1/4 cup mini chocolate chips, optional
Optional Protein Addition
For a higher-protein version, you can add:
- 1/3 to 1/2 cup vanilla or unflavored protein powder
- 2 to 4 tablespoons milk, almond milk, or another milk of choice, only if needed to soften the mixture
Because protein powders vary considerably in how much liquid they absorb, add the milk gradually rather than all at once.
Instructions
Step 1: Prepare the Pan
Line an approximately 8-inch square baking pan with parchment paper, leaving some parchment hanging over the sides. This makes it much easier to lift the finished bars from the pan.
Lightly grease the parchment if desired.
Step 2: Prepare the Dry Ingredients
Place the rolled oats in a large mixing bowl.
Add the dried cranberries, chopped nuts, sunflower or pumpkin seeds if using, and shredded coconut if desired.
If you are adding protein powder, mix it into the oats before adding the wet ingredients.
Stir everything together until evenly distributed.
Step 3: Warm the Peanut Butter Mixture
Place the peanut butter and honey or maple syrup in a small saucepan over low heat.
Warm gently, stirring constantly, until the peanut butter becomes soft and the sweetener blends smoothly into it.
Do not boil the mixture. You only need enough heat to make it easier to combine.
Remove the saucepan from the heat and stir in the vanilla extract and salt.
Step 4: Combine the Mixtures
Pour the warm peanut butter mixture over the oat mixture.
Using a sturdy spoon or spatula, stir thoroughly until all of the oats and other ingredients are coated.
The mixture should be thick and sticky.
If you added protein powder and the mixture seems unusually dry or crumbly, add milk one tablespoon at a time until it becomes cohesive.
Step 5: Add Chocolate Chips
If using mini chocolate chips, allow the peanut butter mixture to cool slightly before adding them. This helps prevent the chocolate chips from melting completely.
Fold them gently into the mixture.
Step 6: Press Into the Pan
Transfer the mixture to the prepared baking pan.
Use the back of a spatula, a piece of parchment paper, or the bottom of a glass to press the mixture down firmly and evenly.
This step is important. Pressing firmly helps the bars hold together after chilling.
Pay particular attention to the corners and edges.
Step 7: Chill
Place the pan in the refrigerator for at least 1 to 2 hours.
For firmer bars, allow them to chill longer.
Once completely set, lift the mixture from the pan using the parchment paper.
Step 8: Cut the Bars
Place the chilled slab on a cutting board.
Using a sharp knife, cut it into squares or rectangular bars.
For snack-sized portions, you can cut the mixture into 12 to 16 bars.
No-Bake Method
These bars are especially convenient because they do not require an oven.
The warm peanut butter and honey mixture acts as the binding base. When combined with the oats, nuts, seeds, and cranberries and then chilled, the mixture firms up into chewy bars.
For a completely no-cook approach, you can gently warm the peanut butter and honey in short intervals in the microwave, stirring between each interval. The goal is simply to soften the mixture enough to combine everything smoothly.
Optional Baked Method
If you prefer a slightly firmer and more toasted bar, the mixture can also be baked.
After pressing the mixture into a parchment-lined pan, bake at 350°F (175°C) for approximately 12 to 16 minutes, or until the edges are lightly golden.
Allow the bars to cool completely in the pan before cutting.
The baked version will generally have a firmer texture and a more toasted oat and nut flavor.
The History Behind Homemade Snack Bars
Homemade cereal and oat bars developed from a long tradition of combining grains, nuts, seeds, dried fruits, and natural sweeteners into portable foods.
Oats have been used for centuries in many forms, while dried fruits and nuts have traditionally been valued because they are convenient foods that store well. Peanut butter later became a popular ingredient in homemade snack recipes because of its creamy consistency and ability to help bind ingredients together.
Modern homemade snack bars bring these traditional ingredients together in a convenient format. Instead of purchasing a packaged bar, home cooks can combine pantry staples and adjust the recipe according to their preferences.
This cranberry and peanut butter version follows that same simple principle: combine wholesome pantry ingredients, press them together, chill or bake, and create an easy snack that can be prepared ahead of time.
Formation and Texture
The formation of these bars depends on the balance between dry ingredients and the sticky peanut butter mixture.
Rolled oats provide the structure and chewiness. Peanut butter contributes richness and helps hold the ingredients together. Honey or maple syrup provides sweetness and additional binding power.
Dried cranberries bring a soft, chewy fruit texture, while chopped nuts and seeds provide crunch.
If the mixture is too dry, the finished bars may crumble. If it is too wet, the bars may remain excessively soft. This is why any additional liquid should be added gradually, particularly when protein powder is included.
Firmly pressing the mixture into the pan and chilling it thoroughly are also important for producing neat, cohesive bars.
Tips for the Best Snack Bars
Use creamy peanut butter for the smoothest texture.
If using natural peanut butter, stir it thoroughly before measuring because the oil can separate during storage.
Choose old-fashioned rolled oats for a hearty, chewy texture.
If your dried cranberries are very large, chop them into smaller pieces so they distribute more evenly.
Toast the nuts lightly before adding them if you want a deeper roasted flavor.
Do not add chocolate chips while the peanut butter mixture is extremely hot.
Press the mixture firmly into the pan. Loose packing is one of the most common reasons homemade bars fall apart.
Chill completely before cutting.
For cleaner cuts, use a large sharp knife and wipe it between cuts.
Flavor Variations
Peanut Butter and Chocolate
Add mini chocolate chips and use roasted peanuts for a classic peanut butter and chocolate combination.
Cranberry Almond
Use chopped almonds and almond butter instead of peanut butter for a slightly different nutty flavor.
Cranberry Coconut
Add extra shredded coconut and use almonds for a tropical-inspired version.
Apple Cinnamon
Replace part of the cranberries with finely chopped dried apples and add 1/2 teaspoon of cinnamon.
Chocolate Cranberry
Add mini chocolate chips and a small amount of unsweetened cocoa powder for a richer chocolate flavor.
Seed-Packed Version
Use pumpkin seeds, sunflower seeds, chia seeds, and ground flaxseed for additional texture.
How to Store
Store the finished bars in an airtight container.
They can be kept refrigerated for approximately one week, depending on the freshness of the ingredients used.
For longer storage, individually wrap the bars and place them in a freezer-safe container or bag. Frozen bars can be thawed in the refrigerator or allowed to soften at room temperature.
Keeping the bars chilled also gives them a firmer, chewier texture.
Serving Ideas
These snack bars are versatile enough to serve in many ways.
Enjoy one with breakfast alongside yogurt and fresh fruit.
Pack one in a lunchbox for a convenient snack.
Take one along for a hike, road trip, or busy day.
Serve one with coffee or tea in the afternoon.
Cut them into smaller squares for a party or snack tray.
They can also be crumbled over Greek yogurt or oatmeal for additional texture.
For Protein Lovers
For anyone looking to increase the protein content, the easiest modification is adding protein powder to the oat mixture.
A neutral or vanilla-flavored protein powder works particularly well with peanut butter and cranberry.
Because different protein powders absorb different amounts of moisture, the recipe may require a small amount of additional milk. Add it slowly until the mixture becomes thick and moldable without becoming wet.
Another option is to serve the bar alongside a protein-rich food such as Greek yogurt, cottage cheese, or a glass of milk.
Conclusion
These homemade high-protein oat, peanut butter, and cranberry snack bars are a simple example of how everyday pantry ingredients can become a convenient homemade snack.
The oats provide a hearty base, peanut butter brings richness and helps bind everything together, cranberries add fruity sweetness, and nuts and seeds provide extra crunch. Optional coconut and chocolate chips make it easy to customize the recipe for different tastes.
The best part is that you can adjust the recipe to suit your preferences. Make the bars nutty, fruity, chocolatey, coconut-filled, or packed with seeds. Add protein powder when desired, or keep the recipe simple with its original ingredients.
Prepare a batch, chill them until firm, cut them into individual portions, and keep them ready for whenever a homemade snack is needed.