
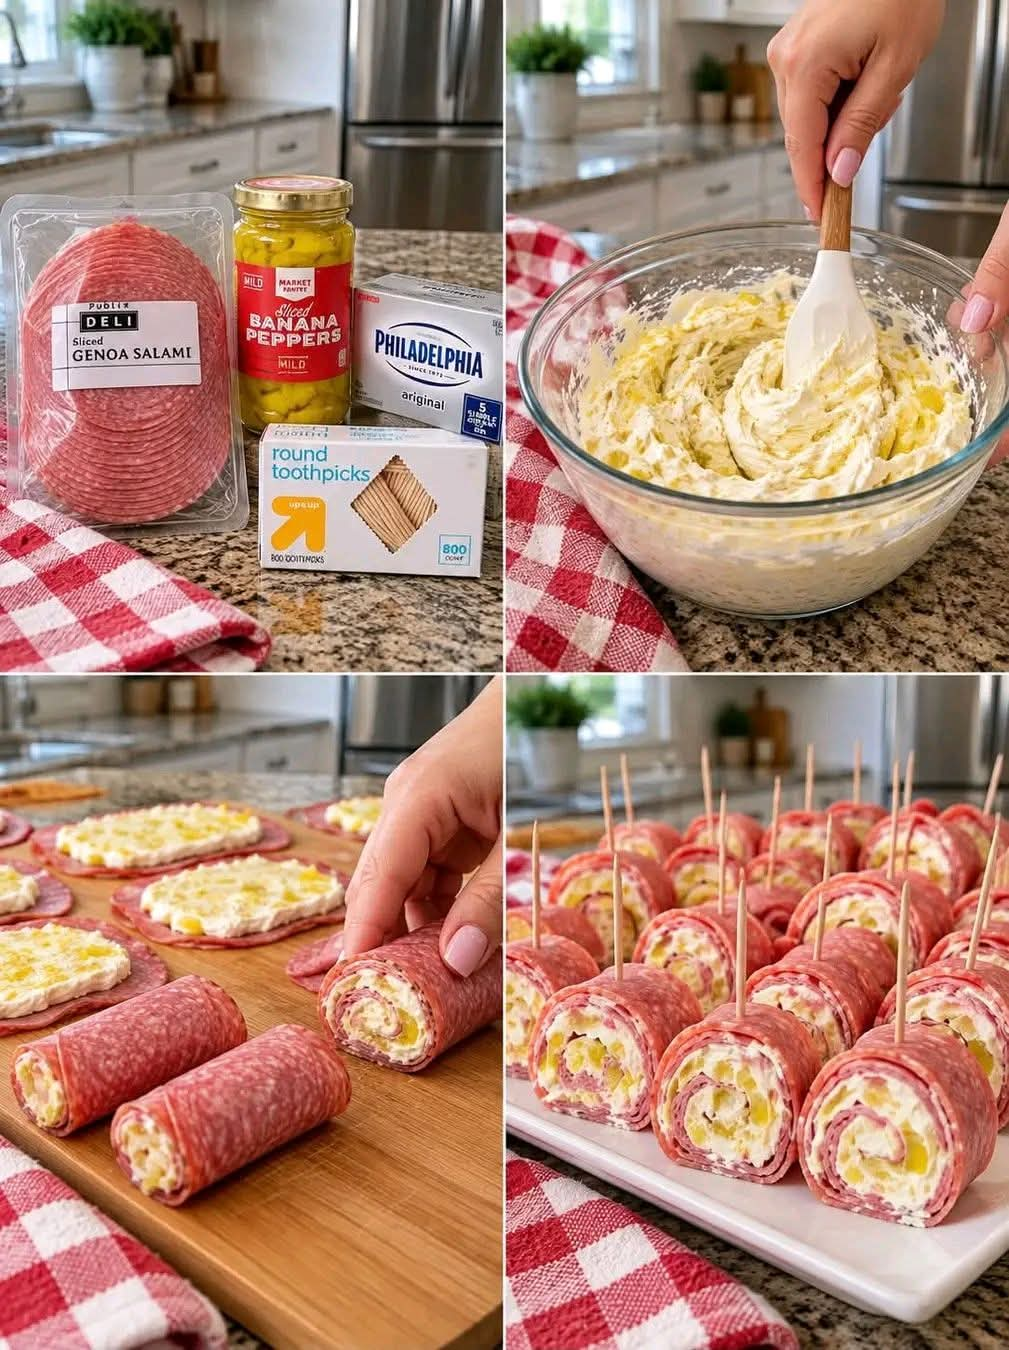
Salami Cream Cheese Roll-Ups
Introduction
Salami Cream Cheese Roll-Ups are an easy, savory appetizer made with thinly sliced Genoa salami, smooth cream cheese, and finely chopped mild banana peppers. The combination is simple but incredibly satisfying: the rich and creamy filling balances the salty, savory flavor of the salami, while banana peppers add a mild tang and a little crunch.
These roll-ups are perfect when you need a party appetizer that can be prepared ahead of time. They require no oven, no complicated cooking techniques, and only a handful of ingredients. Once assembled and chilled, they can be sliced into bite-sized pieces and secured with toothpicks for easy serving.
They are especially popular for holiday gatherings, game-day parties, potlucks, family celebrations, appetizer trays, and casual entertaining.
Ingredients
For the Roll-Ups
- 16 ounces thinly sliced Genoa salami
- 8 ounces Philadelphia cream cheese, softened
- 1/2 cup mild banana peppers, drained and finely chopped
- 1 tablespoon banana pepper juice
- Round toothpicks, for serving
Optional Additions
Although the basic recipe is delicious on its own, you can customize the filling with additional ingredients such as:
- 2 tablespoons finely chopped green onions
- 1/4 cup shredded mozzarella or cheddar cheese
- 1 tablespoon finely chopped fresh parsley
- 1/4 teaspoon garlic powder
- 1/4 teaspoon black pepper
- A small amount of crushed red pepper for extra heat
These additions are optional and can be adjusted according to your taste.
Instructions
Step 1: Prepare the Banana Peppers
Drain the banana peppers thoroughly. Excess liquid can make the cream cheese filling too loose and difficult to spread.
Finely chop the peppers into very small pieces. You want them to be evenly distributed throughout the cream cheese rather than forming large pieces that make the roll-ups difficult to slice.
Measure one tablespoon of the reserved banana pepper juice.
Step 2: Prepare the Cream Cheese Filling
Place the softened cream cheese in a medium mixing bowl.
Add the chopped banana peppers and one tablespoon of banana pepper juice. Stir thoroughly until the ingredients are evenly incorporated and the mixture becomes smooth and spreadable.
If desired, add garlic powder, black pepper, green onions, shredded cheese, or parsley.
The cream cheese should be soft enough to spread easily but should not be runny.
Step 3: Arrange the Salami
Lay the slices of Genoa salami on a clean work surface.
For larger roll-ups, slightly overlap several slices of salami to create a continuous layer. The exact number of slices depends on their size and thickness.
Try to create an even layer without leaving large gaps between the slices.
Step 4: Spread the Filling
Spread a thin, even layer of the cream cheese mixture over the salami.
Do not spread the filling all the way to the very edge. Leaving a small border helps prevent the filling from squeezing out when the roll is rolled.
Use enough filling to create a creamy layer, but avoid making it excessively thick.
Step 5: Roll the Salami
Starting from one end, carefully roll the salami into a tight cylinder.
Roll slowly and firmly enough to keep the filling inside without squeezing it out.
Once completely rolled, place the seam underneath so the roll stays closed.
Step 6: Chill the Roll
Wrap the finished roll tightly in plastic wrap and place it in the refrigerator.
Chill for at least 1 to 2 hours.
For the cleanest slices and easiest preparation, you can make the rolls several hours ahead of serving and allow them to become thoroughly chilled.
Step 7: Slice
Remove the chilled roll from the refrigerator and unwrap it.
Using a sharp knife, cut the roll into bite-sized pieces.
Wipe the knife occasionally with a clean towel if necessary. A clean, sharp knife will help produce neat slices without crushing the filling.
Step 8: Secure and Serve
Insert a round toothpick through each piece to keep the roll-up together.
Arrange the finished Salami Cream Cheese Roll-Ups on a serving platter.
For the best texture and flavor, keep them refrigerated until shortly before serving.
Method
The key to making excellent Salami Cream Cheese Roll-Ups is controlling the moisture and temperature of the ingredients.
The cream cheese should be softened at room temperature so that it spreads easily. However, it should remain firm enough to hold its shape.
The banana peppers should be drained well before being chopped. Their juice provides acidity and flavor, but too much liquid can make the filling watery.
Rolling the salami tightly creates a compact appetizer that is easy to slice. Chilling the completed roll is equally important because it firms the cream cheese and makes cutting much easier.
For an especially neat presentation, prepare the roll the day before serving. Keep it tightly wrapped in the refrigerator and slice it shortly before placing it on the appetizer tray.
Formation and Assembly
The formation of these roll-ups follows a simple three-layer process.
First, the salami creates the outer layer. Its thin, flexible texture makes it ideal for rolling.
Second, the softened cream cheese forms the creamy center. It also acts as the ingredient that holds the chopped banana peppers in place.
Third, the banana peppers provide contrast. Their mild acidity and slight crunch prevent the appetizer from becoming overly rich.
When the roll is chilled and sliced, each piece reveals a spiral-like arrangement of salami and cream cheese filling. The toothpick keeps each individual piece intact and makes the appetizer convenient for guests to pick up and eat.
Flavor Variations
Spicy Salami Roll-Ups
Replace the mild banana peppers with hot banana peppers or pepperoncini. Add a small pinch of crushed red pepper for additional heat.
Cheesy Salami Roll-Ups
Mix 1/4 cup of finely shredded cheddar, mozzarella, or Monterey Jack cheese into the cream cheese filling.
Garlic Herb Roll-Ups
Add garlic powder, dried Italian herbs, parsley, or chives to the cream cheese.
Italian-Style Roll-Ups
Add finely chopped roasted red peppers, Italian seasoning, and a small amount of shredded mozzarella.
Extra-Creamy Version
Mix the softened cream cheese with a tablespoon or two of sour cream before adding the peppers. This produces a softer, more spreadable filling.
Make-Ahead Method
These roll-ups are particularly convenient for entertaining because they can be prepared ahead of time.
Prepare and roll the salami, then wrap the completed rolls tightly in plastic wrap. Refrigerate until firm.
When you are ready to serve, slice the rolls, add toothpicks, and arrange them on a platter.
For food safety, keep the appetizer refrigerated and avoid leaving it at room temperature for extended periods.
Serving Suggestions
Salami Cream Cheese Roll-Ups pair well with a variety of other appetizers.
Serve them alongside:
- Crackers
- Cheese cubes
- Olives
- Pickles
- Fresh vegetables
- Cherry tomatoes
- Grapes
- Nuts
- Deviled eggs
- Vegetable trays
- Other cold-cut appetizers
They also make a great addition to a holiday appetizer board or charcuterie-style platter.
History and Inspiration
The idea behind these roll-ups comes from the long tradition of combining cured meats and creamy cheeses in easy-to-eat appetizers.
Salami and cream cheese are both ingredients that work beautifully in cold appetizer recipes because they require little preparation. Similar rolled appetizers became popular for parties and gatherings because they could be assembled in advance, chilled, sliced, and served without reheating.
The addition of banana peppers gives this modern version its distinctive character. Their mild heat, tanginess, and crisp texture provide a pleasant contrast to the rich cream cheese and salty salami.
The result is a simple appetizer that feels festive without requiring complicated cooking.
Tips for Perfect Roll-Ups
Use softened cream cheese. Cold cream cheese can tear the salami or make spreading difficult.
Drain the banana peppers thoroughly. Too much moisture can make the filling runny.
Do not overfill the salami. A thinner layer produces cleaner, tighter rolls.
Chill before slicing. This is one of the most important steps for achieving neat pieces.
Use a sharp knife. A dull knife can flatten the roll instead of cutting through it cleanly.
Keep the finished appetizer refrigerated until serving.
Conclusion
Salami Cream Cheese Roll-Ups are proof that an impressive appetizer does not need a long ingredient list or complicated preparation. With Genoa salami, creamy Philadelphia cream cheese, tangy banana peppers, and a few toothpicks, you can create a party-ready snack that looks attractive and tastes even better.
The combination of salty salami, smooth cream cheese, and bright banana peppers creates a satisfying balance of rich, creamy, savory, and tangy flavors. Because the roll-ups can be made ahead of time, they are also an excellent choice when you want to spend less time in the kitchen once your guests arrive.
For Salami Roll-Up Lovers
If you love savory appetizers, deli meats, creamy cheese spreads, and bite-sized party foods, these roll-ups are an especially easy recipe to keep in your collection.
They are ideal for holiday parties, family gatherings, potlucks, game days, birthdays, picnics, and casual weekend entertaining.
The best part is that the recipe is flexible. You can keep the classic banana pepper filling, make it spicy, add shredded cheese, introduce fresh herbs, or create your own combination based on the ingredients you have available.
Once you make them, slice them into small pieces, secure them with toothpicks, arrange them on a beautiful platter, and watch them disappear from the table.
Final Method at a Glance
- Soften the cream cheese.
- Drain and finely chop the banana peppers.
- Mix the peppers and banana pepper juice into the cream cheese.
- Lay the Genoa salami slices in an overlapping layer.
- Spread the cream cheese mixture evenly over the salami.
- Roll the salami tightly into a cylinder.
- Wrap and refrigerate for 1 to 2 hours.
- Slice into bite-sized pieces.
- Secure each piece with a toothpick.
- Refrigerate until ready to serve.