
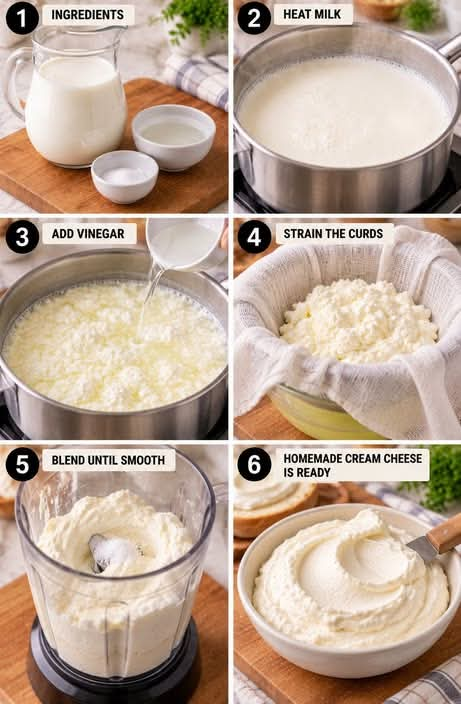
Homemade Cream Cheese
Introduction
Homemade cream cheese is a simple, fresh, and delicious dairy recipe that can be prepared with just a few basic ingredients. With whole milk, vinegar, and a small amount of salt, you can create a creamy spread that is perfect for breakfast, baking, sandwiches, dips, and desserts.
Making cream cheese at home also gives you control over the ingredients and texture. You can make it thick and spreadable or leave it slightly softer and creamier depending on how long you drain it. The finished cheese has a pleasantly mild flavor with a subtle tang from the vinegar.
This recipe is especially useful when you want a homemade alternative to store-bought cream cheese without complicated equipment or special ingredients.
Ingredients
- 4 cups fresh whole milk
- 2 tablespoons white vinegar
- ¼ teaspoon salt
Optional additions
For a flavored cream cheese, you can add:
- 1 tablespoon finely chopped fresh herbs
- 1 small clove garlic, finely minced
- 1 teaspoon honey for a slightly sweet version
- ½ teaspoon black pepper
- 1 tablespoon finely chopped green onions
- A little lemon zest for a fresh flavor
Equipment
- Medium saucepan
- Wooden spoon or heatproof spatula
- Fine-mesh strainer
- Clean cheesecloth or a thin clean kitchen towel
- Large bowl
- Food processor or blender
- Airtight container
Instructions
Step 1: Heat the Milk
Pour the whole milk into a clean saucepan. Place it over medium heat and slowly bring the milk to approximately 85–90°C (185–194°F).
Stir occasionally so the milk does not scorch on the bottom of the pan. You do not need to boil the milk vigorously. The goal is to heat it thoroughly until it is very hot and steaming.
Step 2: Add the Vinegar
Remove the saucepan from the heat. Slowly add the vinegar while gently stirring.
Within a few minutes, you should notice the milk beginning to separate. Small white curds will form while a thin, yellowish liquid called whey remains around them.
If the milk does not separate clearly, allow it to sit for another 5 minutes. If necessary, add another small splash of vinegar and gently stir.
Step 3: Allow the Curds to Form
Let the mixture rest undisturbed for approximately 5–10 minutes.
During this time, the curds will become more defined and separate from the whey. The clearer the separation, the easier it will be to strain the cheese.
Step 4: Strain the Curds
Place a fine-mesh strainer over a large bowl and line it with several layers of clean cheesecloth.
Carefully pour the milk mixture into the lined strainer. The whey will drain into the bowl while the soft curds remain in the cheesecloth.
Allow the curds to drain for approximately 10–20 minutes for a softer cream cheese.
For a thicker consistency, allow them to drain longer.
Step 5: Add the Salt
Transfer the drained curds to a bowl and add ¼ teaspoon of salt.
Mix thoroughly until the salt is evenly distributed.
At this stage, the mixture will resemble a soft, fresh cheese rather than the smooth cream cheese commonly sold in stores.
Step 6: Blend Until Smooth
For a smoother and creamier texture, place the curds in a food processor or blender.
Process for 1–3 minutes, stopping occasionally to scrape down the sides.
The mixture should gradually become smooth, thick, and spreadable.
If it seems too thick, add a very small amount of milk or cream and blend again until you reach the desired consistency.
Step 7: Adjust the Texture
Taste the cream cheese and adjust the salt if necessary.
For a very smooth cream cheese, continue blending until no noticeable curds remain.
For a more rustic homemade texture, blend it for less time and leave some small curds throughout the mixture.
Step 8: Chill
Transfer the finished cream cheese to a clean airtight container.
Refrigerate for at least 1 hour before serving. Chilling allows the cheese to firm up and develop a better texture.
Method
The basic method behind homemade cream cheese is curdling and draining.
First, the milk is heated. Vinegar is then added, causing the milk proteins to separate into solid curds and liquid whey. The curds are collected and drained until they reach the desired moisture level.
The drained curds are then blended until smooth. Salt is added for flavor and also helps give the finished cheese its characteristic savory taste.
The longer the curds are drained, the thicker the final cream cheese will become. Less draining produces a softer, more spreadable cheese, while longer draining produces a thicker cheese that is better suited to certain recipes.
Formation of the Cream Cheese
The formation of this homemade cheese happens when the acidity of the vinegar changes the structure of the milk proteins.
Milk contains proteins, fats, water, lactose, and minerals. When vinegar is introduced to hot milk, the increased acidity causes the casein proteins to come together and form curds.
The remaining liquid is whey.
Once the whey has been removed, the curds become the foundation of the homemade cheese. Blending those curds breaks them down into a smooth mixture, producing the creamy consistency associated with cream cheese.
History
Fresh cheese has been made for centuries in many parts of the world. Long before modern refrigeration and commercially packaged dairy products, people used simple methods to preserve and transform milk into foods that could be stored and eaten later.
Different cultures developed their own forms of fresh cheese using naturally occurring acidity, cultured milk, rennet, or acidic ingredients such as vinegar and citrus juice.
Modern cream cheese became particularly associated with American food culture during the 19th century. Commercial production eventually made smooth, packaged cream cheese widely available and helped establish it as a staple ingredient for cheesecakes, frostings, spreads, dips, and breakfast foods.
Homemade versions continue the same basic tradition of turning fresh milk into a soft, creamy cheese using simple ingredients.
Serving Ideas
Homemade cream cheese can be used in many different ways.
Spread it over:
- Toast
- Bagels
- Crackers
- English muffins
- Fresh bread
- Pancakes
- Waffles
It can also be used as an ingredient in:
- Cheesecake
- Cream cheese frosting
- Stuffed French toast
- Creamy pasta sauces
- Dips
- Sandwich spreads
- Stuffed pastries
- Vegetable dips
- Savory appetizers
For a sweet version, mix the finished cream cheese with a little honey, powdered sugar, vanilla, or cinnamon.
For a savory version, combine it with garlic, herbs, green onions, black pepper, or roasted vegetables.
Tips for the Best Homemade Cream Cheese
Use fresh whole milk whenever possible. The higher fat content helps produce a richer and creamier result.
Do not boil the milk aggressively. Excessive boiling can affect the texture of the curds.
Give the vinegar time to work. Once it has been added, allow the mixture to rest so the curds have enough time to separate.
Drain according to your preferred texture. A shorter draining time creates a softer spread, while a longer draining time produces a thicker cheese.
Blend thoroughly if you want a smooth, commercial-style texture.
Add liquid slowly if the cream cheese becomes too thick. A teaspoon at a time is usually enough to loosen it.
Always keep the finished cream cheese refrigerated.
Storage
Place the homemade cream cheese in a clean, airtight container and refrigerate promptly.
Because this homemade version does not contain the preservatives commonly found in some commercial products, it should be treated as a fresh dairy product. For best quality, use it within a few days and discard it if it develops an unusual smell, color, mold, or other signs of spoilage.
Cream Cheese Lovers
Cream cheese lovers will appreciate how versatile this simple homemade version can be.
For breakfast, spread it over warm toast or a fresh bagel and top it with fruit, honey, or herbs.
For dessert, use it as the base for cheesecake, frosting, or a creamy fruit dip.
For savory dishes, mix it with garlic and herbs to create a simple spread for bread and crackers.
It can also become the starting point for countless flavored cream cheeses. Once you master the basic recipe, you can experiment with sweet and savory combinations depending on how you plan to serve it.
Conclusion
Homemade cream cheese is a wonderful example of how a few simple ingredients can be transformed into something creamy, useful, and delicious. Fresh whole milk, vinegar, and salt are all you need to create a versatile homemade cheese that can be enjoyed in both sweet and savory recipes.
The key is to pay attention to the curdling and draining stages. Once the milk has separated, the rest of the process is straightforward: strain the curds, season them, blend until smooth, and chill.
Whether you spread it on breakfast toast, use it in a cheesecake, make a creamy frosting, or turn it into a savory herb spread, homemade cream cheese is a satisfying kitchen project that is simple enough for beginners and useful enough to make again and again.