
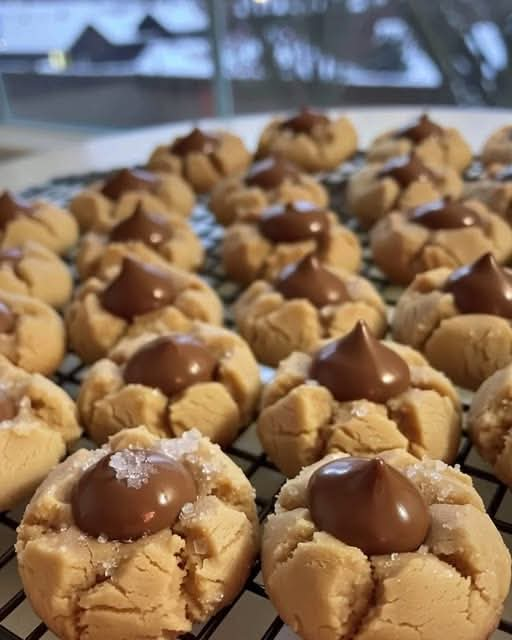
Peanut Blossoms: Classic Peanut Butter Cookies with Hershey’s Kisses
Introduction
Peanut Blossoms are a timeless homemade cookie that combines the rich, creamy flavor of peanut butter with the irresistible sweetness of chocolate. Each cookie has a soft, tender center, slightly crisp edges, and a beautiful chocolate Hershey’s Kiss pressed into the middle. Before baking, the dough balls are rolled in granulated sugar, creating a delicate sweetness and a lovely sparkling finish.
These cookies are perfect for Christmas cookie trays, birthday parties, family gatherings, bake sales, afternoon snacks, and holiday celebrations. Their charming appearance makes them look special, but the recipe is simple enough for beginner bakers to prepare at home.
One of the best things about Peanut Blossoms is the contrast between the nutty cookie and the smooth chocolate center. Enjoy them with a glass of cold milk, a cup of coffee, or hot chocolate for a comforting homemade treat.
Ingredients
Wet Ingredients
- 1/2 cup (113 g) unsalted butter, softened to room temperature
- 3/4 cup (190 g) creamy peanut butter
- 1/3 cup (67 g) granulated sugar
- 1/3 cup (about 67 g) packed light brown sugar
- 1 large egg, at room temperature
- 2 tablespoons milk
- 1 teaspoon vanilla extract
Dry Ingredients
- 1 1/2 cups (about 190 g) all-purpose flour
- 1 teaspoon baking soda
- 1/2 teaspoon salt
For Rolling and Decorating
- 1/4 cup granulated sugar, or as needed
- 1 bag Hershey’s Kisses, unwrapped
Preparation Time
- Preparation time: 15 minutes
- Baking time: 8–10 minutes per batch
- Total time: Approximately 25 minutes, excluding additional batches and cooling
- Oven temperature: 350°F (175°C)
- Yield: Approximately 30–36 cookies, depending on the size of each dough ball
Instructions
Step 1: Prepare the Oven and Baking Sheets
Preheat your oven to 350°F (175°C). Line one or two baking sheets with parchment paper to prevent the cookies from sticking and to make cleanup easier.
Unwrap the Hershey’s Kisses and place them in a small bowl. Keep them nearby so you can decorate the cookies immediately after baking.
Make sure your butter is softened but not melted. Softened butter helps create a smooth dough and gives the finished cookies a tender texture.
Step 2: Cream the Butter and Peanut Butter
Place the softened butter, creamy peanut butter, granulated sugar, and light brown sugar in a large mixing bowl.
Using an electric mixer on medium speed, beat the ingredients for approximately 2–3 minutes, or until the mixture becomes smooth, creamy, and well combined.
The granulated sugar adds sweetness and helps create slightly crisp edges, while the brown sugar contributes moisture and a subtle caramel flavor. The peanut butter provides the rich, nutty taste that makes these cookies so recognizable.
Scrape down the sides of the bowl as needed to ensure everything is evenly mixed.
Step 3: Add the Egg, Milk, and Vanilla
Add the egg, milk, and vanilla extract to the peanut butter mixture.
Beat again until the ingredients are fully incorporated and the mixture looks smooth. Avoid overmixing once everything has come together.
The egg helps bind the dough, the milk adds moisture, and the vanilla enhances the flavor of both the peanut butter and chocolate.
Step 4: Combine the Dry Ingredients
In a separate medium bowl, whisk together the all-purpose flour, baking soda, and salt.
Whisking helps distribute the baking soda and salt evenly throughout the flour, which encourages consistent baking and flavor.
Gradually add the dry ingredients to the wet mixture. Mix on low speed or stir with a wooden spoon until a soft, cohesive dough forms.
Stop mixing as soon as the flour disappears. Overmixing can make the cookies firmer than desired.
The dough should be soft enough to roll into balls without sticking excessively to your hands. If it feels unusually sticky, refrigerate it for 15–20 minutes before shaping.
Step 5: Shape the Cookie Dough
Pour the additional granulated sugar into a small bowl.
Scoop approximately one tablespoon of dough at a time and roll it gently between your palms to form a smooth ball. Try to keep the dough balls similar in size so they bake evenly.
Roll each ball in granulated sugar until the surface is lightly and evenly coated.
Arrange the dough balls on the prepared baking sheets, leaving approximately 2 inches between them to allow room for spreading.
Do not flatten the dough balls. They will spread naturally as they bake.
Step 6: Bake the Cookies
Place the baking sheet in the preheated oven and bake for 8–10 minutes.
The cookies are ready when their edges look set, their surfaces appear slightly puffed, and the bottoms are lightly golden. The centers should remain soft.
Do not wait for the entire cookie to become deeply golden. Peanut butter cookies can dry out if they are baked for too long.
Remember that the cookies will continue to set slightly as they cool on the baking sheet.
Step 7: Add the Hershey’s Kisses
Remove the baking sheet from the oven and immediately press one unwrapped Hershey’s Kiss into the center of each warm cookie.
Press gently but firmly enough for the chocolate to settle into the cookie. Small cracks around the edges are normal and give Peanut Blossoms their traditional appearance.
Work quickly while the cookies are warm, because the chocolate needs to attach to the soft center.
If a cookie cracks excessively, gently press the edges back together while the cookie is still warm.
Step 8: Cool the Cookies
Leave the decorated cookies on the baking sheet for approximately 5 minutes. This allows them to firm up enough to move without breaking.
Carefully transfer them to a wire rack and let them cool completely.
The Hershey’s Kisses will soften from the residual heat. For the neatest presentation, avoid touching or stacking the cookies until the chocolate has set.
If you want the chocolate centers to firm up more quickly, place the cooled cookies in a cool room for a while before storing them.
Methods for Perfect Peanut Blossoms
Method 1: Achieving Soft and Chewy Cookies
For a soft center, measure the flour carefully and avoid adding extra flour unnecessarily. Too much flour can make the cookies dry and crumbly.
Bake only until the edges are set. The centers may look slightly underdone when the cookies first come out of the oven, but they will continue to firm up during cooling.
Light brown sugar also helps maintain a tender texture.
Method 2: Getting the Perfect Sugar Coating
Roll each dough ball in granulated sugar immediately before placing it on the baking sheet. A light, even coating provides the classic sparkling appearance.
If the sugar does not stick well, check that the dough is not too dry. The dough should be soft and slightly tacky on the surface.
Method 3: Preventing Excessive Cracking
Peanut Blossoms naturally develop small cracks when the chocolate is pressed into the warm cookie. However, very large cracks can cause the cookies to fall apart.
To prevent this, make sure the dough balls are smooth and evenly shaped before baking. Avoid overbaking, and press each Kiss into the center with controlled, gentle pressure.
Method 4: Keeping the Chocolate Centers Attractive
Unwrap all the chocolate candies before removing the cookies from the oven. This makes decorating quicker and easier.
Press one Kiss into the center of each cookie while the cookies are still hot. Allow them to cool undisturbed so the chocolate can settle into place.
If you are preparing these cookies for a party or gift box, let them cool completely before arranging them.
The History of Peanut Blossoms
Peanut Blossoms are a beloved American cookie traditionally associated with home baking, holiday celebrations, and family recipe collections.
The cookie became particularly well known after appearing in the 1957 Pillsbury Bake-Off. The original recipe was created by Freda Smith of Gibsonburg, Ohio, and became famous for its clever combination of peanut butter cookie dough and a chocolate candy placed in the center.
The design is simple but memorable. Instead of mixing chocolate chips into the dough, the baker adds a whole chocolate Kiss after baking, creating a distinctive flower-like appearance.
Over the years, Peanut Blossoms have become a popular addition to Christmas cookie exchanges, school celebrations, bake sales, and homemade dessert platters. Many families prepare them every year, sometimes passing the recipe from one generation to the next.
Their lasting popularity comes from their straightforward ingredients, easy preparation, and the classic pairing of peanut butter and chocolate.
Formation and Texture of Peanut Blossoms
The special character of Peanut Blossoms comes from the way the ingredients work together during baking.
The peanut butter base: Peanut butter supplies rich flavor and contributes fat to the dough, creating a tender, satisfying cookie.
The butter and sugars: Butter helps produce a delicate texture, while granulated and brown sugars provide sweetness, browning, and moisture.
The egg and milk: These ingredients bring the dough together and help create a soft interior.
The baking soda: This leavening ingredient encourages the cookies to spread and develop a light texture.
The flour: Flour provides the structure needed to hold the cookie together while keeping it soft.
The sugar coating: The outer layer adds a subtle crunch and gives the cookies their classic appearance.
The chocolate center: The Hershey’s Kiss provides a smooth chocolate contrast to the rich peanut butter cookie.
When the warm cookie is removed from the oven, pressing the Kiss into the middle creates the signature blossom shape. As the cookie cools, the structure firms while the chocolate remains nestled in the center.
Tips and Tricks for the Best Results
- Use creamy peanut butter for the most consistent dough texture.
- Bring the butter and egg to room temperature before mixing.
- Measure flour accurately, preferably by weight.
- Do not melt the butter, because melted butter can change how the cookies spread.
- Avoid overmixing after adding the flour.
- Keep the dough balls uniform in size for even baking.
- Leave enough space between cookies on the baking sheet.
- Add the chocolate Kisses immediately after baking.
- Allow the cookies to cool before moving them to a storage container.
- If your kitchen is warm, let the chocolate set in a cool area before packaging.
Variations to Try
Chocolate Peanut Butter Blossoms
Use chocolate-flavored peanut butter cookie dough or add a small amount of cocoa powder, adjusting the dry ingredients carefully. Pair with regular chocolate Kisses for an even richer cookie.
Dark Chocolate Blossoms
Replace the milk chocolate Kisses with dark chocolate versions for a deeper, less sweet chocolate flavor.
Holiday Sugar Blossoms
Roll the dough balls in colored decorating sugar for Christmas, Valentine’s Day, birthdays, or other celebrations.
Peanut Butter Cup Blossoms
Instead of Hershey’s Kisses, try placing a small peanut butter cup in the center after baking. The result is an extra-rich cookie with a double peanut butter and chocolate flavor.
Chilled Dough Blossoms
If your kitchen is warm or the dough is difficult to handle, refrigerate it for 15–20 minutes before rolling. This can make shaping easier and help the cookies maintain a more consistent form.
Storage and Make-Ahead Instructions
Room-temperature storage: Once completely cool, store Peanut Blossoms in an airtight container for approximately 4–5 days. Keep them in a cool, dry place away from direct sunlight.
Freezing baked cookies: Arrange fully cooled cookies in a freezer-safe container, separating layers with parchment paper. Freeze for up to 2–3 months for best quality. Thaw at room temperature before serving.
Freezing the dough: Roll the dough into balls and freeze them on a tray until firm. Transfer the balls to a freezer-safe bag or container. When ready to bake, allow a little extra baking time if baking directly from frozen, checking for doneness as they cook. Roll in sugar before baking if needed.
Make-ahead party preparation: Bake the cookies a day before your gathering and store them in an airtight container once the chocolate has set. This makes them a convenient dessert for parties and holiday cookie trays.
Serving Suggestions
Peanut Blossoms are delicious on their own, but they also pair beautifully with other treats and drinks.
- Serve with cold milk for a classic snack.
- Enjoy alongside hot coffee or tea.
- Arrange them on a Christmas cookie platter with shortbread and sugar cookies.
- Include them in homemade dessert gift boxes.
- Serve them as an afternoon treat after lunch.
- Add them to a dessert table with brownies, chocolate chip cookies, and peanut butter bars.
For an attractive presentation, arrange the cookies in a single layer so the chocolate centers remain visible.
Frequently Asked Questions
Why did my Peanut Blossoms become dry?
They may have been overbaked or made with too much flour. Bake just until the edges are set, and measure the flour accurately.
Why did my cookies spread too much?
The butter may have been too warm, the dough may have been excessively soft, or the flour measurement may have been too low. Chilling the dough briefly can help.
When should I add the Hershey’s Kisses?
Add them immediately after removing the cookies from the oven. The warmth allows the chocolate to settle into the center.
Can I make the dough ahead of time?
Yes. Cover and refrigerate the dough for up to about 24–48 hours. Let it soften slightly if it becomes too firm to roll.
Can I use crunchy peanut butter?
Yes. Crunchy peanut butter adds small peanut pieces and a little extra texture. The finished cookies may be slightly less smooth but will still be delicious.
Are Peanut Blossoms suitable for people with peanut allergies?
No. The recipe contains peanut butter, and the chocolate candy may also have allergen or cross-contact considerations. Do not serve these cookies to anyone with a peanut allergy.
Conclusion
Peanut Blossoms are a wonderful example of how simple ingredients can create a truly memorable homemade dessert. Their soft peanut butter centers, lightly crisp sugar-coated edges, and classic chocolate Kisses make them a favorite for everyday snacking and special occasions alike.
With a short preparation time, straightforward instructions, and plenty of opportunities for customization, this recipe is suitable for beginner bakers and experienced home cooks. The secret to success is to avoid overbaking, press the chocolate into the cookies while they are warm, and let them cool before serving.
Whether you make them for Christmas, share them with friends, or prepare a batch for your family, these classic cookies are sure to bring a little homemade sweetness to the table.
For Peanut Butter and Chocolate Lovers
If you love the combination of creamy peanut butter and rich chocolate, Peanut Blossoms are a dessert worth making again and again. Every bite combines a tender, nutty cookie with a smooth chocolate center, creating a comforting flavor that feels both nostalgic and timeless.
Bake a batch for your next family gathering, place them in a cookie tin for someone special, or enjoy one with your favorite warm drink. These cookies are proof that a simple homemade treat can become a cherished family tradition.