
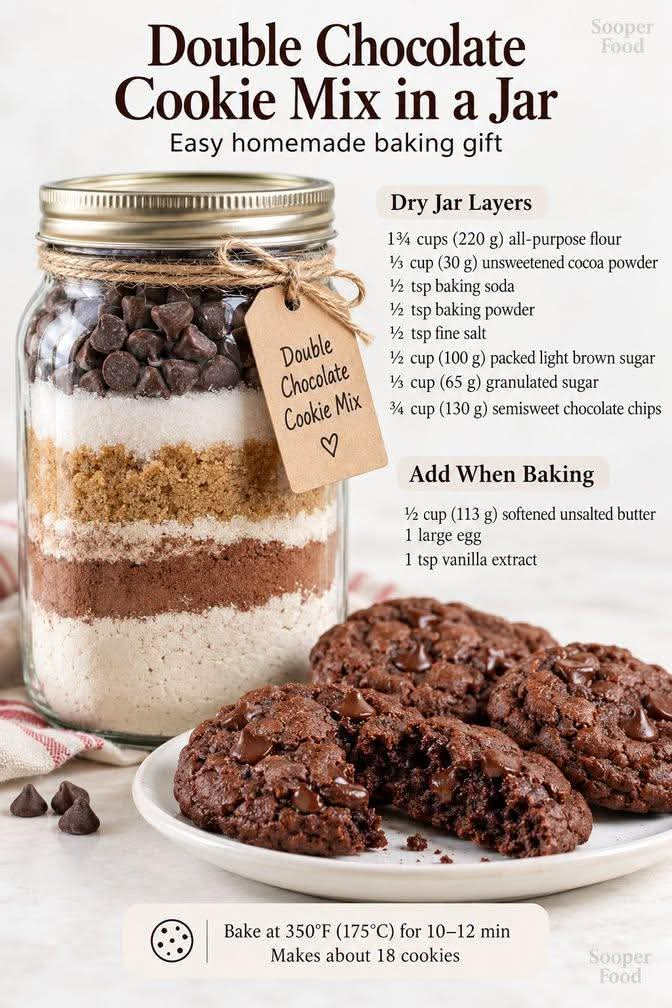
Double Chocolate Cookie Mix in a Jar
A Beautiful Homemade Gift for Chocolate Lovers
Introduction
There is something special about a homemade gift, especially when it comes in a beautiful glass jar filled with layers of delicious baking ingredients. This Double Chocolate Cookie Mix in a Jar is a thoughtful, practical, and delicious gift for birthdays, Christmas, holidays, housewarmings, teachers, neighbors, friends, and family members.
Each jar contains everything needed to prepare rich, chocolatey cookies, with layers of flour, cocoa powder, brown sugar, granulated sugar, and semisweet chocolate chips. When the ingredients are combined with butter, an egg, and vanilla extract, they transform into soft, chewy chocolate cookies with slightly crisp edges and plenty of chocolate flavor.
The best part is that you can prepare the jars ahead of time, decorate them with ribbons, and attach a simple recipe card explaining how to bake the cookies. The recipient only needs to add a few fresh ingredients, mix everything together, and bake.
Whether you are preparing gifts for the holiday season or simply want to surprise someone with a homemade treat, this Double Chocolate Cookie Mix in a Jar is an easy and memorable choice.
Recipe Details
- Preparation time: 15 minutes for assembling the jar
- Baking preparation time: 10 minutes
- Optional chilling time: 15 minutes
- Baking time: 10–12 minutes
- Oven temperature: 350°F (175°C)
- Yield: Approximately 18 cookies
- Jar size: Approximately 1 quart
- Difficulty: Easy
- Category: Homemade gifts, cookies, and desserts
Ingredients
For the Dry Cookie Mix Jar
- 1¾ cups (220 g) all-purpose flour
- ⅓ cup (30 g) unsweetened cocoa powder
- ½ teaspoon baking soda
- ½ teaspoon baking powder
- ½ teaspoon fine salt
- ½ cup (100 g) packed light brown sugar
- ⅓ cup (65 g) granulated sugar
- ¾ cup (130 g) semisweet chocolate chips
Ingredients to Add When Baking
These ingredients should be provided separately and should not be placed inside the dry mix jar.
- ½ cup (113 g) unsalted butter, softened
- 1 large egg
- 1 teaspoon alcohol-free vanilla extract
Optional Decorating Supplies
- One clean, completely dry 1-quart glass jar
- A tight-fitting lid
- Decorative ribbon or twine
- A gift tag or printed recipe card
- A small piece of fabric for decorating the lid
- A label listing the ingredients and baking instructions
Equipment Needed
- A clean, dry glass jar
- A medium mixing bowl
- A whisk
- Measuring cups and spoons
- A spoon or funnel for layering ingredients
- A baking sheet
- Parchment paper
- A cookie scoop or tablespoon
- A wire cooling rack
Instructions for Preparing the Gift Jar
Step 1: Prepare the Jar
Wash the glass jar and lid thoroughly before using them. Allow both pieces to dry completely. There must be no moisture inside the jar because moisture can affect the dry ingredients and shorten the quality of the gift mix.
Choose a jar with a wide opening so the ingredients can be added easily. A 1-quart jar is suitable, although the ingredients should be arranged carefully to fit.
Step 2: Mix the Dry Ingredients
In a medium bowl, whisk together the flour, unsweetened cocoa powder, baking soda, baking powder, and salt.
Mix thoroughly to distribute the cocoa and leavening agents evenly throughout the flour. This step helps ensure that the cookies bake consistently when the recipient prepares the mixture.
Carefully transfer this mixture into the bottom of the dry jar. Level the surface gently without compressing the flour too much.
Step 3: Add the Brown Sugar
Spoon the packed light brown sugar into the jar as the next layer.
Press it down gently with the back of a spoon to create a neat, visible layer. Avoid pressing too hard, because excessive compaction can make the ingredients difficult to remove later.
The brown sugar contributes moisture, sweetness, and a pleasant caramel-like flavor to the finished cookies.
Step 4: Add the Granulated Sugar
Pour the granulated sugar over the brown sugar layer.
Spread it evenly to create a distinct layer. If necessary, gently tap the jar on a folded kitchen towel to settle the ingredients.
Step 5: Finish with Chocolate Chips
Add the semisweet chocolate chips to the top of the jar.
Arrange them evenly so they form an attractive final layer. The contrast between the dark cocoa mixture, the golden-brown sugar, the white sugar, and the chocolate chips makes this gift especially appealing.
Step 6: Seal and Decorate
Wipe the rim of the jar to remove any loose ingredients, then close the lid securely.
Decorate the jar with ribbon, twine, or fabric if desired. Attach a gift tag with the additional ingredients and complete baking directions.
For the best presentation, include the recipe name, estimated yield, oven temperature, baking time, and a reminder that butter, egg, and vanilla must be added separately.
Instructions for Baking the Cookies
Step 1: Preheat the Oven
Preheat the oven to 350°F (175°C).
Line a baking sheet with parchment paper. This prevents the cookies from sticking and makes cleanup easier.
Step 2: Prepare the Wet Ingredients
In a large mixing bowl, beat the softened butter until creamy.
Add the egg and vanilla extract. Mix until the ingredients are well combined.
The butter should be softened but not melted. Using melted butter may cause the cookies to spread more than expected.
Step 3: Add the Cookie Mix
Open the jar and pour the dry ingredients into the bowl containing the butter mixture.
Break apart any firm pieces of brown sugar with a spoon or your fingertips before mixing.
Stir until a thick cookie dough forms and no large pockets of dry flour remain. Avoid overmixing, because excessive mixing can make the cookies less tender.
Step 4: Check the Dough
The dough should be thick, soft, and easy to scoop.
If the dough feels unusually soft, refrigerate it for approximately 15 minutes. Chilling helps the butter firm up and can prevent excessive spreading during baking.
Step 5: Shape the Cookies
Scoop the dough into approximately 18 portions, depending on the size of your cookies.
Roll each portion into a ball if desired, then place the dough balls on the prepared baking sheet. Leave about 2 inches between them to allow room for spreading.
If you prefer a more decorative appearance, press a few additional chocolate chips onto the tops of the dough balls before baking.
Step 6: Bake
Bake for 10–12 minutes, or until the edges appear set while the centers remain slightly soft.
Do not wait until the centers look completely firm. Chocolate cookies continue to set as they cool, and removing them at the right moment helps preserve their soft, chewy texture.
Oven temperatures vary, so begin checking the cookies around the 10-minute mark.
Step 7: Cool the Cookies
Remove the baking sheet from the oven and let the cookies rest for 5 minutes.
Carefully transfer them to a wire rack and allow them to cool further.
Once cooled slightly, the cookies will have a tender center, rich chocolate flavor, and delicious chocolate chips throughout.
Detailed Baking Method
The secret to excellent Double Chocolate Cookies is balancing the dry ingredients with the butter and egg.
The flour provides structure, while the cocoa powder gives the cookies their deep chocolate flavor. Baking soda and baking powder help create the desired texture, and salt balances the sweetness.
Brown sugar helps retain moisture and contributes chewiness. Granulated sugar encourages spreading and helps the edges develop a pleasant texture. The butter provides richness, while the egg binds the ingredients together.
The chocolate chips create pockets of melted chocolate throughout each cookie. For an even richer result, you can use dark chocolate chips or a mixture of semisweet and dark chocolate.
When mixing the dough, make sure the dry ingredients are incorporated evenly. Large pockets of flour or cocoa can lead to unevenly flavored cookies.
Baking time is also important. Slightly soft centers are desirable because the cookies continue cooking gently from the residual heat of the baking sheet after leaving the oven.
The History of Cookie Mix in a Jar
Homemade baking mixes have long been a practical way to save time in the kitchen. By measuring and combining shelf-stable dry ingredients in advance, home bakers can make the preparation of cookies, cakes, and other treats easier.
The idea of presenting these ingredients in decorative glass jars became particularly popular as a homemade gift tradition. Instead of giving a finished dessert, the giver offers a baking experience that the recipient can enjoy later.
Cookie mixes in jars became popular for holidays, teacher appreciation gifts, housewarming celebrations, and charitable fundraising events. Their appeal comes from their simplicity, affordability, and attractive appearance.
Chocolate cookies are especially suitable for this kind of gift because cocoa powder, flour, sugar, and chocolate chips create visually appealing layers.
This Double Chocolate Cookie Mix in a Jar brings together the convenience of a prepared baking mix and the personal touch of a homemade present. Although recipes vary from family to family, the idea remains the same: a thoughtful gift that turns a few simple ingredients into something delicious.
Formation and Presentation of the Gift Jar
The formation of this recipe involves two important stages: arranging the ingredients attractively and preparing the finished cookies with the correct texture.
Forming the Layers
For the best appearance, add the dry ingredients slowly and carefully. A funnel or large spoon can help prevent flour and cocoa powder from coating the sides of the jar.
Keep the layers level and distinct. If the jar is too full, do not force the lid closed or compress the ingredients excessively. Use a slightly larger jar if necessary.
The exact appearance of the layers may vary depending on the shape of the jar and the way the ingredients settle.
Forming the Cookies
When preparing the dough, aim for evenly sized portions. This helps the cookies bake at approximately the same rate.
A cookie scoop is useful because it creates uniform portions, although an ordinary tablespoon works well too.
Leave enough room between the dough balls, and avoid baking too many cookies on one crowded tray. Proper spacing helps the cookies spread without touching one another.
Creating a Beautiful Gift
For Christmas, use festive ribbon and a simple handwritten tag. For birthdays, choose colors that match the recipient’s preferences. For teachers or coworkers, a small label and a neat ribbon can make the jar look elegant without requiring expensive decorations.
You can also attach a wooden spoon, a cookie cutter, or a small printed recipe card to make the present more personal.
Gift Tag Instructions
Attach the following instructions to each jar:
Double Chocolate Cookie Mix
You will need:
- ½ cup softened butter
- 1 large egg
- 1 teaspoon vanilla extract
Baking Directions
- Preheat the oven to 350°F (175°C).
- Beat the butter, egg, and vanilla together.
- Add the contents of the jar and mix until a thick dough forms.
- Scoop onto a parchment-lined baking sheet, leaving about 2 inches between cookies.
- Bake for 10–12 minutes, until the edges are set and the centers remain slightly soft.
- Cool on the baking sheet for 5 minutes before transferring to a wire rack.
Makes approximately 18 cookies.
Tips for the Best Results
Use completely dry equipment. Moisture can affect the dry mix during storage, so ensure the jar, lid, utensils, and ingredients are dry.
Measure accurately. Too much flour can make the cookies dry, while too little flour may cause excessive spreading.
Use good-quality cocoa powder. Unsweetened cocoa powder gives the cookies their rich chocolate flavor.
Use softened butter. Butter that is too cold will be difficult to cream, while melted butter may produce thinner cookies.
Break up the brown sugar before mixing. Brown sugar may harden during storage, so make sure any lumps are broken apart when preparing the dough.
Do not overbake. Removing the cookies while their centers are slightly soft helps keep them chewy.
Customize the chocolate. Semisweet chocolate chips provide a balanced flavor, but dark chocolate chips can make the cookies more intense.
Label allergens clearly. The dry mix contains wheat. Depending on the chocolate chips used, it may also contain milk or be subject to cross-contact with other allergens. The baking directions introduce egg and butter, which contains milk.
Storage and Shelf Life
Store the sealed jar in a cool, dry place away from heat, direct sunlight, and moisture.
For the best gift quality, aim to use the mix within 2–3 months. This is a practical quality guideline rather than a guarantee of shelf life; ingredient freshness, storage conditions, and packaging can affect the result.
Always use fresh ingredients and a clean, completely dry jar. Discard the mix if it becomes damp, develops an unusual smell, or shows signs of spoilage.
After baking, store the completely cooled cookies in an airtight container at room temperature for approximately 3–5 days for the best texture.
Baked cookies can also be frozen in a suitable airtight container for longer storage.
Variations to Try
Triple Chocolate Cookie Mix
Replace some of the semisweet chocolate chips with white chocolate chips or dark chocolate chunks for a variety of chocolate flavors.
Chocolate Walnut Cookies
Add a small layer of chopped walnuts if the jar has sufficient room. Clearly label the jar for tree-nut allergens.
Mint Chocolate Cookies
Use mint-flavored chocolate chips or add a small amount of peppermint extract when preparing the wet ingredients. Start with a small quantity because peppermint flavor can quickly become overpowering.
Espresso Chocolate Cookies
Add approximately 1 teaspoon of instant espresso powder to the dry mixture for a deeper chocolate flavor.
Chocolate Orange Cookies
Add a little finely grated orange zest when preparing the dough. Fresh zest should not be added to the dry gift jar because its moisture can affect storage.
Serving Suggestions
Serve these Double Chocolate Cookies with a glass of cold milk, a cup of coffee, or hot tea.
They are excellent for afternoon snacks, dessert platters, holiday cookie exchanges, bake sales, and family gatherings.
For a simple dessert, serve a warm cookie with a scoop of vanilla ice cream. You can also crumble the cookies over chocolate pudding or use them as a base for an indulgent ice cream sandwich.
For gifting, place several baked cookies in a decorative box alongside the jar so the recipient can enjoy a finished treat immediately and save the mix for another day.
Frequently Asked Questions
Can I put the butter and egg inside the jar?
No. Butter and eggs are perishable ingredients and should be provided separately. Only the dry ingredients belong in the gift jar.
Can I prepare several jars at once?
Yes. Prepare multiple jars using accurate measurements, clean equipment, and completely dry containers. Attach a label to each jar with the additional ingredients and baking directions.
Can I use Dutch-process cocoa powder?
You can, but cocoa powders differ in acidity. Since this recipe uses both baking soda and baking powder, natural unsweetened cocoa powder is a straightforward choice for predictable results.
Why did my cookies spread too much?
Possible causes include melted butter, very warm dough, inaccurate flour measurements, or a baking sheet that is still hot from a previous batch. Chill the dough briefly and use a cool baking sheet if spreading is a problem.
Can I make the cookies ahead of time?
Yes. The dry mix can be assembled in advance, and the finished cookies can be frozen. Allow frozen cookies to thaw before serving, or warm them briefly if you prefer a softer texture.
Is this recipe suitable for beginners?
Absolutely. The jar preparation requires simple measuring and layering, while the baking process involves basic mixing, scooping, and baking.
Conclusion
Double Chocolate Cookie Mix in a Jar is more than a convenient baking recipe. It is a thoughtful way to share the joy of homemade cookies with the people who matter to you.
The beautiful layers make the jar attractive, the preparation is simple, and the finished cookies deliver rich cocoa flavor, soft centers, and plenty of chocolate chips.
Whether you make one jar for a friend or prepare a collection of gifts for the holidays, this recipe offers an affordable and personal alternative to store-bought presents.
Prepare the ingredients, layer them carefully, attach the baking instructions, and let someone enjoy the pleasure of making fresh chocolate cookies at home.
For the Lovers of Homemade Chocolate Cookies
If you love rich chocolate desserts, soft cookies, and thoughtful homemade gifts, this recipe deserves a place in your collection.
It is perfect for chocolate lovers, baking beginners, busy families, holiday hosts, and anyone who enjoys giving a gift that can be used and enjoyed.
The next time you need a simple but memorable present, prepare a Double Chocolate Cookie Mix in a Jar. With a little care, a few pantry ingredients, and a beautiful presentation, you can give someone the ingredients for a warm, homemade treat they will be happy to bake and share.
A thoughtful gift, a simple recipe, and delicious chocolate cookies—all in one jar.