
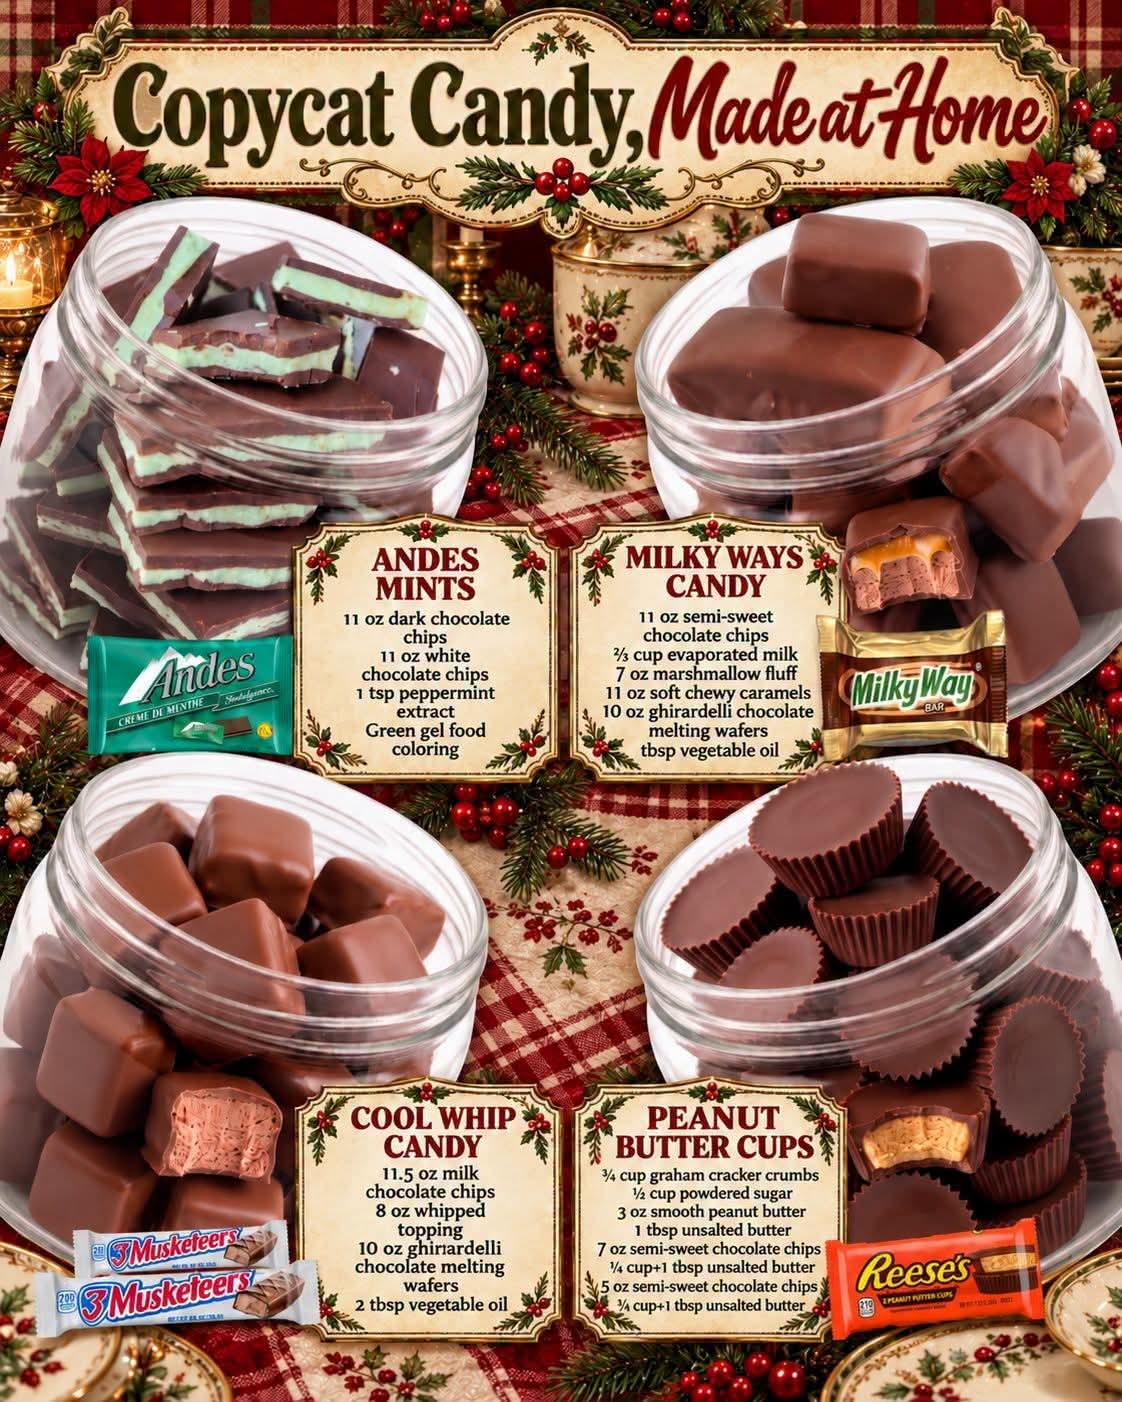
Homemade Christmas Candy: Four Copycat Favorites to Make in Your Own Kitchen
Introduction
Homemade candy season is one of the sweetest times of the year. As Christmas approaches, kitchens fill with the delicious aromas of melted chocolate, creamy peanut butter, peppermint, caramel, and other irresistible treats. Making candy at home is a wonderful way to prepare for the holidays, create thoughtful homemade gifts, and share something special with family and friends.
This collection features four popular candy-shop favorites that you can recreate in your own kitchen: homemade Andes-style chocolate mints, Milky Way-inspired caramel and marshmallow candy, creamy Cool Whip chocolate candy, and classic homemade peanut butter cups.
Each recipe offers a different combination of flavors and textures. The Andes-style mints deliver refreshing peppermint between layers of chocolate. The Milky Way-inspired candy combines fluffy marshmallow, rich chocolate, and chewy caramel. Cool Whip candy has a soft, creamy center surrounded by a smooth chocolate coating, while peanut butter cups bring together a sweet peanut butter filling and a delicious chocolate shell.
These treats are ideal for Christmas dessert platters, holiday parties, cookie exchanges, candy trays, and homemade gift boxes. Best of all, you can prepare them ahead of time and keep them chilled until you are ready to serve.
If you love homemade holiday candy, these four recipes deserve a place in your Christmas kitchen.
Recipe 1: Homemade Andes-Style Chocolate Mints
Introduction
Homemade Andes-style chocolate mints are a delicious combination of rich chocolate and refreshing peppermint. Their beautiful layered appearance makes them look elegant on a holiday dessert table, while their simple ingredients make them surprisingly easy to prepare.
The secret to these candies is creating thin, even layers of chocolate with a gentle mint flavor in the middle. A little green gel food coloring gives the center its familiar festive appearance, making these candies especially attractive for Christmas celebrations.
Ingredients
- 11 ounces dark chocolate chips
- 11 ounces white chocolate chips
- 1 teaspoon peppermint extract
- Green gel food coloring, as needed
Instructions
- Prepare a small rectangular baking pan or shallow tray by lining it with parchment paper. Make sure the paper extends slightly over the edges so you can lift out the finished candy easily.
- Melt approximately half of the dark chocolate chips in a microwave-safe bowl. Heat in 20-second intervals, stirring thoroughly after each interval until the chocolate is smooth.
- Spread the melted dark chocolate into a thin, even layer across the prepared pan. Refrigerate for approximately 10 to 15 minutes, or until the chocolate is mostly set but not extremely cold and brittle.
- Place the white chocolate chips in a clean bowl and melt them gently using the microwave in short intervals. White chocolate can scorch easily, so stir frequently and avoid overheating.
- Add the peppermint extract to the melted white chocolate and mix until evenly combined.
- Add a small amount of green gel food coloring. Stir until the white chocolate becomes a consistent mint-green color. Add more coloring gradually if necessary.
- Carefully spread the green peppermint chocolate over the dark chocolate layer. Use a spatula to create a smooth, even surface.
- Melt the remaining dark chocolate chips and gently spread them over the green layer.
- Return the pan to the refrigerator and chill for 30 to 45 minutes, or until the entire slab is firm.
- Lift the chocolate from the pan using the parchment paper. Allow it to sit at room temperature briefly before cutting it into small rectangles or squares with a sharp knife.
- Arrange the finished mints in a candy dish or store them in an airtight container in a cool place.
Method
The layered chocolate method gives these candies their distinctive appearance. The dark chocolate provides a rich cocoa flavor, while the green peppermint layer supplies a cool, refreshing contrast.
For the neatest layers, let each chocolate layer become firm enough to support the next one without allowing the surface to become excessively cold. Slightly softened chocolate layers can bond better than completely chilled, hard layers.
If the chocolate becomes too firm before you add the next layer, the finished candy may separate when cut. Working patiently and spreading each layer evenly helps produce beautiful homemade mints.
History of Chocolate Mints
Chocolate and peppermint have been a popular confectionery combination for generations. Peppermint provides a refreshing flavor that balances the richness of chocolate, making the combination especially appealing after meals and during holiday celebrations.
Andes chocolate mints became widely recognized as a familiar after-dinner confection. Homemade versions allow candy makers to recreate the layered chocolate-and-mint experience using readily available ingredients.
Formation and Texture
The finished mints should have three distinct layers: dark chocolate on the bottom, a green peppermint center, and dark chocolate on top.
Once set, they should be firm enough to hold their shape while melting smoothly in the mouth. Their thin layers make them easy to serve alongside cookies, brownies, and other Christmas desserts.
Conclusion
Homemade Andes-style chocolate mints are an elegant addition to any Christmas candy collection. Their attractive green center, rich chocolate flavor, and refreshing peppermint taste make them especially suitable for holiday gift boxes.
For Chocolate Mint Lovers
Serve these mints after dinner with coffee or hot chocolate. You can also chop them into small pieces and sprinkle them over brownies, chocolate ice cream, or peppermint desserts.
For a gift, place the mints in small paper candy cups inside a decorative tin. Keep them cool so their layers remain firm and attractive.
Recipe 2: Homemade Milky Way-Inspired Candy Bars
Introduction
If you love the combination of chocolate, marshmallow, and caramel, these homemade Milky Way-inspired candy bars are an excellent holiday treat.
They feature a soft, sweet chocolate-marshmallow center, a layer of chewy caramel, and a smooth chocolate coating. The combination creates a rich candy that looks impressive on a Christmas platter and tastes like something from a confectionery shop.
Although these are homemade copycat-style candies rather than an exact reproduction of the commercial product, they capture the indulgent flavors that make chocolate and caramel candy bars so popular.
Ingredients
- 11 ounces semi-sweet chocolate chips
- 2/3 cup evaporated milk
- 7 ounces marshmallow fluff
- 11 ounces soft, chewy caramels
- 10 ounces chocolate melting wafers
- 1 tablespoon vegetable oil
Instructions
- Line a square or rectangular baking pan with parchment paper. Choose a pan that will produce a candy slab thick enough to cut into individual bars.
- Place the semi-sweet chocolate chips in a heatproof bowl. Melt them gently in the microwave, stirring every 20 seconds until smooth.
- In a separate microwave-safe bowl, combine the evaporated milk and marshmallow fluff. Warm the mixture gently and stir until it becomes smooth and easy to mix. If necessary, heat in short intervals.
- Add the melted semi-sweet chocolate to the marshmallow mixture. Stir thoroughly until the mixture is evenly combined.
- Pour the chocolate-marshmallow mixture into the prepared pan. Spread it evenly with a spatula.
- Refrigerate the chocolate layer for approximately 30 to 45 minutes, or until it is firm enough to support the caramel.
- Unwrap the soft caramels and place them in a microwave-safe bowl. Add a small splash of water or evaporated milk if needed to help soften them, then heat in short intervals, stirring between each interval.
- Once the caramel is smooth and spreadable, carefully spread it over the chilled chocolate-marshmallow layer. Work gently to avoid disturbing the bottom layer.
- Refrigerate again until the caramel is firm enough to cut cleanly.
- Lift the candy slab out of the pan and cut it into bars using a sharp knife. If the caramel sticks to the knife, lightly warm the blade and wipe it clean between cuts.
- Place the chocolate melting wafers in a heatproof bowl. Add the vegetable oil and melt according to the package directions, stirring until smooth.
- Dip each bar into the melted chocolate, making sure all sides are covered. Use a fork to lift the bar and allow excess chocolate to drip back into the bowl.
- Place the coated bars on a parchment-lined tray.
- Refrigerate until the chocolate coating has completely set.
- Store the finished bars in an airtight container in the refrigerator.
Method
This recipe uses a layered candy-making method. First, the chocolate and marshmallow mixture creates the soft center. The caramel is added once the base has firmed up, and the chocolate coating seals the layers together.
The most important step is controlling the temperature of each layer. If the chocolate-marshmallow base is too soft, the caramel may sink into it. If the caramel is too hot, it may soften the base and make the bars difficult to handle.
Letting each layer cool before adding the next produces a cleaner result.
History of Chocolate, Marshmallow, and Caramel Candy
Chocolate-covered caramel candies have long been favorites in candy shops. The addition of marshmallow creates a softer, lighter texture that contrasts with chewy caramel and a crisp chocolate shell.
Milky Way-inspired homemade candies draw on this familiar combination of chocolate, caramel, and nougat-like softness. Making them at home allows you to control their size, thickness, and chocolate coating.
Formation and Texture
The finished candy bars should have a soft chocolate-marshmallow layer, a distinct caramel center, and a smooth chocolate exterior.
Allow the bars to rest briefly at room temperature before serving so the caramel is not excessively firm. If they have been refrigerated for several hours, a short resting period makes them easier to bite.
Conclusion
These homemade chocolate caramel bars are a wonderful choice for anyone who enjoys rich, layered candy. They are particularly good for Christmas parties because they can be made ahead and arranged neatly on a dessert tray.
For Caramel Candy Lovers
Serve these bars with coffee, milk, or a cup of hot chocolate. You can also wrap individual bars in parchment paper and place them in a holiday gift box.
For the best presentation, cut the bars into similar sizes and drizzle a little additional melted chocolate over the tops.
Recipe 3: Homemade Cool Whip Chocolate Candy
Introduction
Homemade Cool Whip chocolate candy is a creamy, chocolate-covered treat made with just a few main ingredients. It is ideal for anyone who enjoys smooth chocolate candies with a soft center rather than a crunchy or chewy filling.
The whipped topping gives the center a light, creamy quality, while the chocolate coating adds richness and helps each piece hold its shape.
This candy is especially convenient during the busy holiday season because it requires very little preparation. Once the filling has been chilled and coated, the refrigerator does most of the work.
Ingredients
- 11.5 ounces milk chocolate chips
- 8 ounces whipped topping, thawed
- 10 ounces chocolate melting wafers
- 2 tablespoons vegetable oil
Instructions
- Line a square baking pan or shallow container with parchment paper.
- Place the milk chocolate chips in a microwave-safe bowl. Heat in 20-second intervals, stirring frequently until the chocolate is completely melted and smooth.
- Allow the melted chocolate to cool slightly. It should remain fluid but should not be extremely hot.
- Add the thawed whipped topping gradually, folding it into the melted chocolate with a spatula.
- Continue folding gently until the mixture is evenly combined. Avoid vigorous stirring, which can make the texture less uniform.
- Transfer the mixture to the prepared pan. Spread it into an even layer.
- Place the pan in the freezer for approximately 2 to 3 hours, or until the mixture is firm enough to cut. The exact time will depend on the depth of the filling and your freezer.
- Lift the chilled filling from the pan and cut it into small squares or rectangles. If the mixture softens while cutting, return it to the freezer briefly.
- Place the chocolate melting wafers in a clean bowl and add the vegetable oil.
- Melt the wafers according to the package directions, stirring until the coating is smooth.
- Using a fork, dip each frozen piece into the melted chocolate. Let the excess coating drip away before placing the candy on parchment paper.
- Refrigerate the coated candies until the chocolate has set.
- Store the finished candies in an airtight container in the refrigerator or freezer, depending on your preferred firmness.
Method
The key to this recipe is combining the chocolate with the whipped topping without overheating the mixture.
The whipped topping contains air and moisture, so the final consistency differs from traditional chocolate fudge. The mixture needs sufficient chilling time to become firm enough for cutting and dipping.
Working with small batches is helpful because the filling can soften quickly at room temperature. Keep the remaining pieces chilled while dipping the first batch.
History of Creamy Chocolate Candy
Creamy chocolate confections have been popular for generations, ranging from chocolate truffles to soft-centered candy bars. Home cooks have also developed simple refrigerator candies using whipped toppings and melted chocolate as convenient alternatives to traditional candy-making techniques.
This version reflects the modern approach to homemade desserts: a short ingredient list, minimal equipment, and a creamy filling surrounded by chocolate.
Formation and Texture
The finished pieces should have a smooth chocolate exterior and a soft, creamy center.
Because the filling contains whipped topping, these candies are more delicate than traditional hard candies or firm chocolate fudge. Keep them chilled until serving and avoid leaving them at room temperature for extended periods.
Conclusion
Cool Whip chocolate candy is a simple yet indulgent dessert that fits beautifully into a holiday candy collection. Its creamy center and smooth chocolate shell make it a good choice for dessert platters, homemade gifts, and family celebrations.
For Creamy Chocolate Lovers
Serve these candies directly from the refrigerator for a firmer bite, or let them stand briefly before serving for a softer center.
You can also sprinkle a little finely chopped toasted nuts over the chocolate coating before it sets. Store the candies cold, and keep them refrigerated because of the perishable whipped topping.
Recipe 4: Homemade Peanut Butter Cups
Introduction
Homemade peanut butter cups are a classic treat for anyone who loves the combination of chocolate and peanut butter. With a sweet, slightly crumbly peanut butter filling surrounded by a rich chocolate shell, these candies offer a satisfying balance of sweetness and nutty flavor.
They are particularly suitable for Christmas candy boxes because they can be made in small paper liners, arranged neatly, and prepared ahead of time.
The homemade filling is easy to adjust to your preference. You can make it sweeter with powdered sugar or add a little more peanut butter for a stronger roasted peanut flavor.
Ingredients
For the Peanut Butter Filling
- 3/4 cup graham cracker crumbs
- 1/2 cup powdered sugar
- 3 ounces smooth peanut butter
- 1 tablespoon unsalted butter, softened
For the Chocolate Coating
- 7 ounces semi-sweet chocolate chips
- 1/4 cup plus 1 tablespoon unsalted butter
For the Remaining Chocolate Layer
- 5 ounces semi-sweet chocolate chips
- 1/4 cup plus 1 tablespoon unsalted butter
Instructions
- Arrange small paper candy liners in a mini muffin pan. If you do not have a mini muffin pan, use a flat tray and sturdy candy liners.
- In a mixing bowl, combine the graham cracker crumbs and powdered sugar.
- Add the smooth peanut butter and softened butter.
- Mix until the ingredients form a uniform filling. The mixture should hold together when pressed between your fingers without being excessively sticky.
- If the filling feels too soft, add a little more graham cracker crumb. If it seems too dry, mix in a small amount of additional peanut butter.
- Divide the filling into small portions and shape each portion into a flattened disk that fits inside the candy liners.
- Press the filling gently into the bottom of each liner, leaving enough room around the edges for the chocolate coating.
- Place the semi-sweet chocolate chips and the first portion of butter in a heatproof bowl.
- Melt the mixture gently in the microwave, stirring every 20 seconds until smooth. Alternatively, melt it over a double boiler.
- Spoon a thin layer of melted chocolate into each liner, covering the bottom and allowing a little chocolate to rise around the edges of the filling.
- Place the peanut butter disks into the chocolate-lined cups. Press gently so they sit evenly.
- Melt the remaining chocolate chips with the second portion of butter.
- Spoon the remaining chocolate mixture over the peanut butter centers, making sure the filling is completely covered.
- Gently tap the pan on the counter to help the chocolate settle and remove small air pockets.
- Refrigerate the cups for approximately 45 to 60 minutes, or until the chocolate is firm.
- Carefully remove the cups from the pan and arrange them on a serving plate.
- Store the finished peanut butter cups in an airtight container in the refrigerator.
Method
This recipe uses a molded chocolate method. A bottom layer of chocolate creates the base, the peanut butter mixture forms the center, and the final layer of chocolate seals the filling inside.
The graham cracker crumbs help give the filling structure, while powdered sugar adds sweetness and helps absorb some of the moisture from the peanut butter.
The butter contributes richness and helps the chocolate melt smoothly. Because the quantities of butter and chocolate affect the consistency, melt the chocolate gently and allow the cups to chill completely before removing them from their liners.
History of Peanut Butter Cups
Chocolate and peanut butter became a popular combination in American confectionery during the twentieth century. Peanut butter cups are now among the best-known examples of the pairing, combining the roasted flavor of peanuts with the sweetness of chocolate.
Homemade versions have become a favorite for holiday baking and candy making because they require few ingredients and can easily be customized.
Formation and Texture
A good homemade peanut butter cup has three elements: a firm chocolate base, a soft and sweet peanut butter center, and a chocolate top.
The filling should be thick enough to hold its shape but tender enough to bite through easily. The chocolate shell should be firm and smooth, providing a pleasant contrast to the creamy center.
Conclusion
Homemade peanut butter cups are a timeless addition to any candy collection. Their familiar flavor, simple preparation, and attractive appearance make them suitable for Christmas parties, homemade gifts, and everyday treats.
For Peanut Butter Lovers
Enjoy these cups straight from the refrigerator with a glass of cold milk or a cup of coffee. For an extra-special presentation, drizzle the tops with a little melted chocolate or sprinkle them with finely crushed graham crackers before the coating sets.
If you are preparing these candies for someone with a peanut allergy, choose a different recipe rather than substituting ingredients without checking all labels and cross-contact risks.
General Tips for Making Homemade Christmas Candy
1. Use Gentle Heat
Chocolate can burn or become grainy if overheated. Microwave it in short intervals, stirring thoroughly between each one. Stop heating when a few small pieces remain and allow the residual warmth to melt them.
2. Prepare Everything Before You Begin
Measure the ingredients, line the pans, unwrap the caramels, and prepare your parchment paper before melting the chocolate. Candy mixtures can firm up quickly, so having everything ready makes the process easier.
3. Keep Layers Even
For layered candies, spread each mixture evenly. Consistent thickness helps the finished pieces look professional and makes them easier to cut.
4. Allow Enough Chilling Time
Do not rush the setting process. Chocolate, caramel, and soft fillings all need enough time to become firm before cutting, dipping, or serving.
5. Use a Sharp Knife
When cutting layered candy slabs, use a sharp knife and wipe the blade clean between cuts. If the candy is extremely cold, let it rest briefly before cutting to reduce cracking.
6. Store Each Candy Properly
Andes-style mints and chocolate-coated caramel bars should be kept in an airtight container in a cool place or refrigerated when necessary. Cool Whip candy must be kept refrigerated or frozen because of its perishable filling. Peanut butter cups can be refrigerated for a firmer texture.
For longer storage, freeze suitable candies in a freezer-safe container with parchment paper between the layers. Thaw them in the refrigerator to help minimize condensation.
7. Make Beautiful Homemade Gifts
Arrange different candies in separate paper liners and place them in a decorative holiday box. Include a small ingredient card for each variety, particularly when the candies contain peanuts, dairy, or other common allergens.
Homemade candy is a thoughtful gift, but it should be stored and transported at an appropriate temperature.
Conclusion: Four Sweet Reasons to Make Homemade Candy
Homemade Andes-style chocolate mints, Milky Way-inspired candy bars, Cool Whip chocolate candy, and peanut butter cups each bring something different to the holiday table.
The mints offer refreshing peppermint and layered chocolate. The caramel bars combine chewy sweetness with a soft chocolate-marshmallow center. Cool Whip candy provides a creamy filling beneath a smooth chocolate shell, while peanut butter cups deliver the familiar combination of chocolate and nutty sweetness.
Preparing these candies at home lets you choose the size of each piece, customize the presentation, and create a selection that suits your family’s tastes. They can be made for Christmas gatherings, shared with neighbors, packed into gift boxes, or served on a dessert platter beside cookies and brownies.
The best part is that you do not need professional candy-making equipment to get started. With a few simple ingredients, a little patience, and enough chilling time, you can create a delicious assortment of homemade treats right in your own kitchen.
For Homemade Candy Lovers
If you had to choose just one of these four homemade candies to make first, which would it be?
Would you choose the refreshing Andes-style chocolate mints, the rich caramel-filled candy bars, the creamy Cool Whip chocolate candy, or the classic peanut butter cups?
Prepare your favorite, share it with the people you love, and make this holiday season a little sweeter with homemade candy.