
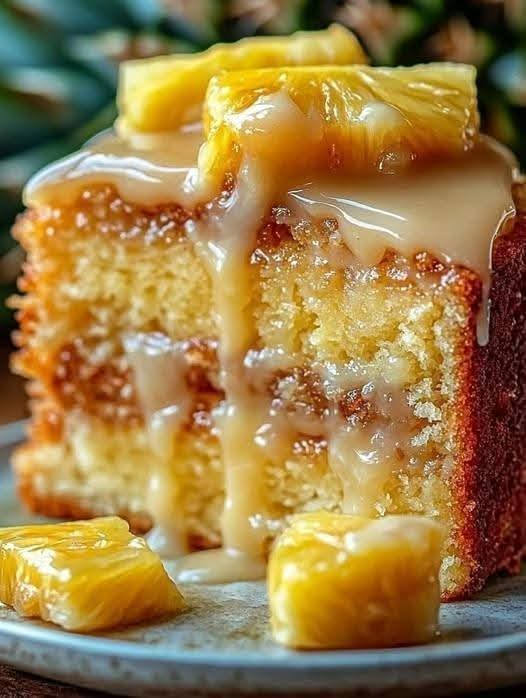
Pineapple Heaven Cake – A Moist, Buttery Cake Bursting with Sweet Pineapple Flavor
Introduction
Pineapple Heaven Cake is a delightful homemade dessert that combines the rich flavor of buttery cake with the refreshing sweetness of juicy pineapple. Every slice is soft, tender, and wonderfully moist, with a delicate vanilla aroma and a light pineapple glaze that adds the perfect finishing touch.
This cake is an excellent choice for family gatherings, Sunday dinners, afternoon tea, birthday celebrations, potlucks, or simply when you want to treat yourself to something sweet. The combination of sour cream and crushed pineapple gives the cake a beautiful texture, while the powdered sugar and pineapple juice glaze create a delicate sweetness that complements every bite.
One of the best things about this recipe is that it uses simple ingredients that are easy to find in most kitchens. You do not need complicated equipment or professional baking skills to make a delicious cake that looks and tastes special.
Whether you serve it plain, drizzle it with extra pineapple glaze, or add a little whipped cream on the side, this Pineapple Heaven Cake is a dessert worth saving and making again.
Ingredients
Preparation time: 20 minutes
Baking time: 35–45 minutes
Cooling time: 20–30 minutes
Servings: 8–10 slices
For the Pineapple Cake
- 1 1/2 cups all-purpose flour
- 1 teaspoon baking powder
- 1/2 teaspoon salt
- 1/2 cup unsalted butter, softened to room temperature
- 1 cup granulated sugar
- 2 large eggs, at room temperature
- 1 teaspoon vanilla extract
- 1/2 cup sour cream
- 1 cup crushed pineapple, thoroughly drained
For the Pineapple Glaze
- 1/2 cup powdered sugar
- 2 tablespoons pineapple juice
Optional Garnishes
- A few small pieces of pineapple
- A light dusting of powdered sugar
- Fresh whipped cream
- A little finely grated lemon zest
- Toasted coconut flakes
These garnishes are optional and are not required for the original recipe.
Instructions
Step 1: Prepare the Oven and Baking Pan
Preheat your oven to 350°F (175°C).
Grease an 8-inch round cake pan or a similar-sized baking pan with butter or nonstick baking spray. For easier removal, line the bottom with parchment paper.
Make sure the oven has reached the correct temperature before placing the cake inside. Proper preheating helps the cake rise evenly and develop a lightly golden crust.
Step 2: Prepare the Dry Ingredients
In a medium-sized mixing bowl, combine the all-purpose flour, baking powder, and salt.
Whisk the ingredients together until evenly distributed. This step helps prevent pockets of baking powder or salt from forming in the finished cake.
Set the bowl aside while you prepare the butter and sugar mixture.
Step 3: Cream the Butter and Sugar
Place the softened butter in a large mixing bowl. Add the granulated sugar and beat with an electric mixer for approximately 3–4 minutes, until the mixture becomes pale, light, and fluffy.
If you do not have an electric mixer, use a sturdy whisk or wooden spoon and mix thoroughly.
Creaming the butter and sugar is an important step because it incorporates air into the mixture. This helps create a softer, lighter cake rather than a dense one.
Scrape down the sides of the bowl occasionally to ensure everything is evenly combined.
Step 4: Add the Eggs and Vanilla
Add the eggs one at a time, beating well after each addition.
Once the eggs are incorporated, add the vanilla extract and mix until the batter becomes smooth and fragrant.
If the mixture looks slightly curdled, do not worry. It will usually come together when you add the flour and sour cream.
Step 5: Add the Sour Cream
Add the sour cream to the butter mixture and stir until combined.
Sour cream contributes moisture, richness, and a gentle tang that balances the sweetness of the sugar and pineapple. It also helps produce a tender crumb.
Avoid overmixing at this stage. Mix only until the ingredients are evenly incorporated.
Step 6: Incorporate the Dry Ingredients
Add the flour mixture gradually to the wet ingredients, mixing on low speed or folding gently with a spatula.
Stop mixing as soon as the flour disappears into the batter. Overmixing can develop excess gluten and make the finished cake tough.
The batter should be thick, creamy, and easy to spread.
Step 7: Fold in the Crushed Pineapple
Drain the crushed pineapple thoroughly in a fine-mesh strainer, pressing gently with the back of a spoon to remove excess juice.
Measure one cup of drained pineapple and fold it into the batter using a spatula.
Distribute the pineapple evenly without stirring too vigorously. This allows the fruit to remain spread throughout the cake and provides little bursts of pineapple flavor in every slice.
Properly draining the pineapple is especially important because too much liquid can make the center of the cake overly wet or prevent it from baking properly.
Step 8: Transfer the Batter to the Pan
Pour the batter into the prepared cake pan.
Use a spatula to spread it evenly, gently smoothing the top. Tap the pan lightly against the counter once or twice to release any large air pockets.
Place the pan on the center rack of the preheated oven.
Step 9: Bake Until Golden
Bake for approximately 35–45 minutes, depending on your oven and the size of your pan.
The top should turn lightly golden, and the edges should begin to pull away slightly from the sides of the pan.
To check whether the cake is done, insert a toothpick into the center. It should come out clean or with a few moist crumbs, but without wet batter.
If the top browns too quickly while the center remains underbaked, loosely cover it with aluminum foil and continue baking until done.
Remove the cake from the oven and allow it to cool in the pan for about 10–15 minutes before transferring it to a wire rack.
Step 10: Prepare the Pineapple Glaze
While the cake cools, prepare the simple pineapple glaze.
Place the powdered sugar in a small bowl. Add the pineapple juice gradually, whisking until the mixture becomes smooth.
For a thicker glaze, use slightly less juice. For a thinner glaze that drizzles easily, add a few extra drops.
The glaze should be thick enough to cling to the cake while still flowing gently from a spoon.
Step 11: Glaze the Cake
Allow the cake to cool until it is warm or completely at room temperature.
Drizzle the pineapple glaze over the top, letting it flow naturally toward the edges.
For a decorative finish, sprinkle a little grated lemon zest or toasted coconut over the glaze. You can also arrange a few small pineapple pieces on top immediately before serving.
Allow the glaze to set for approximately 10–15 minutes before slicing.
Step 12: Slice and Serve
Cut the cake into eight to ten slices using a sharp knife.
Serve each slice on its own or alongside whipped cream, vanilla ice cream, or a cup of tea or coffee.
The cake should be soft and buttery, with juicy pineapple pieces throughout and a sweet pineapple glaze that enhances the tropical flavor.
Methods for Making the Perfect Pineapple Heaven Cake
1. The Creaming Method
The creaming method is the foundation of this recipe. Beating butter and sugar together incorporates air, helping the cake develop a lighter texture.
Use softened butter rather than melted butter. Melted butter will not trap air in the same way and can change the texture of the cake.
2. The Gentle Folding Method
Once the flour has been added, mix gently. Fold in the crushed pineapple with a spatula instead of beating the batter aggressively.
This preserves the tender structure and distributes the fruit evenly.
3. The Moisture-Balancing Method
Pineapple contains a significant amount of water. Always drain it before measuring, particularly if you are using canned crushed pineapple.
Do not pour all the liquid from the can into the batter. The measured pineapple juice is intended for the glaze, while the drained fruit belongs in the cake.
4. The Proper Cooling Method
Let the cake rest in the pan briefly before removing it. A cake that is transferred while extremely hot may break apart, while leaving it in the pan for too long can trap steam and make the bottom damp.
Cool it on a wire rack to allow air to circulate around the cake.
5. The Glazing Method
Apply the glaze after the cake has cooled sufficiently. If the cake is piping hot, the glaze may melt and soak into the surface instead of forming a delicate sweet coating.
For a more pronounced pineapple flavor, you can brush a small amount of pineapple juice over the cooled cake before glazing, but use it sparingly to avoid making the cake soggy.
The History of Pineapple Cake
Pineapple desserts have a long history in home baking, particularly as pineapple became more widely available through commercial canning and international trade.
In the United States, canned pineapple became a popular baking ingredient during the early twentieth century. It made tropical fruit easier to store, transport, and use throughout the year, encouraging home cooks to experiment with pineapple cakes, puddings, pies, and other desserts.
One especially famous dessert is pineapple upside-down cake, in which pineapple slices are arranged beneath a layer of brown sugar and butter before the cake is baked and inverted for serving.
Over time, home bakers developed many other pineapple cake variations, including pineapple sheet cakes, pineapple layer cakes, pineapple loaf cakes, and simple fruit-filled butter cakes.
Pineapple Heaven Cake belongs to this broader family of comforting homemade desserts. Its particular combination of butter, sour cream, crushed pineapple, vanilla, and a pineapple glaze is a modern-style recipe rather than a dish with one firmly established historical origin.
Its appeal comes from a familiar baking tradition: combining everyday pantry ingredients with sweet fruit to create a cake that feels special without requiring complicated techniques.
The Formation and Texture of Pineapple Heaven Cake
The beauty of Pineapple Heaven Cake lies in how its ingredients work together during baking.
The butter and sugar create the rich foundation of the cake. When creamed properly, they help introduce air into the batter and contribute to a fine, tender crumb.
The eggs provide structure and help bind the ingredients together. They also contribute richness and support the cake’s rise.
The flour and baking powder form the structure and help the cake rise as it bakes. The flour provides the framework, while the baking powder releases gas that makes the batter expand.
The sour cream adds moisture and richness. Its slight acidity complements the sweet pineapple and contributes to a soft texture.
The crushed pineapple provides fruity flavor and small pockets of juicy sweetness. Draining it well helps maintain the right balance of moisture.
The vanilla extract enhances the buttery flavor and complements the pineapple without overpowering it.
The pineapple glaze provides a sweet, lightly tangy finish. It adds another layer of flavor and gives the cake a beautiful homemade appearance.
When baked correctly, these ingredients produce a cake with a lightly golden exterior, a moist interior, a delicate crumb, and a refreshing pineapple flavor.
Tips for the Best Results
- Use room-temperature eggs and softened butter for easier mixing.
- Drain the crushed pineapple thoroughly before adding it to the batter.
- Measure flour accurately by spooning it into the measuring cup and leveling the top.
- Avoid overmixing once the flour is added.
- Check the cake early if your oven tends to run hot.
- Let the cake cool before adding the glaze.
- Use fresh pineapple only if it is finely crushed and well drained.
- For extra flavor, add a small amount of lemon zest to the batter.
- For a tropical variation, sprinkle toasted coconut over the glaze.
- Store leftovers in an airtight container to help preserve moisture.
Delicious Variations to Try
Pineapple Coconut Heaven Cake
Add 1/3 cup of unsweetened shredded coconut to the batter. Finish the cake with toasted coconut flakes after applying the glaze.
The coconut adds a pleasant texture and complements the pineapple beautifully.
Pineapple Lemon Cake
Add one teaspoon of finely grated lemon zest to the batter. The citrus aroma brightens the pineapple flavor and balances the sweetness.
Pineapple Cream Cake
Serve each slice with a spoonful of lightly sweetened whipped cream. For a special occasion, add a few pineapple pieces on top.
Pineapple Almond Cake
Add 1/4 teaspoon of almond extract along with the vanilla. Use a light hand, because almond extract can quickly become overpowering.
Pineapple Upside-Down-Inspired Cake
For a different presentation, arrange thin pineapple rings and a little brown sugar mixture in the bottom of a suitable cake pan, then carefully add the batter and bake. This changes the original recipe’s presentation and may require adjusting the baking time.
Serving Suggestions
Pineapple Heaven Cake is versatile enough for casual afternoons and special occasions.
- For afternoon tea: Serve a slice with black tea or herbal tea.
- For a family dessert: Add a small spoonful of whipped cream.
- For summer gatherings: Serve slightly chilled with fresh pineapple.
- For birthdays and celebrations: Decorate with coconut flakes and a few pineapple pieces.
- For a warm dessert: Gently warm an individual slice and serve it with vanilla ice cream.
Because the cake is already rich and flavorful, simple accompaniments work best.
Storage and Make-Ahead Instructions
At room temperature: If the cake is unglazed and your kitchen is cool, it can generally be stored in an airtight container for up to one day. Because this cake contains moist fruit and sour cream, refrigeration is the safer choice for longer storage, especially in warm weather.
In the refrigerator: Store the cooled, glazed cake in an airtight container for approximately 3–4 days. Let individual slices sit at room temperature briefly before serving if you prefer a softer texture.
In the freezer: Freeze individual slices without the glaze, wrapped securely and placed in a freezer-safe container, for up to 2 months for best quality. Thaw in the refrigerator and prepare fresh glaze before serving.
Make-ahead tip: Bake the cake a day before serving and refrigerate it once cooled. Add the glaze shortly before presentation for the freshest appearance.
Common Mistakes to Avoid
Using undrained pineapple: Excess liquid can make the center gummy or heavy. Drain the pineapple thoroughly.
Using cold butter: Cold butter does not cream effectively with sugar. Let it soften before mixing.
Overmixing the batter: Excess mixing after adding flour can make the cake tough. Stop as soon as the ingredients are combined.
Removing the cake too early: An underbaked center can collapse or appear wet. Test the middle with a toothpick before removing the cake from the oven.
Glazing a very hot cake: The glaze may become too thin and disappear into the surface. Let the cake cool first.
Cutting too soon: Give the cake time to cool and the glaze time to set for cleaner slices.
Conclusion
Pineapple Heaven Cake is a wonderful example of how simple ingredients can create an unforgettable homemade dessert. Its buttery crumb, soft texture, sweet pineapple pieces, and delicate fruit glaze make every slice a pleasure to enjoy.
The recipe is straightforward enough for beginner bakers yet delicious enough to serve to guests. It can be dressed up with whipped cream and toasted coconut or served simply with a cup of coffee.
Most importantly, this is the kind of cake that fits naturally into family traditions. It is easy to prepare, easy to share, and delicious enough to inspire requests for another slice.
Save this Pineapple Heaven Cake recipe for your next gathering, weekend baking session, or whenever you crave a sweet taste of the tropics.
For Pineapple Cake Lovers
If you love moist cakes, sweet fruit, and classic homemade desserts, this recipe deserves a place in your collection. The combination of vanilla, butter, sour cream, and pineapple creates a balanced flavor that is comforting without being overly complicated.
Pineapple lovers can enjoy the fruit in every slice, while the simple glaze adds just enough sweetness to make the cake feel complete.
Serve it to family, share it with friends, or keep a slice for yourself to enjoy later. One homemade cake can turn an ordinary afternoon into a special occasion.
Recipe to save: Pineapple Heaven Cake
A soft, buttery pineapple cake finished with a sweet pineapple glaze. Simple ingredients, easy preparation, and delicious results make this a dessert you will want to bake again and again.