
Old-Fashioned Dump Cake: The Easy, Buttery Dessert Everyone
Loves
Introduction
There is something wonderfully comforting about a homemade dessert that requires only a handful of simple ingredients and very little preparation. Old-fashioned dump cake is one of those recipes that proves you do not need complicated techniques, expensive ingredients, or hours in the kitchen to create something delicious.
This classic American dessert is loved for its beautiful combination of sweet fruit filling, tender cake topping, and golden, buttery edges. The name might sound unusual, but the method is wonderfully simple: layer the ingredients in a baking dish, add melted butter, and let the oven do the work.
Dump cake is perfect for family dinners, Sunday suppers, potlucks, holidays, and last-minute gatherings. Serve it warm with a scoop of vanilla ice cream, and you have a dessert that tastes like a cross between a fruit cobbler and a soft, buttery cake.
The best part is that this recipe is easy to customize. You can use cherry, apple, peach, blueberry, or pineapple filling, depending on what your family enjoys. Once you make it, you may find yourself returning to this simple dessert whenever you need something sweet and satisfying.
Ingredients
For the Classic Dump Cake
- 2 cans (21 ounces each) cherry pie filling
- 1 box (15.25 ounces) yellow cake mix
- 3/4 cup (170 g) unsalted butter, melted
- 1 teaspoon vanilla extract, optional
- 1/2 teaspoon ground cinnamon, optional
- 1/2 cup chopped pecans or walnuts, optional
- Vanilla ice cream or whipped cream, for serving
Equipment
- One 9-by-13-inch baking dish
- A mixing bowl or measuring jug
- A spatula or spoon
- A knife for cutting the butter, if using sliced rather than melted butter
Instructions
Step 1: Prepare the Oven
Preheat your oven to 350°F (175°C).
Lightly grease a 9-by-13-inch baking dish with butter or nonstick cooking spray. This helps prevent the fruit filling from sticking around the edges and makes serving easier.
Step 2: Add the Fruit Filling
Open both cans of cherry pie filling and spread the filling evenly across the bottom of the prepared baking dish.
Use a spatula to distribute the cherries and syrup into an even layer so every serving contains plenty of fruit.
If you want to add a little extra flavor, stir the optional vanilla extract into the cherry filling before spreading it in the dish.
Step 3: Add the Cake Mix
Open the yellow cake mix and sprinkle the dry mix evenly over the cherry filling.
Do not prepare the cake mix according to the instructions on the box. Do not add eggs, water, or oil.
The dry cake mix forms the topping that will become golden and tender as it absorbs moisture from the fruit and butter.
Spread it carefully into the corners of the dish. Try to avoid leaving large piles of dry mix in one area.
Step 4: Add the Butter
Pour the melted butter slowly over the entire surface of the dry cake mix.
Move the measuring jug around the dish as you pour to help distribute the butter as evenly as possible.
If you prefer, you can cut the cold butter into thin slices and arrange them across the top. Melted butter generally makes it easier to cover the surface, while sliced butter is a traditional alternative used in many dump cake recipes.
Some small dry patches may remain, but try to moisten as much of the cake mix as possible.
Do not stir the layers together. Keeping them separate is an important part of the traditional preparation method.
Step 5: Add Optional Toppings
If you enjoy a little crunch, sprinkle chopped pecans or walnuts over the top.
For a warmer flavor, lightly dust the surface with ground cinnamon.
These additions are optional, but they can give the dessert an extra layer of flavor and texture.
Step 6: Bake Until Golden
Place the baking dish in the preheated oven and bake for approximately 45–55 minutes.
The fruit filling should be bubbling around the edges, and the topping should look golden brown.
Check the center before removing the dish from the oven. If you notice large areas of dry cake mix, allow it to bake a little longer, checking every five minutes.
Ovens vary, so use the color of the topping and the bubbling fruit as your main indicators.
Step 7: Allow the Cake to Rest
Remove the baking dish from the oven and place it on a heat-safe surface.
Let the dump cake rest for 10–15 minutes before serving. The fruit filling will be extremely hot when it first comes out of the oven, and resting allows the juices to settle slightly.
The topping will remain buttery and tender, with crisp edges and a softer texture where it meets the fruit.
Step 8: Serve and Enjoy
Spoon the warm dessert into bowls.
For a classic finishing touch, add a scoop of vanilla ice cream or a spoonful of whipped cream. The cold, creamy topping contrasts beautifully with the warm cherries and buttery cake.
Serve immediately for the best combination of textures.
Detailed Cooking Method
The secret to a successful dump cake is understanding how the ingredients work together.
Unlike a traditional cake, this dessert does not require a batter. Instead, the fruit filling supplies moisture from below, while the butter moistens the dry cake mix from above. During baking, the fruit becomes hot and bubbly, and the cake topping develops a golden crust.
The Layering Method
Always begin with the fruit filling. This provides the moist foundation for the dessert and helps prevent the bottom from becoming dry.
Next, distribute the cake mix evenly. Uneven layers can cause some areas to bake beautifully while other areas remain powdery.
Finally, add the butter. Butter helps the topping brown and contributes richness and flavor.
The Baking Method
Bake uncovered so moisture can escape and the topping can develop color.
If the top browns too quickly while the center still looks underdone, loosely cover the dish with aluminum foil for the remaining baking time.
Avoid stirring the dessert halfway through baking. Stirring can disturb the layers and produce a different texture from the classic dump cake.
The Cooling Method
Allowing the cake to rest before serving is important. The filling thickens slightly as it cools, making the dessert easier to spoon into bowls.
The cake is especially delicious while still warm, but leftovers are also enjoyable after refrigeration.
The History of Dump Cake
Dump cake is a familiar part of American home baking, particularly in the tradition of easy family desserts made with pantry staples.
Its popularity grew during the twentieth century, when convenience ingredients such as packaged cake mixes and canned fruit fillings became increasingly common in American kitchens. Home cooks appreciated recipes that required little measuring, minimal preparation, and no complicated mixing techniques.
Dump cakes became especially popular in community cookbooks, church gatherings, potlucks, and family recipe collections. Their appeal was straightforward: a few affordable ingredients could be transformed into a generous dessert that was easy to share.
The exact origin of dump cake is difficult to establish, and there is no single universally recognized inventor. However, the dessert belongs to a broader tradition of simple fruit cobblers, crisps, and other baked puddings that combine fruit with a flour-based topping.
Over time, many variations developed. Some cooks used cherry pie filling and yellow cake mix, while others preferred apples, peaches, pineapple, blueberries, or chocolate cake mix.
Today, dump cake remains popular because it offers the comfort of an old-fashioned homemade dessert without the effort required for a traditional cake or pie.
How Dump Cake Gets Its Texture
The texture is one of the most appealing features of this dessert.
The bottom layer becomes juicy and fruit-filled, while the upper layer develops a buttery, golden surface.
The edges often become slightly crisp, while the middle stays softer and more tender. This contrast makes dump cake similar to a cobbler, although the topping is made with packaged cake mix rather than a traditional biscuit or pastry dough.
The butter also helps create rich flavor and encourages browning. Meanwhile, the fruit filling releases moisture and creates a sweet sauce beneath the topping.
For the best results, distribute the butter carefully and bake until the topping is golden and the filling bubbles.
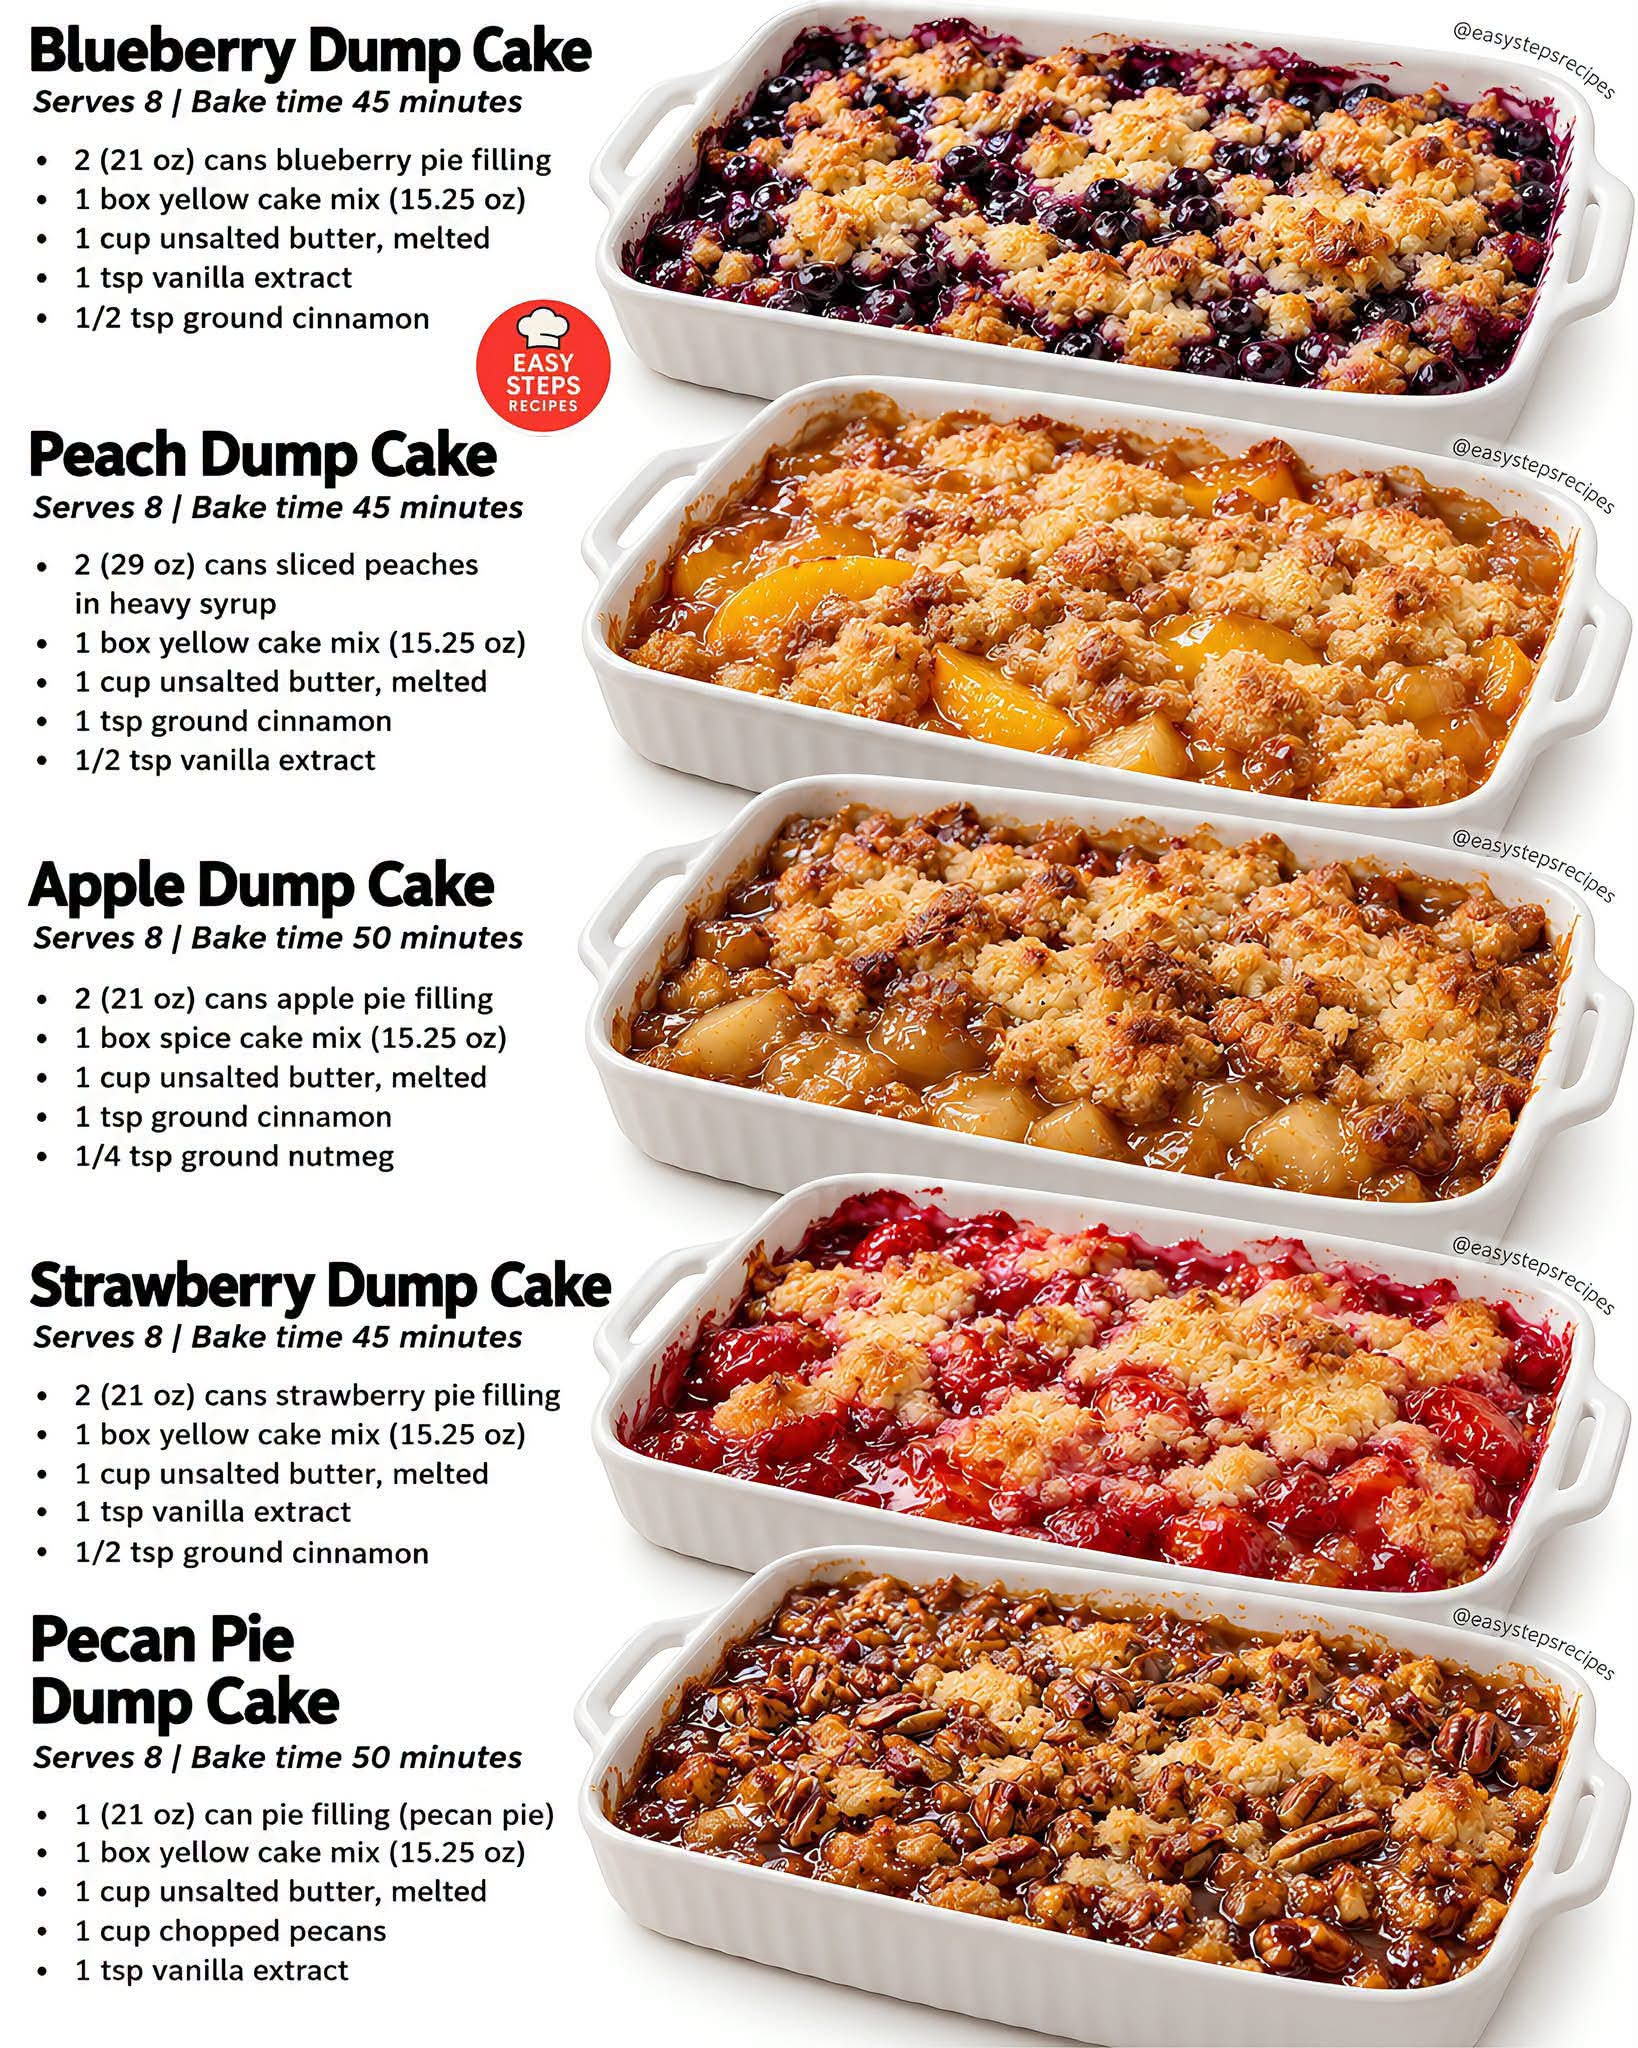
Delicious Dump Cake Variations
One of the greatest advantages of this recipe is how easily it can be adapted.
1. Cherry Dump Cake
Use the original recipe with cherry pie filling and yellow cake mix.
The cherries provide a sweet-tart flavor, while the buttery topping creates a comforting contrast. This is an excellent choice for anyone making dump cake for the first time.
2. Apple Cinnamon Dump Cake
Replace the cherry filling with two cans of apple pie filling.
Use yellow or spice cake mix, and sprinkle cinnamon over the top before baking. Chopped pecans are an excellent optional addition.
This variation is especially inviting during autumn and the holiday season.
3. Peach Dump Cake
Use two cans of peach pie filling and a yellow cake mix.
For extra flavor, add a little cinnamon or nutmeg. Serve warm with vanilla ice cream for a dessert reminiscent of peach cobbler.
4. Blueberry Dump Cake
Use two cans of blueberry pie filling with yellow or white cake mix.
The blueberries create a deep, fruity filling, and the buttery topping makes the dessert rich without requiring a separate crust.
5. Chocolate Cherry Dump Cake
Replace the yellow cake mix with chocolate cake mix while keeping the cherry pie filling.
The combination of chocolate and cherries creates a richer dessert that is particularly good served with vanilla ice cream.
6. Pineapple Dump Cake
Use crushed pineapple or pineapple tidbits with a suitable amount of their juice, adjusting the liquid to avoid an overly wet dessert.
Sprinkle yellow cake mix over the fruit and distribute melted butter across the surface. Shredded coconut or chopped pecans can be added for extra texture.
Because crushed pineapple has a different consistency from pie filling, the finished result may be juicier than the classic cherry version.
Tips for the Best Homemade Dump Cake
Distribute the cake mix evenly. This is one of the most important steps. Thick piles of dry mix may not absorb enough butter or moisture.
Cover as much of the surface with butter as possible. Uneven butter distribution can leave powdery patches on top.
Do not mix the layers. The classic technique relies on layering the fruit, dry cake mix, and butter.
Use the correct baking dish. A 9-by-13-inch dish provides room for the filling to bubble and the topping to brown.
Watch the final baking time. The cake is ready when the filling bubbles and the topping is golden. If necessary, extend the baking time in small increments.
Let the cake rest before serving. This helps the filling settle and reduces the risk of burns from the hot fruit.
Choose your favorite cake mix. Yellow cake mix is a reliable choice, but white, spice, and chocolate cake mixes can all work with suitable fruit fillings.
Storage and Reheating
Refrigeration
Allow the leftover dump cake to cool, then cover the baking dish or transfer the dessert to an airtight container.
Refrigerate within two hours of baking and consume within three to four days.
Reheating
For individual portions, microwave for approximately 20–40 seconds, then check the temperature and heat longer if necessary.
To warm a larger portion, place it in an oven-safe dish and heat at 325°F (165°C) until warmed through.
The topping may soften during refrigeration. Reheating in the oven can help restore some of its texture.
Freezing
You can freeze leftover dump cake in a freezer-safe container for up to about three months for best quality.
Thaw it in the refrigerator before reheating. Keep in mind that the fruit filling may become softer and the topping may lose some crispness after freezing.
Serving Suggestions
Dump cake is versatile enough for everyday meals and special occasions.
Serve it with vanilla ice cream for a classic dessert. Add whipped cream for a lighter finish, or sprinkle a few chopped toasted nuts over each serving for extra crunch.
For a holiday table, apple or cherry dump cake pairs well with coffee, tea, or hot chocolate.
For a family gathering, bake the dessert in a large dish and place it in the center of the table so everyone can serve themselves.
It is also a convenient dessert for potlucks because it can be prepared ahead of time and transported in its baking dish.
Frequently Asked Questions
Why is my dump cake still powdery on top?
This usually happens when portions of the dry cake mix do not receive enough butter or moisture. Distribute the butter more evenly next time. If you discover dry patches while baking, you can carefully spoon a little additional melted butter over those areas and continue baking until the topping is cooked.
Should I prepare the cake mix first?
No. For this traditional recipe, use the cake mix directly from the box without adding eggs, oil, or water.
Can I use fresh fruit instead of canned filling?
Yes, but fresh fruit needs appropriate preparation and usually requires added sugar and some thickening. Canned pie filling is more predictable because it already contains sweetened fruit and a thickened sauce.
Can I make dump cake ahead of time?
Yes. You can bake it earlier in the day and reheat it before serving. For the best topping texture, serve it warm shortly after baking.
Is dump cake the same as cobbler?
They are similar but not identical. Both feature fruit baked beneath or alongside a topping. Traditional cobblers often use biscuit dough or a homemade batter, whereas dump cake usually uses dry packaged cake mix and butter.
Can I make it without nuts?
Absolutely. Nuts are entirely optional and can be omitted without changing the basic recipe.
Conclusion
Old-fashioned dump cake is proof that a simple dessert can become a family favorite. With just cherry pie filling, yellow cake mix, and butter, you can create a warm, sweet dessert with bubbling fruit, a golden topping, and plenty of homemade comfort.
Its straightforward preparation makes it ideal for beginners, busy families, holiday gatherings, and anyone who enjoys delicious desserts without complicated baking techniques.
You can follow the classic cherry version or experiment with apples, peaches, blueberries, pineapple, and chocolate. Every variation brings something different to the table while preserving the easy method that makes dump cake so popular.
Serve it warm, add a scoop of vanilla ice cream, and enjoy a dessert that brings people together one spoonful at a time.
For Dump Cake Lovers
If you love old-fashioned desserts, this recipe deserves a place in your collection. It is easy to prepare, simple to customize, and generous enough to share with family and friends.
Whether you call it a dump cake, a fruit cobbler-style dessert, or your favorite easy cake, its appeal is the same: a delicious combination of sweet fruit and buttery topping with very little effort.
The next time you need a dependable dessert for Sunday dinner, a family celebration, or an unexpected visit, remember this recipe. Keep a box of cake mix and a couple of cans of fruit filling in your pantry, and you will be ready to bake something comforting whenever the occasion calls for it.
Recipe at a Glance
- Preparation time: 10 minutes
- Baking time: 45–55 minutes
- Resting time: 10–15 minutes
- Total time: Approximately 65–80 minutes
- Oven temperature: 350°F (175°C)
- Yield: 10–12 servings
- Difficulty: Easy
- Best served: Warm, with vanilla ice cream or whipped cream
This classic dump cake is simple, buttery, fruity, and wonderfully satisfying—the kind of dessert that makes people ask for another serving and the recipe to make it at home.