
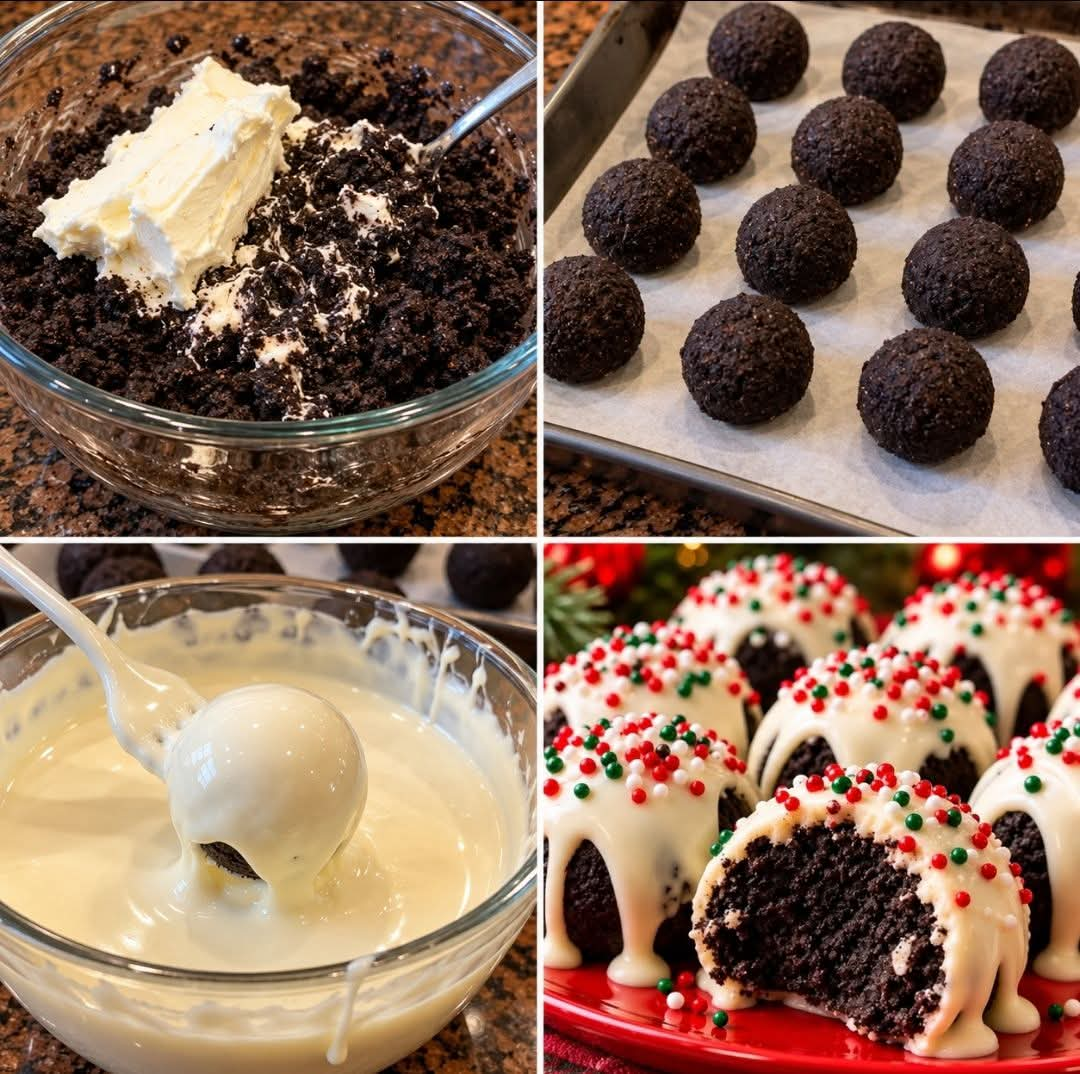
Christmas Oreo Balls – Easy No-Bake Holiday Treat
Introduction
Christmas Oreo Balls are one of those irresistible holiday desserts that bring sweetness, joy, and a little festive magic to every celebration. With a rich, creamy Oreo cookie center, a smooth white chocolate coating, and cheerful red and green sprinkles, these bite-sized treats look beautiful on a Christmas dessert table and taste even better than they look.
Every year, these little chocolate-covered delights become a family favorite. They are often among the first desserts to disappear, sometimes before Christmas dinner has even begun. Their combination of crunchy chocolate cookies, velvety cream cheese, and sweet white chocolate makes them difficult to resist.
The best part is that you do not need an oven, complicated equipment, or professional baking skills to make them. This simple no-bake recipe requires only a handful of ingredients and a little chilling time. You can prepare them ahead of your holiday gathering, arrange them in festive gift boxes, or serve them alongside cookies, brownies, fudge, and other Christmas sweets.
Whether you are preparing treats for a family party, a cookie exchange, a school celebration, or a homemade Christmas gift, these Christmas Oreo Balls are guaranteed to make the season a little sweeter.
Ingredients
Preparation time: 25–35 minutes
Chilling time: 1–2 hours
Total time: Approximately 2 hours
Yield: About 30–36 Oreo balls
For the Oreo Cookie Center
- 36 regular Oreo cookies, including the cream filling
- 8 ounces (225 g) cream cheese, softened to room temperature
- 1 teaspoon vanilla extract, optional
For the White Chocolate Coating
- 16 ounces (450 g) white chocolate melting wafers or white candy melts
- 1 teaspoon coconut oil or neutral vegetable oil, optional, to thin the coating if needed
For the Christmas Decoration
- 2–3 tablespoons red and green Christmas sprinkles
- 2 tablespoons crushed Oreo cookies, optional
- A little melted red or green candy coating, optional, for decorative drizzles
Instructions
Step 1: Prepare the Oreo Cookies
Place the Oreo cookies in a food processor and pulse until they become very fine crumbs. There should be no large cookie pieces remaining because a fine crumb mixture helps the centers hold together smoothly.
If you do not have a food processor, place the cookies in a sturdy resealable plastic bag. Remove excess air, seal the bag, and crush the cookies with a rolling pin until finely ground.
Transfer the crumbs to a large mixing bowl.
Step 2: Mix the Cream Cheese Filling
Add the softened cream cheese to the Oreo crumbs. If desired, add the vanilla extract for a slightly deeper flavor.
Mix thoroughly using a sturdy spoon, spatula, or electric mixer on low speed. Continue mixing until the cream cheese is evenly distributed and the mixture resembles a thick, moist chocolate dough.
Scrape down the sides of the bowl as needed. There should be no large streaks of plain cream cheese remaining.
The mixture should be moist enough to hold its shape when pressed between your fingers. If it feels too soft, refrigerate it for 15–20 minutes before shaping.
Step 3: Shape the Oreo Balls
Line a baking sheet or large tray with parchment paper.
Scoop approximately one tablespoon of the Oreo mixture at a time and roll it between your palms to form smooth, round balls about one inch in diameter.
Place each ball on the prepared tray, leaving a little space between them.
Continue until all the mixture has been used. For a more uniform presentation, use a small cookie scoop to portion the mixture evenly.
Step 4: Chill Until Firm
Place the tray in the refrigerator for at least one hour, or until the Oreo balls are firm enough to dip.
For a quicker option, place them in the freezer for approximately 15–20 minutes. Avoid freezing them until completely solid, as very cold centers can cause the chocolate coating to crack as they warm.
Chilling is important because firm centers are much easier to handle and dip into melted chocolate.
Step 5: Melt the White Chocolate
Place the white chocolate melting wafers in a microwave-safe bowl.
Microwave in 20-second intervals, stirring thoroughly after each interval until the chocolate is smooth and fully melted. White chocolate can scorch easily, so use short intervals and avoid overheating it.
If the coating is too thick for dipping, stir in a small amount of coconut oil or neutral vegetable oil, starting with half a teaspoon. Add more only if necessary.
Alternatively, melt the chocolate in a heatproof bowl set over a saucepan of gently simmering water. Make sure the bottom of the bowl does not touch the water and keep all water and steam away from the chocolate.
Step 6: Dip the Oreo Balls
Remove a few chilled Oreo balls from the refrigerator at a time, leaving the remaining ones cold.
Drop one ball into the melted white chocolate. Use a fork or dipping tool to turn it gently until completely covered.
Lift the ball out and allow the excess chocolate to drip back into the bowl. Gently tap the fork against the edge of the bowl to remove excess coating.
Carefully slide the coated ball onto the parchment-lined tray. If necessary, use a toothpick or another fork to help release it.
Repeat with the remaining Oreo balls until all are coated.
Step 7: Add the Christmas Decorations
While the white chocolate coating is still wet, immediately sprinkle each ball with red and green Christmas sprinkles.
Work in small batches because the coating begins to set quickly. Adding the sprinkles before the chocolate hardens helps them stick securely.
For a more elegant finish, drizzle the balls with melted red or green candy coating. You can also sprinkle a small amount of finely crushed Oreo cookies over some of them for a contrasting appearance.
For a simple, classic look, leave a few balls plain with their smooth white chocolate shells.
Step 8: Allow the Coating to Set
Place the decorated Oreo balls in the refrigerator for approximately 15–30 minutes, or until the chocolate coating is completely firm.
Once set, transfer them to a serving platter, arrange them in small paper candy cups, or place them in an airtight container for storage.
Your Christmas Oreo Balls are now ready to serve.
Method of Preparation
The secret to perfect Christmas Oreo Balls is the balance between the creamy filling and the firm chocolate shell.
First, finely crushed Oreo cookies are combined with cream cheese to create a rich, truffle-like center. The mixture is rolled into small portions and chilled so that the balls maintain their shape during dipping.
Next, the chilled centers are covered in melted white chocolate. The coating provides a sweet, delicate shell that contrasts beautifully with the darker Oreo filling.
Finally, red and green sprinkles give each piece a festive Christmas appearance. Once the coating sets, the balls can be served immediately or refrigerated until the celebration begins.
For the smoothest results, use softened cream cheese, finely crushed cookies, properly chilled centers, and gently melted coating chocolate.
The History of Oreo Balls
Oreo Balls are a modern no-bake dessert inspired by the long-standing tradition of chocolate truffles and homemade confectionery.
Chocolate truffles traditionally feature rich centers covered in chocolate or cocoa powder. Over time, home cooks began experimenting with simpler ingredients and easier preparation methods, creating truffle-style sweets from crushed cookies, cream cheese, and melted chocolate.
Oreo cookies, introduced in the United States in 1912, became a popular ingredient for creative desserts because their chocolate wafers and sweet cream filling provide a distinctive flavor and convenient base.
Combining crushed Oreo cookies with cream cheese produces a dense, smooth filling that resembles the texture of a traditional truffle without requiring baking or complicated candy-making techniques.
The Christmas version adds a seasonal touch with white chocolate, red and green decorations, and festive presentation. These treats have become popular for holiday dessert tables, cookie exchanges, homemade gifts, and family celebrations because they are simple to prepare and easy to share.
Although there is no single universally recognized inventor of Christmas Oreo Balls, their popularity reflects the creativity of home cooks who transform everyday ingredients into memorable holiday desserts.
Formation and Presentation
The formation of Christmas Oreo Balls is simple, but a few small details can make them look especially attractive.
Creating Uniform Shapes
Use a cookie scoop or measuring spoon to portion the mixture evenly. Roll each portion gently between your palms until the surface is smooth and round.
If the mixture sticks to your hands, chill it briefly before continuing.
Achieving a Smooth White Chocolate Shell
Make sure the Oreo centers are firm before dipping. The melted coating should be fluid enough to cover the balls without becoming excessively thick.
Allow excess chocolate to drip away before placing each ball on the tray. This helps prevent large pools of chocolate from forming around the bottom.
Decorating for Christmas
Use red and green sprinkles for a traditional holiday appearance. Gold sugar pearls, silver decorations, crushed cookies, or contrasting chocolate drizzles can also create an attractive presentation.
Arrange the finished balls in alternating colors on a white platter, place them in festive paper cups, or stack them carefully in a decorative Christmas tin.
For homemade gifts, place the fully chilled treats in food-safe containers and keep them refrigerated until they are ready to be delivered.
Making Them Look Professional
- Use a fork or dedicated chocolate dipping tool for cleaner coating.
- Gently tap off excess chocolate before placing each ball on the tray.
- Add decorations immediately after dipping.
- Wipe the fork between dips if chocolate begins to accumulate.
- Refrigerate the finished balls until the coating is firm before arranging them.
Helpful Tips for Perfect Results
Use regular Oreo cookies. This recipe is designed for standard Oreo cookies with their filling included. Specialty varieties may have different moisture levels and could require adjustments.
Soften the cream cheese first. Room-temperature cream cheese blends more easily and helps prevent lumps.
Do not skip the chilling stage. Firm centers are easier to dip and less likely to break apart in the melted coating.
Avoid overheating white chocolate. Melt slowly and stir frequently. If the coating becomes too thick, add a very small amount of oil rather than continuing to heat it aggressively.
Keep water away from the chocolate. Even a small amount of water can cause melted chocolate to seize and become grainy.
Decorate immediately. Sprinkles should be added while the coating is wet so they adhere properly.
Use clean, dry equipment. This is especially important when melting chocolate.
Delicious Variations
1. Classic Chocolate Oreo Balls
Replace the white chocolate coating with semisweet or milk chocolate. Finish with chocolate cookie crumbs or a drizzle of white chocolate.
2. Peppermint Christmas Oreo Balls
Add a small amount of finely crushed peppermint candy to the Oreo mixture, or sprinkle peppermint pieces over the white chocolate coating.
Use peppermint sparingly so that it complements rather than overwhelms the cookie flavor.
3. Red and Green Drizzle Oreo Balls
Dip the balls in white chocolate and allow the coating to become slightly firm. Drizzle with melted red and green candy melts for a striped holiday design.
4. Golden Christmas Oreo Balls
Dip the centers in white chocolate and decorate with gold-colored edible sprinkles for an elegant holiday dessert tray.
5. Chocolate-Filled Oreo Balls
Press a small chocolate chip or a small piece of chocolate into the center of each portion before rolling it into a ball. Seal the filling completely inside before chilling and dipping.
6. Dark Chocolate and White Chocolate Oreo Balls
Prepare half the batch with white chocolate and half with dark chocolate. Arrange the contrasting colors together for a beautiful dessert platter.
Storage Instructions
Because the filling contains cream cheese, Christmas Oreo Balls should be refrigerated.
Refrigerator: Store in an airtight container for up to 5–7 days, provided they have been handled safely and kept consistently refrigerated at 40°F (4°C) or below.
Freezer: Freeze the finished balls in a freezer-safe airtight container for approximately 2 months for best quality. Separate layers with parchment paper to prevent sticking. Thaw overnight in the refrigerator before serving.
Serving: Remove the desired quantity shortly before dessert time. Avoid leaving cream-cheese-filled Oreo balls at room temperature for more than two hours, or one hour when the temperature is above 90°F (32°C).
If transporting them to a party, use an insulated cooler with ice packs.
Serving Suggestions
Christmas Oreo Balls pair beautifully with hot chocolate, coffee, tea, or a glass of cold milk.
Serve them alongside gingerbread cookies, sugar cookies, brownies, fudge, peppermint bark, and other seasonal sweets. They also make excellent additions to Christmas dessert boards and cookie exchange boxes.
For a party, arrange them on a tiered serving stand with other bite-sized treats. For gifts, place them in small food-safe boxes lined with parchment or decorative candy cups.
Their small size makes them convenient for guests who want to sample several desserts without committing to a large slice of cake.
Frequently Asked Questions
Can I make Christmas Oreo Balls ahead of time?
Yes. They are an excellent make-ahead dessert. Prepare them one or two days before your event and store them in an airtight container in the refrigerator.
Do I need to bake the Oreo Balls?
No. This is a completely no-bake recipe. The cookies are crushed, mixed with cream cheese, shaped, chilled, and coated in melted chocolate.
Can I use white chocolate chips instead of melting wafers?
Yes, but white chocolate chips can be thicker and more difficult to dip with a smooth finish. Melt them gently and add a small amount of neutral oil if needed. White candy melts or dipping wafers are often easier to work with.
Why are my Oreo Balls falling apart?
The mixture may be too soft, the cookie crumbs may be too coarse, or the centers may not have been chilled long enough. Refrigerate the mixture, make sure the cookies are finely crushed, and chill the shaped balls until firm.
Why is my white chocolate coating cracking?
The centers may be too cold, the coating may be too thick, or the temperature difference between the filling and coating may be too great. Allow frozen or very cold centers to sit briefly in the refrigerator before dipping, and avoid overheating the coating.
Can I make them without cream cheese?
Cream cheese is the traditional binder for this version. Substitutions can change the consistency, flavor, and storage requirements, so use a tested alternative recipe if you need to avoid dairy.
Can children help make these treats?
Yes. Children can help crush cookies in a sealed bag, roll the chilled mixture, and add sprinkles. An adult should supervise the melting and handling of hot chocolate.
Conclusion
Christmas Oreo Balls are proof that a memorable holiday dessert does not need to be complicated. With just a few simple ingredients, you can create creamy chocolate-cookie centers covered in a smooth white chocolate shell and finished with festive red and green decorations.
They are easy enough for beginners, attractive enough for a Christmas dessert table, and delicious enough to become a yearly family tradition.
Prepare a batch for your next holiday gathering, wrap a few as homemade gifts, or keep them ready in the refrigerator for unexpected visitors. Their rich flavor, bite-sized shape, and cheerful appearance make them a treat that everyone will want to try.
Do not be surprised if they disappear before Christmas dinner even begins.
For Oreo Lovers
If you love the combination of chocolate cookies, creamy filling, and sweet chocolate coating, these Christmas Oreo Balls deserve a place on your holiday baking list. They deliver all the flavor of a chocolate-cookie dessert in a convenient bite-sized treat, without turning on the oven.
Make them with your favorite decorations, experiment with different chocolate coatings, and enjoy sharing them with family and friends throughout the festive season.
Once you serve these creamy, chocolatey holiday treats, they may become one of the most requested desserts at every Christmas celebration.
Final Recipe Summary
- Recipe: Christmas Oreo Balls
- Preparation: 25–35 minutes
- Chilling: 1–2 hours, plus setting time
- Yield: Approximately 30–36 pieces
- Difficulty: Easy
- Cooking method: No-bake
- Main ingredients: Oreo cookies, cream cheese, white chocolate, and Christmas sprinkles
- Storage: Refrigerate in an airtight container
A simple, festive, and delicious no-bake Christmas treat that is perfect for parties, dessert tables, cookie exchanges, and homemade holiday gifts.