
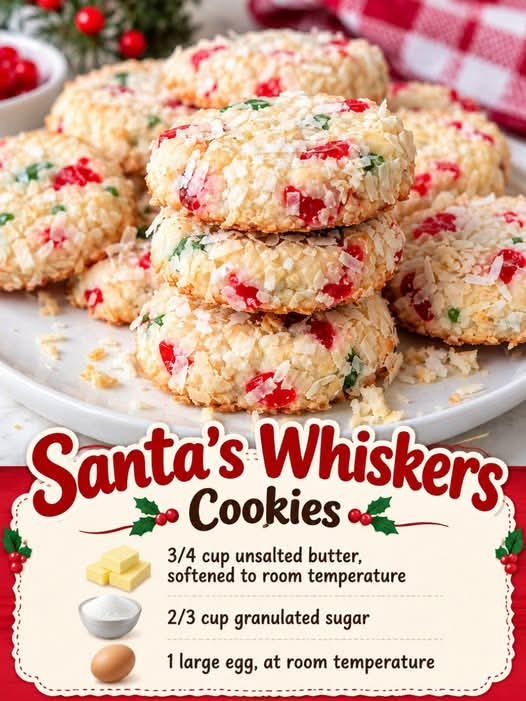
Santa’s Whiskers Cookies: A Classic Old-Fashioned Christmas Cookie Recipe
Introduction
Santa’s Whiskers Cookies are a beautiful, buttery, old-fashioned Christmas treat that brings the magic of holiday baking straight into your kitchen. With their delicate texture, sweet vanilla flavor, colorful candied cherries, and snowy coating of shredded coconut, these cookies are a festive addition to any Christmas dessert table.
These traditional slice-and-bake cookies are especially popular with families who enjoy preparing homemade treats during the holiday season. Their charming appearance makes them perfect for Christmas parties, cookie exchanges, family gatherings, school celebrations, and homemade edible gifts.
One of the best things about Santa’s Whiskers Cookies is that the dough can be prepared ahead of time. Simply shape it into logs, chill until firm, slice into rounds, and bake until the edges are lightly golden. This convenient method allows you to enjoy fresh homemade cookies without spending hours in the kitchen on a busy holiday morning.
The combination of buttery cookie dough, sweet cherries, and coconut creates a delightful balance of flavors and textures. Every slice looks like a little Christmas decoration, with colorful fruit surrounded by a white coconut border that resembles Santa Claus’s whiskers.
Whether you are continuing a family tradition or discovering this classic recipe for the first time, Santa’s Whiskers Cookies are a wonderful way to make the holiday season sweeter.
Ingredients
Preparation time: 20 minutes · Chilling time: 2–3 hours · Baking time: 10–14 minutes per batch
Yield: Approximately 30–36 cookies, depending on slice thickness.
For the buttery cookie dough
- 3/4 cup (170 g) unsalted butter, softened to room temperature
- 2/3 cup (133 g) granulated sugar
- 1 large egg, at room temperature
- 1 teaspoon pure vanilla extract
- 2 cups (240 g) all-purpose flour
- 1/4 teaspoon salt
For the traditional Christmas filling
- 1/2 cup finely chopped red candied cherries
- 1/2 cup finely chopped green candied cherries, optional
- 3/4 cup sweetened shredded coconut, for coating the dough logs
Optional ingredients for extra flavor
- 1/4 teaspoon almond extract for a delicate almond aroma
- 1/3 cup finely chopped pecans for a nutty crunch
- 1/2 cup mini chocolate chips for a chocolate variation
The four ingredients you provided form the starting point of the buttery dough. The flour, salt, candied cherries, and coconut complete the traditional Santa’s Whiskers cookie recipe.
Instructions
Step 1: Prepare your baking equipment
Preheat your oven to 350°F (175°C). Line two baking sheets with parchment paper.
Measure all the ingredients before you begin. Make sure the butter is softened but not melted. Properly softened butter should feel smooth when pressed with a finger while still holding its shape.
Finely chop the candied cherries and set them aside. If they are especially sticky, pat them gently with a paper towel before chopping.
Step 2: Cream the butter and sugar
Place the softened butter and granulated sugar in a large mixing bowl.
Using a hand mixer or stand mixer, beat the butter and sugar together for approximately 2–3 minutes, until the mixture becomes pale, creamy, and fluffy.
Scrape down the sides of the bowl as needed to ensure that everything is evenly mixed.
This step is important because it helps create a tender cookie with a delicate crumb. Avoid using melted butter, as it can make the dough too soft and difficult to shape.
Step 3: Add the egg and vanilla
Add the egg and pure vanilla extract to the creamed butter and sugar.
Beat until the mixture is smooth and well combined. The egg helps bind the ingredients together, while the vanilla adds a warm, sweet aroma that complements the buttery flavor.
If the mixture appears slightly uneven after adding the egg, do not worry. The dough will come together when you incorporate the dry ingredients.
Step 4: Combine the dry ingredients
In a separate bowl, whisk together the all-purpose flour and salt.
Gradually add the flour mixture to the butter mixture, mixing on low speed until a soft dough forms.
Stop mixing as soon as the flour is incorporated. Overmixing can develop the gluten in the flour and make the cookies less tender.
The dough should be soft enough to shape but firm enough to hold together. If it feels particularly sticky, refrigerate it for 15–20 minutes before proceeding.
Step 5: Fold in the candied cherries
Add the finely chopped red and green candied cherries to the dough.
Use a spatula or wooden spoon to fold them in gently, distributing the fruit throughout the mixture.
The bright red and green pieces give these cookies their classic Christmas appearance. Try to distribute them evenly so that every slice contains a colorful mixture of cherries.
If you prefer a simpler cookie, you can use only red cherries. You may also substitute finely chopped dried cranberries, although the flavor and appearance will be slightly different.
Step 6: Shape the dough into logs
Divide the dough into two equal portions.
Place each portion on a clean work surface and roll it into a log approximately 2 inches (5 cm) in diameter.
Try to keep both logs as even as possible. Uniform logs make it easier to cut cookies of the same thickness and help them bake evenly.
Spread the shredded coconut on a plate or a sheet of parchment paper. Roll each dough log in the coconut, gently pressing so that the coconut adheres to the outside.
The coconut creates the signature snowy border that gives Santa’s Whiskers Cookies their name.
Step 7: Wrap and chill the dough
Wrap each dough log tightly in plastic wrap or parchment paper.
Place the logs in the refrigerator for at least 2–3 hours, or until they are firm enough to slice cleanly.
For convenience, you can prepare the dough the night before and refrigerate it overnight.
Do not skip the chilling step. Firm dough is easier to slice, spreads less during baking, and helps the cookies maintain their attractive round shape.
Step 8: Slice the cookies
Remove one chilled dough log from the refrigerator and unwrap it.
Using a sharp knife, cut the log into rounds approximately 1/4 inch (6 mm) thick.
If the dough is extremely firm and begins to crack, let it rest at room temperature for a few minutes. If it becomes too soft, return it to the refrigerator briefly.
Arrange the slices on the prepared baking sheets, leaving approximately 1–2 inches between them.
Keep the slices as even as possible so that they finish baking at approximately the same time.
Step 9: Bake the cookies
Place the baking sheets in the preheated oven.
Bake for approximately 10–14 minutes, depending on the thickness of the cookies and your oven.
The cookies should look set around the edges, with lightly golden bottoms. The tops should remain relatively pale.
Avoid baking them until deeply browned. Santa’s Whiskers Cookies are best when they retain their delicate, buttery texture.
If baking multiple trays, rotate them halfway through the baking time if your oven heats unevenly.
Step 10: Cool and serve
Remove the cookies from the oven and allow them to rest on the baking sheet for about 5 minutes.
Carefully transfer them to a wire rack and let them cool completely.
The cookies will become firmer as they cool, making them easier to handle and package.
Arrange them on a festive serving plate, place them in decorative Christmas tins, or package them in small gift boxes to share with family and friends.
Cooking Methods
Santa’s Whiskers Cookies use several classic baking techniques that help produce their characteristic flavor, texture, and appearance.
1. The creaming method
Creaming butter and sugar is a foundational cookie-making technique. Beating these ingredients together creates a smooth mixture and incorporates air, helping the cookies develop a delicate texture.
For the best results, use softened butter and beat until the mixture looks lighter and fluffier.
2. The mixing and folding method
After adding the egg and vanilla, the dry ingredients are mixed into the dough gradually.
The cherries are folded in gently at the end. This helps distribute the fruit evenly without unnecessarily overworking the dough.
3. The slice-and-bake method
Rather than rolling out the dough and cutting individual shapes, you form the dough into logs and chill them.
Once firm, the logs can be sliced into neat rounds. This method is convenient for holiday baking because the dough can be prepared in advance and baked when needed.
4. The coconut-coating method
The dough logs are rolled in shredded coconut before chilling.
The coconut adheres to the surface and creates the familiar white border around each cookie. It adds a subtle sweetness and a pleasant texture that complements the buttery center and candied cherries.
5. The controlled baking method
A moderate oven temperature allows the cookies to bake evenly without becoming too dark.
Because these cookies are relatively delicate, it is important to check them before the end of the suggested baking time. Remove them once the edges are set and the bottoms are lightly golden.
The History of Santa’s Whiskers Cookies
Santa’s Whiskers Cookies are associated with the tradition of American Christmas baking, when families prepare a variety of homemade sweets to share during the holiday season.
Although the exact origin of the recipe and its name is difficult to establish with certainty, the cookies reflect several long-standing holiday baking traditions: buttery slice-and-bake dough, colorful candied fruit, and coconut used to create a snowy decorative finish.
Slice-and-bake cookies became a practical favorite because their dough could be prepared ahead of time, refrigerated, and baked in convenient batches. This was especially useful for households preparing multiple kinds of cookies for Christmas celebrations.
The name “Santa’s Whiskers” comes from the shredded coconut around the outside of the cookies. Its white, fluffy appearance resembles Santa Claus’s snowy beard and whiskers.
The red and green candied cherries add another festive touch, reflecting the traditional colors associated with Christmas decorations.
Over time, home bakers have created their own versions of the recipe. Some add chopped pecans or walnuts, others use almond extract, and some dip the finished cookies in chocolate for a richer dessert.
Despite these variations, the central idea remains the same: a buttery cookie with colorful fruit and a snowy coconut coating.
Today, Santa’s Whiskers Cookies are a charming choice for cookie exchanges, homemade holiday gifts, family gatherings, and Christmas dessert platters.
Formation and Texture of Santa’s Whiskers Cookies
The appearance and texture of these cookies depend on how the dough is prepared, shaped, chilled, and baked.
The buttery dough
Butter gives the cookies their rich flavor and tender texture. Sugar adds sweetness, while the egg binds the ingredients together. Flour provides structure, and a small amount of salt balances the sweetness.
When the ingredients are mixed correctly, the dough should be soft, smooth, and easy to shape.
The colorful cherry center
Finely chopped candied cherries create bright red and green flecks throughout each cookie.
Cutting the cherries into small, even pieces helps distribute their flavor and color more consistently. Larger pieces can make slicing more difficult or cause the dough to crumble around the fruit.
The snowy coconut exterior
Shredded coconut forms the decorative coating around the outside of each dough log.
When the log is sliced, the coconut creates a white border that frames the colorful cherry-studded center. This distinctive appearance is what makes Santa’s Whiskers Cookies recognizable on a Christmas dessert platter.
The finished texture
A well-made Santa’s Whiskers Cookie should be buttery, tender, and lightly crisp around the edges.
The center should hold together without becoming hard or dry, while the coconut adds a gentle texture and the cherries contribute little bursts of sweetness.
For the most attractive results, chill the dough thoroughly, use a sharp knife, and cut slices of uniform thickness.
Tips for Perfect Santa’s Whiskers Cookies
- Use properly softened butter. Butter that is too cold will not cream well, while melted butter can make the dough greasy.
- Measure flour accurately. Too much flour can make the dough dry and difficult to slice.
- Chop the cherries finely. Small pieces distribute more evenly and make cleaner slices.
- Chill the dough thoroughly. This is one of the most important steps for maintaining the cookies’ shape.
- Use a sharp knife. A clean blade helps prevent the dough from crumbling or dragging.
- Keep the slices uniform. Even thickness helps the cookies bake at the same rate.
- Avoid overbaking. The cookies should remain fairly pale, with only lightly golden edges.
- Allow them to cool properly. The cookies become firmer as they cool, so handle them gently while they are warm.
- Bake a test cookie if needed. If you are unsure about your oven temperature, bake one slice first and adjust the timing if necessary.
Delicious Variations
1. Almond Santa’s Whiskers Cookies
Replace half the vanilla extract with almond extract for a delicate nutty aroma.
Almond flavor pairs especially well with candied cherries and coconut, making this a wonderful variation for people who enjoy traditional bakery-style cookies.
2. Pecan Santa’s Whiskers Cookies
Add approximately 1/3 cup finely chopped pecans to the dough.
The pecans provide a gentle crunch and a rich, nutty flavor that complements the sweet cherries. Make sure the nuts are chopped finely enough that the dough remains easy to slice.
3. Extra-Festive Cherry Cookies
Use both red and green candied cherries for a colorful Christmas appearance.
For a slightly different flavor, replace some of the candied cherries with chopped dried cranberries. This creates a fruitier cookie with a more pronounced tartness.
4. Coconut-Lovers Cookies
If you love coconut, press a little extra shredded coconut onto the outside of the dough logs before wrapping and chilling them.
Sweetened coconut creates a sweeter coating, while unsweetened coconut offers a more pronounced coconut flavor.
5. Chocolate-Dipped Santa’s Whiskers Cookies
After the cookies have cooled completely, dip one edge of each cookie into melted semi-sweet chocolate.
Place the cookies on parchment paper until the chocolate sets. The combination of chocolate, coconut, and candied cherries creates a delicious alternative to the traditional version.
6. Cranberry and Orange Cookies
Replace the candied cherries with finely chopped dried cranberries and add 1 teaspoon of finely grated orange zest to the dough.
This variation has a bright citrus aroma and a pleasant balance of sweetness and tartness.
Serving Suggestions
Santa’s Whiskers Cookies are versatile enough to serve on many occasions throughout the holiday season.
They pair beautifully with:
- A warm cup of coffee or tea.
- Hot chocolate on a cold winter evening.
- A glass of milk for a classic Christmas treat.
- A platter of gingerbread cookies, shortbread, and sugar cookies.
- Vanilla ice cream for a simple dessert.
- Homemade Christmas sweets packaged in decorative gift boxes.
For a beautiful presentation, arrange the cookies on a white plate or a festive serving tray. The coconut coating and colorful cherry pieces will stand out, creating a cheerful holiday display.
These cookies also make thoughtful homemade gifts for neighbors, teachers, coworkers, friends, and family members.
Storage and Make-Ahead Instructions
Storing baked cookies
Allow the cookies to cool completely before storing them.
Place them in an airtight container and keep them at room temperature in a cool, dry place for approximately 5–7 days for best quality.
If stacking the cookies, place parchment paper between the layers to help protect their delicate edges and coconut coating.
Freezing baked cookies
Arrange the cooled cookies in a freezer-safe container, separating the layers with parchment paper.
Freeze for up to 2–3 months for best quality. When ready to serve, thaw them at room temperature while still in their container to help prevent condensation from forming directly on the cookies.
Freezing the dough
Santa’s Whiskers dough is particularly convenient for making ahead.
Shape the dough into logs, coat them with coconut, and wrap them tightly. Place the wrapped logs in a freezer-safe bag or container and freeze for up to 2 months for best quality.
Thaw the logs in the refrigerator until they are firm but sliceable. Cut into rounds and bake according to the recipe instructions.
Preparing the dough overnight
If you plan to bake the cookies the next day, prepare and shape the dough logs in the evening.
Wrap them tightly and refrigerate overnight. The following day, simply slice and bake them.
This is an excellent way to reduce stress when preparing desserts for a Christmas gathering.
Frequently Asked Questions
Can I make Santa’s Whiskers Cookies without candied cherries?
Yes. You can substitute finely chopped dried cranberries or another firm dried fruit. The cookies will still be delicious, although they will have a slightly different flavor and appearance.
Why is chilling the dough necessary?
Chilling firms the butter and makes the dough easier to slice. It also helps the cookies maintain their shape during baking and reduces excessive spreading.
Why does my dough crumble when I slice it?
The dough may be too cold, too dry, or insufficiently mixed. Let it rest at room temperature for a few minutes and use a sharp knife. If the dough contains too much flour, it may remain crumbly even after resting.
Why did my cookies spread too much?
The dough may have been too warm, the butter may have been too soft, or the logs may not have chilled long enough. Make sure the dough is firm before slicing and place the cookies on cool baking sheets.
Can I use unsweetened shredded coconut?
Yes. Unsweetened coconut works well if you prefer a less sweet coating. The coconut flavor will be more pronounced, and the finished cookies will have a slightly different sweetness level.
How do I know when the cookies are ready?
The edges should look set, and the bottoms should be lightly golden. The tops may remain pale. Let the cookies rest on the baking sheet for about 5 minutes before transferring them to a wire rack.
Can I make the dough without a mixer?
Yes. A sturdy wooden spoon and a little patience are enough. Make sure the butter is softened, cream it thoroughly with the sugar, and mix the remaining ingredients until the dough comes together.
Can I prepare the dough several days in advance?
Yes. The shaped dough logs can generally be refrigerated for 2–3 days when wrapped tightly. If you need to store them longer, freezing is a convenient option.
Conclusion
Santa’s Whiskers Cookies are a wonderful example of how simple ingredients can become a beautiful and memorable Christmas treat.
Their rich buttery flavor, delicate texture, sweet candied cherries, and snowy coconut coating make them a delightful addition to any holiday dessert table. The slice-and-bake method is convenient, the dough can be prepared in advance, and the finished cookies are easy to package for sharing.
Whether you bake them for a family gathering, a Christmas cookie exchange, a holiday party, or a homemade gift, these cookies bring a little extra charm to the season.
Take your time preparing the dough, chill it thoroughly, and enjoy the comforting process of homemade holiday baking. You may find that these colorful cookies become one of the recipes your family looks forward to every December.
For Santa’s Whiskers Cookie Lovers
If you love old-fashioned Christmas cookies, Santa’s Whiskers Cookies deserve a special place in your holiday recipe collection.
Every slice offers a delicate buttery center, colorful cherry pieces, and a snowy coconut border that makes the cookies look festive without requiring complicated decorating.
They are ideal for anyone who enjoys traditional baking, nostalgic flavors, and homemade desserts made with simple ingredients. Their cheerful appearance makes them especially appealing on Christmas cookie platters, while their delicious flavor ensures that guests will return for another.
The best part is that you do not need to bake everything in one day. Prepare the dough logs ahead of time, keep them chilled or frozen, and bake fresh cookies whenever you need a sweet treat.
Share them with friends, pack them into Christmas tins, or serve them with a warm drink while enjoying a quiet winter evening.
Santa’s Whiskers Cookies are more than just a dessert. They are a little reminder of the joy of Christmas baking, the warmth of family traditions, and the happiness that comes from sharing something homemade with the people you love.