
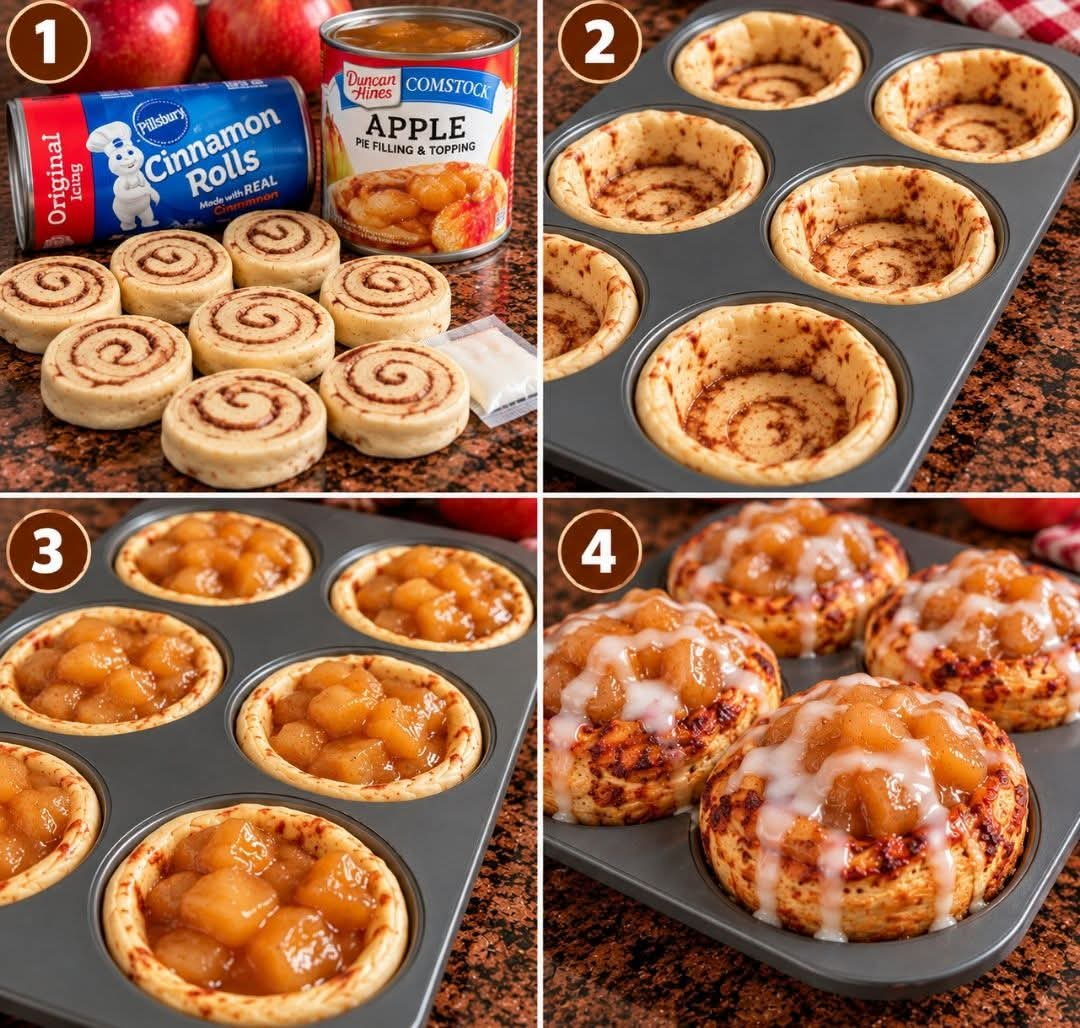
2-Ingredient Apple Pie Cups – The Easiest Fall Dessert Ever
Introduction
There is something truly special about the comforting taste of warm apples and cinnamon during the fall season. When the weather turns cooler and you begin craving homemade desserts, these 2-Ingredient Apple Pie Cups are the perfect solution. They are sweet, delicious, incredibly easy to prepare, and require only two main ingredients.
This recipe is ideal for busy weekdays, family gatherings, holiday celebrations, or those evenings when you want something homemade without spending hours in the kitchen. With convenient refrigerated biscuit dough and ready-made apple pie filling, you can create individual apple pie treats that taste as if you spent much more time preparing them.
The outside becomes beautifully golden and slightly crisp, while the inside stays soft, warm, and filled with sweet apple goodness. Each little cup delivers the familiar flavor of traditional apple pie in a simple, handheld dessert.
The best part is that you do not need complicated baking techniques, special equipment, or a long list of ingredients. These easy apple pie cups are proof that a wonderful dessert can come from the simplest ingredients.
Ingredients
Preparation: 10 minutes · Baking: 15–20 minutes · Total: approximately 30 minutes · Makes 8 cups

1. Refrigerated biscuit dough
– 1 can refrigerated biscuit dough, containing 8 biscuits.
This forms the soft, golden crust that holds the apple filling. Regular refrigerated biscuits work best for this easy version.

2. Apple pie filling
– 1 to 1½ cups prepared apple pie filling.
Choose a thick filling with tender apple pieces and a sweet cinnamon-spiced sauce. If the apple slices are very large, chop them into smaller pieces.
Optional ingredients for extra flavor
The recipe works with only two ingredients, but you can customize it with a few extras if desired.
- 1 teaspoon ground cinnamon
- 2 tablespoons melted butter
- 2 tablespoons brown sugar
- Caramel sauce for drizzling
- Powdered sugar for dusting
- Vanilla ice cream for serving
These additions are optional and are not necessary for the basic recipe.
Instructions
Step 1: Prepare the oven
Preheat your oven to 375°F (190°C). Lightly grease an 8-cup muffin pan with cooking spray or a little butter to prevent the dough from sticking.
If your biscuit dough package recommends a different baking temperature, follow the package directions and monitor the cups closely.
Step 2: Prepare the biscuit dough
Open the refrigerated biscuit dough and separate the eight biscuits.
Place each biscuit on a clean work surface. Using your fingers or the bottom of a small glass, gently flatten each biscuit into a round disc.
The dough should be wide enough to cover the bottom and sides of a muffin cup. Avoid making it too thin, because the dough needs enough thickness to hold the filling without tearing.
Step 3: Shape the apple pie cups
Place one flattened biscuit into each prepared muffin cup.
Gently press the dough against the bottom and sides, creating a small well in the center. Leave enough dough around the edges to form a little crust that will hold the apples.
Make sure there are no large holes in the bottom of the dough, as the filling could leak through during baking.
Step 4: Add the apple filling
Spoon approximately 2 to 3 tablespoons of apple pie filling into each biscuit cup, adjusting the amount to fit.
Do not overfill the cups. The apple filling may bubble as it heats, and leaving a little space at the top helps prevent spills.
For smaller, neater apple pieces, chop the filling before spooning it into the dough.
Step 5: Bake until golden
Place the muffin pan in the preheated oven and bake for approximately 15–20 minutes, or until the biscuit dough is cooked through and golden brown.
Baking time will depend on the thickness of the dough and your oven. If the centers still look doughy, continue baking for a few additional minutes.
The apple filling should be hot and bubbling gently, while the crust should look firm and lightly browned.
Step 6: Cool and remove
Remove the pan from the oven and allow the apple pie cups to cool for about 5–10 minutes.
Carefully loosen the edges with a small butter knife if necessary, then lift the cups out of the muffin pan.
Allowing them to rest helps the crust firm up and makes serving easier. Be careful, because the apple filling will be very hot immediately after baking.
Step 7: Add your favorite topping
Serve the cups plain for the simplest two-ingredient dessert.
For a more indulgent treat, drizzle them with caramel sauce, sprinkle them with cinnamon sugar, or add a small scoop of vanilla ice cream while they are still warm.
The contrast between the warm apple filling and cold ice cream makes these little desserts especially delicious.
Methods of Preparation
There are several ways to prepare these easy apple pie cups, depending on the texture and flavor you prefer.
Method 1: Classic oven-baked apple pie cups
This is the recommended method for the original recipe.
The biscuit dough bakes into a soft, golden crust, while the apple filling becomes warm and tender. The muffin pan helps the cups maintain their shape and makes it easy to prepare individual portions.
This method is especially useful when making dessert for family dinners, potlucks, or holiday gatherings.
Method 2: Cinnamon sugar apple pie cups
For a sweeter, bakery-style finish, brush the tops of the biscuit dough lightly with melted butter before baking.
Mix a little granulated sugar with ground cinnamon and sprinkle it over the exposed dough.
Bake as directed. The result is a fragrant, lightly sweetened crust that complements the apple filling beautifully.
This variation adds extra ingredients, but it keeps the preparation simple.
Method 3: Caramel apple pie cups
For a caramel-inspired version, prepare the cups using the original two ingredients.
After baking and cooling slightly, drizzle each cup with caramel sauce. You can also sprinkle a few chopped pecans on top for extra crunch.
The caramel enhances the natural sweetness of the apples and gives the dessert a flavor reminiscent of caramel apples and traditional apple pie.
Method 4: Apple pie cups with a crumble topping
If you enjoy desserts with a crunchy topping, mix 2 tablespoons of flour, 1 tablespoon of brown sugar, and 1 tablespoon of softened butter until small crumbs form.
Sprinkle a little crumble over each filled cup before baking.
Bake until the biscuit crust is cooked and the topping is lightly golden. This variation adds a pleasant contrast between the soft apples, tender dough, and crumbly topping.
The History of Apple Pie
Apple pie has a long history in European cooking, with early written recipes appearing in medieval England. Over time, apple pies evolved as cooks adapted pastry techniques, sweeteners, spices, and locally available apples.
When European settlers brought their culinary traditions to North America, apple pie became an increasingly familiar dessert. Apples were widely used in home kitchens because they could be stored, cooked, preserved, and incorporated into many different dishes.
Traditional apple pie usually involves preparing pastry, arranging apples with sugar and spices, and baking everything together. Although delicious, a classic pie can take time to assemble.
Modern home cooks have found easier ways to enjoy similar flavors. Canned pie fillings, refrigerated dough, muffin pans, and other convenience ingredients make it possible to prepare individual apple desserts with much less effort.
These 2-Ingredient Apple Pie Cups are a modern shortcut inspired by the familiar flavors of traditional apple pie. They are not a historical traditional recipe, but they carry the same comforting combination of tender apples and golden baked dough.
Formation and Texture
The secret to successful apple pie cups lies in how the dough and filling work together during baking.
The biscuit crust: Refrigerated biscuit dough contains flour, liquid, fat, and leavening ingredients. As it heats, the dough expands and develops a soft interior with a golden exterior.
The apple filling: Prepared apple pie filling contains cooked or partially cooked apples suspended in a sweet, thickened sauce. During baking, the filling becomes hot and releases a wonderful apple and cinnamon aroma.
The individual cup shape: The muffin pan supports the dough as it bakes, helping each portion develop a bottom and sides that hold the filling.
The final texture: When baked correctly, the crust is tender and golden, while the apples remain soft and juicy. Letting the cups rest briefly after baking helps them hold together when removed from the pan.
For the best result, avoid using excessively watery filling, and make sure the dough is fully baked underneath the apples.
Tips for Perfect Apple Pie Cups
- Do not overfill: Leave a little room at the top so the filling does not spill over.
- Cut large apples into smaller pieces: This makes the cups easier to fill and eat.
- Use a greased muffin pan: This helps prevent sticking and makes removal easier.
- Check the bottoms: The tops may brown before the dough underneath the filling is fully cooked.
- Allow a short cooling period: The cups become easier to handle after resting for several minutes.
- Customize the flavor: Cinnamon, nutmeg, caramel, or chopped nuts can make the dessert feel special.
- Serve warm: These cups are especially enjoyable while the crust is tender and the filling is warm.
Storage and Reheating
Store leftover apple pie cups in an airtight container in the refrigerator for up to 3–4 days.
To reheat, place them in an oven or toaster oven at 325°F (165°C) until warmed through. This helps restore some of the crust’s texture. A microwave also works for a quick reheat, although the dough may become softer.
For longer storage, freeze the completely cooled cups in a freezer-safe container for up to 2 months for best quality. Thaw them in the refrigerator before reheating.
Do not leave the finished cups at room temperature for more than 2 hours.
Serving Suggestions
These apple pie cups are versatile enough for many occasions.
- Breakfast treats: Serve one alongside coffee or tea for a sweet morning treat.
- After-dinner dessert: Add vanilla ice cream and caramel sauce.
- Fall gatherings: Arrange the cups on a platter for an easy seasonal dessert.
- Thanksgiving and Christmas: Serve them as individual alternatives to a full apple pie.
- Lunchbox treats: Once fully cooled and packed safely, they make a convenient sweet bite.
- Family movie nights: Serve them warm with whipped cream or a dusting of powdered sugar.
Because each cup is individually portioned, guests can easily take one without cutting and serving an entire pie.
Frequently Asked Questions
Can I really make apple pie cups with only two ingredients?
Yes. Refrigerated biscuit dough and prepared apple pie filling are all you need for the basic recipe. Butter, cinnamon, sugar, and toppings are optional.
Can I use homemade apple pie filling?
Absolutely. Homemade filling works well as long as it is thick enough to stay inside the dough cups. Let it cool slightly before adding it to the biscuits.
Can I use crescent roll dough instead of biscuit dough?
Yes. Crescent roll dough can be used, although the texture will be more delicate and flaky. Press the seams together if necessary, and check the baking time because it may differ from biscuit dough.
Can I prepare the cups ahead of time?
For the best texture, bake them shortly before serving. You can prepare the filling in advance and refrigerate it, then assemble and bake the cups when needed.
How do I prevent soggy bottoms?
Use thick apple filling, avoid overfilling, and bake until the biscuit dough is fully cooked. Let the cups rest briefly before removing them from the pan.
Can I make them without added sugar?
The basic recipe requires no additional sugar, but refrigerated dough and prepared apple pie filling may already contain sugar. Check the package labels if you are trying to reduce your sugar intake.
Conclusion
These 2-Ingredient Apple Pie Cups are a wonderful reminder that homemade desserts do not have to be complicated. With just refrigerated biscuit dough and apple pie filling, you can create eight little treats filled with the warm, familiar flavors of fall.
They are easy enough for beginners, convenient enough for busy families, and delicious enough to serve at a holiday gathering. Whether you enjoy them plain, topped with cinnamon sugar, or served warm with vanilla ice cream, these miniature apple desserts bring the comfort of apple pie to the table without all the work.
Once you try them, you may find yourself making them throughout the fall season and beyond. Keep a can of biscuit dough and a can of apple pie filling on hand, and you will always be close to a quick, comforting dessert.
For the Love of Easy Homemade Desserts
Some of the best recipes are the ones that bring people together without requiring hours of preparation. These apple pie cups are perfect for sharing with family, serving to unexpected guests, or making with children who want to help in the kitchen.
The sweet apple filling, soft golden crust, and simple preparation make this recipe a lovely addition to any home baker’s collection.
If you love easy fall desserts, this is one worth saving and sharing. Serve it warm, enjoy every bite, and make it your own with your favorite toppings.
Recipe lovers will appreciate how simple, affordable, and adaptable these little apple pie cups can be. Sometimes, two ingredients are all you need to create something everyone looks forward to eating.