
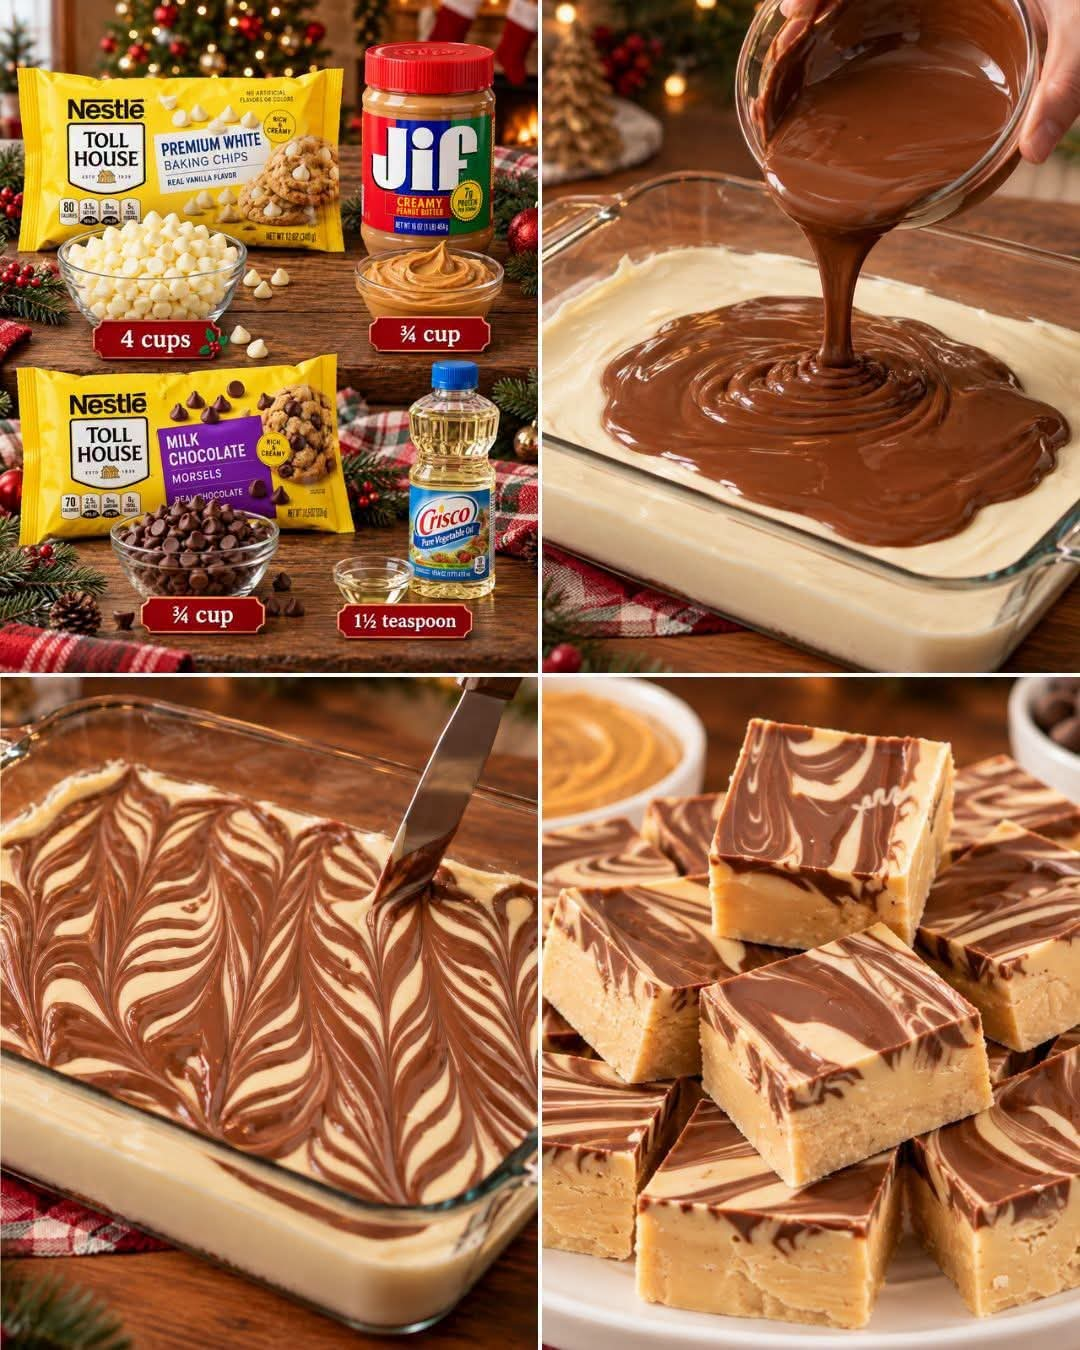
Tiger Butter Fudge – Foolproof 4-Ingredient Recipe in Just 5 Minutes
Introduction
If you love creamy peanut butter, smooth white chocolate, and rich milk chocolate, this Tiger Butter Fudge is the perfect homemade treat. With only four simple ingredients and about five minutes of preparation, you can create a beautiful marbled fudge that looks impressive and tastes absolutely delicious.
Tiger Butter Fudge gets its name from the striking swirls of dark chocolate running through a creamy peanut butter and white chocolate base. Every bite offers a wonderful combination of sweetness, nuttiness, and chocolate flavor.
This easy no-bake dessert is perfect for Christmas candy trays, holiday parties, bake sales, homemade gifts, family gatherings, or simply satisfying your sweet tooth. You don’t need a candy thermometer, complicated techniques, or hours in the kitchen. Just melt, swirl, chill, and slice!
Ingredients
Preparation time: 5 minutes Chilling time: 2 hours Total time: Approximately 2 hours and 5 minutes Yield: 25–36 small squares
For the Tiger Butter Fudge
- 4 cups white baking chips
- ¾ cup creamy peanut butter
- ¾ cup milk chocolate chips
- 1½ teaspoons vegetable oil
Optional Equipment
- An 8-by-8-inch or 9-by-9-inch square baking pan
- Parchment paper
- Two microwave-safe bowls
- A rubber spatula
- A butter knife or skewer for creating the swirls
Instructions
Step 1: Prepare the Baking Pan
Line an 8-by-8-inch square baking pan with parchment paper, leaving a little extra paper hanging over the sides. This makes it much easier to lift the finished fudge out of the pan.
Smooth the parchment paper into the corners and set the pan aside while you prepare the chocolate mixture.
Step 2: Melt the White Chocolate
Place the white baking chips in a large microwave-safe bowl.
Microwave them in 20- to 30-second intervals, stirring thoroughly after each interval. Continue until the chips are almost completely melted and the mixture is smooth.
Be careful not to overheat the white chocolate, as it can become thick or grainy. Stirring helps distribute the heat evenly.
Step 3: Add the Peanut Butter
Add the creamy peanut butter to the melted white baking chips.
Stir slowly until the peanut butter is completely incorporated and the mixture becomes smooth, creamy, and glossy.
The peanut butter gives the fudge its signature nutty flavor and helps create the soft, rich texture that makes Tiger Butter Fudge so irresistible.
Step 4: Melt the Milk Chocolate
Place the milk chocolate chips in a separate microwave-safe bowl.
Add the vegetable oil and stir to combine. Microwave in 20-second intervals, stirring after each interval, until the chocolate is smooth and melted.
The small amount of oil helps make the chocolate easier to drizzle and swirl.
Step 5: Pour the Peanut Butter Mixture
Pour the melted white chocolate and peanut butter mixture into the prepared baking pan.
Use a spatula to spread it evenly into the corners, creating a smooth surface.
Work while the mixture is still soft so that the chocolate can be swirled easily.
Step 6: Create the Tiger Stripes
Drizzle the melted milk chocolate over the peanut butter mixture in thin lines.
Using a butter knife or skewer, gently drag through the chocolate in curved lines, loops, and figure-eight patterns.
Avoid mixing too vigorously. The goal is to create beautiful contrasting ribbons of milk chocolate throughout the creamy peanut butter base.
This marbled pattern gives the fudge its distinctive tiger-like appearance.
Step 7: Chill Until Firm
Place the pan in the refrigerator for approximately 2 hours, or until the fudge is completely firm.
If your kitchen is warm, allow additional chilling time. The fudge should be firm enough to lift from the pan and cut into neat squares.
Step 8: Slice and Serve
Lift the chilled fudge out of the pan using the parchment paper.
Place it on a cutting board and use a sharp knife to cut it into small squares.
For cleaner slices, warm the knife under hot water, wipe it dry, and cut gently. Repeat as needed.
Arrange the pieces on a serving plate or store them in an airtight container until ready to enjoy.
Method of Preparation
The secret to successful Tiger Butter Fudge is combining melted white baking chips with creamy peanut butter before adding the contrasting milk chocolate.
The white chocolate mixture creates the main body of the fudge, while the milk chocolate forms the decorative tiger stripes. Gentle swirling keeps the two colors distinct and produces an attractive marbled finish.
Unlike traditional cooked fudge, this recipe does not require boiling sugar, monitoring temperatures, or beating the mixture to a particular stage. It relies on melted baking chips and refrigeration to create its firm texture.
For the smoothest results, use a microwave at reduced intervals, stir frequently, and avoid introducing water into either chocolate mixture.
The History of Tiger Butter Fudge
Tiger Butter Fudge is a popular homemade confection inspired by the classic combination of peanut butter and chocolate.
Although its exact origin is uncertain, the recipe fits into a long tradition of American homemade fudge and chocolate-peanut butter candies. Fudge became especially popular as a homemade sweet because it could be prepared in small batches and adapted with different flavors and toppings.
The tiger-stripe appearance distinguishes this version from ordinary chocolate fudge. Instead of blending everything into one uniform color, the contrasting chocolate is swirled across a lighter peanut butter base.
Modern versions often use white baking chips and microwave preparation, making the recipe faster and more accessible for busy families, holiday bakers, and anyone who wants homemade candy without complicated equipment.
Formation and Texture
The finished Tiger Butter Fudge should have three appealing qualities.
1. A creamy center: The white baking chips and peanut butter create a rich, smooth base with a sweet and nutty flavor.
2. Chocolate ribbons: The milk chocolate creates dark, attractive swirls that contrast with the pale peanut butter mixture.
3. A firm but tender bite: After chilling, the fudge should hold its shape while remaining easy to bite into.
For the best appearance, drizzle the milk chocolate evenly and use only a few gentle knife movements. Too much swirling can blend the colors together and hide the beautiful tiger-stripe effect.
Helpful Tips for Foolproof Fudge
- Choose good-quality baking chips. They make a difference in flavor and melting performance.
- Use creamy peanut butter. Natural peanut butter that separates heavily may produce a less predictable texture.
- Melt slowly. Chocolate can scorch if heated too quickly.
- Keep everything dry. Even a small amount of water can cause melted chocolate to seize.
- Don’t over-swirl. A few gentle strokes create the prettiest pattern.
- Chill thoroughly. Cutting the fudge before it has set can result in messy edges.
- Make clean cuts. A warm, dry knife helps produce neat squares.
Variations to Try
Crunchy Peanut Butter Tiger Fudge
Replace the creamy peanut butter with crunchy peanut butter for a little extra texture in every bite.
Dark Chocolate Tiger Fudge
Use dark chocolate chips instead of milk chocolate for a deeper, less sweet chocolate flavor.
Holiday Tiger Butter
Sprinkle a small amount of festive-colored sugar or finely chopped nuts over the top before chilling.
Extra Peanut Butter Flavor
For a stronger nutty taste, you can experiment with a slightly higher proportion of peanut butter, although this may change how firmly the fudge sets.
Tiger Butter Fudge Gift Boxes
Cut the fudge into small squares and arrange them in mini paper candy cups. Place them in a food-safe gift box for birthdays, holiday gatherings, or homemade Christmas presents.
How to Store Tiger Butter Fudge
Store the fudge in an airtight container in the refrigerator for approximately 2 weeks for the best quality.
Separate layers with parchment paper to prevent the pieces from sticking together.
For longer storage, freeze the fudge in a freezer-safe airtight container for up to 2 months. Thaw it in the refrigerator before serving to help preserve its texture.
Avoid leaving the fudge in a hot environment for extended periods, as it can soften and lose its shape.
Serving Suggestions
Tiger Butter Fudge is delicious served alongside coffee, tea, or a cold glass of milk. It also makes a wonderful addition to dessert platters, holiday cookie trays, afternoon snacks, and homemade candy assortments.
Because it is rich and sweet, small squares are usually enough to satisfy a chocolate craving.
Remember that this recipe contains peanuts and may contain milk or soy depending on the baking chips used. Keep it away from anyone with a relevant allergy.
Conclusion
Tiger Butter Fudge proves that homemade candy doesn’t have to be complicated. With four simple ingredients, five minutes of preparation, and a little patience while it chills, you can make a gorgeous treat with creamy peanut butter flavor and ribbons of smooth milk chocolate.
Whether you’re preparing a holiday dessert tray, creating edible gifts, or looking for an easy weekend treat, this foolproof recipe is one to keep close at hand.
Once you see those beautiful chocolate stripes and taste the creamy combination of peanut butter and white chocolate, you’ll understand why this classic homemade confection remains a favorite.
For the Love of Homemade Sweets
The best recipes are often the simplest ones. Tiger Butter Fudge brings together familiar pantry ingredients to create something that looks special without requiring hours of work.
Make a batch for your family, share a few squares with friends, or wrap some pieces for someone who loves chocolate and peanut butter. This easy fudge is a lovely reminder that a homemade treat can make an ordinary day feel special.
Have you ever made Tiger Butter Fudge? Share your favorite fudge flavor or let us know whether you prefer milk chocolate or dark chocolate in the swirls.