
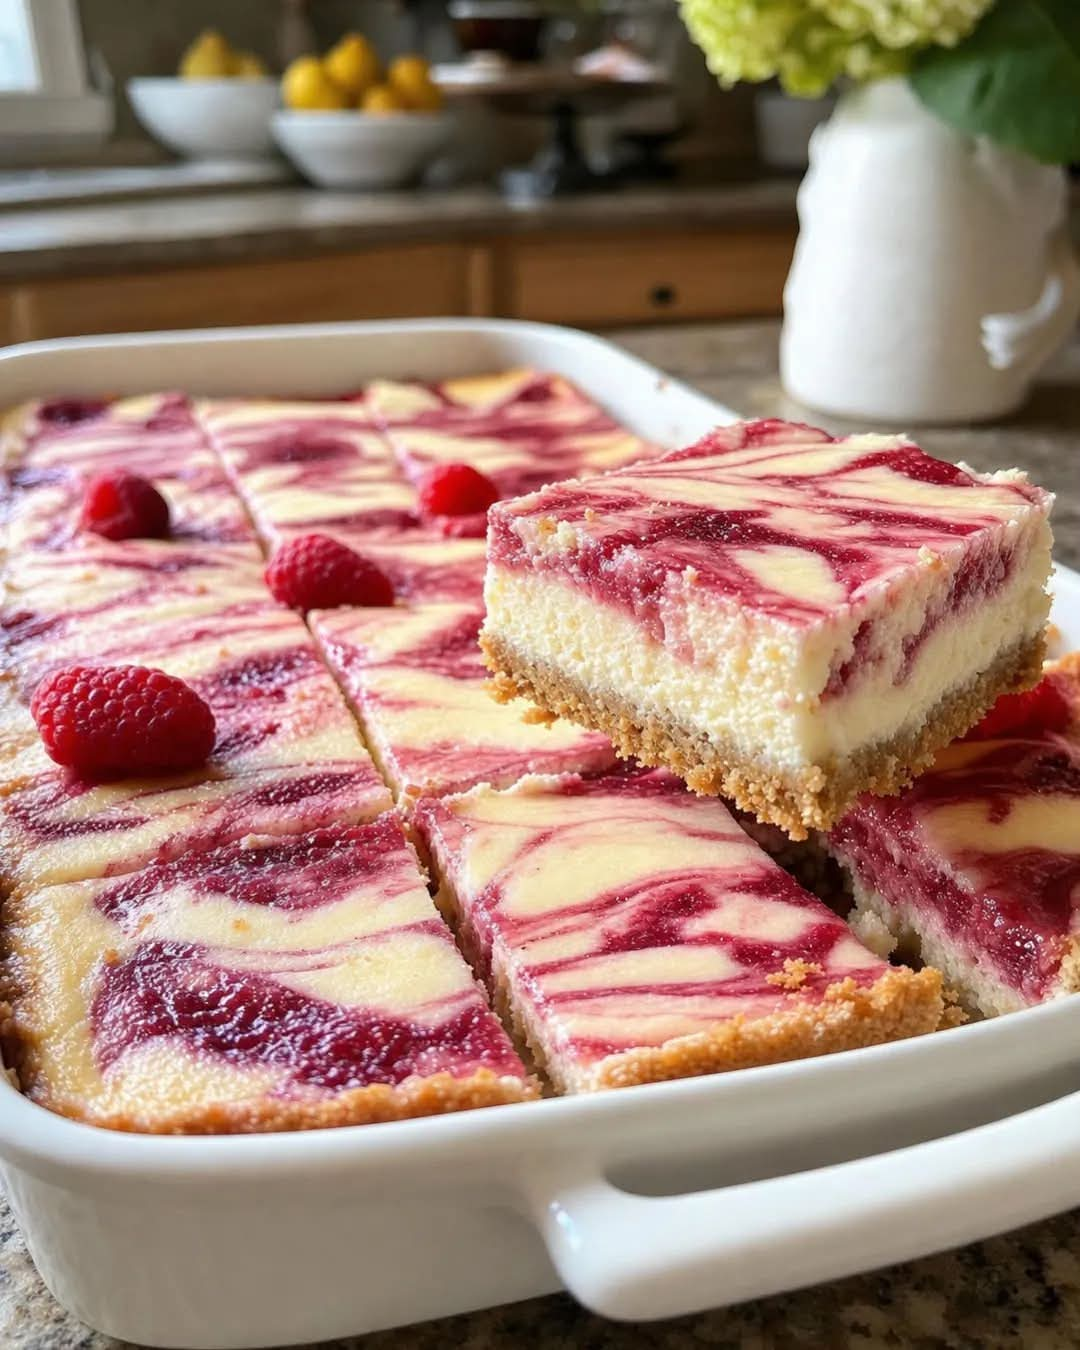
Raspberry Cheesecake Bars: The Creamy, Fruity Dessert That Disappears Before the Kettle Boils
Introduction
I brought a pan of raspberry cheesecake bars to our first neighborhood supper, thinking I would bring home a few leftovers for the next day’s coffee. Everyone enjoyed the meal, the conversation was wonderful, and the dessert table quickly became the center of attention. But these raspberry cheesecake bars were the real star of the evening.
They had a buttery graham cracker crust, a rich and creamy cheesecake filling, and a beautiful raspberry swirl that added just the right balance of sweetness and tartness. Every square looked like something from a little neighborhood bakery, and the combination of creamy cheesecake and juicy raspberries made them almost impossible to resist.
By the time the evening ended, I carried home a pan with just one lonely square remaining. My husband ate it while I washed the dishes. I hadn’t even put the kettle on yet.
That was when I knew this recipe deserved a permanent place in my dessert collection.
These raspberry cheesecake bars are perfect for family gatherings, neighborhood suppers, holiday celebrations, potlucks, birthdays, and quiet afternoons when you want something special with your coffee or tea. They have all the deliciousness of a traditional cheesecake but are easier to slice, serve, transport, and share.
Ingredients

This recipe makes approximately 16 bars.
For the buttery graham cracker crust
- 2 cups graham cracker crumbs
- 6 tablespoons unsalted butter, melted
- 3 tablespoons granulated sugar
- 1 pinch of salt
For the creamy cheesecake filling
- 16 ounces (450 g) cream cheese, softened to room temperature
- ¾ cup granulated sugar
- 2 large eggs, at room temperature
- ½ cup sour cream
- 1 teaspoon pure vanilla extract
- 1 tablespoon all-purpose flour
- 1 teaspoon fresh lemon juice
For the raspberry swirl
- 1 cup fresh or frozen raspberries
- 2 tablespoons granulated sugar
- 1 teaspoon lemon juice
- 1 teaspoon cornstarch
- 1 tablespoon water
Optional topping
- ½ cup fresh raspberries
- 2 tablespoons powdered sugar
- A little whipped cream for serving
Instructions
Step 1: Prepare the baking pan
Preheat your oven to 325°F (165°C).
Line an 8-inch or 9-inch square baking pan with parchment paper, leaving some overhang on the sides. This will make it much easier to lift the cheesecake out after chilling.
Lightly grease any exposed sides of the pan.
Step 2: Make the graham cracker crust
Place the graham cracker crumbs in a medium bowl. Add the melted butter, granulated sugar, and a pinch of salt.
Stir until the crumbs are evenly moistened and resemble damp sand.
Transfer the mixture to the prepared pan. Press it firmly and evenly across the bottom using the back of a spoon or the flat bottom of a measuring cup.
Bake for 8–10 minutes, until the crust is lightly fragrant and beginning to set.
Remove from the oven and allow it to cool slightly while preparing the filling.
Step 3: Prepare the raspberry sauce
Add the raspberries, sugar, lemon juice, cornstarch, and water to a small saucepan.
Cook over medium-low heat for approximately 5–8 minutes, stirring frequently and gently crushing the berries as they soften.
The raspberries will release their juices and form a thick, vibrant red sauce.
If you prefer a smooth swirl without seeds, press the sauce through a fine-mesh strainer. Otherwise, leave it as it is for a more rustic texture.
Allow the sauce to cool before adding it to the cheesecake filling.
Step 4: Make the cheesecake filling
Place the softened cream cheese in a large mixing bowl.
Beat on medium-low speed until smooth and creamy, scraping down the sides of the bowl as needed.
Add the granulated sugar and beat until fully incorporated.
Add the eggs one at a time, mixing on low speed after each addition. Avoid overbeating, as too much air can cause the cheesecake to puff up and crack while baking.
Mix in the sour cream, vanilla extract, lemon juice, and flour. Continue mixing just until the filling is smooth and uniform.
The finished mixture should be thick, silky, and free of large lumps.
Step 5: Assemble the raspberry cheesecake bars
Pour the cheesecake filling over the prepared crust and spread it evenly with a spatula.
Spoon small drops of the cooled raspberry sauce across the surface.
Using a toothpick or the tip of a butter knife, gently swirl the raspberry sauce through the filling. Create delicate curves and ribbons rather than mixing the sauce completely into the cheesecake.
This creates the beautiful raspberry pattern that makes each bar look special.
Reserve a little sauce if you would like to add extra raspberry flavor when serving.
Step 6: Bake until just set
Place the pan in the preheated oven and bake for approximately 30–40 minutes, depending on the pan size and your oven.
The edges should look set, while the center should retain a slight jiggle when the pan is moved gently.
Do not wait for the center to become completely firm in the oven. The cheesecake will continue to set as it cools.
Remove the pan from the oven and place it on a heat-safe surface.
Step 7: Cool the cheesecake
Allow the cheesecake bars to cool at room temperature for about an hour.
Avoid placing the hot pan directly into the refrigerator, as gradual cooling helps the cheesecake set more evenly.
Once cooled, cover the pan and refrigerate for at least 4 hours, preferably overnight.
This chilling step is essential for clean slices and a firm, creamy texture.
Step 8: Slice and serve
Lift the chilled cheesecake out of the pan using the parchment paper.
Place it on a cutting board and slice into 16 squares with a sharp knife. For especially neat edges, wipe the knife clean between cuts.
Garnish with fresh raspberries or a light dusting of powdered sugar if desired.
Arrange the bars on a serving platter and watch how quickly they disappear.
Methods for Perfect Raspberry Cheesecake Bars

1. The crust method
Press the crumbs firmly and evenly into the pan. A compact crust is less likely to crumble when you lift and slice the chilled bars.

2. The creamy filling method
Use room-temperature cream cheese and eggs. Mix gently and scrape the bowl frequently to prevent lumps without adding too much air.

3. The raspberry swirl method
Cool the raspberry sauce before using it. Add small spoonfuls and swirl lightly for a pretty marbled appearance.

4. The chilling method
Refrigerate the bars thoroughly before slicing. Cold cheesecake holds its shape and delivers the smooth, dense texture that makes these bars so satisfying.
The History of Cheesecake and Raspberry Desserts
Cheesecake has a long culinary history. Ancient Greek food traditions included preparations made with cheese, honey, and other simple ingredients. Over many centuries, cheesecake evolved across Europe, with different regions developing their own versions.
Modern American cheesecake became especially associated with cream cheese, which gives the dessert its characteristic richness and smooth texture. Graham cracker crusts also became a popular foundation for American cheesecakes, offering a convenient alternative to pastry crusts.
Raspberries have long been enjoyed in preserves, sauces, pies, tarts, and other desserts. Their natural tartness complements the sweetness and richness of dairy-based fillings.
Raspberry cheesecake bars combine these familiar traditions into a convenient dessert. Unlike a full round cheesecake, bars can be baked in a square pan and divided into individual portions. That makes them particularly practical for parties, bake sales, family dinners, and neighborhood gatherings.
This particular recipe is a homemade-style variation inspired by classic cheesecake and fruit-swirl desserts rather than a claim to one specific historical origin.
Formation: How the Layers Work Together
The beauty of these bars comes from the way each layer contributes a different texture and flavor.
The bottom layer: Buttery crust
The graham cracker crumbs absorb the melted butter, allowing the mixture to hold together after baking and chilling. The slight crunch provides a contrast to the soft filling.
The middle layer: Creamy cheesecake
Cream cheese creates the rich foundation. Eggs help the filling set during baking, while sour cream adds a gentle tang and contributes to its smooth texture. Vanilla rounds out the flavor, and lemon juice brightens the overall taste.
The top layer: Raspberry ribbons
The raspberry sauce supplies a fruity, slightly tart contrast to the sweet filling. Its vibrant color creates a marbled pattern that makes the bars attractive without requiring elaborate decoration.
The final result
After chilling, the crust becomes firm, the filling turns dense and creamy, and the raspberry swirl settles into the cheesecake. Every bite combines buttery crumbs, smooth cheesecake, and bright berry flavor.
Tips, Variations, and Storage
Helpful baking tips
- Use full-fat block cream cheese for the richest texture.
- Make sure the raspberry sauce is cool before swirling it into the filling.
- Avoid overbaking; a slight wobble in the center is normal.
- Chill the bars thoroughly before cutting.
- For clean slices, use a long, sharp knife warmed in hot water and wiped dry between cuts.
Delicious variations
Mixed berry cheesecake bars: Replace half the raspberries with blueberries or blackberries.
Lemon raspberry cheesecake bars: Add a teaspoon of finely grated lemon zest to the filling.
Chocolate raspberry cheesecake bars: Sprinkle a small handful of mini chocolate chips over the crust before adding the filling.
Gluten-free version: Use certified gluten-free graham-style crumbs and a gluten-free flour alternative suitable for baking.
Extra-fruity version: Serve each square with a spoonful of fresh raspberry sauce and a few whole berries.
Storage instructions
- Refrigerator: Store in an airtight container for up to 5 days.
- Freezer: Freeze individual bars, wrapped well, for up to 2 months for best quality.
- Thawing: Thaw frozen bars overnight in the refrigerator.
- Serving: Keep the bars refrigerated until serving time, especially in warm weather.
Serving Suggestions
These raspberry cheesecake bars are versatile enough for almost any occasion.
Serve them after Sunday dinner with coffee, arrange them on a holiday dessert platter, bring them to a neighborhood supper, or package a few squares in a container for friends.
For an elegant presentation, place each bar in a paper baking cup and garnish with a fresh raspberry. For a casual family dessert, simply arrange the squares on a plate and let everyone help themselves.
They also pair beautifully with plain black tea, freshly brewed coffee, or a glass of cold milk.
Conclusion
Some desserts become family favorites because they are beautiful. Others become favorites because they are easy to make. Raspberry cheesecake bars manage to be both.
The buttery crust, velvety filling, and bright raspberry swirl create a dessert that tastes as though it took hours of complicated work, even though the preparation is straightforward.
They are easy to transport, simple to serve, and just right for sharing with the people around your table.
And if you happen to bring them to a neighborhood supper, you might want to save yourself a square before putting the pan down. You never know when someone at home might decide that the last piece is too tempting to wait for the kettle.
For the Love of Homemade Desserts
The best recipes are often the ones that bring people together. A pan of cheesecake bars can turn an ordinary supper into a special occasion, encourage neighbors to share stories, and give family members something delicious to look forward to.
These raspberry cheesecake bars are made for those little moments: the first bite after dinner, the last square shared at the kitchen counter, and the request for the recipe before everyone leaves.
Bake a batch, let it chill, and share it with the people you love. Just remember to put aside your own piece before serving.
Recipe at a glance
- Preparation time: 25 minutes
- Baking time: 30–40 minutes
- Cooling and chilling time: About 5 hours or longer
- Total time: Approximately 6 hours
- Yield: 16 bars
- Difficulty: Moderate
- Best feature: Creamy cheesecake with a buttery crust and a sweet-tart raspberry swirl
The only real problem with these bars is that one pan may not be enough.