
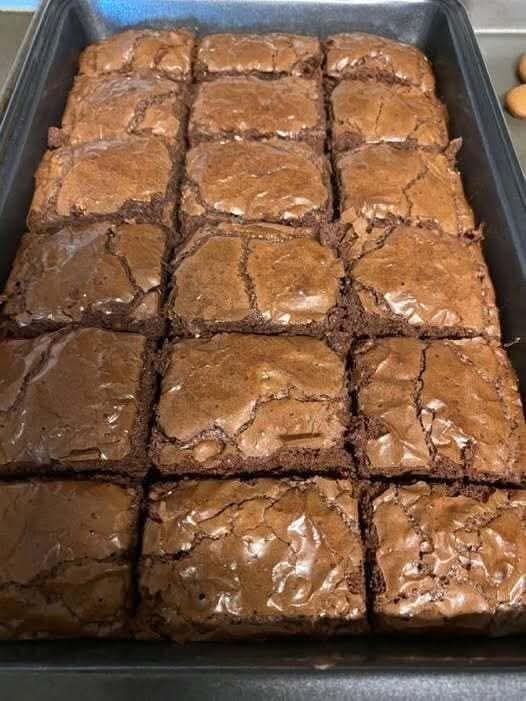
Homemade Fudge Brownies
🍫 Homemade Fudge Brownies
Rich, Gooey, Chocolatey & Completely Irresistible
❤️ Introduction
There is something wonderfully comforting about a homemade brownie. The moment you pull a pan of warm brownies from the oven, the aroma of butter and deep chocolate fills the kitchen, and every bite delivers that perfect combination of a slightly crisp top and a rich, fudgy center.
These Homemade Fudge Brownies are designed for chocolate lovers who want brownies that are dense, moist, gooey, and intensely chocolatey rather than cakey. They are simple enough for a weekday treat but special enough for birthdays, dinner parties, holidays, bake sales, or a cozy weekend dessert.
Serve them warm with a scoop of vanilla ice cream, dust them with powdered sugar, or enjoy them exactly as they are—with a cold glass of milk. 🥛🍫
🛒 Ingredients
For the Brownies
- 1 cup (226 g) unsalted butter
- 2 cups (400 g) granulated sugar
- 4 large eggs, room temperature
- 2 teaspoons vanilla extract
- 1 cup (125 g) all-purpose flour
- 1 cup (85–90 g) unsweetened cocoa powder
- 1/2 teaspoon salt
- 1 teaspoon espresso powder, optional
- 1 cup (170 g) semisweet or dark chocolate chips
- 1/2 cup (85 g) chopped chocolate or chocolate chunks
Optional Toppings
- Flaky sea salt
- Extra chocolate chips
- Chopped walnuts or pecans
- Powdered sugar
- Chocolate drizzle
- Vanilla ice cream
🍫 Instructions
Step 1: Prepare the Pan
Preheat your oven to 175°C / 350°F.
Line a 9 × 13-inch baking pan with parchment paper, leaving some paper hanging over the sides. Lightly grease the parchment.
The parchment makes it much easier to lift the entire brownie slab from the pan after baking.
Step 2: Melt the Butter and Chocolate
Place the butter in a saucepan over low heat and allow it to melt gently.
Remove the saucepan from the heat and add the chocolate chips and chopped chocolate.
Stir until the chocolate melts into the warm butter and becomes smooth and glossy.
Allow the mixture to cool slightly.
💡 Important Method
Don’t add the eggs immediately while the butter mixture is extremely hot. Let it cool for a few minutes so the eggs don’t begin to cook when they are added.
Step 3: Add the Sugar
Pour the melted butter and chocolate mixture into a large mixing bowl.
Add the granulated sugar and whisk thoroughly.
This step helps create that beautiful shiny brownie crust while keeping the interior dense and fudgy.
Step 4: Add the Eggs and Vanilla
Add the eggs one at a time, whisking well after each addition.
Add the vanilla extract.
Continue whisking for about 1–2 minutes, until the mixture becomes smooth, thick, and glossy.
Don’t skip this step—the way the eggs and sugar are incorporated contributes to the texture of the finished brownies.
Step 5: Mix the Dry Ingredients
In another bowl, whisk together:
- Flour
- Cocoa powder
- Salt
- Espresso powder, if using
Sifting the cocoa powder and flour is especially helpful because cocoa powder can contain small lumps.
Step 6: Combine Wet and Dry Ingredients
Gradually add the dry ingredients to the chocolate mixture.
Using a spatula, gently fold everything together until you no longer see streaks of flour.
⚠️ Don’t Overmix
Once the flour disappears, stop mixing.
Overmixing develops gluten and can make your brownies more cakey or chewy instead of soft and fudgy.
Step 7: Add Extra Chocolate
Fold in the remaining chocolate chunks or chocolate chips.
For an extra indulgent brownie, sprinkle a few additional chocolate chips over the top of the batter.
You can also add:
- Walnuts
- Pecans
- Hazelnuts
- Peanut butter chips
- White chocolate chunks
Step 8: Fill the Pan
Pour the brownie batter into the prepared pan.
Spread it evenly using a spatula.
Gently tap the pan on the counter once or twice to remove large air pockets.
For a beautiful bakery-style finish, sprinkle a small amount of flaky sea salt over the top.
Step 9: Bake
Place the pan in the preheated oven.
Bake for approximately 25–32 minutes, depending on your oven and how fudgy you want the brownies.
For Fudgy Brownies
Look for:
- A set, shiny top
- Slightly firm edges
- A center that still looks soft
- A toothpick that comes out with moist crumbs, rather than completely clean
❤️ The Secret
Do not wait for the toothpick to come out completely clean.
A completely clean toothpick usually means the brownies have been baked longer and may become cakier or drier.
Step 10: Cool Completely
Remove the brownies from the oven and place the pan on a cooling rack.
Allow them to cool for at least 30–60 minutes before slicing.
For exceptionally clean, dense slices, refrigerate the brownies for about an hour before cutting.
Use the parchment paper to lift the brownie slab from the pan.
🔪 Step 11: Slice
Use a sharp knife to cut the brownies into squares.
For cleaner cuts, wipe the knife between slices.
You can make:
- 12 large brownies
- 16 medium brownies
- 24 small brownie bites
✨ Formation & Texture
The beauty of these brownies comes from the balance of their ingredients.
🧈 Butter
Butter provides richness, moisture, and a luxurious mouthfeel.
🍫 Chocolate
Melted chocolate gives the brownies a deep chocolate flavor and contributes to their fudgy texture.
🍫 Cocoa Powder
Cocoa powder intensifies the chocolate flavor without adding extra liquid.
🥚 Eggs
Eggs help bind everything together and provide structure.
🍚 Sugar
Sugar contributes sweetness while also helping create the shiny, delicate crust.
🌾 Flour
A moderate amount of flour gives the brownies enough structure without turning them into cake.
🕰️ A Little History of Brownies
Brownies are an American dessert that emerged around the turn of the 20th century.
Their exact origin is debated, but early brownie recipes appeared in American cookbooks in the late 19th and early 20th centuries.
One of the most famous early associations is with the 1893 World’s Columbian Exposition in Chicago, where a chocolate dessert called a brownie is traditionally linked to the event.
Over time, brownies evolved into many different styles.
Some are:
- Dense and fudgy
- Soft and chewy
- Light and cakey
- Filled with nuts
- Swirled with peanut butter
- Layered with caramel
- Topped with frosting
But the classic chocolate brownie remains one of the world’s favorite homemade desserts.
👩🍳 Baker’s Methods & Secrets
Secret #1: Use Good Chocolate
The better the chocolate, the better the brownie.
Dark chocolate or semisweet chocolate works beautifully.
Secret #2: Don’t Overbake
This is probably the most important secret.
Brownies continue to firm up as they cool, so removing them while the center is still slightly soft gives you that wonderful fudgy texture.
Secret #3: Let Them Rest
Freshly baked brownies can seem too soft when they’re hot.
Give them time to cool.
The center will become richer, thicker, and easier to slice.
Secret #4: Add Espresso Powder
You won’t necessarily taste coffee.
Instead, a small amount of espresso powder can make the chocolate taste deeper and more intense.
Secret #5: Add Flaky Salt
A tiny sprinkle of flaky sea salt on top balances the sweetness and makes the chocolate flavor stand out.
🍦 Serving Ideas
These brownies are delicious by themselves, but you can turn them into an unforgettable dessert.
🍨 Brownie à la Mode
Warm a brownie slightly and top it with vanilla ice cream.
Add chocolate sauce and chopped nuts.
🍓 Chocolate & Berry Brownies
Serve with fresh strawberries, raspberries, or cherries.
🥜 Peanut Butter Brownies
Swirl creamy peanut butter into the batter before baking.
🍫 Triple Chocolate Brownies
Use cocoa powder, melted chocolate, and chocolate chips.
🍯 Caramel Brownies
Drizzle caramel sauce over the baked brownies before serving.
❤️ For Brownie Lovers
If you’re a true chocolate lover, these brownies can easily become your favorite homemade dessert.
For an even richer experience, serve them slightly warm with:
A scoop of vanilla ice cream + warm chocolate sauce + a pinch of flaky sea salt.
The contrast between the warm, gooey brownie and cold, creamy ice cream is absolutely irresistible.
🧊 Storage
Room Temperature
Store cooled brownies in an airtight container for up to 3–4 days.
Refrigerator
For a firmer, extra-fudgy texture, refrigerate them in an airtight container.
Freezer
Wrap individual brownies tightly and freeze for up to 2–3 months.
To serve, allow them to thaw at room temperature or warm them gently in the microwave.
🌟 Conclusion
Homemade Fudge Brownies prove that you don’t need complicated ingredients or fancy equipment to create an incredible dessert.
With melted butter, chocolate, cocoa powder, eggs, sugar, and flour, you can create brownies that are rich, glossy, fudgy, gooey, and packed with chocolate flavor.
The key is simple: use quality chocolate, don’t overmix the batter, and most importantly, don’t overbake them.
Cut yourself a square while they’re still slightly warm, add a scoop of vanilla ice cream if you like, and enjoy every chocolate-filled bite. 🍫❤️
🍫 Final Baker’s Tip
For the ultimate fudgy brownie, slightly underbake rather than overbake. The brownies will continue setting as they cool, leaving you with that soft, gooey center everyone loves.
❤️ Made for Chocolate Lovers
Save this recipe, share it with another brownie lover, and make a batch whenever you need a little homemade chocolate happiness.
One bite, and you’ll understand why classic fudge brownies never go out of style! 🍫🤎