
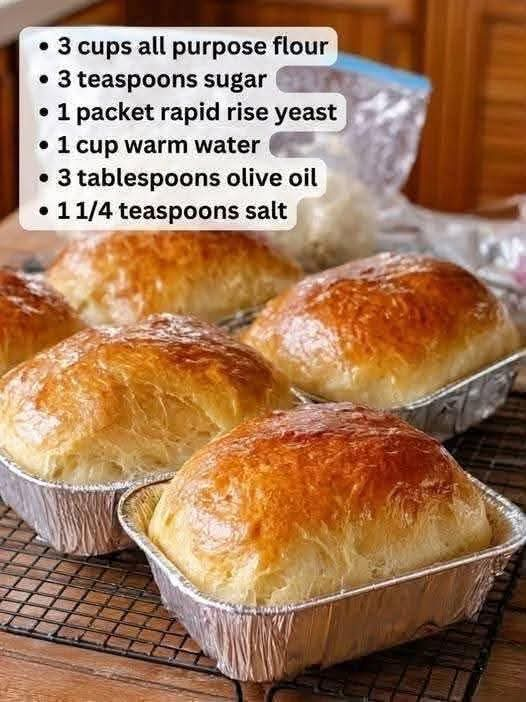
Bread in a Bag
Introduction
Bread in a Bag is a simple, fun, and practical way to make homemade bread with very little mess. The dough is mixed and kneaded directly inside a large food-safe plastic bag, making this recipe especially convenient for beginners, families, and anyone who wants fresh bread without covering the kitchen in flour.
The finished loaf is soft inside, lightly golden outside, and wonderfully fragrant. Although the method is unconventional, the basic bread-making principles remain the same: yeast fermentation develops flavor and helps the dough rise, while kneading develops gluten and gives the loaf its structure.
This recipe is particularly enjoyable because you can feel the dough developing through the bag without needing a stand mixer or complicated equipment.
Ingredients
For the Bread
- 3 cups all-purpose flour
- 3 teaspoons granulated sugar
- 1 packet rapid-rise yeast, approximately 7 g
- 1 cup warm water, about 110°F (43°C)
- 3 tablespoons olive oil
- 1 teaspoon salt
For Preparing the Pan
- A little olive oil or butter for greasing
- A small amount of flour, if needed
Optional Additions
For a different flavor, you can add:
- 1 teaspoon garlic powder
- 1 teaspoon dried Italian herbs
- 1 tablespoon grated Parmesan cheese
- 1 tablespoon sesame seeds
- 1 tablespoon poppy seeds
- 1 tablespoon chopped fresh herbs
- A little shredded cheese
Equipment
- One large, sturdy food-safe resealable plastic bag
- Measuring cups and spoons
- Large loaf pan
- Small bowl
- Kitchen towel
- Wire cooling rack
- Pastry brush, optional
Method
Step 1: Prepare the Yeast Mixture
Pour the warm water into a small bowl. The water should feel warm but not hot, ideally around 110°F (43°C).
Add the sugar and rapid-rise yeast. Stir gently and let the mixture stand for about 5 minutes.
With rapid-rise yeast, this resting step is optional, but it can help ensure that the yeast is active before you begin.
Do not use very hot water. Excessive heat can damage the yeast and prevent the bread from rising properly.
Step 2: Fill the Bag
Open a large food-safe resealable plastic bag and place it in a bowl or measuring jug to keep it stable.
Add the flour and salt to the bag.
Seal the bag temporarily and shake it gently to distribute the dry ingredients.
Step 3: Add the Wet Ingredients
Open the bag and pour in the yeast mixture.
Add the olive oil.
Press out some of the excess air and seal the bag securely.
Make sure the bag is strong enough to withstand kneading. If the bag feels thin or fragile, place it inside a second food-safe bag.
Step 4: Mix the Dough
Gently squeeze and massage the outside of the bag to combine the ingredients.
Continue mixing until the flour is incorporated and a rough dough begins to form.
At first, the dough may look sticky and uneven. Keep working it rather than immediately adding large amounts of flour.
Step 5: Knead Inside the Bag
Continue squeezing, folding, and pressing the dough through the bag for approximately 8 to 10 minutes.
The goal is to develop gluten, which gives the bread its structure.
As you knead, the dough should gradually become smoother, softer, and more elastic.
If the dough is extremely sticky, add flour one tablespoon at a time. Avoid adding too much flour because an overly dry dough can produce a heavy loaf.
If the dough seems too dry or crumbly, add a teaspoon of warm water at a time until it becomes soft and workable.
Step 6: First Rise
Once the dough is smooth and elastic, leave it inside the sealed bag.
Place the bag in a warm, draft-free area.
Allow the dough to rise for approximately 60 to 90 minutes, or until it has roughly doubled in size.
The exact rising time depends on the temperature of your kitchen. A warmer environment will generally make the dough rise faster.
Step 7: Shape the Dough
Grease a loaf pan lightly with olive oil or butter.
Open the bag and gently remove the risen dough.
Place it on a lightly floured surface.
Press the dough gently to remove some of the larger air bubbles.
Shape it into a loaf by folding the dough inward and rolling it into a smooth log.
Place the shaped dough into the prepared loaf pan with the seam facing downward.
Step 8: Second Rise
Cover the loaf loosely with a clean kitchen towel.
Allow it to rise for another 30 to 45 minutes.
The dough should become noticeably puffy and should rise toward or slightly above the rim of the loaf pan.
Avoid allowing it to overproof, because an excessively risen loaf can collapse during baking.
Step 9: Prepare the Oven
Preheat the oven to 375°F (190°C).
Allow the oven to become fully heated before putting the bread inside.
For a slightly more attractive crust, brush the top of the dough lightly with olive oil before baking.
You can also sprinkle the top with sesame seeds, poppy seeds, or herbs.
Step 10: Bake
Place the loaf in the center of the preheated oven.
Bake for approximately 25 to 35 minutes.
The bread should become golden brown on top and should sound hollow when gently tapped.
If the top begins browning too quickly, loosely cover it with aluminum foil during the final portion of baking.
Step 11: Cool
Remove the bread from the oven and allow it to rest in the pan for approximately 5 to 10 minutes.
Carefully remove the loaf from the pan and transfer it to a wire rack.
Allow it to cool for at least 30 minutes before slicing.
Cutting bread while it is extremely hot can compress the soft interior and make the slices seem gummy.
Formation of the Bread
The formation of Bread in a Bag follows the same fundamental process as traditional yeast bread.
First, the flour provides gluten-forming proteins. When water is added and the dough is kneaded, these proteins begin forming a gluten network.
The yeast then consumes available sugars and produces carbon dioxide. The gluten network traps this gas, causing the dough to expand and rise.
During baking, the dough undergoes several important changes. The yeast becomes inactive as the temperature rises, the gluten structure sets, and the starches gelatinize. The surface develops its golden color and appealing aroma through browning reactions.
The result is a loaf with a tender crumb and a pleasantly crisp exterior.
History and Background
Homemade bread has been prepared for thousands of years, long before modern kitchens, electric mixers, and packaged yeast existed. Early bread makers relied on naturally occurring yeast and simple methods of mixing, fermenting, shaping, and baking dough.
Modern bread-making became much easier with commercially produced yeast, standardized flour, ovens, and convenient kitchen equipment.
Bread in a Bag is best understood as a modern convenience technique rather than a specific historic style of bread. The idea is to reduce cleanup by allowing the dough to be mixed and kneaded inside a sealed food-safe bag.
This approach became popular as an accessible family and beginner-friendly bread-making activity because it makes the process less intimidating and minimizes direct contact with sticky dough.
Tips for Successful Bread
Use the Correct Water Temperature
Water that is too hot can harm the yeast. Aim for approximately 110°F (43°C).
Measure Flour Carefully
Too much flour can make the bread dense and dry. If possible, measure flour by weight. The 3 cups in this recipe are approximately 360 g, depending on how the flour is measured.
Do Not Rush the Rise
The dough needs enough time to ferment and develop its structure. If your kitchen is cool, the first rise may take longer than an hour.
Avoid Excess Flour
A slightly soft dough generally produces a softer loaf. Add flour gradually rather than trying to make the dough completely dry.
Give the Bread Time to Cool
Cooling allows the crumb to finish setting and makes the bread easier to slice.
Serving Suggestions
Bread in a Bag is delicious served warm with butter, but it can also be used for:
- Breakfast toast
- Sandwiches
- Grilled cheese
- French toast
- Garlic bread
- Toasted bread with eggs
- Soup and stew
- Bruschetta
- Bread and butter
- Deli-style sandwiches
For a sweet variation, add a little cinnamon and raisins to the dough.
For a savory version, add garlic, herbs, Parmesan, or grated cheese.
Storage
Once completely cooled, store the bread in an airtight container or bread bag at room temperature for up to a few days.
For longer storage, slice the loaf and freeze the slices in a well-sealed freezer bag.
Frozen slices can be toasted directly from the freezer, making them convenient for quick breakfasts and sandwiches.
Conclusion
Bread in a Bag is an excellent introduction to homemade bread because it simplifies one of the most important parts of bread-making: handling the dough.
The method requires only a handful of basic ingredients and avoids much of the mess associated with traditional kneading. More importantly, it teaches the essential principles of yeast bread: proper hydration, gluten development, fermentation, shaping, proofing, and baking.
The finished loaf is soft, fragrant, satisfying, and versatile enough for breakfast, lunch, dinner, or a simple snack.
For Bread Lovers
For anyone who loves homemade bread, this recipe is a wonderful starting point. Once you become comfortable with the basic dough, you can experiment with different flours, herbs, cheeses, seeds, spices, and toppings.
Bread lovers can also turn this basic dough into dinner rolls, small sandwich loaves, herb bread, garlic bread, or rustic rolls.
The best part is that homemade bread does not need to be complicated. A little patience, good ingredients, and careful attention to the dough can produce a beautiful loaf right in your own kitchen.
Final Method at a Glance
- Combine warm water, sugar, and yeast.
- Place flour and salt in a large food-safe bag.
- Add the yeast mixture and olive oil.
- Seal the bag and mix the ingredients.
- Knead the dough inside the bag for 8 to 10 minutes.
- Let the dough rise for 60 to 90 minutes.
- Shape the dough and place it in a greased loaf pan.
- Let it rise again for 30 to 45 minutes.
- Bake at 375°F (190°C) for 25 to 35 minutes.
- Cool on a wire rack before slicing.
- Serve with butter, use for sandwiches, or enjoy toasted.
This simple method turns basic pantry ingredients into a comforting homemade loaf with minimal cleanup and plenty of opportunities for customization.