
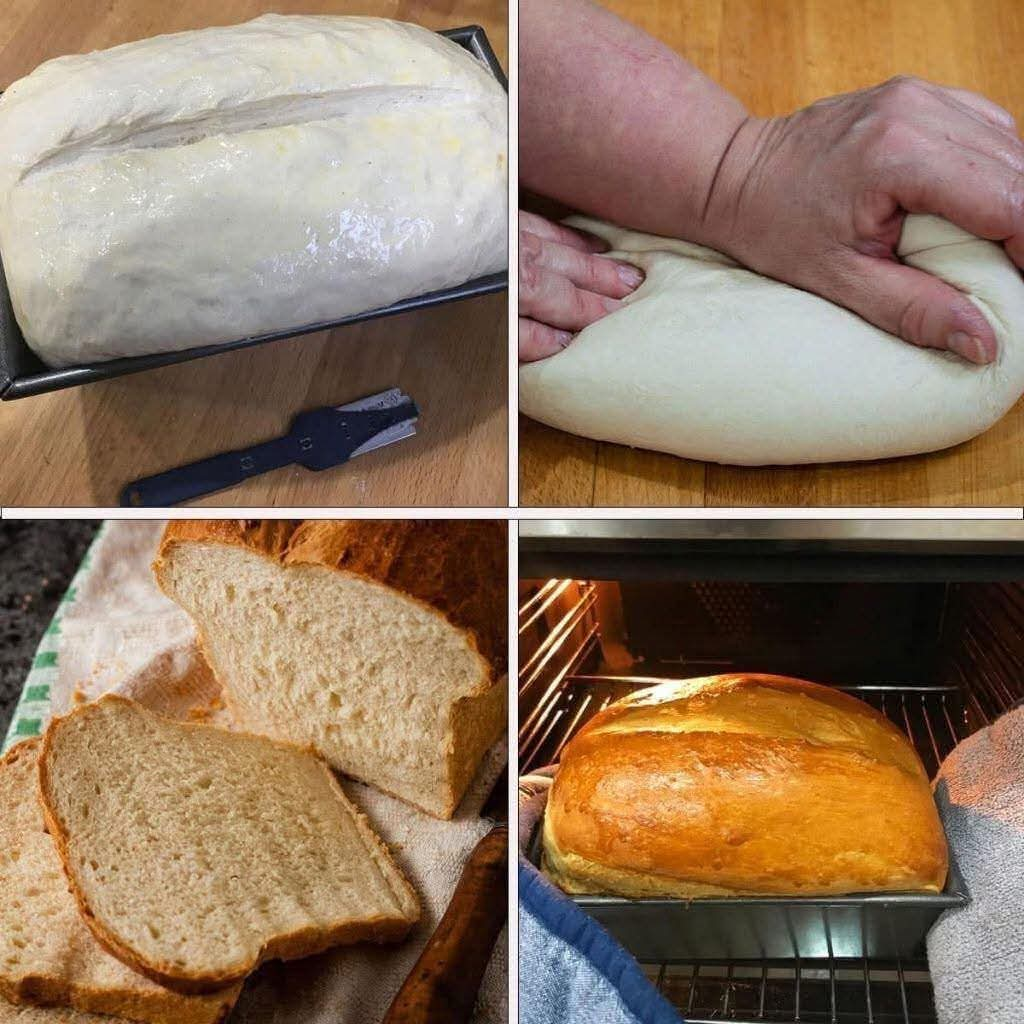
Foolproof Homemade Bread
Introduction
There is something wonderfully comforting about a loaf of homemade bread. The smell of yeast, warm milk, and freshly baked dough filling the kitchen is enough to make an ordinary day feel special. This simple homemade bread recipe produces a soft, tender interior with a lightly golden crust and a rich, buttery flavor.
The dough is made with everyday ingredients and does not require complicated equipment or advanced baking skills. Once you learn the basic method, you can make this bread regularly for sandwiches, toast, breakfast, dinner, or simply tear off a warm piece and spread it with butter.
The secret is patience during the rising stages, proper kneading, and adding enough flour to create a soft dough without making it heavy.
Ingredients
For the Bread
- 1 cup warm milk
- ½ cup warm water
- 2¼ teaspoons active dry yeast
- ¼ cup granulated sugar
- 2 tablespoons butter, melted
- 1 teaspoon salt
- 4 to 4½ cups all-purpose flour
- Additional melted butter for brushing the finished loaf, optional
For Serving
- Soft butter
- Honey or jam, optional
- Cheese, optional
- Your favorite sandwich fillings, optional
Instructions
Step 1: Prepare the Yeast
Pour the warm milk and warm water into a large mixing bowl.
The liquids should feel comfortably warm rather than hot. Very hot liquid can damage the yeast.
Add the sugar and active dry yeast. Stir gently and allow the mixture to stand for approximately 5 to 10 minutes.
The surface should become slightly foamy. This indicates that the yeast is active and ready to work.
If the mixture does not foam at all, check the freshness of your yeast before continuing.
Step 2: Add the Butter and Salt
Add the melted butter and salt to the yeast mixture.
Stir until everything is evenly combined.
The butter adds richness and helps create a soft, flavorful loaf.
Step 3: Add the Flour
Begin adding the flour gradually, starting with about 4 cups.
Stir with a wooden spoon or sturdy spatula until the mixture begins forming a dough.
If the dough is extremely sticky, gradually add some of the remaining ½ cup flour.
Do not automatically add all 4½ cups. Flour absorbs liquid differently depending on the brand, humidity, and measuring method.
The finished dough should be soft and slightly tacky but should not cling heavily to your hands.
Step 4: Knead the Dough
Transfer the dough to a lightly floured work surface.
Knead it for approximately 8 to 10 minutes.
To knead, push the dough away from you with the heel of your hand, fold it back toward yourself, rotate it slightly, and repeat.
Continue until the dough becomes smoother, softer, and more elastic.
If using a stand mixer, knead with the dough hook on low to medium-low speed for approximately 6 to 8 minutes.
Avoid adding excessive flour while kneading. A slightly soft dough generally produces a more tender loaf than a stiff, heavily floured dough.
First Rise
Place the kneaded dough in a lightly greased bowl.
Turn the dough once so its surface is lightly coated.
Cover the bowl with a clean kitchen towel or plastic wrap.
Place it somewhere warm and allow it to rise for approximately 1 to 1½ hours, or until it has roughly doubled in size.
The exact time will depend on the temperature of your kitchen.
A warmer environment will usually make the dough rise faster, while a cool kitchen may require additional time.
Forming the Loaf
Once the dough has doubled, gently press it down to release excess air.
Turn it onto a lightly floured surface.
Shape the dough into a smooth loaf.
For a traditional loaf, gently flatten the dough into a rectangle, fold the sides inward, then roll it tightly from one end to the other. Pinch the seam closed and place the loaf seam-side down in a greased loaf pan.
You can also divide the dough into two smaller portions and make two smaller loaves.
Second Rise
Cover the shaped dough again and allow it to rise for approximately 30 to 45 minutes.
The dough should become visibly puffy.
Do not let it rise excessively, because an over-proofed loaf may collapse during baking.
While the dough is completing its second rise, preheat your oven to 375°F (190°C).
Baking Method
Place the risen loaf in the preheated oven.
Bake for approximately 25 to 35 minutes, depending on the size and shape of your loaf and your oven.
The bread should develop a beautiful golden-brown crust.
A properly baked loaf should sound hollow when gently tapped on the bottom.
If the top begins browning too quickly, loosely cover it with aluminum foil during the final portion of baking.
The Butter Finish
As soon as the bread comes out of the oven, brush the top generously with melted butter.
This gives the crust a wonderful buttery flavor and helps keep it soft.
Allow the loaf to cool for at least 15 to 20 minutes before slicing.
Although it can be tempting to cut into the bread immediately, allowing it to cool slightly gives the interior time to finish setting.
Detailed Method
The complete process can be remembered as:
Mix, activate, knead, rise, shape, rise again, bake, butter, and cool.
The first rise develops the structure and flavor of the dough. Kneading develops gluten, which gives the bread enough strength to hold the gases produced by the yeast. The second rise gives the shaped loaf its final volume.
During baking, the yeast becomes highly active for a short period before the heat eventually stops its activity. The dough expands, the proteins and starches set, and the crust develops its characteristic golden color and aroma.
History of Homemade Bread
Bread is one of humanity’s oldest prepared foods. Early forms of bread were very different from the soft sandwich loaves commonly made today, but the basic idea was remarkably similar: combine a grain-based flour with liquid, form a dough, and cook it.
Yeast-leavened breads became increasingly important as people learned how fermentation could transform a dense mixture of flour and water into something lighter and more flavorful.
Over generations, bread-making traditions developed throughout Europe, the Middle East, Africa, and many other parts of the world. Milk, butter, eggs, sugar, and other ingredients were incorporated into different recipes, producing softer and richer styles of bread.
Modern homemade sandwich bread reflects this long tradition while taking advantage of commercially produced yeast and standardized flour.
Formation of the Bread
The formation of the loaf involves several important stages.
Gluten Formation
When flour is mixed with liquid, proteins in the flour begin forming gluten. Kneading strengthens this gluten network.
This network provides the structure needed for the dough to expand during fermentation.
Fermentation
The yeast consumes available sugars and produces carbon dioxide and other fermentation byproducts.
The carbon dioxide becomes trapped within the developing gluten structure, causing the dough to rise.
Shaping
After the first rise, the dough is gently deflated and shaped.
Proper shaping creates tension on the outside of the loaf and helps the bread rise upward rather than spreading outward.
Final Proofing
The shaped loaf undergoes a second rise.
This stage gives the dough its final volume and contributes to the finished texture.
Baking
The heat of the oven causes the dough to expand rapidly before its structure sets.
The crust browns through chemical reactions involving sugars and proteins, creating the familiar aroma, flavor, and color of freshly baked bread.
Tips for Perfect Homemade Bread
Use the Right Temperature
The milk and water should be warm, not hot. Excessive heat can prevent the yeast from working properly.
Do Not Over-Flour
This is one of the most important tips.
Adding too much flour can create a dense, dry loaf. Start with 4 cups and add more only if necessary.
Knead Properly
The dough should become smooth and elastic.
If it tears immediately when gently stretched, it may need more kneading.
Give the Dough Enough Time
Bread dough cannot always be rushed.
If your kitchen is cool, the dough may take longer to double in size. Watch the dough rather than relying exclusively on the clock.
Avoid Over-Proofing
A loaf that rises too much can lose its structure and collapse.
The dough should look puffy and expanded but still have enough strength to hold its shape.
Let It Cool
Fresh bread continues to develop its internal structure after leaving the oven.
Allowing it to cool slightly makes slicing easier and helps prevent a gummy interior.
Serving Ideas
This bread is delicious served warm with butter.
For breakfast, slice it and toast it until lightly golden, then serve with butter, honey, jam, or peanut butter.
For lunch, use it for sandwiches filled with cheese, vegetables, roasted meat, eggs, or your favorite fillings.
At dinner, serve thick slices alongside soups, stews, roasted meats, pasta, or vegetables.
It can also be transformed into French toast, bread pudding, croutons, garlic toast, or simple buttered toast.
Storage
Once completely cool, store the bread in an airtight container or bread bag at room temperature.
For the best texture, enjoy it within several days.
If you will not eat the entire loaf quickly, slice it and freeze the slices in a well-sealed freezer bag. Individual slices can then be removed as needed and warmed or toasted.
Homemade Bread Lovers
For bread lovers, this recipe is especially satisfying because it turns a handful of ordinary ingredients into something that feels completely homemade.
There is a special pleasure in slicing into a loaf you have kneaded, shaped, and baked yourself. The crust is warm, the center is soft, and the buttery aroma fills the kitchen.
It is also an excellent beginner recipe because the process teaches the fundamental skills needed for many other yeast breads.
Once you are comfortable with this dough, you can experiment with different shapes, fillings, herbs, cheeses, seeds, or toppings.
Variations
Soft Dinner Rolls
Instead of forming one large loaf, divide the dough into smaller pieces and shape them into balls. Arrange them in a greased baking dish, allow them to rise, and bake until golden.
Garlic Butter Bread
Mix melted butter with minced garlic and dried or fresh herbs. Brush the mixture over the baked bread before serving.
Herb Bread
Add dried rosemary, thyme, oregano, or Italian seasoning to the dough for a savory variation.
Cheese Bread
Fold shredded cheese into the dough before shaping, or sprinkle cheese over the top during the final minutes of baking.
Honey Bread
Replace some or all of the sugar with honey for a slightly different flavor.
Common Problems and Solutions
Bread is too dense:
The dough may have contained too much flour, may not have risen sufficiently, or may have been under-kneaded.
Bread did not rise:
The yeast may have been inactive, the liquid may have been too hot or too cold, or the dough may have been kept in a very cold environment.
Bread is dry:
Too much flour or overbaking can cause dryness.
Bread collapsed:
The dough may have been over-proofed or the loaf may not have developed enough structure.
Crust is too hard:
The loaf may have been baked too long. Brushing it with butter immediately after baking can also help produce a softer crust.
Conclusion
Homemade bread does not need to be complicated. With warm milk, water, yeast, sugar, butter, salt, and flour, you can create a soft and flavorful loaf right in your own kitchen.
The most important ingredients are not only what goes into the bowl but also patience, proper kneading, careful proofing, and attention to the dough’s texture.
Once you experience the smell of freshly baked bread and taste a warm slice spread with butter, it becomes easy to understand why homemade bread has remained a beloved kitchen tradition for generations.
This is the kind of recipe worth making again and again: simple enough for a beginner, dependable enough for regular baking, and delicious enough to make you think twice before reaching for a store-bought loaf.