
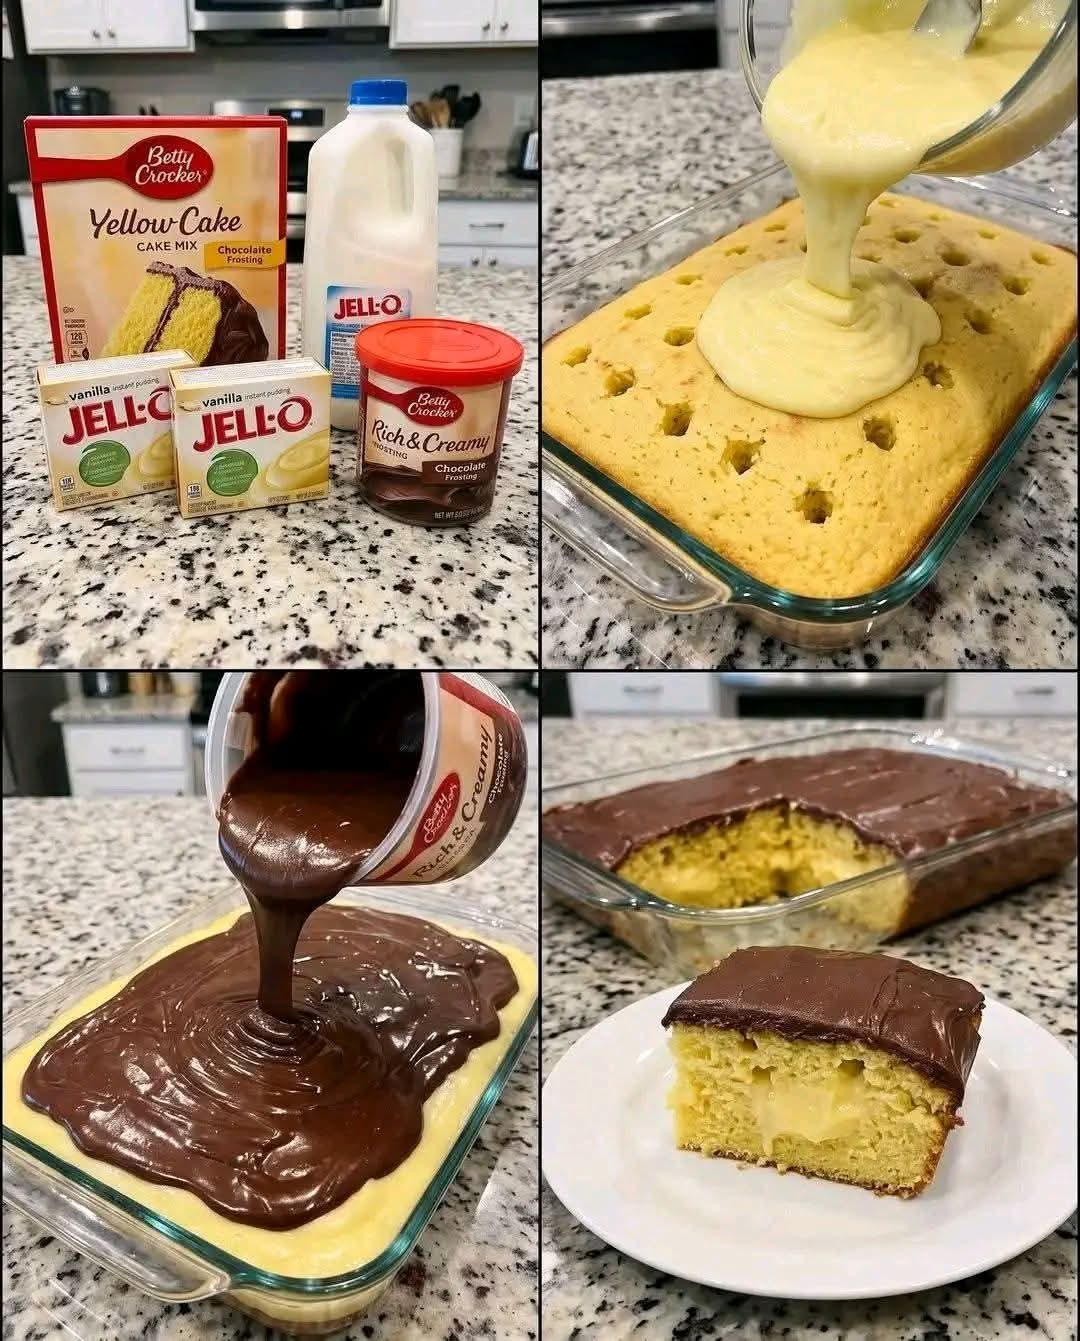
Boston Cream Poke Cake
Introduction
Boston Cream Poke Cake is a simple yet wonderfully indulgent dessert inspired by the classic Boston cream pie. It combines a soft yellow cake, creamy vanilla pudding, and a rich chocolate topping in one easy-to-make dessert. The special feature of a poke cake is the small holes made throughout the baked cake, allowing the vanilla pudding to soak deep inside and create creamy pockets in every slice.
This recipe is especially convenient because it starts with a boxed yellow cake mix and prepared chocolate frosting, while still delivering the familiar flavors of a traditional Boston cream dessert. After chilling, the cake becomes wonderfully moist, creamy, and rich, making it an excellent choice for family gatherings, celebrations, potlucks, holidays, or an everyday dessert.
Ingredients
For the Cake
- 1 box (15.25 oz) Betty Crocker Yellow Cake Mix
- Water, vegetable oil, and eggs as directed on the cake-mix package
For the Vanilla Cream Filling
- 2 boxes (3.4 oz each) Jell-O Vanilla Instant Pudding Mix
- 3 cups cold milk
For the Chocolate Topping
- 1 tub (16 oz) Betty Crocker Rich & Creamy Chocolate Frosting
Equipment
- 9 x 13-inch baking pan
- Large mixing bowl
- Whisk
- Spatula
- Wooden spoon with a round handle
- Measuring cups
- Refrigerator
- Microwave-safe bowl, if desired
Preparation Method
Step 1: Prepare the Cake
Preheat your oven according to the temperature specified on the yellow cake-mix package.
Grease a 9 x 13-inch baking pan thoroughly, paying particular attention to the corners and sides. Prepare the yellow cake batter according to the package directions, using the required water, oil, and eggs.
Pour the batter evenly into the prepared pan. Bake according to the package instructions, or until the cake is golden and a toothpick inserted into the center comes out clean or with only a few moist crumbs.
Remove the cake from the oven and allow it to cool for approximately 15 minutes. The cake should still be warm when you begin making the holes.
Step 2: Create the Poke Holes
Take the round handle of a wooden spoon and gently poke holes throughout the warm cake.
Space the holes approximately 1 inch apart so the pudding can spread throughout the cake. Push the spoon deeply into the cake, but avoid going completely through to the bottom of the pan.
The holes are what transform this ordinary yellow cake into a moist Boston cream poke cake.
Step 3: Make the Vanilla Pudding
Place the two packages of vanilla instant pudding mix into a large bowl.
Add 3 cups of cold milk. Whisk vigorously for exactly 2 minutes, until the mixture begins to thicken.
Do not allow the pudding to become completely firm before adding it to the cake. It should still be pourable so it can easily flow into the holes.
Step 4: Fill the Cake
Immediately pour the prepared vanilla pudding evenly over the warm cake.
Use a spatula to gently spread the pudding across the entire surface. Pay special attention to the holes, gently pushing the pudding toward them so it sinks into the cake.
Some pudding will remain on top, forming a creamy layer, while the rest will travel into the holes and create pockets of vanilla cream throughout the cake.
Step 5: Chill the Cake
Place the cake in the refrigerator for at least 1 hour.
This chilling period allows the pudding to set and gives the cake time to absorb some of the creamy filling. For the best texture, avoid rushing this stage.
Step 6: Prepare the Chocolate Frosting
Remove the lid and foil seal from the chocolate frosting container.
Microwave the frosting for approximately 15 to 20 seconds, just until it becomes soft and pourable. Stir carefully if necessary.
The frosting should be fluid enough to spread easily but should not be hot.
If your container is not microwave-safe, transfer the frosting to a microwave-safe bowl before heating.
Step 7: Add the Chocolate Layer
Pour the softened chocolate frosting over the chilled cake.
Using a spatula, spread the chocolate evenly from the center toward the edges until the entire surface is covered.
The chocolate layer should form a smooth, rich topping that resembles the chocolate glaze traditionally associated with Boston cream desserts.
Step 8: Final Chilling
Return the finished cake to the refrigerator.
Chill for at least another 2 hours before slicing and serving. This final resting period allows the pudding and cake to fully set and gives the layers time to meld together.
For an even firmer and more flavorful dessert, the cake can be prepared several hours ahead of serving.
Formation of the Cake
The beauty of Boston Cream Poke Cake comes from its three distinct layers and textures.
The first layer is the soft yellow cake. Because the cake is poked while still warm, it becomes especially receptive to the vanilla pudding.
The second component is the vanilla pudding. Some of the pudding fills the holes throughout the cake, creating creamy pockets, while the remainder forms a smooth layer across the top.
The final layer is the chocolate frosting. Once chilled, it creates a rich chocolate covering that balances the sweetness of the vanilla filling and the buttery flavor of the yellow cake.
When sliced, each piece contains cake, vanilla cream, and chocolate, giving you the familiar combination associated with Boston cream pie in an easier poke-cake format.
History and Inspiration
Boston cream pie is a classic American dessert traditionally made from layers of sponge cake filled with custard or pastry cream and covered with chocolate. Despite its name, it is actually a cake rather than a pie.
The dessert is strongly associated with Boston and became an iconic American confection. Over time, its combination of yellow cake, creamy vanilla filling, and chocolate topping inspired many modern variations.
The poke cake technique offers a particularly simple interpretation. Instead of carefully assembling multiple cake layers and spreading pastry cream between them, holes are made directly into a single cake and the filling is poured inside. This method makes it possible to achieve a creamy-filled cake without complicated assembly.
Boston Cream Poke Cake therefore brings together the traditional flavor combination with a practical modern baking method.
Serving Suggestions
For the best presentation, allow the cake to remain thoroughly chilled before cutting.
Use a sharp knife to cut the cake into squares. Wipe the knife between cuts if you want especially neat slices.
The cake can be served on its own because it already contains cake, vanilla cream, and chocolate topping. For an extra-special presentation, individual portions can be accompanied by a small spoonful of whipped cream or a few fresh berries.
Because this is a rich dessert, relatively small squares are usually satisfying.
Storage
Keep the cake covered and refrigerated because the filling contains milk.
Store leftovers in the refrigerator and enjoy them within several days for the best quality. Keep the cake chilled until ready to serve.
If preparing the dessert for a gathering, it is ideal to make it several hours in advance so the pudding has plenty of time to set and the flavors can develop.
Helpful Methods and Tips
Use Cold Milk
The milk should be cold when preparing the instant pudding. This helps the pudding thicken properly.
Do Not Overmix the Pudding
Whisk the pudding and milk for approximately 2 minutes, as directed. Once it begins to thicken, move quickly to the next step.
Poke Evenly
Distribute the holes across the entire cake rather than concentrating them in one area. This ensures that every serving contains some of the creamy vanilla filling.
Do Not Poke Through the Bottom
Leaving a little cake underneath the holes helps keep the pudding inside the cake instead of allowing it to collect at the bottom of the pan.
Warm the Frosting Carefully
The chocolate frosting only needs to become pourable. Heating it too much can make it excessively thin or hot, which can interfere with the chilled pudding layer.
Give It Time to Chill
The refrigeration stages are important. The first chilling period helps the pudding settle into the cake, while the second chilling period allows the complete dessert to firm up before slicing.
Variations
For a stronger vanilla flavor, add a small amount of vanilla extract to the pudding mixture.
For a richer chocolate topping, replace the prepared frosting with a homemade chocolate ganache.
You can also use chocolate pudding instead of vanilla pudding for a completely different flavor combination, although the classic Boston cream character comes from the contrast between vanilla cream and chocolate.
For a more traditional presentation, decorate the chilled cake with a light drizzle of melted chocolate rather than covering the entire surface with frosting.
Conclusion
Boston Cream Poke Cake is an easy, comforting dessert that captures the beloved combination of tender yellow cake, smooth vanilla cream, and rich chocolate in a simple format. The poke-cake method eliminates complicated layering while allowing the creamy filling to reach deep into the cake.
Its make-ahead nature also makes it especially practical for entertaining. Prepare it earlier in the day, allow it to chill thoroughly, and it will be ready when dessert time arrives.
For the Lovers of Boston Cream Desserts
If you love the classic combination of vanilla custard and chocolate, this cake is an excellent dessert to keep in your recipe collection. Every bite brings together soft cake, cool vanilla pudding, and a smooth chocolate topping.
It is the kind of dessert that feels familiar and homemade while requiring very little complicated preparation. Whether served at a family dinner, brought to a potluck, or prepared simply because you are craving something sweet, Boston Cream Poke Cake is an easy and satisfying choice.