
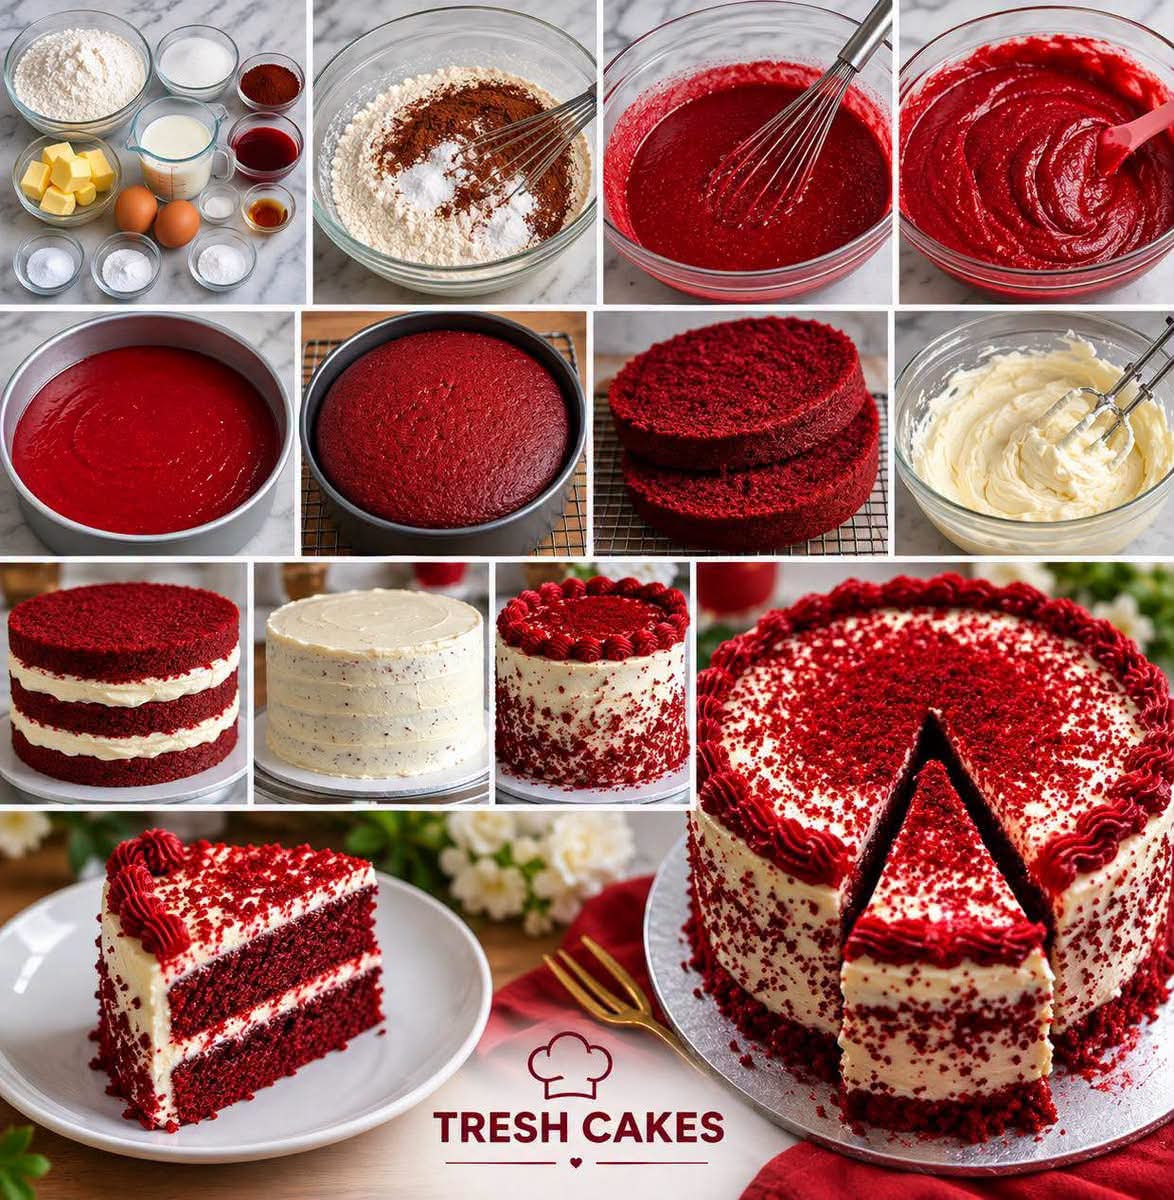
Classic Red Velvet Cake with Cream Cheese Frosting
Introduction
Red Velvet Cake is one of those classic desserts that immediately feels special. Its striking deep-red color, delicate cocoa flavor, soft texture, and rich cream cheese frosting make it a favorite for birthdays, holidays, family celebrations, weddings, and afternoon gatherings.
Unlike a traditional chocolate cake, red velvet has a much more subtle cocoa flavor. The combination of buttermilk, vinegar, cocoa powder, vanilla, and vegetable oil creates a cake that is tender, moist, and pleasantly tangy. The cream cheese frosting adds a smooth, creamy contrast to the slightly chocolatey cake.
This recipe produces two beautiful 8-inch layers that can be stacked into a classic celebration cake. The finished cake is generously covered with cream cheese frosting and decorated with red velvet crumbs for a simple but elegant appearance.
Whether you are making red velvet cake for a special occasion or simply want a homemade dessert that everyone will remember, this recipe delivers a soft, flavorful cake with a rich and creamy finish.
A Brief History of Red Velvet Cake
The exact origin of Red Velvet Cake is debated, but the dessert became particularly associated with American baking traditions during the twentieth century.
Early versions of red velvet cake were generally lighter in color than many modern versions. The reddish appearance could develop naturally from the interaction between natural cocoa and acidic ingredients such as buttermilk and vinegar.
As food coloring became more widely available, bakers began using red food coloring to create the vivid red appearance that is now strongly associated with the cake.
Red velvet eventually became a beloved Southern and American celebration dessert. Its combination of tender cake and cream cheese frosting helped establish it as a recognizable classic that continues to appear at birthdays, Christmas gatherings, weddings, anniversaries, and holiday dinners.
Ingredients
For the Red Velvet Cake
- 2 1/2 cups all-purpose flour, approximately 313 grams
- 1 1/2 cups granulated sugar, approximately 300 grams
- 1 teaspoon baking soda
- 1 teaspoon salt
- 1 tablespoon unsweetened cocoa powder
- 1 1/2 cups vegetable oil, approximately 360 ml
- 1 cup buttermilk, approximately 240 ml
- 2 large eggs
- 1 tablespoon vanilla extract
- 1 tablespoon white vinegar
- 1 to 2 tablespoons red food coloring
For the Cream Cheese Frosting
- 2 cups cream cheese, approximately 450 grams, softened
- 1 cup unsalted butter, approximately 227 grams, softened
- 4 cups powdered sugar, approximately 500 grams, sifted
- 1 teaspoon vanilla extract
For Decoration
- Small amount of red velvet cake crumbs
- Additional cream cheese frosting for piping, if desired
Equipment
- Two 8-inch round cake pans
- Parchment paper
- Large mixing bowls
- Whisk
- Electric hand mixer or stand mixer
- Rubber spatula
- Measuring cups and spoons
- Wire cooling rack
- Cake board or serving plate
- Offset spatula or cake scraper
- Piping bag and decorative tip, optional
Preparation Method
Step 1: Prepare the Cake Pans
Begin by preheating the oven to 175°C (350°F).
Grease two 8-inch round cake pans thoroughly. Line the bottoms with parchment paper to make removing the cakes easier after baking.
If desired, lightly dust the greased sides with flour. Set the prepared pans aside while you make the batter.
Step 2: Combine the Dry Ingredients
In a large mixing bowl, add the all-purpose flour, granulated sugar, baking soda, salt, and cocoa powder.
Whisk the ingredients together until they are evenly distributed.
This step is important because it prevents concentrated pockets of baking soda, salt, or cocoa from remaining in the finished cake.
Step 3: Prepare the Wet Ingredients
In a separate bowl, combine the vegetable oil, buttermilk, eggs, vanilla extract, white vinegar, and red food coloring.
Whisk until the eggs are completely incorporated and the mixture has an even red color.
The vegetable oil helps keep the cake moist, while the buttermilk and vinegar contribute acidity and tenderness.
Step 4: Make the Batter
Slowly pour the wet ingredients into the bowl containing the dry ingredients.
Using a whisk or rubber spatula, gently mix everything together until the batter becomes smooth and evenly combined.
Do not overmix the batter. Once the flour has been incorporated and there are no obvious dry patches, stop mixing.
Overmixing can develop too much gluten and may result in a cake that is less tender.
Step 5: Divide the Batter
Pour the batter evenly between the two prepared cake pans.
Try to distribute the batter as evenly as possible so that both layers bake to approximately the same height.
Gently tap the pans on the counter once or twice to release any large air bubbles.
Step 6: Bake the Cake
Place both cake pans in the preheated oven.
Bake for approximately 30 to 35 minutes.
Begin checking the cakes toward the end of the baking time. Insert a toothpick into the center of each cake. If it comes out clean or with only a few moist crumbs attached, the cakes are ready.
Avoid opening the oven repeatedly during baking because this can cause unnecessary temperature fluctuations.
Step 7: Cool the Cake Layers
Remove the baked cakes from the oven and allow them to cool in their pans for approximately 10 minutes.
Carefully run a thin knife around the edges if necessary, then gently turn the cakes out onto a wire rack.
Remove the parchment paper and allow the layers to cool completely before frosting.
The cakes must be completely cool before assembly. If the layers are still warm, the cream cheese frosting can become soft and difficult to work with.
Preparing the Cream Cheese Frosting
Step 1: Beat the Butter and Cream Cheese
Place the softened cream cheese and softened unsalted butter in a large mixing bowl.
Beat them together until the mixture becomes smooth, creamy, and completely combined.
Make sure both ingredients are properly softened before beginning. This helps create a smooth frosting without lumps.
Step 2: Add the Powdered Sugar
Gradually add the sifted powdered sugar.
Mix on low speed initially to prevent the sugar from flying out of the bowl, then increase the speed and beat until the frosting becomes light and fluffy.
Step 3: Add the Vanilla
Add the vanilla extract and mix until evenly incorporated.
Taste the frosting and adjust the consistency if necessary. If it seems too soft, refrigerate it briefly before decorating. If it is too thick, mixing it for a little longer can help create a smoother texture.
Assembling the Red Velvet Cake
Place the first completely cooled cake layer on a cake board, serving plate, or cake stand.
Spread a generous layer of cream cheese frosting over the top.
Place the second cake layer carefully over the frosting.
Press very gently to make sure the layers are aligned without forcing too much frosting out of the sides.
Spread a thin layer of frosting around the entire cake to create a crumb coat. This first layer helps trap loose cake crumbs.
Refrigerate the cake briefly until the crumb coat becomes firmer.
Then apply the remaining cream cheese frosting over the top and sides of the cake.
Use an offset spatula or cake scraper to smooth the frosting. The cake can be perfectly smooth or given a slightly rustic homemade appearance.
Creating the Red Velvet Crumb Decoration
For a traditional and attractive finish, reserve a small amount of red velvet cake.
You can use a thin piece trimmed from the top of one cake layer or simply crumble a small piece of the baked cake.
Rub the cake gently between your fingers until fine crumbs form.
Sprinkle the crumbs over the top of the frosted cake. You can also press a small amount around the sides for a classic red velvet appearance.
For an additional decorative touch, pipe small swirls or rosettes of cream cheese frosting around the edge.
Formation and Structure of the Cake
The beauty of this Red Velvet Cake comes from the contrast between its components.
The cake layers are soft and moist, with a mild cocoa flavor rather than the intense chocolate taste of a traditional chocolate cake.
The buttermilk provides acidity and contributes to the cake’s tender texture. The vinegar works with the baking soda to support the leavening process, while the vegetable oil helps retain moisture.
The cream cheese frosting provides richness and tanginess. When the cake is assembled, each bite combines the tender red velvet crumb with smooth, sweet cream cheese frosting.
The final red velvet crumbs provide both visual contrast and a pleasant textural element.
Important Tips for a Successful Red Velvet Cake
Use Room-Temperature Ingredients
Allow the eggs, cream cheese, and butter to come to room temperature before preparing the recipe.
Room-temperature ingredients generally combine more evenly, especially when preparing the frosting.
Do Not Overmix
Once the dry and wet ingredients have been combined, mix only until the batter is smooth.
Overmixing can make the cake denser and less tender.
Measure Flour Carefully
Too much flour can make the cake dry.
For the most consistent results, weighing the flour is preferable. If using measuring cups, spoon the flour into the cup and level it rather than packing it down.
Cool Completely Before Frosting
This is one of the most important steps.
A warm cake can soften or melt the cream cheese frosting, making the layers difficult to assemble.
Chill Before Slicing
After decorating, refrigerate the cake for a short period before slicing.
This helps the frosting firm up and makes the layers easier to cut neatly.
Serving Suggestions
Red Velvet Cake is delicious served chilled or slightly cool.
For an elegant presentation, cut the cake into neat slices and place each slice on a dessert plate.
It can be served on its own because the cake already contains a rich cream cheese frosting. For special occasions, you can accompany each slice with fresh strawberries, raspberries, or a small amount of whipped cream.
The cake is particularly suitable for birthdays, Christmas celebrations, Valentine’s Day, anniversaries, family dinners, afternoon tea, and special gatherings.
Storage
Because the cake contains cream cheese frosting, it should be stored in the refrigerator.
Place the finished cake in an airtight cake container or cover it carefully to prevent it from absorbing odors from other foods.
It can generally be kept refrigerated for several days while maintaining good texture and flavor.
For the best eating experience, allow a refrigerated slice to sit for a short time before serving. This allows the cake and frosting to soften slightly.
Make-Ahead Method
The cake layers can be baked ahead of time and allowed to cool completely.
Once cooled, wrap the layers securely and store them until you are ready to assemble the cake.
The cream cheese frosting can also be prepared ahead and refrigerated. Before using it, allow it to soften slightly and beat it briefly until smooth and spreadable.
Preparing the components ahead of time can make this dessert much easier to assemble for birthdays and special occasions.
Variations
Red Velvet Cupcakes
The same batter can be adapted into cupcakes. Divide the batter between lined cupcake cups and adjust the baking time according to the size of the cupcakes.
Top each cooled cupcake with cream cheese frosting.
Red Velvet Sheet Cake
Instead of using two round pans, the batter can be baked in a suitable rectangular pan. The baking time may need to be adjusted depending on the depth and size of the pan.
Layered Celebration Cake
For a taller cake, the recipe can be adapted into additional layers. Spread cream cheese frosting between each layer and finish the exterior with a smooth layer of frosting.
Red Velvet Cake with Fresh Berries
Fresh strawberries or raspberries can be added as a garnish. Their natural acidity pairs particularly well with the sweetness of the frosting.
The Best Way to Cut Red Velvet Cake
For clean slices, use a sharp knife.
Wipe the knife clean between cuts if you want each slice to have a neat appearance.
For especially precise slices, briefly chill the fully assembled cake before cutting. The firmer frosting will help the layers remain intact.
Why People Love Red Velvet Cake
Red Velvet Cake has a combination that appeals to many different tastes.
It is visually striking without requiring complicated decoration. The cake itself is soft and moist, while the subtle cocoa flavor keeps it from tasting like an ordinary chocolate cake.
The cream cheese frosting is another major reason this dessert is so popular. Its slightly tangy flavor balances the sweetness of the cake and creates a rich, creamy finish.
The combination makes Red Velvet Cake suitable for both casual family gatherings and elegant celebrations.
Conclusion
Classic Red Velvet Cake is more than a beautiful dessert. It is a combination of tender cake, subtle cocoa flavor, tangy buttermilk, rich cream cheese frosting, and a striking red appearance.
The process is straightforward when each stage is given enough attention. Prepare the pans carefully, combine the ingredients without overmixing, bake until the layers are properly cooked, allow them to cool completely, and finish with a generous layer of cream cheese frosting.
The result is a moist, soft, and elegant cake that looks impressive on a dessert table while still having the comforting character of a homemade classic.
Whether prepared for a birthday, holiday celebration, family dinner, or simply as a weekend baking project, this Red Velvet Cake is a timeless dessert that brings together beautiful presentation and familiar homemade flavor.
For Red Velvet Cake Lovers
For anyone who loves the combination of creamy frosting and tender cake, this recipe is especially satisfying.
Red Velvet Cake lovers can enjoy it as a traditional two-layer cake, transform it into cupcakes, add fresh berries, or create a taller celebration cake with additional layers.
The most important part is the balance between the soft red velvet cake and the creamy cream cheese frosting. When those two elements come together, every slice becomes rich, moist, and memorable.
This is the kind of dessert that looks beautiful when served and disappears quickly once everyone gets a taste.
Classic Southern Pecan Cake
Introduction
Classic Southern Pecan Cake is the kind of homemade dessert that feels like it belongs at a family gathering, holiday table, church supper, or Sunday afternoon coffee. It is rich without being complicated, filled with finely chopped pecans, and made with a combination of granulated sugar and brown sugar that gives the cake a deep, comforting sweetness.
The vegetable oil keeps the cake wonderfully moist, while the eggs provide richness and structure. The pecans are the true star of the recipe, adding a buttery flavor and a delicate crunch throughout every slice. Vanilla brings everything together with a warm aroma that makes the kitchen smell inviting while the cake is baking.
This is an especially good recipe for anyone who loves old-fashioned cakes that are simple to prepare but impressive enough to serve to guests. It can be enjoyed plain, dusted with powdered sugar, or finished with a simple glaze or creamy frosting.
Ingredients
For the Pecan Cake
- 1 cup granulated sugar
- 1 cup packed brown sugar
- 1 cup vegetable oil
- 4 large eggs, preferably at room temperature
- 2 cups finely chopped pecans
- 1 cup all-purpose flour
- 1 cup self-rising flour
- 1 teaspoon vanilla extract
Optional Finishing Ideas
The cake is delicious on its own, but you can also serve it with:
- Powdered sugar for dusting
- A simple vanilla glaze
- Cream cheese frosting
- Whipped cream
- A scoop of vanilla ice cream
- Additional toasted pecans
- Caramel sauce
Preparation
Before beginning, gather all of your ingredients and prepare your baking pan. Allowing the eggs to come closer to room temperature can help them blend more easily into the batter.
Preheat the oven to 350°F (175°C).
Grease and flour a 9-inch round cake pan, 9-inch square baking pan, or a suitable Bundt pan. If using a Bundt pan, make sure every part of the interior is thoroughly greased and lightly floured because the pecans can make the cake more difficult to release.
Finely chop the pecans. Avoid turning them into pecan meal. Small pieces are ideal because they distribute throughout the cake while still providing texture.
Method
Step 1: Combine the Sugars
Place the granulated sugar and brown sugar in a large mixing bowl.
Break up any large lumps of brown sugar. Mixing the two sugars together first helps distribute the sweetness evenly throughout the batter.
Step 2: Add the Oil
Pour the vegetable oil into the sugar mixture.
Using a whisk or electric mixer, beat the mixture until the sugars are evenly moistened and the mixture looks smooth.
The oil is important because it gives this cake its tender, moist texture.
Step 3: Add the Eggs
Add the eggs one at a time.
Beat well after each addition before adding the next egg. Scrape down the sides of the bowl occasionally so that everything mixes evenly.
Once the eggs have been incorporated, add the vanilla extract and mix briefly.
The batter should now have a rich, smooth appearance.
Step 4: Prepare the Flours
In a separate bowl, combine the all-purpose flour and self-rising flour.
Because self-rising flour already contains leavening ingredients, there is no need to add additional baking powder or baking soda to the recipe.
Whisk the two flours together to distribute them evenly.
Step 5: Add the Flour
Gradually add the flour mixture to the wet ingredients.
Mix gently just until the flour disappears.
Do not overmix the batter. Overmixing can develop too much gluten and make the finished cake heavier than necessary.
Step 6: Add the Pecans
Fold the finely chopped pecans into the batter using a spatula or wooden spoon.
Work gently until the pecans are evenly distributed.
Reserve a small handful of pecans if you would like to sprinkle some over the top before baking.
Step 7: Fill the Pan
Pour the batter into the prepared baking pan.
Use a spatula to spread the batter evenly and smooth the surface.
If desired, sprinkle a few additional chopped pecans over the top.
Step 8: Bake
Place the cake in the preheated oven.
Bake for approximately 40 to 50 minutes, depending on the size and shape of your pan.
Begin checking the cake toward the earlier end of the baking time. Insert a toothpick or thin skewer into the center. It should come out clean or with only a few moist crumbs attached.
Avoid overbaking because the goal is a moist, tender pecan cake.
Step 9: Cool
Remove the cake from the oven and place the pan on a cooling rack.
Allow the cake to cool in the pan for approximately 10 to 15 minutes.
If using a Bundt pan, carefully loosen the edges with a thin knife or spatula before turning the cake onto the cooling rack.
Allow the cake to cool completely before adding frosting or glaze.
Toasting the Pecans
For an even deeper pecan flavor, you can toast the pecans before adding them to the batter.
Spread the chopped pecans on a baking sheet and toast them in a 350°F (175°C) oven for approximately 5 to 8 minutes.
Watch them carefully because pecans can burn quickly.
Allow them to cool before folding them into the batter.
Toasting is optional, but it can give the cake a more pronounced nutty aroma and flavor.
The Formation of the Cake
The structure of this cake comes from the interaction between the eggs and flour. The eggs provide moisture, richness, and structure, while the flour gives the cake its framework.
The combination of granulated sugar and brown sugar creates a more complex sweetness than using only one type of sugar. Brown sugar also contributes a subtle caramel-like flavor.
Vegetable oil is responsible for much of the cake’s moist texture. Unlike butter, oil remains liquid at room temperature, helping the cake stay soft even after it has cooled.
The pecans add both flavor and texture. Because they are finely chopped, they become incorporated throughout the cake rather than remaining only on the surface.
The self-rising flour provides the necessary leavening, helping the cake rise during baking.
History and Southern Inspiration
Pecans have long been closely associated with Southern American cooking. The pecan tree is native to North America, and pecans became an important ingredient in Southern desserts, candies, pies, cakes, and other traditional dishes.
Pecan desserts became particularly popular in the American South because pecans were readily available in many areas and could be incorporated into inexpensive homemade sweets.
Classic pecan cakes developed alongside other beloved Southern desserts, often appearing at family celebrations, holiday dinners, community gatherings, and potluck tables.
There are many versions of pecan cake. Some are made with butter, some with oil, some with brown sugar, and others include caramel, coconut, chocolate, or cream cheese frosting. This version keeps the focus on the simple combination of sweet cake and abundant pecans.
It has the character of an old-fashioned homemade dessert: straightforward ingredients, generous portions, and plenty of flavor.
Serving Suggestions
Once completely cooled, slice the cake into generous portions.
For a simple presentation, serve it plain with a cup of coffee or tea.
For a more elegant dessert, add a light vanilla glaze and sprinkle chopped pecans over the top.
For a holiday-style presentation, serve each slice with a small spoonful of whipped cream and a few toasted pecans.
For an especially indulgent dessert, warm a slice slightly and serve it with vanilla ice cream and a drizzle of caramel sauce.
Optional Simple Vanilla Glaze
If you want to finish the cake with a glaze, combine:
- 1 cup powdered sugar
- 1 to 2 tablespoons milk
- 1/2 teaspoon vanilla extract
Whisk until smooth.
Add a little more milk if necessary until the glaze reaches a pourable consistency.
Drizzle the glaze over the completely cooled cake and allow it to set for several minutes before slicing.
Tips for the Best Pecan Cake
Use fresh pecans whenever possible. Pecans are naturally rich in oils, so old or improperly stored nuts can develop a stale flavor.
Do not overmix after adding the flour. Mix only until the ingredients are combined.
Measure the flour carefully. Too much flour can make the cake dry and heavy.
Use a properly prepared pan. Greasing and flouring the pan helps prevent sticking.
Do not open the oven repeatedly during the first part of baking because a sudden temperature change can interfere with the cake’s rise.
Let the cake cool before slicing. A warm cake can be delicate and may crumble more easily.
If you want stronger pecan flavor, lightly toast the nuts before adding them to the batter.
Storage
Store the cooled cake in an airtight container at room temperature for approximately 2 to 3 days.
For longer storage, refrigerate the cake in a tightly covered container. Allow individual slices to come toward room temperature before serving for the best texture.
The cake can also be frozen. Wrap individual slices tightly in plastic wrap and place them in a freezer-safe container or bag. Freeze for up to several months for best quality.
Thaw the slices in the refrigerator or at room temperature.
Why Pecan Cake Lovers Enjoy It
Pecan cake lovers appreciate this dessert because it combines several comforting qualities in one simple recipe.
The outside develops a lightly baked, golden finish while the inside remains tender and moist. The brown sugar gives the cake a warm caramel-like sweetness, while the vanilla adds a familiar homemade aroma.
Most importantly, every bite contains pecans.
For people who enjoy traditional Southern desserts, this cake has the familiar feeling of something that could have been served at a family gathering for generations. It is simple enough for an ordinary weekend but special enough for birthdays, Thanksgiving, Christmas, Easter, potlucks, and other celebrations.
Conclusion
Classic Southern Pecan Cake is a wonderfully simple homemade dessert built around one of the most beloved ingredients in Southern baking: the pecan.
With two kinds of sugar, vegetable oil, eggs, vanilla, flour, and plenty of finely chopped pecans, the recipe produces a rich and satisfying cake without requiring complicated techniques.
Serve it plain for a traditional homemade treat, add a simple glaze for extra sweetness, or pair it with ice cream and caramel for a special dessert.
Whether prepared for a holiday table, a family dinner, an afternoon gathering, or simply because you are craving something sweet and nutty, this pecan cake is the kind of recipe that is easy to make, easy to share, and easy to remember.