
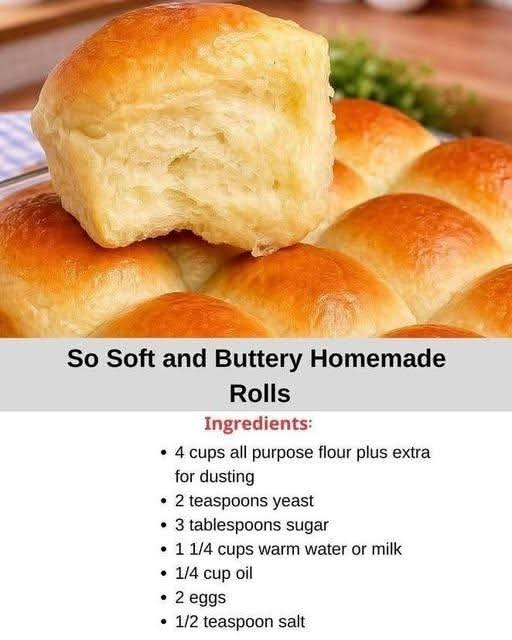
Soft and Fluffy Homemade Dinner Rolls
Introduction
There is something especially comforting about a basket of freshly baked homemade dinner rolls. When they come out of the oven warm, golden, and beautifully soft, they can turn an ordinary meal into something memorable. These homemade dinner rolls have a tender, fluffy center, a lightly golden exterior, and a subtle sweetness that makes them perfect alongside almost any meal.
This recipe is simple enough for a beginner but delicious enough to become a regular family favorite. The dough is made with basic pantry ingredients, including flour, yeast, sugar, warm milk or water, coconut oil, and eggs. The coconut oil gives the rolls a delicate richness while the eggs help create a soft and tender texture.
They are wonderful served with soups, stews, roasted meats, pasta, holiday dinners, or simply warm from the oven with butter.
Ingredients
For the Dough
- 4 cups all-purpose flour
- 2 teaspoons active dry yeast
- 3 tablespoons granulated sugar
- 1 1/4 cups warm milk or warm water
- 1/4 cup coconut oil, melted and slightly cooled
- 2 large eggs
- 1 teaspoon salt
For the Topping
- 1 tablespoon melted butter or coconut oil, optional
- A small pinch of flaky salt, optional
Instructions
Step 1: Prepare the Yeast
Pour the warm milk or water into a large mixing bowl. The liquid should be comfortably warm rather than hot. Add the sugar and yeast and stir gently.
Allow the mixture to stand for about 5 to 10 minutes. If the yeast is active, a light layer of foam should begin forming on the surface.
If using instant yeast, you can combine it directly with the flour, although allowing it to bloom first is a helpful way to make sure the yeast is active.
Step 2: Add the Wet Ingredients
Add the melted coconut oil and eggs to the yeast mixture. Whisk gently until the ingredients are well combined.
Make sure the coconut oil is not extremely hot when added, because very hot oil can affect the yeast and eggs.
Step 3: Add the Dry Ingredients
In a separate bowl, combine the flour and salt.
Gradually add the flour mixture to the wet ingredients, stirring after each addition. Continue mixing until a soft dough begins to form.
The dough should be soft and slightly tacky but should not be extremely sticky. If it feels too wet, add a tablespoon of flour at a time. Avoid adding too much flour because an overly stiff dough can produce heavy rolls.
Step 4: Knead the Dough
Transfer the dough to a lightly floured work surface.
Knead for approximately 8 to 10 minutes by hand, folding the dough over itself and pushing it forward with the heel of your hand. Continue until the dough becomes smoother, softer, and more elastic.
You can also use a stand mixer fitted with a dough hook. Knead on low to medium speed until the dough becomes smooth and elastic.
Step 5: First Rise
Place the dough in a lightly greased bowl and turn it once so the surface is lightly coated.
Cover the bowl with a clean kitchen towel or plastic wrap.
Place it somewhere warm and allow the dough to rise for approximately 1 to 1 1/2 hours, or until it has roughly doubled in size.
The rising time will depend on the temperature of your kitchen.
Step 6: Shape the Rolls
Once the dough has doubled, gently press it down to release excess air.
Transfer it to a lightly floured surface and divide it into approximately 12 to 16 equal pieces.
Shape each piece into a smooth ball by pulling the edges underneath and gently rolling the dough between your hands.
Arrange the dough balls in a lightly greased baking dish or baking pan, leaving a little space between each roll.
Step 7: Second Rise
Cover the shaped rolls again with a clean towel.
Let them rise for approximately 30 to 45 minutes, or until they look noticeably puffed and soft.
This second rise is important because it helps create the light, airy texture that makes homemade dinner rolls so fluffy.
Step 8: Bake
Preheat the oven to 375°F (190°C).
Place the risen rolls in the oven and bake for approximately 18 to 23 minutes, or until the tops are beautifully golden brown.
Keep an eye on them during the final few minutes because baking times can vary depending on the size of the rolls and your oven.
Step 9: Finish the Rolls
Remove the rolls from the oven and immediately brush the tops with a little melted butter or coconut oil if desired.
Allow them to cool for several minutes before serving.
For the softest texture, cover the warm rolls loosely with a clean kitchen towel while they cool.
Method
The secret to these soft and fluffy dinner rolls is the combination of yeast, eggs, fat, and proper rising time.
The yeast gives the dough its structure and allows it to expand. The eggs contribute richness, color, and tenderness, while the coconut oil helps keep the finished rolls soft.
The two rising periods are equally important. During the first rise, the yeast develops the dough’s volume and flavor. After shaping, the second rise allows the individual rolls to become light and airy before they enter the oven.
The dough should remain soft rather than heavily floured. Adding too much flour is one of the most common reasons homemade rolls become dense. A slightly tacky dough generally produces a softer finished roll.
The History of Homemade Dinner Rolls
Bread has been an important part of meals for thousands of years, but soft dinner rolls became especially popular as home baking developed and yeast became easier for households to use.
Across Europe and North America, families developed their own versions of enriched bread using ingredients such as milk, butter, eggs, sugar, and various fats. These softer breads were often served at family gatherings, Sunday dinners, celebrations, and holiday meals.
American-style dinner rolls became particularly associated with large family meals and festive occasions. Recipes were passed from one generation to another, with each family making small changes according to the ingredients available in their kitchen.
Today’s homemade dinner rolls continue that tradition. The basic idea remains wonderfully simple: make a soft yeast dough, allow it to rise, shape it into individual portions, and bake until golden.
Formation and Shaping
The shape of the rolls is completely customizable.
For classic round dinner rolls, divide the dough into equal portions and roll each piece into a smooth ball.
For pull-apart rolls, place the dough balls close together in a round or rectangular baking dish. As they rise and bake, they will touch each other and create a beautiful pull-apart loaf.
For slightly more decorative rolls, divide each portion into three small pieces, roll them into thin ropes, and braid them together.
The most important thing is to make the portions as equal as possible so that the rolls bake evenly.
Tips for Extra-Soft Rolls
Use warm rather than hot liquid. Extremely hot liquid can damage the yeast.
Do not overload the dough with flour. Add only enough flour to create a soft, workable dough.
Give the dough enough time to rise. A slow, complete rise produces better texture and flavor.
Knead until the dough becomes smooth and elastic.
Keep the shaped rolls covered during the second rise so that the surface does not dry out.
Brush the baked rolls with melted butter or coconut oil while they are still warm for a softer crust.
How to Store Them
Store completely cooled dinner rolls in an airtight container or sealed bag at room temperature for up to 2 to 3 days.
For longer storage, place the rolls in a freezer-safe bag and freeze them for up to 2 to 3 months.
To serve, allow frozen rolls to thaw at room temperature and warm them gently in the oven.
Serving Ideas
These rolls are delicious with:
- Roast chicken
- Roast beef
- Turkey
- Mashed potatoes and gravy
- Soups and stews
- Pasta dishes
- Barbecue
- Holiday dinners
- Breakfast sandwiches
- Homemade soups
- Butter and jam
They are also excellent served warm with a little salted butter.
Why Dinner Roll Lovers Will Love This Recipe
Dinner roll lovers will appreciate how soft, fluffy, and versatile these homemade rolls are.
They have a lightly sweet flavor without being dessert-like, making them suitable for both savory and sweet meals. Their tender texture makes them easy to pull apart, while the golden tops give them just enough crust to provide contrast.
They are also much more satisfying than packaged rolls because they come straight from your own oven.
Conclusion
These Soft and Fluffy Homemade Dinner Rolls are a wonderful example of how a few simple ingredients can create something special. With flour, yeast, sugar, warm milk or water, coconut oil, eggs, and salt, you can make a basket of tender homemade rolls that everyone will want to reach for.
The key is patience: allow the dough to rise properly, avoid adding excessive flour, and give the shaped rolls enough time to become beautifully puffy before baking.
Serve them warm alongside your favorite meal, and do not be surprised if the entire basket disappears before dinner is over. Once you make these homemade rolls, they may quickly become one of those recipes your family asks you to make again and again.