
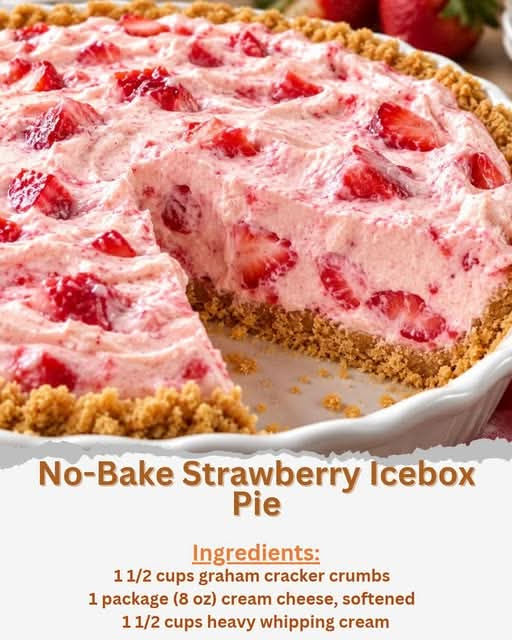
No-Bake Strawberry Icebox Pie – A Creamy, Refreshing Dessert Everyone Will Love
Introduction
If you love fresh strawberries, creamy cheesecake filling, and a buttery graham cracker crust, this No-Bake Strawberry Icebox Pie is the perfect dessert to add to your recipe collection. It is cool, creamy, sweet, and wonderfully refreshing, making it an excellent choice for warm summer days, family gatherings, birthdays, potlucks, and weekend treats.
The best part about this recipe is that you do not need to turn on your oven to make the filling. The crust is prepared with graham cracker crumbs and melted butter, while the rich cream cheese filling is whipped with powdered sugar, vanilla, and fluffy whipped cream. Fresh strawberries and a touch of strawberry jam complete the dessert with a beautiful fruity flavor.
Every slice offers a delightful combination of textures: a crisp, buttery crust, a smooth and airy filling, and juicy strawberries in every bite. After a few hours in the refrigerator, the pie becomes chilled and firm enough to slice and serve.
Whether you are preparing dessert for your family or bringing something special to a gathering, this strawberry icebox pie is an easy, attractive dessert that looks impressive without requiring complicated baking techniques.
Ingredients
Preparation time: 25 minutes
Chilling time: 4–6 hours, preferably overnight
Servings: 8
For the graham cracker crust
- 1 1/2 cups graham cracker crumbs
- 1/4 cup granulated sugar
- 6 tablespoons unsalted butter, melted
For the creamy filling
- 1 package (8 oz or 225 g) cream cheese, softened
- 1 cup powdered sugar
- 1 teaspoon vanilla extract
- 1 1/2 cups heavy whipping cream, cold
For the strawberry topping
- 2 cups fresh strawberries, hulled and sliced
- 1/4 cup strawberry jam
Optional decorations
- A few additional fresh strawberries
- Extra graham cracker crumbs
- A small amount of whipped cream for serving
Instructions
Step 1: Prepare the graham cracker crust
Place the graham cracker crumbs in a medium-sized mixing bowl. Add the granulated sugar and stir until evenly combined.
Pour in the melted butter and mix thoroughly until the crumbs resemble damp sand. When you press a little of the mixture between your fingers, it should hold together.
Transfer the mixture to a 9-inch pie dish. Press it firmly across the bottom and up the sides using the back of a spoon or the flat bottom of a measuring cup.
Make the crust as even as possible so that every slice holds together nicely.
Place the crust in the refrigerator for at least 20–30 minutes to help the butter firm up. Since this is a no-bake pie, chilling the crust is important for creating a stable base.
Step 2: Beat the cream cheese
Place the softened cream cheese in a large mixing bowl.
Using an electric hand mixer, beat the cream cheese for approximately 2–3 minutes until it becomes smooth, creamy, and free of lumps.
Add the powdered sugar and vanilla extract. Continue beating until the mixture is fluffy and evenly combined.
Scrape down the sides of the bowl occasionally to ensure that all the ingredients are incorporated.
Make sure the cream cheese is softened before mixing. Cold cream cheese can leave small lumps in the filling.
Step 3: Whip the heavy cream
Pour the cold heavy whipping cream into a separate, clean mixing bowl.
Using an electric mixer, beat the cream until stiff peaks form. This usually takes approximately 3–5 minutes, depending on your mixer.
Stiff peaks mean that when you lift the beaters, the whipped cream forms peaks that hold their shape.
Be careful not to overwhip the cream, as it can become grainy and begin turning into butter.
For the best results, use very cold cream and a chilled mixing bowl.
Step 4: Combine the filling
Add approximately one-third of the whipped cream to the cream cheese mixture and gently stir to lighten it.
Then fold in the remaining whipped cream using a spatula. Use slow, sweeping motions to preserve as much air as possible.
Continue folding until the mixture is smooth, fluffy, and evenly combined.
Avoid vigorous stirring because the air incorporated into the whipped cream helps create the light texture that makes this pie so delicious.
Step 5: Prepare the strawberries
Wash the strawberries under cool running water and dry them thoroughly with a clean towel.
Remove the green tops and slice the strawberries into thin, even pieces.
Place the sliced strawberries in a small bowl.
Add the strawberry jam and gently stir until the fruit is lightly coated. The jam gives the strawberries a glossy appearance and adds an extra layer of fruity sweetness.
If the jam is very thick, warm it for a few seconds until it becomes easier to stir, then allow it to cool before combining it with the fruit.
Avoid adding hot jam to the strawberries or filling.
Step 6: Assemble the pie
Remove the chilled graham cracker crust from the refrigerator.
Spoon the cream cheese and whipped cream filling into the crust. Spread it evenly with a spatula, smoothing the top.
Arrange the strawberry slices over the filling. You can create a circular pattern around the center, place them in overlapping rows, or scatter them naturally for a rustic homemade appearance.
Spoon any remaining strawberry jam lightly over the fruit.
For an especially attractive finish, reserve a few strawberry slices to decorate the center of the pie just before serving.
Step 7: Chill until firm
Cover the pie loosely with plastic wrap or place it in a suitable covered container.
Refrigerate for at least 4–6 hours, or preferably overnight.
During this time, the crust firms up, the filling becomes more stable, and the flavors blend together.
Do not skip the chilling stage. The filling needs sufficient time in the refrigerator to develop a texture that is creamy yet firm enough to slice.
Step 8: Slice and serve
Once the pie is thoroughly chilled, remove it from the refrigerator.
Use a sharp knife to cut clean slices. For neater portions, dip the knife in warm water and wipe it dry between cuts.
Serve each slice cold, optionally topped with a little whipped cream or additional fresh strawberries.
The result is a beautiful strawberry dessert with a buttery crust, a fluffy cheesecake-style filling, and a glossy layer of fresh fruit.
Method of Preparation
The secret to a successful No-Bake Strawberry Icebox Pie is preparing each layer correctly and allowing enough time for everything to chill.
First, the graham cracker crumbs are mixed with sugar and melted butter. The butter binds the crumbs together as it cools, creating a firm crust without the need for baking.
Next, the cream cheese is beaten until smooth before the powdered sugar and vanilla are added. Whipping the heavy cream separately introduces air into the mixture, giving the filling its light and delicate texture.
The whipped cream is then gently folded into the cream cheese mixture. This technique is important because excessive stirring can remove the air that makes the filling fluffy.
Finally, fresh strawberries coated with strawberry jam are arranged over the filling. The jam provides shine and extra strawberry flavor while complementing the creamy center.
Refrigeration brings all the layers together. The butter firms up, the filling settles, and the fruit becomes a refreshing topping for the chilled pie.
The History of Icebox Pie
Icebox desserts became popular in American home kitchens during the late nineteenth and early twentieth centuries, as refrigeration technology became more accessible. Before modern refrigerators were common, many households used insulated iceboxes to keep food cool.
These chilled desserts offered a convenient alternative to traditional baked pies, particularly during hot weather. They often featured cream, sweetened condensed milk, custards, cookies, crackers, or other ingredients that could be assembled and chilled.
Over time, no-bake pies evolved into countless variations, including chocolate pies, lemon icebox pies, banana cream desserts, and strawberry-filled creations.
Strawberries have long been a favorite ingredient for spring and summer desserts because of their natural sweetness, bright color, and refreshing flavor. Combining them with a creamy filling and a crumb crust creates a modern variation that draws on the tradition of simple, chilled homemade desserts.
This particular recipe is a contemporary-style strawberry icebox pie. While icebox desserts have a long history, the exact combination of ingredients in this recipe should not be attributed to a specific historical origin without a verified source.
Formation and Texture of the Pie


One of the most appealing features of this dessert is the contrast between its three main layers.
The graham cracker crust: The crumbs and butter create a lightly crunchy, sweet foundation. Pressing the crumbs firmly into the pie dish helps prevent the crust from crumbling when sliced.
The creamy filling: Cream cheese provides richness and a gentle tang, while powdered sugar adds sweetness. Whipped cream lightens the mixture, creating a texture similar to a fluffy cheesecake mousse.
The strawberry topping: Fresh strawberries provide juiciness and a natural fruity flavor. Strawberry jam adds shine and enhances the sweetness without requiring a complicated cooked topping.
Together, these layers create a dessert that is rich without being overly heavy and fruity without losing its creamy character.
For the neatest slices, ensure the filling is thoroughly chilled and the strawberries are dry before adding them. Excess moisture from freshly washed fruit can soften the topping and make the dessert more difficult to serve.
Tips for the Perfect Strawberry Icebox Pie
- Use softened cream cheese. This helps prevent lumps and creates a smoother filling.
- Keep the whipping cream cold. Cold cream whips more easily and holds its shape better.
- Fold gently. Preserve the air in the whipped cream for a light, fluffy texture.
- Press the crust firmly. A compact crust is less likely to crumble when you cut the pie.
- Dry the strawberries well. Too much water can make the topping runny.
- Allow enough chilling time. Overnight refrigeration generally gives the pie its best texture.
- Sweeten to your taste. If your strawberries are particularly sweet, you can slightly reduce the jam.
- Use a chilled serving plate. This can help the slices stay cool for a little longer at the table.
Delicious Variations
1. Strawberry Cheesecake Icebox Pie
For a richer cheesecake flavor, increase the cream cheese slightly and reduce the whipped cream proportionately. Keep the mixture light enough to spread easily and chill thoroughly before serving.
2. Strawberry Chocolate Pie
Sprinkle finely grated chocolate or chocolate curls over the strawberry topping. The chocolate adds a rich contrast to the fruity filling.
3. Strawberry Lemon Icebox Pie
Add 1–2 teaspoons of fresh lemon juice and a little finely grated lemon zest to the cream cheese mixture. The citrus gives the dessert a brighter flavor.
4. Strawberry Vanilla Wafer Pie
Replace the graham cracker crumbs with finely crushed vanilla wafer cookies. This produces a sweeter crust with a delicate vanilla flavor.
5. Mixed Berry Icebox Pie
Combine the strawberries with a handful of fresh blueberries or raspberries. Use fruit that is firm and dry so the topping retains its texture.
6. Strawberry Cream Pie with Extra Fruit
Reserve some of the sliced strawberries and arrange them in a decorative pattern on top just before serving. This is a simple way to make the dessert look especially beautiful for guests.
Serving Suggestions
This chilled strawberry pie works wonderfully for many occasions.
- Summer gatherings: Serve it after a barbecue or outdoor family meal.
- Birthday celebrations: Decorate the top with whole or sliced strawberries for a simple celebration dessert.
- Sunday lunch: Offer a chilled slice after a family meal.
- Afternoon tea: Pair it with tea, coffee, or a glass of cold milk.
- Potlucks and parties: Transport the pie in a covered container and keep it refrigerated until serving.
- Holiday dessert tables: Add fresh strawberry decorations for a colorful contrast to other desserts.
For a special presentation, serve each slice with a small spoonful of whipped cream and a few fresh strawberry pieces.
Frequently Asked Questions
Can I make this pie the day before?
Yes. In fact, making it the day before serving is an excellent idea. Overnight chilling allows the filling to set and makes the pie easier to slice.
Can I use frozen strawberries?
Fresh strawberries are preferable for the topping because frozen strawberries release more liquid as they thaw. If frozen strawberries are your only option, thaw them completely and drain them very well before using them.
Why is my filling too soft?
The filling may be too soft if the heavy cream was not whipped to stiff peaks, the cream cheese mixture was too warm, or the pie did not chill long enough. Refrigerate it for additional time before cutting.
Can I use store-bought whipped topping?
Yes. You can substitute approximately 3 cups of thawed whipped topping for the heavy whipping cream. Fold it into the sweetened cream cheese mixture until combined. The flavor and texture may differ slightly from freshly whipped cream.
How should I store leftovers?
Cover the pie and refrigerate it promptly. For the best quality, enjoy it within 2–3 days. Because it contains dairy and fresh fruit, do not leave it at room temperature for more than 2 hours, or more than 1 hour when the temperature is above 90°F (32°C).
Can I freeze the pie?
The pie can be frozen, although the fresh strawberries may soften after thawing. For the best result, freeze the assembled pie without the fresh strawberry topping, wrap it securely, and use it within about 1 month for good quality. Thaw it in the refrigerator and add the fresh strawberries and jam before serving.
How do I get clean slices?
Chill the pie thoroughly, use a sharp knife, and wipe the blade between slices. This helps create clean edges and keeps the creamy filling from smearing.
Conclusion
This No-Bake Strawberry Icebox Pie is proof that a delicious homemade dessert does not have to be complicated. With a buttery graham cracker crust, a smooth cream cheese filling, and fresh strawberries coated in sweet jam, every bite offers a refreshing combination of creamy, fruity, and crunchy textures.
It is easy enough for an ordinary weekday but attractive enough for birthdays, celebrations, and family gatherings. Best of all, you can prepare it ahead of time and leave it in the refrigerator until you are ready to serve.
Make it for the people you love, share it with friends, or keep a slice waiting in the refrigerator for a special afternoon treat. This is the kind of chilled dessert that can quickly become a favorite in your home.
For the Love of Homemade Desserts
Some of the most memorable recipes are the ones that bring people together around the table. A chilled strawberry pie, served in generous slices and made with simple ingredients, can turn an ordinary meal into something special.
The beauty of this recipe lies in its simplicity: no complicated baking, no elaborate decorations, and no special equipment required. Just a little preparation, fresh strawberries, a creamy filling, and enough patience to let everything chill.
Once you serve that first slice with its beautiful strawberry topping and smooth, creamy center, you may find that everyone wants another piece.
Make it ahead, keep it chilled, and enjoy every delicious bite of this homemade strawberry icebox pie.