
Little Debbie Christmas Tree Cake Balls – A Festive No-Fuss Holiday Dessert
Introduction
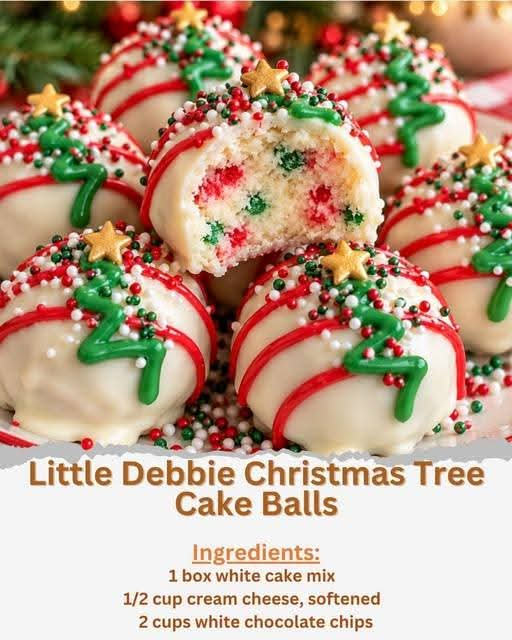
The holiday season is the perfect time to prepare sweet treats that bring joy to the table, and these Little Debbie Christmas Tree Cake Balls are a wonderful addition to any Christmas celebration. Inspired by the nostalgic flavors and festive appearance of classic Christmas tree snack cakes, these bite-sized desserts combine soft white cake, creamy cream cheese, and a smooth white chocolate coating colored in a beautiful holiday green.
Each cake ball is shaped like a miniature Christmas tree, making it an eye-catching treat for Christmas parties, family gatherings, cookie exchanges, dessert tables, and homemade holiday gift boxes. The colorful red and white sprinkles add a festive finishing touch, creating the appearance of tiny ornaments and freshly fallen snow.
One of the best things about this recipe is its simplicity. Instead of making cake completely from scratch, you can use a boxed white cake mix, which saves time while still delivering a delicious result. Once the cake is baked and cooled, it is crumbled, mixed with softened cream cheese, shaped into little trees, and dipped in green-tinted white chocolate.
These Christmas Tree Cake Balls are rich, sweet, soft, and creamy on the inside, with a delicate chocolate shell on the outside. They look impressive, but the preparation is straightforward enough for beginner bakers. You can even invite children to help decorate the finished trees with sprinkles.
Whether you are preparing desserts for Christmas Eve, a winter bake sale, or a festive family movie night, these little cake trees are sure to bring a touch of holiday magic to your dessert platter.
Ingredients

This recipe makes approximately 20 Christmas Tree Cake Balls.
For the cake mixture
- 1 box white cake mix, approximately 15–16 ounces depending on the brand
- Eggs required by the cake mix package
- Vegetable oil required by the cake mix package
- Water required by the cake mix package
- ½ cup cream cheese, softened to room temperature
For the chocolate coating
- 2 cups white chocolate chips
- Green food coloring, preferably oil-based or specifically formulated for chocolate
For decoration
- Red sprinkles
- White sprinkles
- Additional festive sugar decorations, if desired
For preparation
- Wax paper or parchment paper
- Baking sheet
- Large mixing bowl
- Microwave-safe bowl
- Small cookie scoop or tablespoon
- Fork or dipping tool
Important tip: White chocolate can seize or become thick when exposed to water-based food coloring. Oil-based coloring or coloring labeled as suitable for chocolate is the safest choice for a smooth green coating.
Instructions
Step 1: Bake the white cake
Preheat your oven to the temperature specified on the cake mix package. Prepare the baking pan according to the package instructions, using nonstick spray or parchment paper as appropriate.
In a large mixing bowl, combine the white cake mix with the required eggs, vegetable oil, and water. Follow the package directions for mixing, taking care not to overmix the batter.
Pour the batter into the prepared pan and bake for the time recommended on the package. Check for doneness by inserting a toothpick into the center. If it comes out clean or with a few moist crumbs, the cake is ready.
Remove the cake from the oven and allow it to cool completely. This step is essential because warm cake can make the cream cheese mixture too soft and difficult to shape.
Step 2: Crumble the cooled cake
Once the cake has cooled completely, transfer it to a large mixing bowl.
Using clean hands or a fork, break the cake into fine, even crumbs. Remove any particularly large pieces so the final mixture will have a consistent texture.
Continue crumbling until the cake resembles soft, fine breadcrumbs. A uniform crumb helps the cream cheese distribute evenly and makes shaping the Christmas trees much easier.
Step 3: Add the cream cheese
Add the softened cream cheese to the cake crumbs.
Mix thoroughly with a sturdy spoon or clean hands until the cream cheese is evenly incorporated. The mixture should hold together when pressed between your fingers without being excessively wet or sticky.
If the mixture seems too dry, check that the cream cheese has been thoroughly mixed in before adding anything else. If it feels very soft, refrigerate it for 15–20 minutes before shaping.
Avoid adding too much cream cheese, as an overly moist mixture may lose its shape during dipping.
Step 4: Shape the Christmas trees
Line a baking sheet with wax paper or parchment paper.
Scoop out small, evenly sized portions of the cake mixture. Roll each portion gently between your palms to form a compact ball, then taper the top and shape the sides into a small cone.
Gently flatten the sides if you want a more recognizable Christmas tree silhouette. The top should be narrow, while the bottom should be slightly wider and stable enough to stand.
Arrange the shaped trees on the prepared baking sheet, leaving a little space between each piece.
For approximately 20 uniform trees, use a small cookie scoop or tablespoon to divide the mixture evenly.
Step 5: Chill the cake balls
Place the baking sheet in the refrigerator for at least 1 hour.
Chilling allows the cream cheese mixture to firm up, helping the cake trees maintain their shape when dipped into the melted coating.
If the trees become soft while you are working, return them to the refrigerator for another 10–15 minutes.
The cake trees should be firm but not frozen solid when you begin dipping them.
Step 6: Melt the white chocolate
Place the white chocolate chips in a microwave-safe bowl.
Microwave in 30-second intervals, stirring thoroughly after each interval. Continue until the chocolate is mostly melted, then stir until the remaining pieces dissolve into a smooth coating.
White chocolate burns easily, so use short heating intervals and avoid overheating it.
Add a small amount of green food coloring suitable for chocolate. Stir gently until the color is evenly distributed.
If you want a traditional Christmas tree shade, start with a small amount of green and gradually add more until you reach your preferred color.
If the coating becomes too thick for dipping, warm it gently in short bursts and stir well. Avoid adding water or ordinary milk, which can cause the chocolate to seize.
Step 7: Dip each Christmas tree
Remove a few chilled cake trees from the refrigerator at a time, leaving the rest cold.
Using a fork or dipping tool, lower one tree into the green chocolate coating. Spoon chocolate over any exposed areas until the tree is completely covered.
Lift the tree carefully and allow excess chocolate to drip back into the bowl.
Gently tap the fork against the edge of the bowl to remove extra coating without damaging the shape.
Transfer the coated tree to the lined baking sheet. Use a toothpick or small utensil to tidy any excess chocolate around the base if necessary.
Repeat with the remaining cake trees.
Step 8: Decorate with festive sprinkles
While the coating is still wet, decorate each tree with red and white sprinkles.
Red sprinkles can resemble Christmas ornaments, while white sprinkles create the appearance of snow. You can also add tiny silver sugar pearls or other edible holiday decorations for a more elaborate finish.
Work quickly because the chocolate coating may begin to set before you finish decorating.
For a neat presentation, use a small spoon or your fingertips to place decorations carefully rather than scattering too many over each tree.
Step 9: Allow the coating to set
Leave the decorated cake trees at room temperature until the chocolate coating becomes firm.
If you want to speed up the process, place the tray in the refrigerator for approximately 15–30 minutes, or until the coating has completely set.
Once firm, transfer the cake balls to a serving platter or an airtight container.
Step 10: Serve and enjoy
Arrange the Little Debbie Christmas Tree Cake Balls on a festive platter, alternating their positions to create an attractive display.
Serve them chilled or allow them to sit briefly at room temperature before serving, depending on your preferred texture.
Each bite offers a soft, sweet cake center, a creamy hint of cream cheese, and a smooth white chocolate shell. The red and white sprinkles provide the final festive touch.
Methods for Perfect Christmas Tree Cake Balls


1. The cake-crumb method
The key to a smooth cake ball is making sure the baked cake is completely cooled and finely crumbled. Large chunks can cause uneven textures and make the trees difficult to shape.
Fine crumbs combine more easily with cream cheese, creating a mixture that holds its shape.
2. The cream cheese binding method
Cream cheese acts as the binder that transforms ordinary cake crumbs into a moldable dessert mixture.
Start with the specified amount and mix thoroughly before deciding whether anything needs adjusting. Too much cream cheese can make the mixture sticky and cause the trees to slump.
3. The shaping method
For the most recognizable Christmas tree appearance, begin with a compact ball and gradually taper the top into a cone.
Keep the base broad enough for the tree to stand upright. If the shape becomes too soft, chill the mixture before continuing.
4. The chilling method
Refrigeration is essential for easy dipping. Cold cake trees are less likely to break apart in the melted coating.
Keep the unused pieces refrigerated while working in batches, especially in a warm kitchen.
5. The smooth-coating method
Melt white chocolate slowly and stir regularly. If the chocolate becomes too thick, gently warm it again rather than overheating it.
Use coloring intended for chocolate to prevent the coating from becoming grainy or stiff.
6. The decorating method
Add the sprinkles immediately after dipping each tree. Once the chocolate sets, the decorations will not adhere easily.
For a polished look, distribute the decorations evenly rather than covering every surface completely.
History of Christmas Tree Cake-Inspired Desserts
Christmas tree-shaped cakes and holiday sweets have become familiar parts of modern Christmas celebrations. The tradition of serving special cakes during the winter holidays is much older, with European families historically preparing festive breads, fruitcakes, spiced cakes, and other baked treats to mark seasonal gatherings.
In more recent decades, commercially packaged snack cakes have become another source of holiday nostalgia. Little Debbie’s Christmas Tree Cakes are recognizable seasonal treats associated with soft cake, sweet filling, white icing, and colorful festive decorations.
Home bakers have developed many desserts inspired by these holiday snack cakes, including cake pops, dessert bars, truffles, and cake balls. These recipes recreate familiar festive flavors in new shapes that are easy to share at parties.
This particular version uses white cake mix, cream cheese, and a green white-chocolate coating to create a miniature Christmas tree dessert. It is a homemade interpretation inspired by the holiday snack-cake tradition, rather than an official Little Debbie recipe.
The appeal is easy to understand: the recipe combines the nostalgic flavor of cake-based treats with the fun of decorating individual Christmas trees.
Formation: What Makes These Cake Balls So Delicious?
The texture and flavor of these treats come from several ingredients working together.
The white cake center: The cake provides the soft, tender base. Its mild vanilla flavor allows the cream cheese and chocolate coating to shine.
The cream cheese binder: Cream cheese adds richness and moisture while helping the cake crumbs form a cohesive mixture.
The white chocolate shell: The coating creates a sweet outer layer with a delicate snap once set. Its creamy flavor complements the cake center.
The green color: Green food coloring transforms the white chocolate into a festive coating that resembles evergreen branches.
The red and white decorations: Sprinkles provide a colorful finish, evoking the look of ornaments and snow on a miniature Christmas tree.
Together, these elements produce a dessert that is visually festive, easy to portion, and rich enough to satisfy a sweet craving with just one or two pieces.
Preparation Time and Recipe Details
Preparation time
Approximately 20 minutes of active preparation
Baking time
Approximately 25 minutes, depending on the cake mix
Chilling and setting
At least 1 hour, plus time for the chocolate coating to set
Yield
Approximately 20 cake balls
Estimated calories
Approximately 180 calories per serving, depending on portion size and ingredients
Tips for Storage and Make-Ahead Preparation
How to store the cake balls
Because these cake balls contain cream cheese, store them in an airtight container in the refrigerator. They are best enjoyed within 3–5 days.
Arrange them in a single layer when possible. If stacking is necessary, separate the layers with parchment paper to protect the decorations.
Can you freeze them?
Yes. Once the chocolate coating has fully set, arrange the cake balls in a freezer-safe container and freeze for up to 2 months for best quality.
Thaw them in the refrigerator before serving. Keeping them cold during thawing helps reduce condensation on the chocolate coating.
Can you prepare them ahead of Christmas?
Absolutely. Bake the cake, prepare the mixture, and shape the trees a day ahead. Keep them covered in the refrigerator and dip them in chocolate when you are ready to decorate.
You can also make the finished cake balls a few days before your celebration, provided they remain refrigerated.
How can you make them look more professional?
- Use a cookie scoop for consistent sizes.
- Chill the trees thoroughly before dipping.
- Work in small batches.
- Use a dipping fork for an even coating.
- Remove excess chocolate around the base.
- Apply sprinkles before the coating sets.
- Arrange the finished trees on a white platter to highlight their green color.
Conclusion
Little Debbie Christmas Tree Cake Balls are a delightful way to bring festive color, nostalgic flavor, and homemade charm to the holiday season. With a soft white cake center, creamy cream cheese binding, a sweet green white-chocolate coating, and cheerful red and white sprinkles, these little treats look as wonderful as they taste.
They are ideal for Christmas dessert tables, holiday parties, school celebrations, cookie exchanges, and homemade edible gifts. The recipe is simple enough for beginners, yet the finished cake balls look special enough to impress your guests.
Best of all, you can make them ahead of time, customize the decorations, and involve the whole family in the shaping and decorating process. Every little tree becomes a miniature holiday creation.
Once you add these festive cake balls to your Christmas baking list, they may become a seasonal tradition your family asks for year after year.
For Christmas Cake Ball Lovers
These treats are perfect for anyone who loves sweet cake bites, creamy centers, and festive holiday desserts. They bring together the convenience of a boxed cake mix and the creativity of homemade Christmas decorating.
Serve them alongside sugar cookies, chocolate fudge, gingerbread, peppermint bark, or other seasonal favorites for a colorful holiday dessert spread.
How would you decorate your Christmas Tree Cake Balls?
- Classic green trees with red and white sprinkles
- Green trees with colorful candy ornaments
- White chocolate trees covered in snowy decorations
- Extra-sweet trees with a drizzle of white chocolate
Whichever style you choose, these little Christmas tree treats are a delicious way to make holiday memories, share homemade sweets, and bring a little extra sweetness to the most wonderful time of the year.