
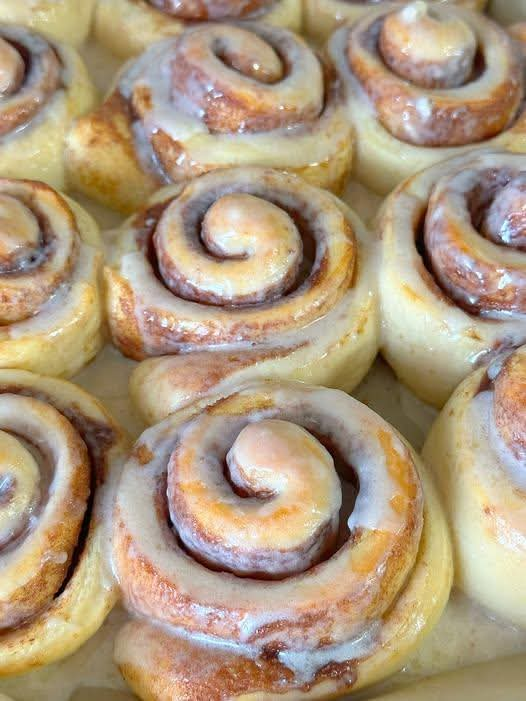
Homemade Cinnamon Rolls: Soft, Fluffy, Buttery Rolls with Sweet Cinnamon Filling and Creamy Vanilla Icing
Introduction
There is nothing quite like the smell of homemade cinnamon rolls baking in the oven. The warm aroma of cinnamon, brown sugar, and freshly baked bread fills the kitchen with a comforting sweetness that makes everyone eager to gather around the table. Soft, fluffy, and generously coated with creamy vanilla icing, these homemade cinnamon rolls are the kind of treat that makes an ordinary morning feel special.
Unlike many store-bought cinnamon rolls, homemade cinnamon rolls allow you to control the sweetness, the amount of cinnamon filling, and the generous layer of icing on top. Each roll is made from a soft yeast dough enriched with butter, egg, and warm milk, creating a tender texture that practically melts in your mouth.
The secret to making bakery-style cinnamon rolls at home is allowing the dough enough time to rise, spreading the cinnamon-sugar filling evenly, and baking the rolls until they are lightly golden while remaining soft inside.
Whether you serve them for breakfast, brunch, a holiday gathering, or an afternoon treat with coffee, these cinnamon rolls are guaranteed to become a favorite. Best of all, the recipe uses simple ingredients that you may already have in your kitchen.
Ingredients


This recipe makes approximately 12 delicious cinnamon rolls.
For the dough
- 3 cups bread flour
- 2 teaspoons instant yeast
- 3 tablespoons granulated sugar
- ½ teaspoon salt
- 1 large egg
- 4 tablespoons unsalted butter, softened
- ¾ cup warm milk
- Additional milk, 1 tablespoon at a time, if needed
For the cinnamon filling
- 5 tablespoons unsalted butter, softened
- ½ cup packed brown sugar
- 1 tablespoon ground cinnamon
For the creamy vanilla icing
- 3 tablespoons unsalted butter, softened
- 2 cups powdered sugar
- 1 teaspoon vanilla extract
- 3 tablespoons milk, plus a little extra if needed
Instructions
Step 1: Prepare the dough
Begin by adding the bread flour, instant yeast, granulated sugar, and salt to the bowl of a stand mixer. Mix the dry ingredients briefly until they are evenly distributed.
Add the softened butter and egg. Slowly pour in the warm milk while mixing on low speed. Continue mixing until the ingredients come together to form a soft dough.
Increase the mixer speed to medium and knead for approximately 8–10 minutes. The dough should become smooth, elastic, and slightly tacky without being excessively sticky.
If the dough looks dry or crumbly, add milk one tablespoon at a time until it comes together properly.
Transfer the dough to a lightly greased bowl. Turn it once to coat the surface, then cover with a clean kitchen towel or plastic wrap.
Leave the dough in a warm place for approximately 1–2 hours, or until it has doubled in size. The exact rising time will depend on the temperature of your kitchen.
Step 2: Prepare the cinnamon-sugar filling
While the dough rises, prepare the filling.
In a small bowl, combine the packed brown sugar and ground cinnamon. Stir thoroughly until the cinnamon is evenly distributed throughout the sugar.
Make sure the butter is softened enough to spread easily. Soft butter will cover the dough without tearing it and will help the cinnamon-sugar mixture adhere to the surface.
Set the filling aside until the dough is ready.
Step 3: Roll out the dough
Once the dough has doubled in size, gently press it down to release excess air.
Transfer it to a lightly floured work surface. Using a rolling pin, roll the dough into a large rectangle approximately ¼ inch thick.
Try to keep the edges reasonably straight so the finished rolls will be similar in size.
Spread the softened butter evenly across the surface, leaving a small border along one long edge. Sprinkle the cinnamon-brown sugar mixture over the butter, distributing it evenly from one end to the other.
Press the filling gently into the butter so that it stays in place as you roll the dough.
Step 4: Shape the cinnamon rolls
Starting at one long edge, roll the dough tightly into a log. Keep the roll firm enough to hold its shape, but avoid squeezing it so tightly that the filling escapes.
Pinch the seam gently to seal the log.
Using a sharp knife or unflavored dental floss, cut the log into 12 equal pieces. Dental floss is particularly useful because it cuts cleanly without flattening the soft dough.
Arrange the rolls on a parchment-lined baking sheet or in a lightly greased baking dish, leaving a little space between them to allow for expansion.
Cover the rolls and let them rise for another 45–60 minutes, or until they look puffy and slightly enlarged.
Step 5: Bake until golden and fluffy
Preheat your oven to 350°F (175°C).
Place the risen cinnamon rolls in the oven and bake for approximately 20–25 minutes. Begin checking them at the 20-minute mark.
The tops should be lightly golden, and the centers should be fully baked but still soft. Avoid overbaking, as this can make the rolls dry.
If the tops brown too quickly before the centers are done, loosely cover them with aluminum foil for the remaining baking time.
Remove the rolls from the oven and allow them to cool for about 5–10 minutes before icing.
Step 6: Make the creamy vanilla icing
While the rolls bake, prepare the icing.
Place the softened butter in a mixing bowl and beat until smooth and creamy.
Gradually add the powdered sugar, mixing at low speed to prevent it from scattering. Add the vanilla extract and milk, then beat until the icing becomes smooth, thick, and spreadable.
If the icing is too thick, add a little more milk, about one teaspoon at a time. If it is too thin, add a little extra powdered sugar.
The finished icing should be creamy enough to spread over the rolls while slowly melting into their warm surfaces.
Step 7: Ice and serve
Once the cinnamon rolls have cooled slightly, spread the vanilla icing generously over the tops.
For a delicious bakery-style finish, apply the icing while the rolls are still warm. Some will melt into the cinnamon swirls, while the rest will remain as a sweet, creamy layer on top.
Serve the rolls warm for the best flavor and texture. Each bite should offer soft bread, buttery cinnamon filling, caramel-like brown sugar, and smooth vanilla icing.
Methods for Perfect Homemade Cinnamon Rolls


1. The proper kneading method
Kneading develops the gluten in bread flour, giving the dough the strength needed to rise and create a soft, stretchy texture. Knead until the dough looks smooth and elastic.
If kneading by hand, expect to spend approximately 10–15 minutes working the dough.
2. The correct rising method
Yeast needs warmth, moisture, and time to work. Allow the dough to rise until doubled rather than relying only on the clock.
A cold kitchen may require additional rising time. Avoid placing the dough somewhere excessively hot, as high temperatures can damage the yeast.
3. The even-filling method
Spread the butter gently and distribute the cinnamon-sugar mixture evenly. This ensures that every roll has a delicious spiral of sweet cinnamon filling.
Leaving a small border along the far edge helps seal the log and prevents too much filling from escaping.
4. The clean-cutting method
For neat, round cinnamon rolls, slide a piece of unflavored dental floss underneath the dough log, cross the ends over the top, and pull them in opposite directions.
This method creates clean cuts without crushing the dough.
5. The soft-baking method
Bake only until the rolls are cooked through and lightly golden. The centers should remain tender rather than dry.
Using a baking dish can help the rolls stay close together, allowing their sides to remain soft as they bake.
6. The warm-icing method
Let the rolls rest briefly before applying the icing. If they are extremely hot, the icing may melt completely and become too thin. If they are slightly warm, the icing will soften beautifully while retaining some of its creamy texture.
History of Cinnamon Rolls
Cinnamon rolls belong to a long tradition of sweet, enriched breads enjoyed across Europe and beyond. Cinnamon itself was a prized spice in historical trade, and its warm aroma made it a natural addition to sweet pastries, cakes, and breads.
One of the best-known traditions comes from Sweden, where kanelbullar, or cinnamon buns, became a beloved part of everyday coffee breaks. Sweden even celebrates Cinnamon Bun Day on October 4.
Similar pastries developed throughout Northern Europe and eventually became popular in North America, where cinnamon rolls often grew larger and sweeter, with generous fillings made from butter, brown sugar, and cinnamon.
American-style cinnamon rolls are frequently topped with powdered-sugar icing or cream cheese frosting. They became especially popular as a breakfast and brunch treat, although many families enjoy them as a dessert or holiday pastry.
Today, homemade cinnamon rolls remain a symbol of comfort, hospitality, and family baking. Their enduring appeal comes from the combination of simple ingredients, a wonderful aroma, and a soft, sweet center.
Formation: Understanding the Layers of a Cinnamon Roll
The beauty of a cinnamon roll comes from the way its ingredients work together during preparation and baking.
The outer layer: The bread dough develops a lightly golden surface in the oven while remaining tender inside.
The soft interior: Bread flour, milk, egg, butter, and yeast create a rich dough that rises into a fluffy texture.
The cinnamon spiral: Butter holds the brown sugar and cinnamon against the dough, creating the familiar swirls throughout every roll.
The caramelized filling: As the rolls bake, the brown sugar melts with the butter and cinnamon, producing a sweet, fragrant filling.
The creamy icing: Powdered sugar, butter, vanilla, and milk combine to form a smooth topping that complements the warm spices.
Together, these layers create the irresistible contrast that makes homemade cinnamon rolls so satisfying.
Tips, Variations, and Storage
Helpful baking tips
- Use warm milk, not hot milk. Excessive heat can damage the yeast.
- Measure the flour carefully. Too much flour can make the rolls dense.
- Use softened butter for easy spreading.
- Give the dough enough time to rise for a light texture.
- Avoid adding too much extra flour while kneading.
- Let the baked rolls cool slightly before icing.
Delicious variations
Cream cheese icing: Replace part of the butter in the icing with softened cream cheese for a tangier, richer topping.
Pecan cinnamon rolls: Sprinkle chopped pecans over the cinnamon filling before rolling the dough.
Raisin cinnamon rolls: Add a handful of raisins to the filling for extra sweetness and texture.
Extra-cinnamon rolls: Increase the cinnamon slightly if you prefer a stronger, warmer spice flavor.
Caramel cinnamon rolls: Drizzle caramel sauce over the icing for an indulgent dessert-style variation.
Make-ahead method
You can prepare the rolls the night before. After shaping them, place them in a greased baking dish, cover tightly, and refrigerate overnight.
The next morning, let them sit at room temperature until puffy before baking. Depending on how much they have risen in the refrigerator, this may take around 45–90 minutes.
Storage instructions
Store leftover cinnamon rolls in an airtight container at room temperature for up to 2 days, or refrigerate them for up to 5 days.
Reheat an individual roll in the microwave for approximately 10–20 seconds, checking that it is warm without becoming tough.
For longer storage, freeze the cooled rolls in an airtight container for up to 2–3 months. Thaw and reheat before serving.
Conclusion
Homemade cinnamon rolls are worth every minute of preparation. From kneading the soft dough to spreading the fragrant cinnamon filling and finishing everything with creamy vanilla icing, every step contributes to a treat that tastes wonderful fresh from the oven.
The best part is that you can customize them to suit your taste. Make them extra gooey, add chopped pecans, prepare a cream cheese topping, or keep them classic with a simple vanilla glaze.
Serve them on a quiet weekend morning, share them with friends over coffee, or prepare a batch for a special family gathering. Once you experience the soft texture and irresistible aroma of freshly baked cinnamon rolls, it is easy to understand why homemade versions are so beloved.
For the Cinnamon Roll Lovers
These cinnamon rolls are made for anyone who loves soft centers, buttery cinnamon swirls, and sweet icing that melts into every layer.
Some people prefer a light drizzle of icing that lets the cinnamon flavor shine, while others believe that a cinnamon roll is never complete without a thick, generous coating.
How do you like your homemade cinnamon rolls?
- Lots of creamy vanilla icing
- Just a little icing
- Cream cheese frosting instead
- Extra cinnamon filling and pecans
Whatever your preference, these homemade cinnamon rolls are a delicious reminder that some of the best treats are the ones made from scratch and shared with the people you love.