
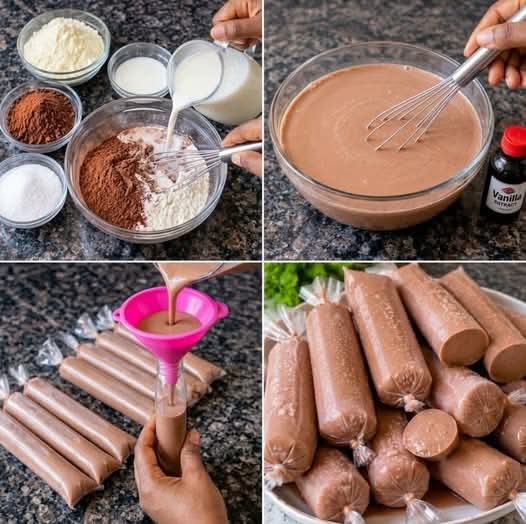
Chocolate Ice Candy Recipe – Creamy, Rich, and Refreshing Homemade Chocolate Treat
Introduction
Chocolate Ice Candy is a delicious frozen dessert that brings together the rich flavor of cocoa, the sweetness of milk, and a smooth, creamy texture in every bite. It is an easy homemade treat that is perfect for hot summer afternoons, family gatherings, children’s parties, or whenever you crave something sweet and refreshing.
Made with simple ingredients such as liquid milk, powdered milk, cocoa powder, sugar, and evaporated milk, this chocolate ice candy is affordable, easy to prepare, and wonderfully satisfying. You do not need an ice cream machine or any special equipment. With just a few minutes of preparation and enough time in the freezer, you can create a batch of chocolate treats that everyone will enjoy.
The secret to making delicious chocolate ice candy is combining the ingredients thoroughly so that the cocoa dissolves completely and the milk mixture becomes smooth. The powdered milk and evaporated milk help create a richer taste, while the cocoa powder gives the dessert its deep chocolate flavor.
Whether you serve it to your children after school, share it with friends, or prepare a large batch for a celebration, this homemade Chocolate Ice Candy is a simple recipe worth keeping in your family recipe collection.
Ingredients


- 2 cups liquid milk – Provides the creamy milk base.
- ½ cup powdered milk – Adds richness and helps give the ice candy a fuller texture.
- 3 tablespoons cocoa powder – Gives the dessert its delicious chocolate flavor.
- ½ cup granulated sugar – Adds sweetness; adjust according to your taste.
- ½ cup evaporated milk – Creates a richer, creamier result.
Optional Ingredients
These additions are not necessary, but you can use them to customize your chocolate ice candy.
- 1 teaspoon vanilla extract for extra aroma.
- 2 tablespoons chocolate syrup for a deeper chocolate taste.
- 1 tablespoon cornstarch for a slightly thicker mixture.
- A small pinch of salt to balance the sweetness.
- 2 tablespoons finely grated chocolate for a more intense chocolate flavor.
Equipment Needed
- A medium-sized mixing bowl or saucepan.
- A whisk or mixing spoon.
- Measuring cups and spoons.
- A fine-mesh strainer, if needed.
- Small ice candy plastic bags or freezer-safe popsicle molds.
- A funnel or small jug for easier filling.
- A freezer.
Instructions: How to Make Chocolate Ice Candy
Step 1: Prepare the Milk Mixture
Pour the 2 cups of liquid milk into a clean mixing bowl or saucepan. Add the ½ cup of powdered milk gradually while whisking continuously.
Continue mixing until the powdered milk dissolves completely. Take your time with this step because undissolved milk powder can create small lumps in the finished dessert.
If you prefer a particularly smooth mixture, you can use a blender for approximately 20–30 seconds.
Step 2: Add the Cocoa Powder
Add the 3 tablespoons of cocoa powder to the milk mixture.
Whisk thoroughly until the cocoa is fully incorporated and the mixture turns a uniform chocolate brown color.
For the best results, sift the cocoa powder before adding it. This helps prevent lumps and makes it easier to achieve a smooth consistency.
If the cocoa powder is difficult to dissolve, mix it first with a few tablespoons of warm milk to form a smooth paste. Allow the paste to cool slightly before stirring it into the remaining milk.
Step 3: Add the Sugar
Add the ½ cup of sugar to the chocolate mixture.
Stir continuously until the sugar dissolves. Taste a small amount and adjust the sweetness if necessary.
Remember that frozen desserts can taste slightly less sweet when frozen, so the mixture should taste pleasantly sweet before it goes into the freezer.
Step 4: Pour in the Evaporated Milk
Add the ½ cup of evaporated milk and mix until everything is well combined.
The evaporated milk gives the chocolate ice candy a richer, more satisfying milk flavor. Continue whisking until the mixture is smooth and evenly colored.
If you are using vanilla extract or a pinch of salt, add them at this stage.
Step 5: Check the Consistency
Inspect the mixture to make sure there are no visible cocoa lumps or undissolved milk powder.
If the mixture looks uneven, whisk it again or blend it briefly. You can also pour it through a fine-mesh strainer.
The finished mixture should be pourable, smooth, and creamy.
Step 6: Fill the Ice Candy Bags or Molds
Using a small jug or funnel, carefully pour the chocolate mixture into clean ice candy bags or freezer-safe popsicle molds.
If you are using plastic bags, leave enough space at the top to tie them securely. Do not overfill them because the liquid expands slightly as it freezes.
Tie each bag tightly, or secure the lids on your molds according to the manufacturer’s instructions.
Step 7: Freeze Until Firm
Arrange the filled bags or molds in a flat position inside the freezer.
Freeze for approximately 6–8 hours, or overnight, depending on the size of the portions and the temperature of your freezer.
For the firmest texture, leave them in the freezer overnight.
Step 8: Serve and Enjoy
Once the chocolate ice candy is completely frozen, remove the desired number of portions from the freezer.
Allow each one to sit at room temperature for about 1–3 minutes if it is too hard to bite comfortably.
Enjoy your homemade chocolate ice candy as a refreshing snack or a simple dessert after a meal.
Preparation and Cooking Methods
Preparation time
10–15 minutes
Freezing time
6–8 hours or overnight
Cooking time
None required for the basic recipe
Estimated yield
Approximately 8–12 small portions, depending on the size of your bags or molds
Method 1: The No-Cook Method
This is the easiest way to prepare chocolate ice candy.
- Combine the liquid milk and powdered milk.
- Add the cocoa powder and sugar.
- Pour in the evaporated milk.
- Whisk until smooth.
- Fill the bags or molds.
- Freeze until solid.
This method is ideal when you want a quick dessert with minimal preparation and no stovetop cooking.
Method 2: The Warm-Milk Method
If your cocoa powder or powdered milk tends to form lumps, the warm-milk method can help.
- Warm a small portion of the liquid milk in a saucepan over low heat. Do not boil it.
- Whisk in the cocoa powder and sugar until dissolved.
- Add the powdered milk and stir until smooth.
- Remove the pan from the heat.
- Mix in the remaining liquid milk and evaporated milk.
- Allow the mixture to cool completely before filling the bags or molds.
- Freeze until firm.
This approach makes it easier to dissolve the cocoa powder and sugar evenly. Never place a warm mixture directly into thin plastic bags, and do not put a hot mixture into the freezer.
The History of Chocolate Ice Candy
Frozen milk-based desserts have a long history in many parts of the world. Before modern refrigerators became common, people used ice, snow, and other cooling methods to preserve and prepare refreshing treats.
Chocolate ice candy belongs to the broader family of homemade frozen desserts that became especially popular as freezers and inexpensive plastic packaging became more accessible.
In the Philippines, ice candy is a familiar homemade frozen snack often prepared with ingredients such as powdered milk, fresh milk, fruit, chocolate, and sugar. It is commonly frozen in narrow plastic bags and sold in neighborhood shops or made at home for family enjoyment.
Chocolate is one of the many flavors people enjoy because it is familiar, affordable, and easy to prepare. Different households develop their own recipes, adjusting the sweetness, milk content, and cocoa quantity to create their preferred taste.
Although the exact origins of this particular combination of ingredients are difficult to establish, the recipe reflects a popular tradition of making simple, affordable frozen treats at home.
Formation: What Makes Chocolate Ice Candy Creamy?
The texture of chocolate ice candy depends on how the ingredients work together during freezing.
1. Liquid milk creates the base. Milk provides moisture and a mild, creamy flavor that allows the cocoa to shine.
2. Powdered milk increases the milk solids. It adds a fuller dairy taste and helps the dessert feel richer than a mixture made with liquid milk alone.
3. Cocoa powder supplies the chocolate flavor. Its natural chocolate notes balance the sweetness and give the frozen dessert its characteristic brown color.
4. Sugar adds sweetness and influences texture. Sugar does more than improve flavor; it also lowers the freezing point of the mixture. This can help prevent the dessert from becoming excessively hard, although the recipe will still freeze firmly.
5. Evaporated milk adds richness. Its concentrated milk flavor makes the finished dessert taste more indulgent.
When the mixture freezes, ice crystals form. Thorough mixing, sufficient milk solids, and the right amount of sugar help create a more pleasant eating experience. Because this recipe does not contain much fat compared with traditional ice cream, it may have a slightly icy texture rather than the soft, scoopable consistency of premium ice cream.
Tips for Perfect Homemade Chocolate Ice Candy
- Dissolve everything completely. Lumps of cocoa or powdered milk can affect the texture.
- Use good-quality cocoa powder. Unsweetened cocoa gives you better control over the chocolate flavor and sweetness.
- Adjust the sugar carefully. Start with the suggested amount, then make small adjustments to suit your taste.
- Do not overfill the bags. Leave space for expansion and secure each bag tightly.
- Freeze the portions flat. This helps them freeze evenly and makes storage easier.
- Keep the mixture cool before freezing. If you use the warm-milk method, let it cool completely first.
- Avoid repeated thawing and refreezing. This can create larger ice crystals and reduce the quality of the dessert.
- Use clean, food-safe packaging. Seal each portion carefully to protect it from freezer odors and contamination.
Delicious Variations to Try

Double Chocolate
Add 1–2 tablespoons of chocolate syrup or a little finely grated chocolate for a more intense chocolate taste.

Extra Creamy
Replace a small portion of the liquid milk with additional evaporated milk for a richer flavor.

Chocolate Banana
Blend in half a ripe banana for a naturally sweet flavor and a thicker texture.
You can also experiment with a small amount of instant coffee to deepen the chocolate flavor, or add a little cinnamon for a warm, aromatic twist.
If you add fruit, make sure it is fresh and thoroughly blended. Keep in mind that changing the proportions of milk, sugar, and other ingredients may affect the final texture.
How to Store Chocolate Ice Candy
Store the finished chocolate ice candy in a freezer at approximately -18°C (0°F) or colder. Keep the bags or molds sealed and protected from other foods.
For the best flavor and texture, enjoy the ice candy within about 2–4 weeks. It may remain frozen for longer, but its quality can gradually decline.
Because this dessert contains dairy, do not leave it sitting at room temperature for extended periods. Return any portions you are not serving to the freezer promptly, and discard any that have been left out too long or show signs of contamination.
Serving Suggestions
Chocolate ice candy is delicious on its own, but you can also serve it as part of a simple dessert spread.
- Serve after lunch or dinner on a warm day.
- Offer it as a homemade after-school snack.
- Include it in a children’s birthday party dessert selection.
- Serve alongside fresh strawberries or sliced bananas.
- Prepare several flavors together for a colorful homemade frozen treat collection.
- Garnish a serving plate with a little cocoa powder or grated chocolate when serving the dessert without its plastic bag.
For a party, prepare the ice candy the day before so that every portion has enough time to freeze completely.
Frequently Asked Questions
1. Can I make chocolate ice candy without a blender?
Yes. A whisk and a mixing bowl are enough. Just add the powdered milk and cocoa gradually and whisk thoroughly to prevent lumps.
2. Why is my chocolate ice candy too hard?
It may contain too much water relative to the sugar and milk solids, or it may simply be frozen very solid. Allow it to soften for a minute or two before eating. A little additional sugar or evaporated milk in your next batch may improve the texture.
3. Why does my chocolate ice candy taste weak?
Your cocoa powder may be mild, or you may prefer a stronger chocolate flavor. Try increasing the cocoa powder slightly, adding a small amount of chocolate syrup, or using a higher-quality unsweetened cocoa.
4. Can I reduce the sugar?
Yes. You can reduce the sugar to suit your preference, but the dessert may freeze harder and taste less sweet. The sugar also affects texture, not just flavor.
5. Can I use fresh milk instead of evaporated milk?
Yes, although the result may be less rich. Evaporated milk adds concentrated dairy flavor and helps make the dessert more satisfying.
6. How long does chocolate ice candy take to freeze?
Most small portions need around 6–8 hours, although freezing overnight gives you a more reliable result.
Conclusion
Chocolate Ice Candy is proof that a delicious homemade dessert does not need complicated ingredients or expensive equipment. With liquid milk, powdered milk, cocoa powder, sugar, and evaporated milk, you can prepare a smooth, chocolatey frozen treat that is perfect for sharing.
The recipe is easy to customize, simple enough for beginners, and suitable for making in batches. Whether you prefer a classic chocolate flavor, an extra-creamy variation, or a double-chocolate version, the basic method gives you an excellent starting point.
Prepare a batch today, let it freeze overnight, and enjoy the wonderful taste of homemade chocolate ice candy whenever you need a refreshing sweet treat.
For Chocolate Lovers
If you love chocolate desserts, this recipe deserves a place in your collection. Each frozen portion offers a refreshing combination of cocoa and creamy milk flavor without requiring an ice cream machine or a long list of ingredients.
It is a lovely recipe to share with family, serve to guests, or prepare ahead of time for warm days. Once you have mastered the basic version, you can experiment with different flavors and find the combination that everyone at home enjoys most.
Recipe reminder: Mix thoroughly, fill carefully, freeze completely, and enjoy your homemade Chocolate Ice Candy cold.