
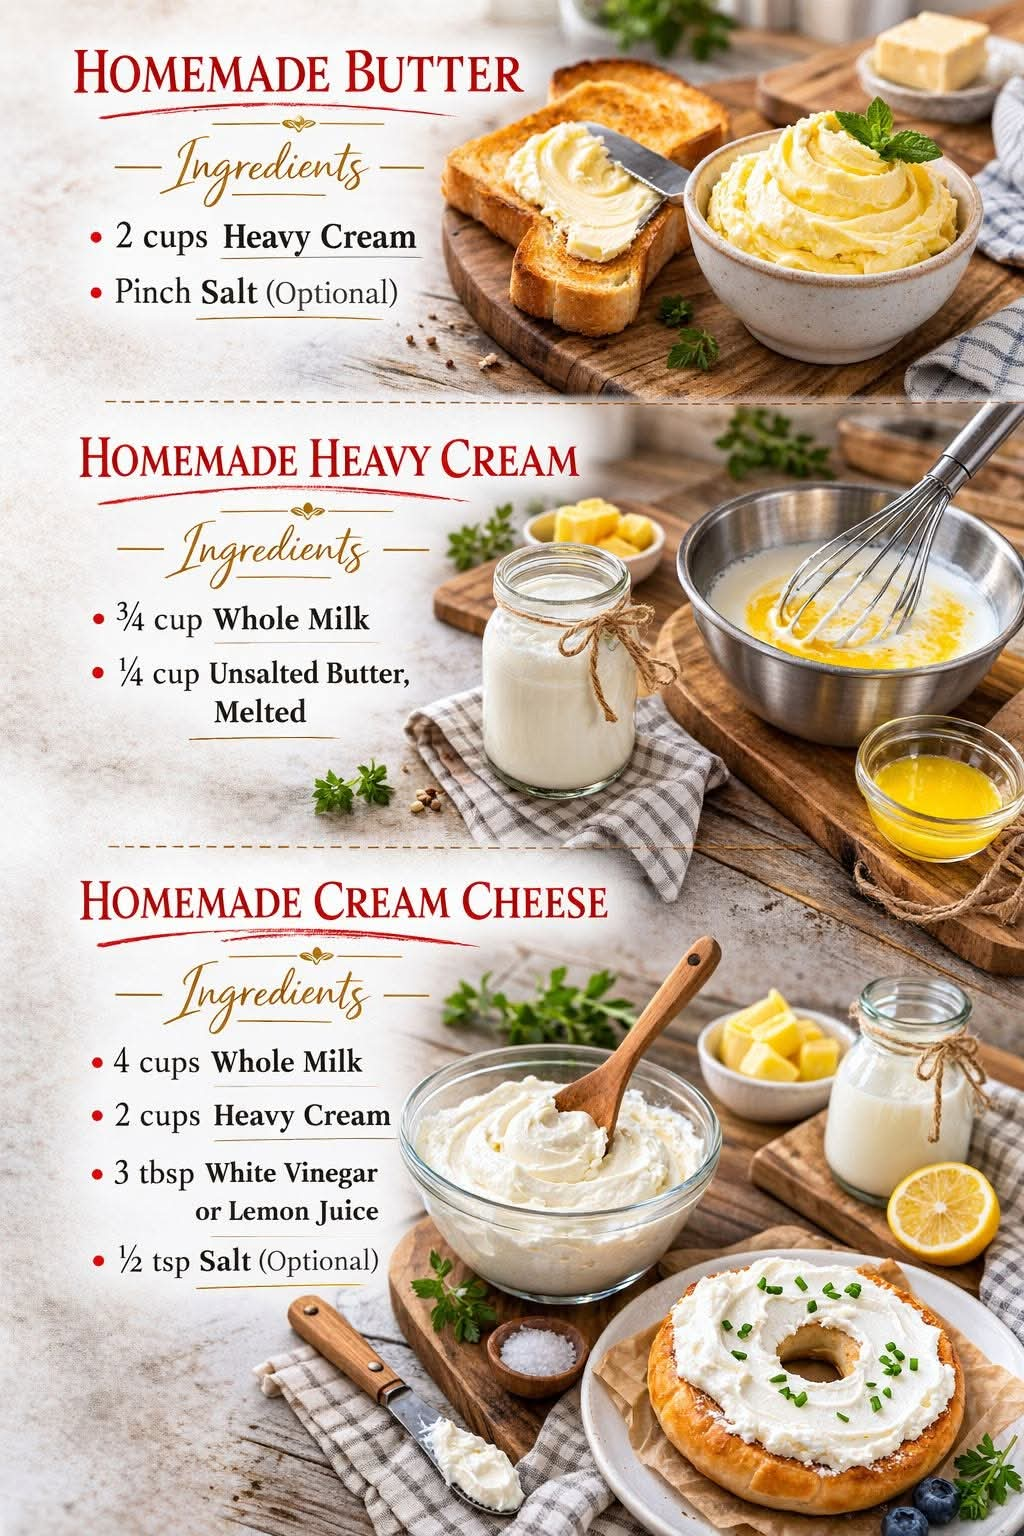
Homemade Butter, Heavy Cream Substitute, and Cream Cheese: Three Easy Kitchen Essentials
Introduction
Making homemade dairy products is a wonderful way to bring freshness, flavor, and a traditional homemade touch into your kitchen. With a few simple ingredients and some basic kitchen equipment, you can prepare your own creamy butter, a convenient heavy cream substitute for cooking and baking, and smooth homemade cream cheese.
These three recipes are useful for everyday cooking, homemade desserts, breakfast spreads, sauces, cakes, cheesecakes, frostings, and many other family favorites. Instead of relying entirely on store-bought products, you can learn how each ingredient is made and adjust the flavor and texture to suit your needs.
Homemade butter has a rich, fresh taste and can be salted or left unsalted. The heavy cream substitute combines milk and butter to create a useful alternative for many cooked dishes. Homemade cream cheese is made by separating milk solids from liquid whey and blending the curds until creamy.
Below, you will find three detailed recipes, including their ingredients, preparation methods, instructions, helpful tips, traditional background, and storage recommendations.
Recipe 1: Homemade Butter

Introduction to Homemade Butter
Homemade butter is one of the simplest dairy products you can make at home. All you need is heavy cream, a little patience, and a mixer, food processor, or tightly sealed jar.
As you whip the cream, it first becomes fluffy whipped cream. Continue mixing, and the fat eventually separates from the liquid. The solid portion becomes butter, while the remaining liquid is traditionally called buttermilk.
The finished butter is rich, creamy, and delicious on warm bread, toast, pancakes, vegetables, and freshly baked biscuits. You can also use it in cookies, cakes, pastries, sauces, and other homemade recipes.
Ingredients
- 2 cups heavy cream (480 ml), preferably not ultra-pasteurized
- A pinch of salt, optional
- Cold water for rinsing
Preparation time: 5–10 minutes, depending on equipment
Yield: Approximately ¾ to 1 cup of butter, depending on the cream’s fat content and processing.
Equipment Needed
- Stand mixer, hand mixer, food processor, or sturdy jar with a tight-fitting lid
- Large mixing bowl, if needed
- Fine-mesh strainer
- Spatula or clean hands
- Airtight storage container
Instructions
Step 1: Prepare the cream
Pour the heavy cream into the bowl of a stand mixer or food processor. If you are using a jar, fill it no more than halfway so the cream has room to move.
For easier separation, use cream with a high milk-fat content. Cream that is not ultra-pasteurized may separate more readily, although some ultra-pasteurized creams also work.
Step 2: Whip the cream
Begin mixing at medium speed. At first, the cream will become thicker and form soft peaks. Continue beating until it resembles whipped cream.
Do not stop at this stage. Keep mixing, and the whipped cream will eventually lose its fluffy texture and begin to look grainy.
Step 3: Separate the butter
After further mixing, yellowish clumps of butter will form, and a thin liquid will separate from them.
This is the stage when the cream has turned into butter. The liquid is the buttermilk left over from the churning process.
Turn off the mixer once the butter has clearly separated.
Step 4: Drain the buttermilk
Pour the contents through a fine-mesh strainer, collecting the liquid in a clean container.
You can save the liquid for pancakes, biscuits, or other baking recipes if it has been handled hygienically and refrigerated promptly. Remember that this liquid is not necessarily the same as cultured buttermilk sold in stores.
Step 5: Rinse the butter
Transfer the butter into a bowl and add cold water. Gently press and fold the butter with a spatula to release any remaining buttermilk.
Drain the cloudy water and repeat with fresh cold water until the water is nearly clear.
This step helps remove residual buttermilk, which can otherwise shorten the butter’s storage life.
Step 6: Knead and season
Press the butter gently to remove as much remaining liquid as possible. Add a pinch of salt if you prefer salted butter.
Mix until the salt is evenly distributed. For unsalted butter, simply leave it out.
Step 7: Shape and store
Transfer the butter into a clean, airtight container. Smooth the top with a spatula or shape it into a small block.
Refrigerate promptly and use within approximately one week as a conservative homemade storage guideline. For longer storage, freeze it in a well-sealed container.
Methods for Making Homemade Butter
There are three convenient ways to make butter at home.
Stand mixer method: The easiest option for larger batches. Use a splash guard if available because the liquid may splatter when separation occurs.
Food processor method: A fast option that usually produces butter in a short time. Watch carefully once the cream begins to separate.
Jar-shaking method: Pour cream into a tightly sealed jar, leaving plenty of empty space. Shake vigorously until the cream passes through the whipped stage and forms butter. This method takes more effort but is useful when you do not have an electric appliance.
Tips for Perfect Butter
- Keep the cream cold before beginning.
- Use a large bowl to prevent splashing.
- Do not discard the butter before rinsing it thoroughly.
- Add salt gradually so the butter does not become too salty.
- Use clean utensils and a clean storage container.
- Avoid leaving homemade butter at room temperature for extended periods.
History of Homemade Butter
Butter-making dates back thousands of years. Before modern refrigeration and electric mixers, families produced butter by shaking or churning cream in containers made from wood, ceramic, leather, or other available materials.
Traditional butter-making was an important part of farm life. Cream collected from milk was churned into butter, while the remaining liquid was used in cooking or fed to animals. Butter could be stored and transported more easily than fresh cream, making it a valuable household ingredient.
Today, homemade butter remains popular because it is simple to prepare and allows cooks to control its saltiness, freshness, and flavor.
Formation of Butter
Butter forms when cream is agitated. The mechanical action causes fat globules to collide and combine, eventually separating the milk fat into a solid mass.
The process follows three main stages:
- Liquid cream becomes whipped cream.
- Continued agitation breaks down the foam and encourages the fat globules to join together.
- Butter separates from the liquid buttermilk.
Rinsing and kneading remove excess liquid, producing a smoother butter that is better suited for storage.
Conclusion
Homemade butter is a rewarding kitchen project that requires very few ingredients. Whether spread on warm bread, melted over vegetables, or incorporated into homemade pastries, it offers a fresh and satisfying flavor.
Once you understand the process, you can easily prepare salted or unsalted butter whenever you have heavy cream available.
For Butter Lovers
If you enjoy traditional cooking and homemade dairy products, this recipe is an excellent place to start. Try serving fresh butter with warm toast, homemade rolls, pancakes, cornbread, or biscuits. You can also mix in fresh herbs after making the butter for a savory spread.
Recipe 2: Homemade Heavy Cream Substitute

Introduction to Homemade Heavy Cream Substitute
Heavy cream is commonly used to make creamy sauces, soups, pasta dishes, casseroles, and baked goods. If you run out of heavy cream, a mixture of whole milk and melted butter can be a practical substitute for many recipes.
Milk provides moisture, while butter supplies additional fat. When combined thoroughly, they create a richer mixture than milk alone.
However, this substitute has an important limitation: it cannot reliably be whipped into whipped cream. It is intended mainly for cooking and baking applications where the ingredients will be mixed into a batter, sauce, or other dish.
Ingredients
- ¾ cup whole milk (180 ml)
- ¼ cup unsalted butter, melted (approximately 57 g or 60 ml by volume)
Preparation time: 5 minutes
Yield: Approximately 1 cup of substitute
Equipment Needed
- Small saucepan or microwave-safe bowl
- Measuring cup
- Mixing bowl or blender
- Whisk or spoon
Instructions
Step 1: Melt the butter
Place the unsalted butter in a small saucepan over low heat or melt it carefully in the microwave.
Heat only until melted. Do not allow it to brown unless you specifically want a browned-butter flavor.
Step 2: Allow the butter to cool slightly
Let the melted butter cool for a short time. It should remain liquid but should not be extremely hot when added to the milk.
This helps prevent the milk from heating too quickly and reduces the risk of an uneven mixture.
Step 3: Measure the milk
Pour ¾ cup of whole milk into a mixing bowl or blender.
Whole milk is recommended because it provides more fat and a richer texture than low-fat milk.
Step 4: Combine the ingredients
Slowly drizzle the melted butter into the milk while whisking continuously.
Alternatively, blend the milk and butter briefly until the mixture looks uniform.
If the butter begins to solidify because the ingredients are too cold, gently warm the mixture and blend again.
Step 5: Use immediately
Use the mixture in recipes that call for heavy cream in cooking or baking, such as certain soups, sauces, casseroles, and cakes.
It may not behave exactly like heavy cream in every recipe, especially when thickening, reducing, or emulsifying is important.
Methods for Making the Substitute
Whisking method: Best for small quantities. Slowly adding the butter while whisking helps distribute the fat through the milk.
Blender method: Useful when you want a more uniform mixture. Blend briefly rather than unnecessarily incorporating air.
Warm mixing method: If the butter solidifies during mixing, gently warm the mixture and whisk again until smooth.
Tips for Best Results
- Use unsalted butter so you can control the salt in your recipe.
- Choose whole milk for a richer result.
- Avoid adding very hot butter directly to cold milk.
- Mix just before using because the mixture may separate when left standing.
- Do not use this substitute for recipes that require whipped cream.
- For recipes that rely heavily on the fat content and consistency of heavy cream, using actual heavy cream will generally give a more predictable result.
History of Heavy Cream Substitutes
Home cooks have long adapted recipes when ingredients were unavailable or expensive. Milk and butter are two traditional dairy staples, so combining them has become a familiar kitchen workaround for some recipes.
Modern cooking guides continue to recommend this mixture for certain applications because it can supply both moisture and fat without requiring a separate trip to the store.
Although convenient, it is best understood as a cooking substitute rather than a perfect replacement for heavy cream in every situation.
Formation of the Substitute
This mixture combines two dairy components with different functions.
- Whole milk supplies water, milk proteins, lactose, and a modest amount of fat.
- Butter contributes concentrated milk fat and a small amount of water and milk solids.
Whisking or blending distributes the melted butter throughout the milk, creating a temporary emulsion. Because the mixture does not have exactly the same composition or structure as heavy cream, it will not reliably produce the same results in every recipe.
Conclusion
Homemade heavy cream substitute is a useful solution when you need a richer dairy mixture for cooking or baking and have milk and butter available.
It takes only a few minutes to prepare and works well in many recipes, but it is not suitable for whipping or for every preparation that specifically depends on heavy cream.
For Cooking and Baking Lovers
Keep this simple combination in mind for creamy soups, selected pasta sauces, casseroles, and cake batters. It is particularly useful for home cooks who want a practical alternative using ingredients they may already have in the refrigerator.
Recipe 3: Homemade Cream Cheese

Introduction to Homemade Cream Cheese
Homemade cream cheese is a soft, creamy dairy spread that can be prepared using milk, optional heavy cream, an acid such as lemon juice or vinegar, and a little salt.
The process begins by heating the dairy mixture and adding an acid to separate the milk solids, called curds, from the liquid whey. After draining, the curds are blended until smooth and spreadable.
The result can be used on toast, bagels, crackers, and sandwiches. It is also useful in cheesecakes, frostings, dips, stuffed pastries, and creamy dessert fillings.
This homemade version resembles a fresh acid-set cream cheese or soft cheese spread. Its precise texture and acidity may differ from commercially manufactured cream cheese, which is made using more controlled processes.
Ingredients
- 4 cups whole milk (960 ml)
- 2 cups heavy cream (480 ml), optional for extra richness
- 2–3 tablespoons white vinegar or lemon juice (30–45 ml)
- ½ teaspoon salt, optional
- A small amount of milk or reserved whey, only if needed to adjust the texture
Preparation time: 15–20 minutes
Draining time: 15–30 minutes or longer, depending on the desired consistency
Yield: Varies with the dairy fat content and the amount of liquid drained.
Equipment Needed
- Medium or large heavy-bottomed saucepan
- Cooking thermometer
- Wooden spoon or silicone spatula
- Fine-mesh strainer
- Clean cheesecloth
- Large bowl for collecting whey
- Blender or food processor
- Clean airtight storage container
Instructions
Step 1: Prepare the dairy mixture
Pour the whole milk and optional heavy cream into a heavy-bottomed saucepan.
Using heavy cream creates a richer result, while using only whole milk produces a lighter cheese.
Place the saucepan over medium heat and stir occasionally to prevent scorching.
Step 2: Heat the mixture
Heat the milk and cream to approximately 85–90°C (185–195°F).
Use a cooking thermometer for accuracy. Avoid letting the mixture boil vigorously, as overheating can affect the texture and cause the dairy to scorch.
Once it reaches the target temperature, remove the saucepan from the heat.
Step 3: Add the acid
Slowly add 2 tablespoons of lemon juice or vinegar while stirring gently.
Allow the mixture to stand for about 10–15 minutes. The milk should begin separating into white curds and a more translucent, yellowish liquid called whey.
If the mixture does not separate sufficiently, add the remaining acid a little at a time, stirring gently and allowing it to rest between additions.
The amount required depends on the milk and cream used.
Step 4: Prepare the strainer
Place a clean cheesecloth over a fine-mesh strainer and position it above a large bowl.
Carefully pour the curds and whey into the lined strainer.
The cheesecloth will hold the curds while the liquid drains into the bowl.
Step 5: Drain the curds
Allow the mixture to drain for approximately 15–30 minutes, checking the consistency as it thickens.
For a softer spread, drain for less time. For a thicker cheese, drain longer.
Do not squeeze out all the moisture at once. Excessive draining can produce a dry, crumbly cheese that is difficult to blend.
Step 6: Blend until smooth
Transfer the drained curds into a blender or food processor.
Blend until the mixture becomes smooth and creamy. Pause as necessary to scrape down the sides of the bowl.
If the cheese is too thick, add a very small amount of reserved whey or milk and blend again.
Add the liquid gradually, because too much can make the finished cheese runny.
Step 7: Add salt
Add ½ teaspoon of salt, if desired, and blend until evenly distributed.
Taste a small amount and adjust the seasoning to your preference.
For sweet recipes, you can leave the salt out or use only a tiny amount, depending on the recipe.
Step 8: Chill and store
Transfer the finished cheese to a clean, airtight container.
Refrigerate promptly and allow it to chill before serving. The texture may become firmer as it cools.
For this homemade fresh cheese, use a conservative refrigerated storage period of about 3–5 days. Discard it if you notice mold, unusual discoloration, an unpleasant smell, or other signs of spoilage.
Because this is a fresh, high-moisture dairy product, careful handling and continuous refrigeration are essential.
Methods for Making Homemade Cream Cheese
Milk-only method: Use the four cups of whole milk without heavy cream. This produces a lighter fresh cheese, although the final yield and smoothness can vary.
Milk-and-cream method: Add the two cups of heavy cream for a richer, higher-fat cheese with a fuller mouthfeel.
Blending method: A blender or food processor creates a smoother texture than simply stirring the drained curds by hand.
Texture-adjustment method: Drain longer for a firmer cheese, or blend in a small amount of milk or whey for a softer spread.
Tips for Perfect Homemade Cream Cheese
- Use fresh, pasteurized dairy products.
- Stir gently when adding the acid.
- Give the mixture time to separate before straining.
- Avoid draining the curds until they become excessively dry.
- Blend thoroughly for a smooth, spreadable consistency.
- Add any extra liquid gradually.
- Keep the finished cheese refrigerated.
- Use clean equipment and avoid returning used utensils to the storage container.
Important note about milk selection
Some ultra-high-temperature (UHT) or ultra-pasteurized milk products may not form curds as expected. If separation is poor, the type of milk may be the reason. Fresh pasteurized whole milk that is suitable for cheesemaking may give more reliable results.
History of Cream Cheese
Cream cheese belongs to a long tradition of fresh cheese-making, in which milk is separated into curds and whey and the curds are processed into a soft dairy food.
The modern American style of cream cheese became popular in the United States during the nineteenth century and eventually became a staple in both sweet and savory cooking.
Today, cream cheese is widely used in cheesecakes, bagel spreads, dips, frostings, and baked goods. Homemade versions follow a simpler fresh-cheese process, making them accessible to people who enjoy traditional kitchen preparation.
Formation of Cream Cheese
Cream cheese begins with milk proteins suspended in liquid. When the dairy mixture is heated and an acid is added, the acidity changes how the proteins behave, causing them to gather into curds.
The formation process has four main stages:
- Heating: The milk and cream are warmed to prepare the mixture for separation.
- Acidification: Lemon juice or vinegar lowers the pH, encouraging the proteins to coagulate.
- Draining: The curds are separated from the whey to remove excess liquid.
- Blending: The curds are processed until the texture becomes smooth and creamy.
The quantity of cream, the amount of acid, and the draining time all influence the final texture and yield.
Conclusion
Homemade cream cheese is a useful recipe for anyone who enjoys fresh dairy spreads and homemade desserts. With milk, optional heavy cream, an acid, and a few basic kitchen tools, you can prepare a soft cheese that works in many everyday dishes.
The key to success is allowing the curds to form properly, draining them to the right consistency, and blending them until smooth. Although the result may not be identical to commercial cream cheese, it offers a practical homemade alternative for a variety of recipes.
For Cream Cheese Lovers
Try spreading your homemade cream cheese on toasted bread or bagels, or use it as a base for herb dips and savory spreads. It can also be incorporated into cheesecake fillings, cream cheese frosting, stuffed pastries, and creamy dessert dips.
For sweet preparations, combine a portion with vanilla and powdered sugar to make a simple dessert filling. For savory dishes, mix it with chopped herbs, garlic, and black pepper.
Final Conclusion: Three Homemade Dairy Essentials
These three recipes demonstrate how a few everyday ingredients can be transformed into useful kitchen staples.
| Homemade product | Main ingredients | Best uses |
|---|---|---|
| Homemade butter | Heavy cream | Toast, biscuits, cooking, baking |
| Heavy cream substitute | Whole milk and butter | Selected sauces, soups, and baked goods |
| Homemade cream cheese | Whole milk, optional cream, and acid | Spreads, dips, cheesecakes, frostings |
The most important difference is how each product is made and used. Butter is created by churning cream until the fat separates. The heavy cream substitute combines milk and butter for selected cooking and baking applications. Cream cheese is formed by separating milk proteins into curds and blending them into a smooth spread.
With these recipes, you can explore traditional homemade cooking, reduce the need for last-minute trips to the store, and prepare fresh ingredients for a variety of family meals and desserts.
A final storage reminder: Refrigerate all three products promptly, use clean utensils, and follow the shorter storage recommendations given for homemade dairy products. Fresh homemade dairy products generally do not last as long as commercially processed versions.