
Buckeye Cheesecake: The Ultimate Peanut Butter and Chocolate Dessert
Introduction
If you love the irresistible combination of creamy peanut butter and rich chocolate, this Buckeye Cheesecake is the dessert of your dreams. Inspired by classic buckeye candies, which feature sweet peanut butter centers covered in chocolate, this decadent cheesecake transforms those beloved flavors into an elegant dessert perfect for holidays, family gatherings, birthdays, and special celebrations.
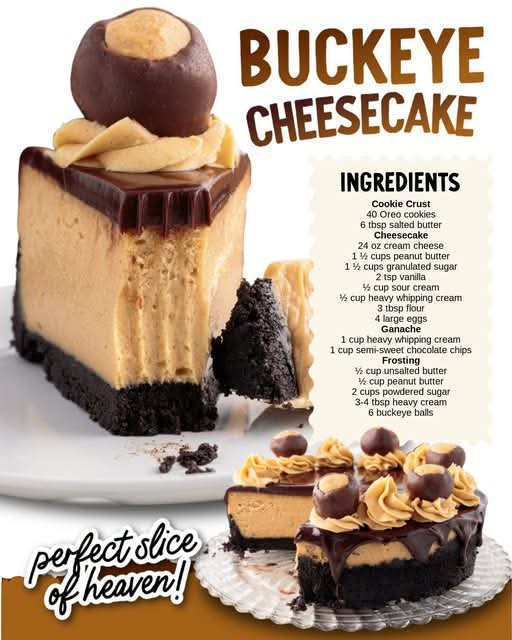
Imagine a crunchy Oreo cookie crust topped with a smooth, velvety peanut butter cheesecake filling, finished with a glossy chocolate ganache and optional peanut butter decorations. Every slice delivers the perfect balance of chocolate richness, peanut butter sweetness, and creamy cheesecake texture.
This dessert looks impressive enough for a holiday dessert table but can be prepared at home using straightforward ingredients. Make it ahead of time, let it chill overnight, and serve a beautiful cheesecake that peanut butter and chocolate lovers will remember.
Ingredients
1. For the Oreo Cookie Crust
- 40 Oreo cookies, including the cream filling
- 6 tablespoons salted butter, melted
2. For the Peanut Butter Cheesecake Filling
- 24 ounces (680 g) full-fat cream cheese, softened
- 1 cup (250 g) creamy peanut butter
- 1 cup (200 g) granulated sugar
- 1/2 cup (100 g) packed light brown sugar
- 3 large eggs, at room temperature
- 3/4 cup (180 g) sour cream, at room temperature
- 1 teaspoon pure vanilla extract
- 2 tablespoons all-purpose flour
- 1/4 teaspoon salt, optional
3. For the Chocolate Ganache Topping
- 1 cup (170 g) semisweet chocolate chips or chopped chocolate
- 1/2 cup (120 ml) heavy whipping cream
- 1 tablespoon butter, optional, for extra shine
4. Optional Peanut Butter Decoration
- 1/4 cup creamy peanut butter
- 2 tablespoons powdered sugar
- 1–2 teaspoons milk, as needed
- Chocolate shavings or mini chocolate chips, for decoration
Equipment Needed
- 9-inch springform pan
- Food processor or rolling pin
- Mixing bowls
- Electric hand mixer or stand mixer
- Rubber spatula
- Measuring cups and spoons
- Baking tray
- Small saucepan or microwave-safe bowl
Instructions
Step 1: Prepare the Oven and Pan
Preheat your oven to 325°F (163°C).
Lightly grease a 9-inch springform pan. You may also line the bottom with parchment paper to make removing the cheesecake easier.
Ensure the cream cheese, eggs, and sour cream are at room temperature. This helps the ingredients blend smoothly and reduces the likelihood of lumps in the filling.
Step 2: Make the Oreo Cookie Crust
Place the 40 Oreo cookies in a food processor and pulse until they become fine crumbs. If you do not have a food processor, place the cookies in a sealed bag and crush them with a rolling pin.
Transfer the crumbs to a mixing bowl. Pour in the melted butter and stir until all the crumbs are evenly moistened.
Press the mixture firmly into the bottom of the prepared springform pan. Use the flat bottom of a measuring cup to create an even layer, pressing some crumbs slightly up the sides if desired.
Bake the crust for 8–10 minutes. Remove it from the oven and allow it to cool slightly while preparing the filling.
Step 3: Prepare the Peanut Butter Cheesecake Filling
In a large mixing bowl, beat the softened cream cheese on medium-low speed until smooth and creamy.
Add the creamy peanut butter, granulated sugar, and brown sugar. Beat until the mixture is well combined, scraping down the sides of the bowl as needed.
Add the eggs one at a time, mixing gently after each addition. Avoid overbeating, as incorporating too much air can contribute to cracks during baking.
Mix in the sour cream, vanilla extract, flour, and optional salt. Continue mixing on low speed just until the filling is smooth.
The finished mixture should be thick, creamy, and free of large lumps.
Step 4: Fill the Crust
Pour the peanut butter cheesecake mixture over the prepared Oreo crust.
Use a spatula to spread the filling evenly and gently tap the pan against the counter to release large air bubbles.
Place the springform pan on a baking tray to catch any butter that might escape from the base.
Step 5: Bake the Cheesecake
Bake at 325°F (163°C) for approximately 55–70 minutes.
The outer edges should appear set, while the center should still have a slight wobble when the pan is gently moved. Avoid waiting until the entire cheesecake becomes completely firm in the oven, because it will continue to set as it cools.
For a more gentle baking environment, place a separate oven-safe pan filled with hot water on the lower oven rack. This adds moisture to the oven without requiring you to submerge the springform pan.
When the cheesecake is ready, turn off the oven, crack the oven door slightly, and let the cheesecake rest inside for about 30 minutes.
Remove it from the oven and allow it to cool to room temperature. Refrigerate for at least 6 hours, preferably overnight, before adding the topping.
Step 6: Prepare the Chocolate Ganache
Place the chocolate chips or chopped chocolate in a heatproof bowl.
Warm the heavy whipping cream in a small saucepan until it is steaming and just beginning to simmer around the edges. Do not let it boil vigorously.
Pour the hot cream over the chocolate and allow it to sit undisturbed for 2–3 minutes.
Stir slowly until the chocolate melts and the mixture becomes smooth and glossy. Add the optional tablespoon of butter for extra richness and shine.
Let the ganache cool for several minutes until it thickens slightly but remains pourable.
Step 7: Add the Chocolate Topping
Remove the chilled cheesecake from the refrigerator.
Carefully release the sides of the springform pan. Pour the chocolate ganache over the top of the cheesecake and spread it gently toward the edges.
For a dramatic appearance, allow some ganache to drip slightly over the sides.
Return the cheesecake to the refrigerator for 30–60 minutes, or until the chocolate topping is set.
Step 8: Prepare the Optional Peanut Butter Decoration
In a small bowl, combine the peanut butter and powdered sugar.
Add milk a little at a time until the mixture becomes smooth enough to pipe or drizzle. Transfer it to a piping bag or a small plastic bag with a tiny corner cut off.
Pipe decorative swirls, lines, or small rosettes over the chocolate ganache. Finish with chocolate shavings or mini chocolate chips if desired.
For a traditional buckeye-inspired finish, arrange small chocolate-covered peanut butter candies around the edge of the cheesecake.
Step 9: Slice and Serve
For neat slices, dip a sharp knife in hot water and wipe it dry between each cut.
Serve the cheesecake cold or allow it to stand at room temperature for approximately 10 minutes before serving for a slightly softer texture.
Keep any leftovers covered and refrigerated.
Methods of Preparation
The Oreo Crust Method
The cookie crust provides a rich chocolate foundation for the creamy peanut butter filling. Including the Oreo filling helps the crumbs bind together, while the melted butter adds structure.
Pressing the crust firmly into the pan prevents it from crumbling excessively when the cheesecake is sliced.
The Creaming Method
Beating the cream cheese until smooth before adding the remaining ingredients is essential. Adding the peanut butter and sugars gradually helps create a consistent filling.
Room-temperature ingredients blend more easily, producing a creamy texture without unnecessary mixing.
The Gentle Baking Method
Cheesecake benefits from moderate oven temperatures and gradual cooling. Gentle baking helps the center cook evenly while reducing the risk of a dry or cracked surface.
A slight wobble in the center is normal when the cheesecake comes out of the oven.
The Ganache Method
Combining warm cream with chocolate creates a silky topping that complements the peanut butter filling. Allowing the ganache to cool slightly before pouring helps it stay on the cheesecake instead of running off too quickly.
The Chilling Method
Refrigeration is an essential part of cheesecake preparation. It allows the filling to firm up, the flavors to develop, and the ganache to set properly.
For the best texture, prepare the cheesecake a day before serving.
History of Buckeye Cheesecake
Buckeye Cheesecake takes inspiration from the famous buckeye candy associated with Ohio in the United States.
Buckeye candies are traditionally made from a sweet mixture of peanut butter, butter, and powdered sugar, which is shaped into small balls and dipped in melted chocolate. A small circle of peanut butter is left visible at the top, creating an appearance similar to the nut of the Ohio buckeye tree.
These candies became especially popular at holiday gatherings, football parties, family celebrations, and homemade candy exchanges.
Cheesecake, meanwhile, has a much longer history, with early forms of cheese-based cakes appearing in ancient Greece. Modern American cheesecake developed into a rich dessert commonly made with cream cheese, sugar, and eggs.
Combining the flavors of buckeye candy with cheesecake brings together two beloved dessert traditions. The result is a rich, creamy treat that offers the familiar taste of peanut butter and chocolate in a special-occasion format.
This particular Oreo-crust version is a modern variation inspired by those classic flavors rather than a claim to one original, documented recipe.
Formation and Texture of the Cheesecake
The success of Buckeye Cheesecake depends on the balance of its three main layers.
The bottom layer: Oreo crust
The crushed cookies and melted butter form a firm chocolate base. Baking the crust briefly helps it hold together when the filling is added.
The middle layer: Peanut butter cheesecake
Cream cheese supplies the characteristic cheesecake richness, while peanut butter adds a deep roasted-nut flavor. Eggs help the filling set during baking, and sour cream contributes moisture and a gentle tang that balances the sweetness.
The result should be dense yet creamy, with a smooth texture that contrasts beautifully with the crunchy crust.
The top layer: Chocolate ganache
Chocolate and cream combine to create a soft, glossy topping. Once chilled, the ganache becomes firm enough to slice while retaining a pleasant, smooth mouthfeel.
Together, these layers create a dessert that is rich without relying on a single flavor. The slight tang of the cheesecake balances the sweet peanut butter, while the chocolate ties everything together.
Tips for the Perfect Buckeye Cheesecake
- Use full-fat cream cheese. It produces a richer filling and helps the cheesecake set properly.
- Choose creamy peanut butter. Conventional creamy peanut butter generally gives the most consistent texture. Natural peanut butter that separates may produce a less predictable filling.
- Avoid overmixing. Mix on low speed once the eggs are added to minimize excess air.
- Do not overbake. The middle should retain a gentle wobble when baking is complete.
- Cool gradually. Sudden temperature changes can encourage cracks.
- Chill thoroughly. Six hours is the minimum recommended chilling time, but overnight refrigeration gives the best results.
- Use a warm knife. Wiping the knife clean between slices creates attractive portions.
- Adjust the chocolate flavor. Semisweet chocolate offers a balanced contrast, while dark chocolate gives the topping a less sweet, more intense flavor.
- Decorate just before serving if desired. Fresh peanut butter piping and chocolate decorations can make the finished dessert look especially appealing.
Variations to Try
Chocolate Peanut Butter Cup Cheesecake
Fold 1 cup of chopped peanut butter cups into the filling before pouring it over the crust. Sprinkle additional pieces over the ganache.
Buckeye Brownie Cheesecake
Replace the Oreo crust with a thin, fully baked brownie base. Allow it to cool before adding the cheesecake filling. The result is especially rich and chocolate-forward.
Salted Chocolate Buckeye Cheesecake
Sprinkle a small pinch of flaky sea salt over the ganache before it sets. The salt highlights the chocolate and peanut butter flavors.
Mini Buckeye Cheesecakes
Divide the crust and filling among lined muffin cups. Bake at 325°F (163°C), beginning to check for doneness after approximately 18–25 minutes. Baking time depends on the size of the cups. Cool and chill completely before decorating.
No-Bake-Inspired Variation
For a no-bake version, prepare the Oreo crust and use a tested no-bake peanut butter cheesecake filling stabilized with whipped cream and an appropriate amount of gelatin or another suitable setting ingredient. Refrigerate until firm. Simply omitting the eggs from this baked recipe will not produce the same safe, reliable texture.
Serving Suggestions
Buckeye Cheesecake is a wonderful centerpiece for Thanksgiving, Christmas, birthdays, potlucks, and family dinners.
Serve small slices because the dessert is particularly rich. It pairs nicely with freshly brewed coffee, espresso, black tea, or a glass of cold milk.
For a beautiful holiday presentation, arrange the cheesecake on a cake stand and decorate the top with chocolate curls, peanut butter swirls, or homemade buckeye candies.
If serving a dessert buffet, cut the cheesecake into smaller portions so guests can enjoy it alongside cookies, brownies, fruit, and other holiday treats.
Storage and Make-Ahead Instructions
Refrigerator: Store the cheesecake covered in the refrigerator for up to 4 days.
Freezer: For longer storage, freeze the cheesecake without decorative toppings when possible. Wrap individual slices or the whole cheesecake securely and freeze for up to 2 months for best quality.
Thawing: Thaw frozen cheesecake in the refrigerator overnight. Add any fresh decorations after thawing.
Make-ahead preparation: Bake the cheesecake one day before your event. Add the ganache after the cheesecake has chilled, then refrigerate until the topping is set. This makes holiday preparation easier and allows the flavors to blend.
Do not leave cheesecake at room temperature for more than 2 hours, or more than 1 hour when the temperature is above 90°F (32°C).
Conclusion
Buckeye Cheesecake is a celebration of two timeless dessert flavors: chocolate and peanut butter. With its crunchy Oreo crust, creamy peanut butter filling, and smooth chocolate ganache, it delivers a delicious combination of textures and flavors in every bite.
Although it looks like something from a professional bakery, this dessert can be made at home with familiar ingredients, careful mixing, and enough time to chill.
Prepare it for a holiday gathering, share it with friends, or save it for a special family occasion. Once you cut into that first slice and reveal the beautiful layers, you will understand why this cheesecake deserves a place among your favorite homemade desserts.
For Peanut Butter and Chocolate Lovers
This recipe is especially appealing to anyone who loves peanut butter cups, chocolate cookies, creamy cheesecake, and traditional buckeye candies.
The deep chocolate crust provides the perfect contrast to the sweet, nutty filling, while the ganache adds a luxurious finishing touch. Every layer has a purpose, creating a dessert that feels both comforting and festive.
If you are looking for a memorable holiday dessert that combines familiar flavors with an impressive presentation, Buckeye Cheesecake is an excellent choice.
Recipe at a Glance
- Preparation time: Approximately 35 minutes
- Baking time: 55–70 minutes
- Cooling and chilling time: Approximately 7–9 hours, including overnight chilling
- Total time: Approximately 9–11 hours, mostly cooling and chilling
- Yield: 12–16 slices
- Oven temperature: 325°F (163°C)
- Difficulty: Intermediate
- Best occasion: Holidays, birthdays, parties, and special family gatherings
Final baking note: This recipe is designed for a 9-inch springform pan. Baking times may vary by oven, so use the set edges and gently wobbling center as your primary doneness cues. If anyone eating the cheesecake has a peanut allergy, choose a completely peanut-free alternative rather than substituting another nut butter without checking their allergy requirements.