
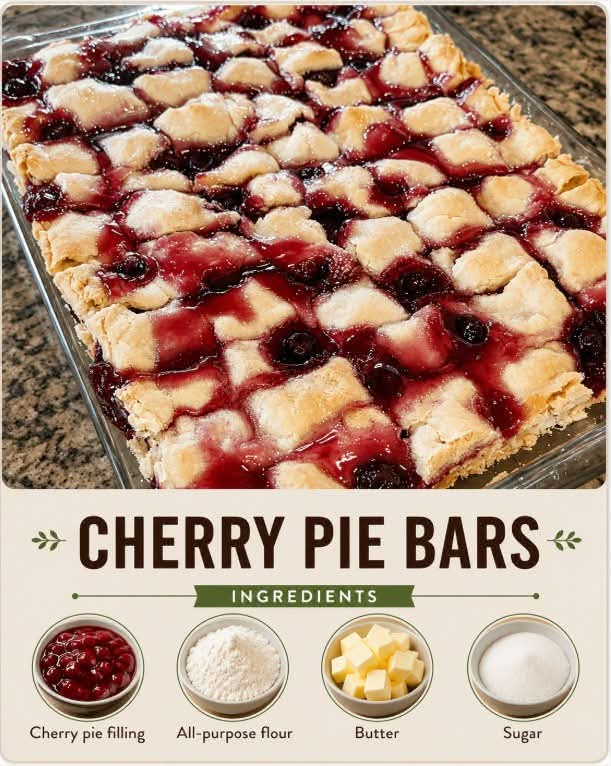
Cherry Pie Bars – A Classic Homemade Dessert with Sweet Cherry Filling
Introduction
Cherry Pie Bars are a delicious, old-fashioned dessert that combines the sweet, buttery flavor of homemade pastry with the irresistible taste of juicy cherry pie filling. They have everything people love about a traditional cherry pie, but in a simple bar form that is easy to prepare, slice, serve, and share.
These beautiful dessert bars feature a soft, buttery crust, a generous layer of sweet cherries, and a golden topping that adds a delightful texture to every bite. The combination of tart cherries and sweet pastry creates a wonderful balance of flavors that makes this recipe perfect for family gatherings, holiday celebrations, potlucks, bake sales, and afternoon coffee breaks.
One of the best things about Cherry Pie Bars is that they are much easier to serve than a traditional pie. There is no need to roll out a delicate pie crust, create a perfect pie edge, or worry about cutting the first slice. Simply bake the dessert in a rectangular pan, allow it to cool, and cut it into beautiful squares.
Whether you are an experienced baker or just starting your baking journey, these homemade Cherry Pie Bars are a wonderful recipe to add to your collection.
Ingredients
For the buttery crust and topping
- 2 ½ cups all-purpose flour
- 1 cup unsalted butter, softened
- 1 cup granulated sugar
- 1 large egg
- 1 teaspoon vanilla extract
- ½ teaspoon baking powder
- ¼ teaspoon salt
For the cherry filling
- 2 cans cherry pie filling, approximately 21 ounces each
- 1 teaspoon lemon juice, optional
- ½ teaspoon almond extract, optional
For the optional glaze
- 1 cup powdered sugar
- 1–2 tablespoons milk
- ¼ teaspoon vanilla extract
The almond extract adds a classic bakery-style flavor that pairs beautifully with cherries. If you prefer a simple, traditional cherry flavor, you can leave it out.
Instructions
Step 1: Prepare the oven and baking pan
Preheat your oven to 350°F (175°C).
Lightly grease a 9-by-13-inch baking pan with butter or nonstick cooking spray. You can also line the pan with parchment paper, leaving a little extra paper hanging over the sides to make removing the baked bars easier.
Set the pan aside while you prepare the dough.
Step 2: Cream the butter and sugar
Place the softened butter and granulated sugar in a large mixing bowl.
Using an electric mixer or a sturdy wooden spoon, beat the butter and sugar together until the mixture becomes light, creamy, and fluffy. This usually takes about 2–3 minutes with an electric mixer.
Add the egg and vanilla extract. Continue mixing until everything is well combined.
Scrape down the sides of the bowl as needed to make sure all the ingredients are evenly incorporated.
Step 3: Mix the dry ingredients
In a separate bowl, combine the all-purpose flour, baking powder, and salt.
Whisk the ingredients together to distribute the baking powder and salt evenly throughout the flour.
Gradually add the dry ingredients to the butter mixture. Mix on low speed until a soft, thick dough forms.
Avoid overmixing, as this can make the finished bars firmer than desired.
Step 4: Form the bottom crust
Transfer approximately two-thirds of the dough into the prepared baking pan.
Using clean hands, a spatula, or the back of a spoon, press the dough evenly across the bottom of the pan.
Make sure the dough reaches the corners and forms a uniform layer. This crust will support the cherry filling and create a tender, buttery base.
Bake the crust for approximately 10–12 minutes, just until it begins to set. It does not need to become deeply golden at this stage.
Remove the pan from the oven.
Step 5: Add the cherry filling
Open the cans of cherry pie filling and stir gently to distribute the cherries throughout the sauce.
If desired, add the lemon juice for a slightly brighter flavor or the almond extract for a classic cherry-dessert aroma.
Spread the cherry filling evenly over the partially baked crust, leaving a small border around the edges if you prefer a neater finish.
Make sure the cherries are distributed throughout the pan so that every bar contains plenty of fruit.
Step 6: Add the buttery topping
Take the remaining dough and distribute it over the cherry filling in small pieces.
You can crumble the dough between your fingers to create a rustic topping, or place small spoonfuls across the surface.
Leave a few small spaces between the pieces so that some of the red cherry filling remains visible. This creates an attractive appearance after baking.
For a more decorative finish, you can gently flatten some of the dough pieces before placing them on top.
Step 7: Bake the Cherry Pie Bars
Return the pan to the oven and bake for approximately 30–40 minutes.
The bars are ready when the topping becomes lightly golden and the cherry filling bubbles gently around the edges.
If the topping begins to brown too quickly, loosely cover the pan with aluminum foil for the remaining baking time.
Remove the pan from the oven and place it on a cooling rack.
Step 8: Prepare the optional glaze
While the bars cool, prepare the glaze.
In a small bowl, combine the powdered sugar, one tablespoon of milk, and vanilla extract.
Stir until smooth. Add a little more milk if necessary to achieve a consistency that can be drizzled easily.
The glaze should be thick enough to remain visible on the surface without running off completely.
Step 9: Cool and decorate
Allow the Cherry Pie Bars to cool completely in the pan before cutting them.
This step is important because the cherry filling needs time to settle. Cutting the bars while they are still hot may cause the filling to spread and the pieces to fall apart.
Once cooled, drizzle the glaze over the top in thin lines.
Allow the glaze to set before slicing the dessert into squares or rectangles.
Step 10: Serve and enjoy
Use a sharp knife to cut the dessert into 12–16 bars, depending on the size you prefer.
Serve them at room temperature with coffee, tea, a glass of milk, or a scoop of vanilla ice cream.
Each piece offers a delicious combination of buttery pastry, sweet cherries, and a lightly crisp topping.
Cooking Methods
Traditional oven-baking method
The oven method produces the best balance of a tender crust, golden topping, and thick cherry filling.
Bake at 350°F (175°C), beginning with a short bake for the bottom crust and finishing with the cherry filling and topping in place.
The exact baking time can vary depending on your oven and the temperature of the ingredients. Look for a golden surface and bubbling filling rather than relying only on the clock.
One-pan preparation method
For a simpler version, you can skip the preliminary crust bake.
Press approximately two-thirds of the dough into the prepared pan, spread the cherry filling over it, and crumble the remaining dough on top.
Bake everything together at 350°F (175°C) for approximately 40–50 minutes, or until the topping is golden and the filling is bubbling.
The bottom crust may be slightly softer with this method, but it is convenient when you want to minimize preparation time.
Homemade cherry filling method
If you prefer to make your own filling, combine approximately 4 cups of pitted cherries with ½ cup sugar, 2 tablespoons cornstarch, 1 tablespoon lemon juice, and 2 tablespoons water in a saucepan.
Cook over medium heat, stirring frequently, until the cherries release their juices and the mixture thickens.
Allow the filling to cool before spreading it over the crust.
Fresh, frozen, or canned cherries can work, although frozen cherries should be thawed and drained as needed. Adjust the sugar according to the sweetness of the fruit.
Preparation and Baking Time
- Preparation time: 20 minutes
- Initial crust baking: 10–12 minutes
- Final baking time: 30–40 minutes
- Cooling time: Approximately 1–2 hours
- Total time: Approximately 2–2½ hours
- Serving size: 12–16 bars
These times are estimates and may vary depending on your oven and cooling conditions.
The History of Cherry Pie Bars
Cherry pie has a long history in American home baking, where fruit pies became a popular way to use seasonal produce and preserve the flavors of summer.
Cherries were especially appreciated for their bright color, sweet-tart flavor, and versatility in desserts. As baking traditions developed, cooks began creating different versions of fruit pies using local ingredients, family recipes, and convenient pantry staples.
Bar-style desserts became popular because they were easy to bake in rectangular pans and convenient to transport. Instead of preparing individual pastries or slicing a traditional pie, home bakers could cut a large batch into small portions for church gatherings, picnics, school events, and family celebrations.
Cherry Pie Bars bring these traditions together. They offer the familiar flavor of cherry pie in a practical dessert that can be prepared for a crowd.
Although this particular recipe is a modern home-baking variation rather than a single historically documented original, it reflects the enduring popularity of fruit-filled pastries and simple homemade sweets.
The Formation and Texture of Cherry Pie Bars
The success of Cherry Pie Bars depends on the way the buttery crust, fruit filling, and crumbly topping work together.
The buttery base
The flour provides structure, while the butter contributes richness and tenderness. Sugar adds sweetness and helps the crust develop a lightly golden color during baking.
The egg binds the ingredients together and gives the dough enough structure to support the filling.
The sweet cherry center
Cherry pie filling provides moisture, fruit flavor, and a beautiful ruby-red color.
Its thick consistency helps prevent the bars from becoming excessively wet. As the dessert cools, the filling becomes easier to slice and holds its shape more effectively.
The golden topping
The remaining dough forms a rustic topping that becomes lightly crisp around the edges while remaining tender underneath.
The small spaces between the dough pieces allow the cherry filling to show through, making the finished dessert attractive and inviting.
The final result
When prepared correctly, the bars have three delicious layers: a firm but tender bottom crust, a sweet and juicy cherry center, and a golden buttery topping.
Allowing the bars to cool completely is the final step in achieving clean slices and a pleasing texture.
Tips for Perfect Cherry Pie Bars
Use softened butter. Butter should be soft enough to mix easily but should not be melted. Melted butter can change the texture of the dough.
Measure the flour carefully. Too much flour may make the crust dry and crumbly. Spoon flour into the measuring cup and level it rather than packing it tightly.
Spread the filling evenly. An even layer ensures that every serving contains a good balance of cherries and pastry.
Do not overbake. The topping should be golden rather than dark brown. Excessive baking can make the crust dry.
Let the bars cool completely. Cooling allows the cherry filling to set and helps the bars maintain their shape when cut.
Use parchment paper. A parchment sling makes it easier to lift the cooled dessert out of the pan before slicing.
Customize the flavor. A little almond extract, lemon zest, or a pinch of cinnamon can add a pleasant twist without overpowering the cherries.
Delicious Variations
Cherry Almond Pie Bars
Add ½ teaspoon almond extract to the dough and another small amount to the filling if desired. Sprinkle sliced almonds over the topping before baking for a nutty finish.
Cherry Cream Cheese Bars
Prepare a cream cheese layer by beating 8 ounces of softened cream cheese with ¼ cup sugar and one egg until smooth.
Spread the cream cheese mixture over the partially baked crust, add the cherry filling, and finish with the remaining dough. Bake until the topping is golden and the cream cheese layer is set.
Chocolate Cherry Pie Bars
Sprinkle ½ cup mini chocolate chips over the cherry filling before adding the topping. Chocolate pairs especially well with the sweet-tart cherry flavor.
Lemon Cherry Pie Bars
Add one teaspoon of finely grated lemon zest to the dough and a little lemon juice to the filling. The citrus adds freshness and balances the sweetness.
Mixed Berry Pie Bars
Replace the cherry filling with blueberry, raspberry, or mixed berry pie filling. The same basic method works well with many fruit flavors.
Crumble-Topped Cherry Bars
For a more pronounced crumb topping, mix a small amount of extra flour, sugar, and cold butter until coarse crumbs form. Sprinkle the crumbs over the cherry filling before baking.
How to Store Cherry Pie Bars
At room temperature
Because these bars contain a fruit filling, refrigeration is the best choice for longer storage, especially in warm conditions. If you leave them out for serving, avoid keeping them at room temperature for more than two hours.
In the refrigerator
Place completely cooled bars in an airtight container and refrigerate for approximately 4–5 days. Separate layers with parchment paper to prevent sticking.
Allow individual portions to sit at room temperature briefly before serving if you prefer a softer crust.
In the freezer
For longer storage, freeze the cooled bars without the glaze whenever possible.
Arrange them in a single layer until firm, then transfer them to a freezer-safe container with parchment between layers. For best quality, use within approximately 2–3 months.
Thaw in the refrigerator overnight and add the glaze after thawing.
Serving Suggestions
Cherry Pie Bars are delicious on their own, but they can also be served in several delightful ways.
- With a scoop of vanilla ice cream for a classic dessert.
- With freshly whipped cream for a light, creamy finish.
- Alongside a cup of coffee or tea for an afternoon treat.
- On a dessert platter with brownies, cookies, and lemon bars.
- As part of a holiday dessert table.
- Warmed slightly and served with a spoonful of vanilla yogurt or whipped topping.
For a special occasion, arrange the bars on a white serving plate and finish them with a light drizzle of glaze. The bright cherry filling creates a beautiful contrast against the golden pastry.
Frequently Asked Questions
Can I use homemade cherry pie filling?
Yes. Homemade filling works beautifully as long as it is thick enough to stay in place during baking. Allow it to cool before assembling the bars.
Can I use fresh cherries?
Yes. Pit the cherries first and cook them with sugar and cornstarch until the mixture thickens. Raw fresh cherries should not simply replace canned pie filling in the same quantity without adjusting the thickener and sugar.
Why are my Cherry Pie Bars falling apart?
The bars may have been cut before they cooled completely, or the filling may have been too loose. Let the dessert cool thoroughly and use a sharp knife for cleaner slices.
Can I make these bars ahead of time?
Absolutely. Bake them the day before serving, allow them to cool, and refrigerate them in an airtight container. Add the glaze shortly before serving for the best appearance.
Can I make the recipe without the glaze?
Yes. The glaze is optional. The bars are already sweet and flavorful from the cherry filling and buttery dough.
How can I tell when they are done?
Look for a golden topping and bubbling cherry filling around the edges. The center should be set enough that the filling is not visibly watery.
Conclusion
Cherry Pie Bars are the perfect combination of simplicity, sweetness, and old-fashioned homemade goodness. With a buttery crust, a generous layer of cherries, and a golden topping, they deliver all the comforting flavors of cherry pie in an easy-to-serve dessert.
This recipe is ideal for busy home bakers because it uses familiar ingredients and requires no complicated pastry techniques. Whether you prepare it for a holiday gathering, a family dinner, a weekend treat, or a neighborhood potluck, these bars are a wonderful way to share something homemade.
You can keep the recipe traditional or experiment with almond, lemon, chocolate, or cream cheese variations. Once you discover how easy these bars are to prepare, you may find yourself making them again and again.
For the Lovers of Homemade Desserts
If you love classic fruit desserts, buttery pastry, and recipes that bring people together, Cherry Pie Bars deserve a place in your kitchen.
They are sweet enough for dessert, simple enough for everyday baking, and attractive enough for special celebrations. Every bite combines the comforting taste of homemade pastry with the bright, fruity flavor of cherries.
Serve them to family and friends, share them at your next gathering, or save a few pieces to enjoy with your favorite hot drink.
These Cherry Pie Bars are a delicious reminder that some of the best desserts are made with simple ingredients, a little patience, and the joy of sharing homemade food with the people you love.
Recipe note: For the best results, use a thick cherry pie filling, bake until the topping is golden, and allow the bars to cool completely before slicing. This will help you achieve beautiful pieces with a rich cherry center and a tender, buttery crust.