
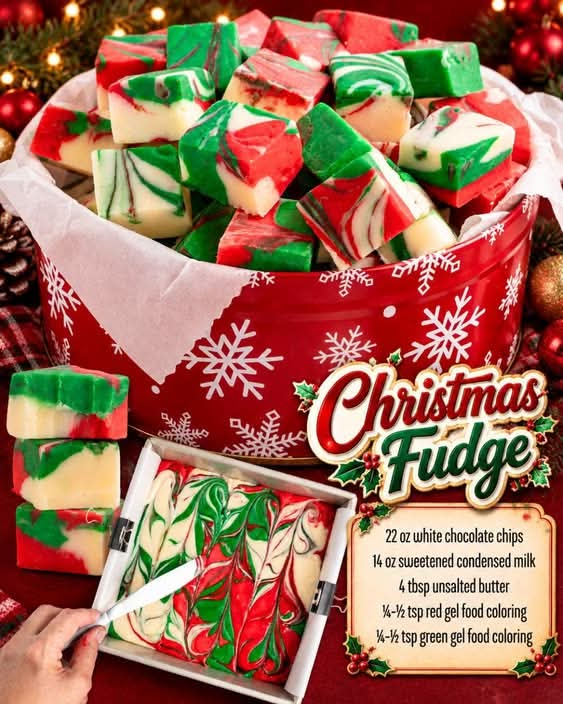
Christmas Fudge
Introduction
Christmas Fudge is a rich, creamy, and beautifully festive holiday candy made with white chocolate, butter, sweetened condensed milk, and traditional red and green Christmas colors. It is one of those simple homemade treats that looks impressive on a Christmas dessert table but requires very little preparation.
The smooth white chocolate base creates a soft and creamy texture, while the red and green swirls give every piece a cheerful holiday appearance. This fudge is perfect for Christmas cookie trays, holiday parties, family gatherings, dessert tables, or homemade edible gifts.
Because the recipe uses only a few basic ingredients, it is also a convenient dessert to prepare when you want something festive without spending hours in the kitchen.
Ingredients
For the Fudge
- 22 ounces white chocolate chips
- 4 tablespoons unsalted butter
- 14 ounces sweetened condensed milk
- 1/2 teaspoon red gel food coloring
- 1/2 teaspoon green gel food coloring
Optional Decorations
- Red and green Christmas sprinkles
- Crushed peppermint candies
- White sanding sugar
- Red and green sugar crystals
- Festive nonpareils
- Finely chopped nuts, if desired
Equipment
- 8-inch or 9-inch square baking pan
- Parchment paper
- Large saucepan
- Wooden spoon or silicone spatula
- Two small bowls
- Measuring spoons
- Sharp knife for cutting
Instructions
Step 1: Prepare the Pan
Line an 8-inch or 9-inch square baking pan with parchment paper. Leave some parchment extending over two sides of the pan so you can easily lift the finished fudge out later.
For easier removal, lightly grease the parchment paper with a small amount of butter.
Set the prepared pan aside.
Step 2: Melt the Fudge Mixture
Place the white chocolate chips, unsalted butter, and sweetened condensed milk into a large, heavy-bottomed saucepan.
Heat the mixture over low heat.
Stir constantly with a silicone spatula or wooden spoon. Continue cooking gently until the white chocolate and butter have completely melted and the mixture becomes smooth and glossy.
Avoid high heat. White chocolate can burn or become grainy if it is overheated.
Once everything is melted and combined, immediately remove the saucepan from the heat.
Step 3: Divide the Mixture
Quickly divide the warm fudge mixture into three approximately equal portions.
Place one portion in a bowl and leave it white.
Place another portion in a second bowl and add the red gel food coloring. Stir thoroughly until the color is evenly distributed.
Add the green gel food coloring to the remaining portion and stir until you have an even green color.
Work relatively quickly because the fudge will begin to thicken as it cools.
Step 4: Form the Christmas Fudge
Spoon alternating amounts of white, red, and green fudge into the prepared baking pan.
You can arrange the colors in stripes, spoonfuls, or alternating sections.
For a marbled Christmas appearance, gently run a knife or skewer through the fudge in a few sweeping motions.
Do not over-swirl. A few gentle movements will create attractive red and green ribbons while keeping the colors distinct.
Step 5: Add Decorations
If desired, sprinkle the top with Christmas sprinkles, red and green sugar crystals, crushed peppermint, or other festive decorations.
Press larger decorations very gently into the surface so they adhere as the fudge sets.
Step 6: Chill
Place the pan in the refrigerator.
Allow the fudge to chill for approximately 2 to 4 hours, or until it is completely firm.
For the cleanest slices, you can leave it refrigerated for several hours or overnight.
Step 7: Remove and Cut
Once the fudge is firm, lift it from the pan using the parchment paper.
Place it on a cutting board.
Use a sharp knife to cut the fudge into small squares.
For cleaner cuts, wipe the knife between slices. You can also briefly warm the knife with hot water, dry it thoroughly, and then cut the fudge.
Method
The main method behind this recipe is a simple melt-and-set technique.
The white chocolate chips provide the creamy chocolate base. Unsalted butter contributes richness and helps create a smooth texture, while sweetened condensed milk provides sweetness and moisture and helps the mixture set into a soft fudge.
The mixture should be heated gently rather than rapidly boiled. Once the ingredients are melted and smooth, the mixture is divided and colored before being transferred to the pan.
The final marbling is created by gently swirling the three colors together. Refrigeration then allows the fudge to firm up into pieces that can be sliced and served.
Important Tips for Perfect Christmas Fudge
Use Low Heat
White chocolate is delicate. Keep the heat low and stir continuously to prevent scorching.
Do Not Add Too Much Food Coloring
Gel food coloring is concentrated, so only a small amount is needed. Adding excessive coloring can affect the texture of the fudge.
Work Quickly
Once the mixture is removed from the heat, it will gradually become thicker. Have your bowls, food coloring, and prepared pan ready before you begin.
Avoid Over-Swirling
The red and green colors should remain visible. Too much swirling can blend the colors together and produce a less defined appearance.
Allow Enough Chilling Time
Cutting the fudge before it has completely set can result in soft or uneven pieces. Give it plenty of time to become firm.
History of Fudge
Fudge is a traditional confection associated with homemade candy making and holiday celebrations. Its exact origins are debated, but fudge became particularly popular in the United States during the late nineteenth century.
Early fudge was commonly prepared at home using sugar, butter, milk, and chocolate or other flavorings. Over time, recipes evolved to include easier ingredients and techniques that made homemade fudge more reliable.
Sweetened condensed milk and chocolate chips became especially useful in modern fudge recipes because they simplify the cooking process. Instead of preparing a traditional sugar syrup and carefully monitoring its temperature, cooks can melt the ingredients together and allow the finished mixture to set.
Christmas fudge developed naturally as families began adding seasonal colors, flavors, nuts, peppermint, and decorations to their favorite fudge recipes.
Formation and Texture
The formation of this Christmas Fudge begins when the white chocolate chips, butter, and sweetened condensed milk are gently heated together.
As the chocolate melts, it combines with the butter and condensed milk to form a thick, smooth mixture. Once removed from the heat, the mixture begins cooling and thickening.
The fudge is then placed into the lined pan and refrigerated. As it cools, it becomes firm enough to cut while maintaining a creamy texture.
The finished fudge should be firm enough to hold its shape but soft enough to melt pleasantly in your mouth.
Serving Suggestions
Christmas Fudge is delicious served chilled or at cool room temperature.
Arrange the squares on a Christmas dessert platter alongside cookies, brownies, truffles, and other homemade candies.
For a gift, place several pieces into a small holiday treat box lined with parchment paper. You can separate layers with wax paper to prevent the pieces from sticking together.
It also makes a beautiful addition to a Christmas cookie exchange or holiday dessert buffet.
Storage
Store the finished fudge in an airtight container.
Keep it refrigerated for the firmest texture. Place parchment or wax paper between layers if you are stacking the pieces.
The fudge can also be brought to room temperature for serving. If your kitchen is particularly warm, return the fudge to the refrigerator to prevent it from becoming too soft.
For longer storage, properly wrapped fudge can also be frozen. Thaw it in the refrigerator before serving.
Variations
Peppermint Christmas Fudge
Add crushed peppermint candies to the top before the fudge sets for a classic holiday flavor.
Red and Green Swirl Fudge
Instead of making distinct layers, spoon the three colors randomly into the pan and gently swirl them together for a colorful marbled design.
Chocolate Christmas Fudge
Replace part of the white chocolate with chocolate chips to create a chocolate-and-Christmas-color version.
Nutty Christmas Fudge
Add finely chopped pecans or walnuts if you enjoy a little crunch in your fudge.
Vanilla Christmas Fudge
Add a small amount of vanilla extract after removing the mixture from the heat for additional flavor.
Common Mistakes to Avoid
Do not melt the chocolate over high heat.
Do not leave the mixture unattended while it is melting.
Do not add large amounts of liquid food coloring.
Do not overmix the colors after placing them in the pan.
Do not cut the fudge before it has completely set.
Do not use a pan that is much larger than recommended, as the finished fudge will become thinner.
Conclusion
Christmas Fudge is a simple and festive homemade candy that turns a few everyday ingredients into a beautiful holiday dessert. The combination of creamy white chocolate, rich butter, sweet condensed milk, and red and green colors makes it especially suited to Christmas celebrations.
Its greatest appeal is its simplicity. There is no complicated dough, no long baking process, and no need for elaborate decorating skills. With gentle heating, careful mixing, and enough chilling time, you can create smooth, colorful fudge that looks beautiful on a holiday dessert table.
For Christmas Fudge Lovers
For anyone who loves creamy homemade candy, this recipe is especially enjoyable because every bite has a smooth white-chocolate texture with a rich sweetness and a festive appearance.
Christmas Fudge is also a wonderful recipe for making memories with family. Children can help add the colored layers and decorations, while adults handle the hot mixture and cutting.
Whether prepared for a Christmas party, wrapped as a homemade gift, added to a cookie tray, or simply enjoyed with a cup of coffee or hot chocolate, this fudge brings a classic homemade touch to the holiday season.
The best part is that every batch can look a little different. You can create bold stripes, delicate swirls, colorful layers, or a simple white fudge topped with red and green decorations. It is an easy recipe that can become part of your family’s Christmas traditions year after year.