
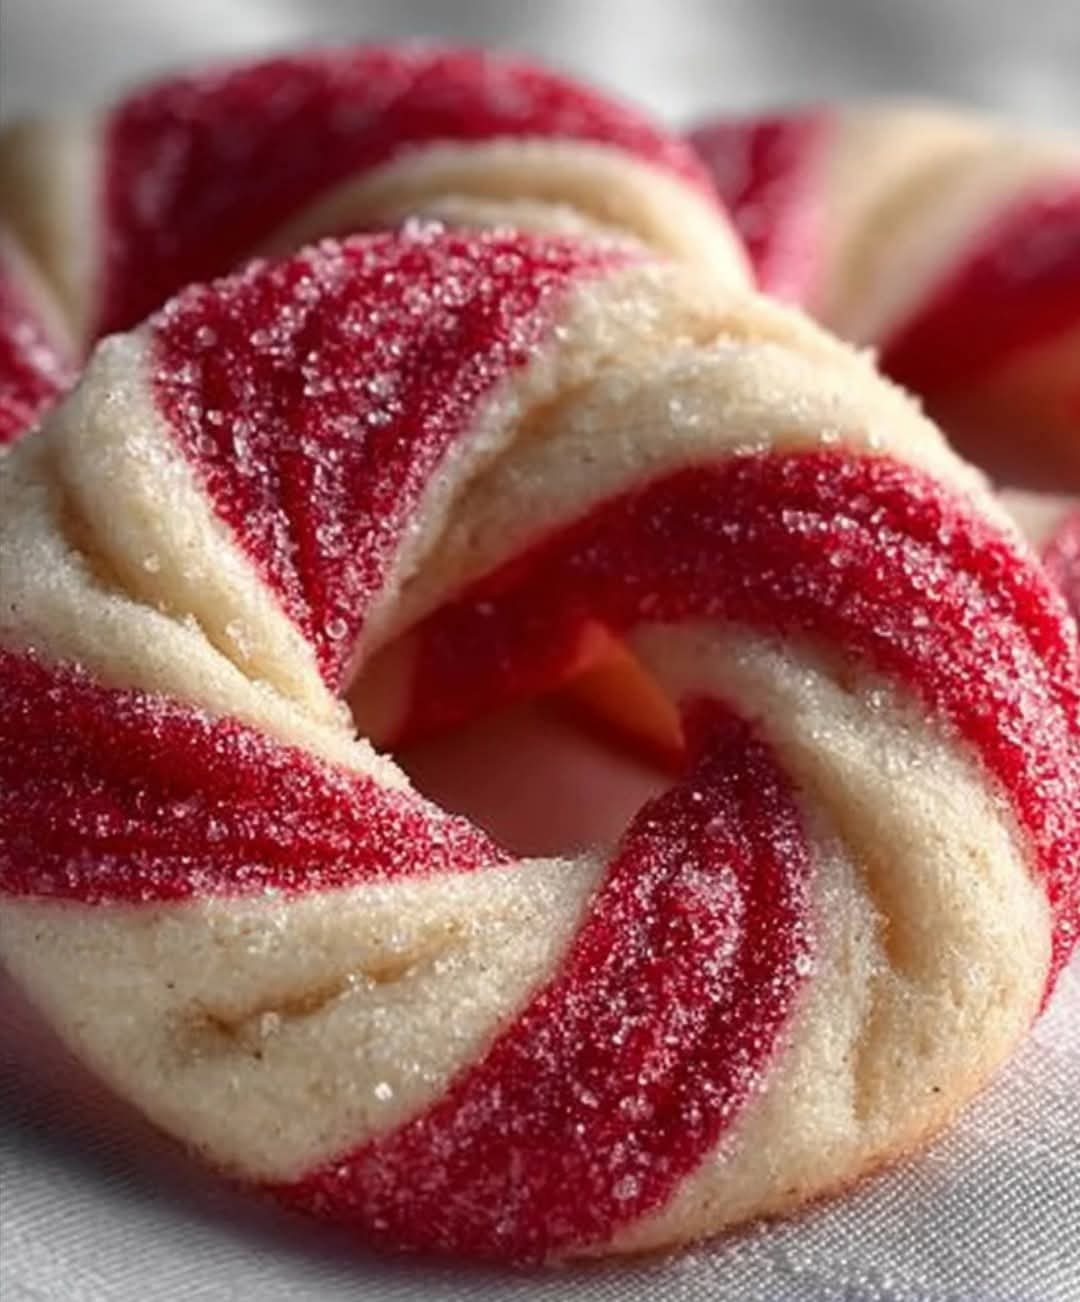
Classic Candy Cane Swirl Cookies
Introduction
Classic Candy Cane Swirl Cookies are a festive Christmas treat made with a rich, buttery sugar-cookie dough flavored with vanilla and peppermint. The dough is divided into two portions, with one portion colored red, then the two doughs are twisted together to create the signature candy-cane swirl.
These cookies are crisp around the edges, tender in the center, and filled with the refreshing flavor of peppermint. Their red-and-white appearance makes them especially attractive on holiday cookie trays, dessert tables, and homemade Christmas gift boxes.
They are also a wonderful baking project for families because the swirling and shaping process is simple enough to enjoy together.
Ingredients
For the Cookie Dough
- 1 cup (227 g) unsalted butter, softened
- 1 cup (200 g) granulated white sugar
- 1 large egg
- 1 teaspoon vanilla extract
- 1/2 teaspoon peppermint extract, or more to taste
- 2 3/4 cups (approximately 345 g) all-purpose flour
- 1/2 teaspoon baking powder
- 1/4 teaspoon salt
For the Red Swirl
- Red gel food coloring, as needed
Optional Finishing
- 2 to 3 tablespoons crushed candy canes
- 1/2 cup melted white chocolate for drizzling
- Extra crushed peppermint candy for decoration
Instructions
Step 1: Prepare the Butter
Place the softened butter in a large mixing bowl. Beat it until smooth and creamy.
Add the granulated sugar gradually and continue beating until the mixture becomes light and fluffy. This usually takes several minutes.
Creaming the butter and sugar properly helps create cookies with a pleasant, tender texture.
Step 2: Add the Egg and Flavorings
Add the egg and beat until completely incorporated.
Mix in the vanilla extract and peppermint extract. If you prefer a stronger peppermint flavor, you can add a small amount of additional peppermint extract, but add it gradually because peppermint extract is quite concentrated.
Step 3: Prepare the Dry Ingredients
In a separate bowl, whisk together the flour, baking powder, and salt.
Gradually add the dry ingredients to the butter mixture. Mix just until a soft cookie dough forms.
Avoid overmixing once the flour has been incorporated. Overworking the dough can make the finished cookies tougher than desired.
Step 4: Divide the Dough
Divide the dough into two approximately equal portions.
Leave one portion plain.
Place the second portion into a separate bowl and add a small amount of red gel food coloring. Knead or mix gently until the color is evenly distributed.
Gel coloring is especially useful because it provides a strong red color without adding much extra liquid to the dough.
Step 5: Chill the Dough
Wrap both portions of dough separately in plastic wrap.
Refrigerate for approximately 30 to 45 minutes, or until the dough is firm enough to handle easily.
Chilling is important because it makes the dough easier to roll and helps the cookies maintain their shape during baking.
Step 6: Create the Swirls
Take small portions of both the white and red dough.
Roll each portion into a thin rope of approximately the same length and thickness.
Place one red rope beside one white rope. Gently twist the two ropes together without squeezing them too tightly.
The goal is to create a clear spiral pattern while keeping the two colors distinct.
Once twisted, gently roll the piece between your hands or on a clean work surface to create a smooth, even cookie rope.
Step 7: Shape the Cookies
Cut the twisted dough into pieces approximately 2 to 3 inches long.
For classic round swirl cookies, gently roll each piece into a spiral or small coil.
For a candy-cane appearance, curve one end slightly after shaping the dough.
Place the shaped cookies on a parchment-lined baking sheet, leaving approximately 1 to 2 inches between them.
Step 8: Chill Again
For especially neat cookies, place the prepared baking sheet in the refrigerator for another 15 to 20 minutes.
This second chilling period helps the butter firm up and reduces spreading during baking.
Step 9: Bake
Preheat the oven to 350°F (175°C).
Bake the cookies for approximately 9 to 12 minutes, depending on their size.
The cookies should look set around the edges while remaining relatively pale. Avoid baking them until they become deeply brown, because this can diminish their delicate peppermint flavor and attractive appearance.
Step 10: Cool
Allow the cookies to rest on the baking sheet for about 5 minutes.
Then carefully transfer them to a wire rack and allow them to cool completely.
They will become firmer as they cool.
Methods
Creaming Method
The first important technique is properly creaming the softened butter and sugar. This incorporates air into the mixture and helps produce a lighter cookie.
Two-Color Dough Method
Dividing the dough into two portions allows one half to remain naturally white while the other becomes red. Keeping the two portions similar in size helps produce balanced swirls.
Twisting Method
The signature appearance comes from twisting equal-sized ropes of red and white dough together. A gentle twist produces defined stripes, while excessive twisting can blend the colors.
Chilling Method
Chilling the dough before shaping makes it easier to handle. Chilling the shaped cookies before baking also helps minimize spreading and preserves the swirl pattern.
Baking Method
Bake the cookies just until the edges are set. Candy Cane Swirl Cookies should generally remain light in color rather than becoming deeply browned.
History and Inspiration
Candy canes have long been associated with Christmas celebrations, particularly because of their red-and-white appearance and peppermint flavor. Over time, those familiar colors and flavors have inspired many holiday desserts, including cakes, cupcakes, fudge, brownies, and cookies.
Swirl cookies became a popular way to incorporate contrasting colors into festive baking. Instead of decorating an ordinary cookie after baking, the color is built directly into the dough.
Candy Cane Swirl Cookies combine these two traditions: the peppermint flavor associated with candy canes and the decorative spiral technique used in patterned holiday cookies.
While recipes vary from family to family, the basic concept remains wonderfully simple: buttery cookie dough, peppermint flavor, two contrasting colors, and a beautiful twist.
Formation and Shaping
The formation of these cookies is one of the most enjoyable parts of the recipe.
Begin with equal portions of red and white dough. Roll each portion into a rope. Try to keep both ropes approximately the same thickness.
Place them side by side and twist them gently.
For a classic spiral cookie, coil the twisted dough into a small round shape.
For a candy-cane-inspired cookie, form a short curved hook at one end.
The dough should not be compressed too much. A gentle touch preserves the separation between the red and white colors.
If the dough becomes sticky while shaping, return it to the refrigerator for several minutes.
Tips for Perfect Candy Cane Swirl Cookies
Use softened butter rather than melted butter. Melted butter can make the dough excessively soft and encourage spreading.
Measure the flour carefully. Too much flour can make the cookies dry, while too little can make the dough difficult to shape.
Use gel food coloring when possible. It creates a strong color without significantly changing the dough’s consistency.
Do not use too much peppermint extract. A little goes a long way.
Keep the red and white ropes similar in thickness so the finished swirls look balanced.
Chill the shaped cookies before baking if your kitchen is warm.
Do not overbake. The cookies should remain relatively pale with lightly set edges.
Allow the cookies to cool completely before decorating or storing.
Optional White Chocolate Finish
For an extra festive presentation, allow the cookies to cool completely and drizzle them lightly with melted white chocolate.
While the chocolate is still soft, sprinkle a small amount of crushed candy cane over the top.
Allow the chocolate to set completely before stacking the cookies.
Storage
Store completely cooled cookies in an airtight container at room temperature.
Place parchment or wax paper between layers to help protect the decorative swirls.
They are best enjoyed within several days, although properly stored cookies can remain enjoyable for longer.
The baked cookies can also be frozen in an airtight freezer-safe container. Separate layers with parchment paper and thaw them at room temperature before serving.
Serving Ideas
Candy Cane Swirl Cookies are beautiful served on a Christmas cookie platter alongside gingerbread cookies, shortbread, sugar cookies, and chocolate treats.
They also make attractive homemade gifts. Arrange them in a small holiday box or clear treat bag and tie it with festive ribbon.
They are especially suitable for Christmas parties, cookie exchanges, family gatherings, school celebrations, and winter afternoon tea.
Conclusion
Classic Candy Cane Swirl Cookies are a beautiful combination of buttery cookie dough, refreshing peppermint, and traditional Christmas colors.
The recipe may look impressive, but the technique is surprisingly simple. Once the red and white doughs are prepared, twisting them together creates the distinctive candy-cane pattern without requiring complicated decorating skills.
Their delicate texture, bright appearance, and familiar peppermint flavor make them a memorable addition to any holiday dessert table.
For Candy Cane Cookie Lovers
Anyone who loves peppermint desserts, classic sugar cookies, or traditional Christmas baking will appreciate these cookies.
They are especially enjoyable for people who love recipes that look special without requiring elaborate equipment or advanced decorating techniques.
The combination of crisp edges, tender centers, buttery flavor, vanilla, and peppermint creates a nostalgic holiday taste that pairs beautifully with coffee, tea, hot chocolate, or a glass of cold milk.
Most importantly, these cookies bring together everything that makes holiday baking enjoyable: simple ingredients, beautiful presentation, a wonderful aroma, and the opportunity to create something special with family and friends.