
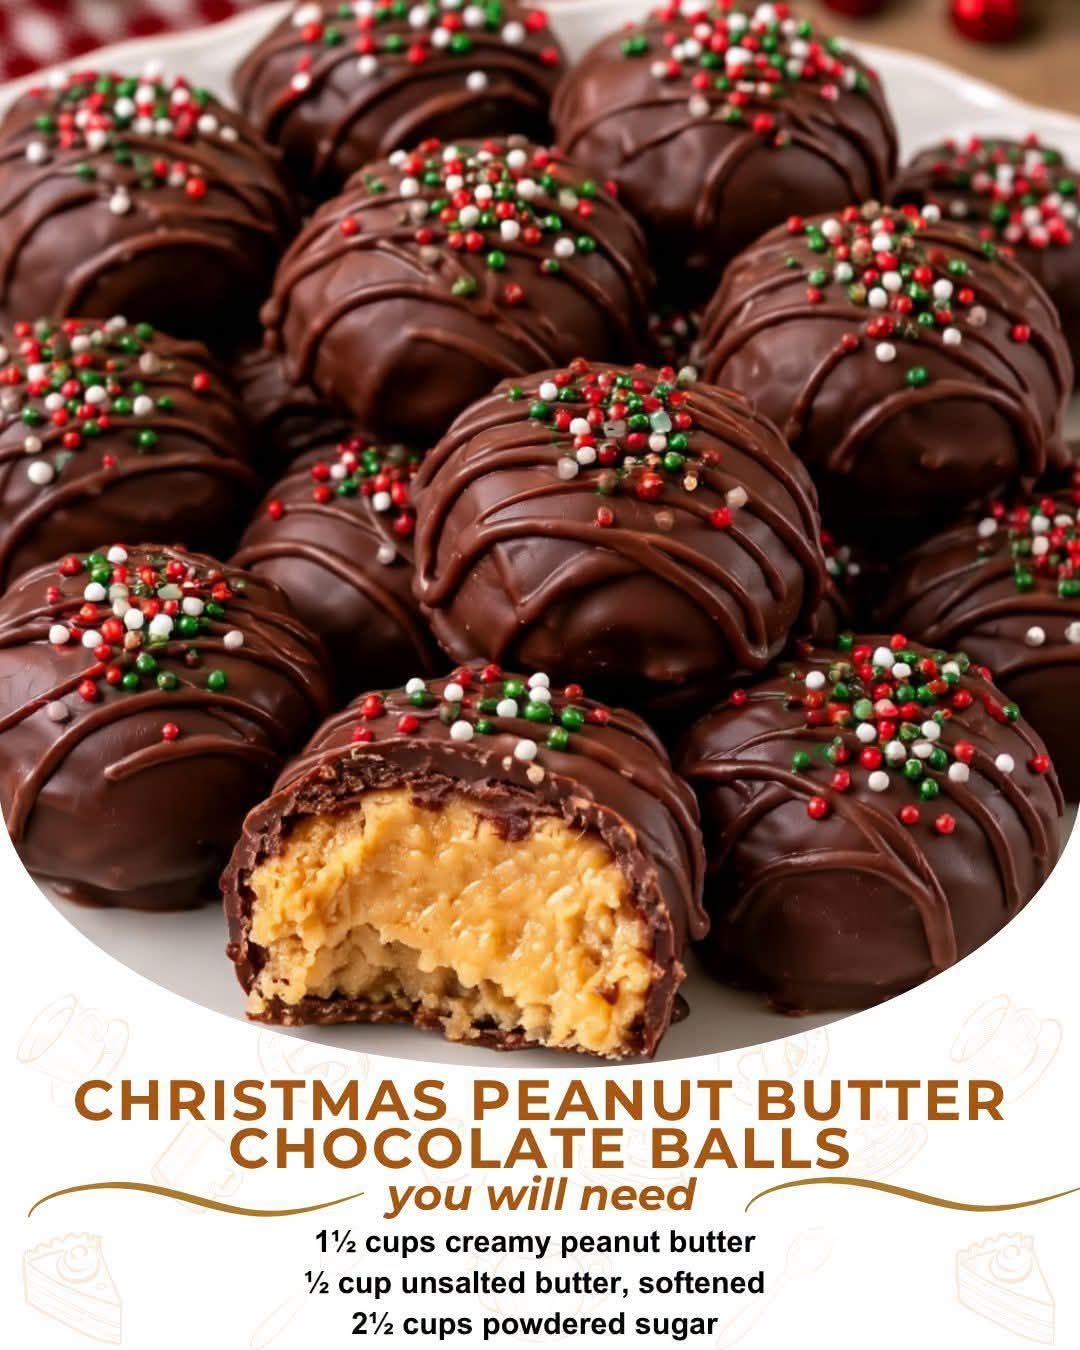
Classic Christmas Peanut Butter Balls
Introduction
Christmas baking has a special way of bringing people together, and few treats are as simple, nostalgic, and satisfying as chocolate-covered peanut butter balls. These little candies combine a rich, creamy peanut butter center with a smooth chocolate coating, creating the perfect balance of salty, sweet, creamy, and chocolatey flavors.
They are wonderfully easy to prepare and require no complicated baking techniques. The peanut butter mixture is blended until thick and smooth, shaped into small balls, chilled until firm, and then dipped in melted chocolate. A few festive sprinkles on top transform them into beautiful holiday treats that look right at home on a Christmas cookie tray.
These peanut butter balls are ideal for Christmas parties, cookie exchanges, family gatherings, dessert tables, homemade gifts, or simply keeping a container in the refrigerator for when a sweet craving appears.
Ingredients
For the Peanut Butter Filling
- 1 1/2 cups creamy peanut butter
- 1/2 cup unsalted butter, softened to room temperature
- 2 1/2 cups powdered sugar
- 1 teaspoon vanilla extract
For the Chocolate Coating
- 2 cups semi-sweet chocolate chips or milk chocolate chips
- 1 tablespoon shortening or coconut oil, optional
For Decoration
- Christmas sprinkles, as needed
- Crushed peanuts, optional
- Shredded coconut, optional
- Finely chopped chocolate, optional
Equipment
- Large mixing bowl
- Electric hand mixer or stand mixer
- Measuring cups and spoons
- Baking sheet
- Parchment paper
- Microwave-safe bowl
- Fork or chocolate dipping tool
- Refrigerator
Instructions
Step 1: Prepare the Baking Sheet
Line a large baking sheet with parchment paper or wax paper. This will prevent the chocolate-covered peanut butter balls from sticking and will make cleanup much easier.
Set the prepared baking sheet aside while you make the filling.
Step 2: Cream the Peanut Butter and Butter
Place the softened butter and creamy peanut butter in a large mixing bowl.
Beat them together on medium speed until the mixture is smooth, creamy, and completely combined. Scrape down the sides of the bowl as necessary.
Using softened butter is important because it allows the mixture to blend evenly without leaving small pieces of butter throughout the filling.
Step 3: Add the Vanilla
Add the vanilla extract and mix until incorporated.
The vanilla adds a gentle sweetness and enhances the flavor of both the peanut butter and chocolate.
Step 4: Add the Powdered Sugar
Gradually add the powdered sugar, mixing after each addition.
Continue mixing until a thick dough-like mixture forms. The finished mixture should be firm enough to roll between your hands without being excessively sticky.
If the mixture feels too soft, add a little additional powdered sugar, one tablespoon at a time, until it reaches the right consistency.
If it becomes too dry or crumbly, allow it to sit for a few minutes and work it gently with your hands. The peanut butter will help bring the mixture together.
Step 5: Shape the Peanut Butter Balls
Scoop out approximately 1 tablespoon of the mixture at a time.
Roll each portion between your palms to form a smooth ball about 1 inch in diameter.
Place each ball onto the prepared parchment-lined baking sheet.
Continue until all of the peanut butter mixture has been used.
For a more uniform appearance, you can use a small cookie scoop to portion the filling.
Step 6: Chill the Balls
Place the baking sheet in the refrigerator for 30 to 60 minutes.
The peanut butter balls should become firm before they are dipped in chocolate. Chilling is one of the most important steps because firm centers are much easier to coat.
If your kitchen is particularly warm, you can chill them for slightly longer.
Step 7: Melt the Chocolate
Place the chocolate chips in a microwave-safe bowl.
If desired, add 1 tablespoon of shortening or coconut oil. This helps make the chocolate smoother and easier to dip.
Microwave the chocolate for 20 to 30 seconds at a time, stirring thoroughly after each interval.
Continue heating and stirring until the chocolate is smooth and completely melted.
Do not overheat the chocolate. Short heating intervals and frequent stirring help prevent scorching.
Step 8: Dip the Peanut Butter Balls
Remove the chilled peanut butter balls from the refrigerator.
Using a fork or dipping tool, place one ball into the melted chocolate. Roll it gently until it is coated on all sides.
Lift the ball from the chocolate and allow the excess chocolate to drip back into the bowl.
Place the coated ball onto the parchment-lined baking sheet.
Repeat with the remaining peanut butter balls.
Step 9: Decorate
While the chocolate is still wet, add Christmas sprinkles to the tops of the peanut butter balls.
You can also decorate them with finely chopped peanuts, shredded coconut, or other festive toppings.
Work fairly quickly because the chocolate will begin to set as it cools.
Step 10: Chill Until Firm
Return the finished peanut butter balls to the refrigerator.
Chill them for approximately 20 to 30 minutes, or until the chocolate coating has completely hardened.
Once firm, they are ready to serve.
Method
The basic method behind these Christmas peanut butter balls is a simple three-stage process: prepare, chill, and coat.
First, the peanut butter and softened butter are beaten together to create a creamy foundation. Powdered sugar is then incorporated gradually, producing a thick and moldable filling. Vanilla gives the center additional flavor.
The mixture is shaped into small balls and refrigerated. This chilling stage firms the filling and makes it much easier to dip into warm melted chocolate without the balls losing their shape.
The final stage is chocolate coating. The chilled peanut butter centers are dipped individually into melted chocolate and placed on parchment to set. Decorations are added before the chocolate hardens.
The result is a firm chocolate shell surrounding a soft, rich peanut butter center.
The History of Peanut Butter Balls
Peanut butter and chocolate have been a popular combination in American desserts for generations. Peanut butter became increasingly common in American kitchens during the late nineteenth and early twentieth centuries, eventually becoming a familiar ingredient in cookies, candies, sandwiches, and homemade desserts.
Chocolate-covered peanut butter candies developed into a particularly beloved combination because the richness of chocolate pairs naturally with the salty, nutty character of peanut butter.
Homemade peanut butter balls became especially popular as holiday candy because they could be prepared without an oven, made in large quantities, and stored for several days. Families could prepare them alongside cookies, fudge, truffles, and other Christmas sweets.
The recipe has many variations. Some versions use graham cracker crumbs for additional texture, while others use crispy cereal, crushed peanuts, or different types of chocolate. The basic idea, however, remains the same: a sweet peanut butter center surrounded by chocolate.
Formation and Texture
The formation of these candies is important because the texture of the center determines how easy they are to coat.
The peanut butter provides the creamy and nutty foundation, while butter adds richness and helps create a smooth texture. Powdered sugar provides sweetness while also giving the mixture enough structure to be shaped into balls.
Once chilled, the centers become firm enough to handle. The melted chocolate forms a thin shell around each center.
When you bite into one, the first texture is the firm chocolate coating, followed by the soft and creamy peanut butter filling.
For the best results, keep the balls relatively small. A diameter of approximately 1 inch provides a good balance between chocolate coating and peanut butter center.
Helpful Tips
Use Creamy Peanut Butter
Creamy peanut butter creates the smoothest filling. Natural peanut butter with significant oil separation can sometimes make the mixture softer and more difficult to shape.
Soften the Butter Properly
The butter should be softened but not melted. Melted butter can make the filling excessively soft.
Add Powdered Sugar Gradually
Do not add all of the powdered sugar at once. Adding it gradually makes it easier to control the consistency.
Chill Before Dipping
Cold peanut butter balls are much easier to coat with chocolate. If the centers become soft while you are working, return them to the refrigerator for several minutes.
Melt Chocolate Slowly
Chocolate can burn easily when overheated. Use short microwave intervals and stir thoroughly between each one.
Keep the Chocolate Smooth
If the chocolate becomes too thick, a very small amount of shortening or coconut oil can help create a smoother coating.
Decorate Immediately
Sprinkles need to be added while the chocolate is still wet. Once the coating hardens, decorations will no longer stick easily.
Variations
Milk Chocolate Peanut Butter Balls
Use milk chocolate chips for a sweeter, creamier coating.
Dark Chocolate Version
Use dark chocolate chips for a richer and less-sweet flavor.
Crunchy Peanut Butter Balls
Replace some or all of the creamy peanut butter with crunchy peanut butter for additional texture.
Peanut and Coconut Version
Add finely chopped peanuts or shredded coconut to the outside while the chocolate is still wet.
Holiday Sprinkle Version
Use different colors of Christmas sprinkles to match your holiday table or gift packaging.
White Chocolate Version
Dip the peanut butter centers in melted white chocolate for a lighter appearance and a sweeter flavor.
Storage
Store the finished peanut butter balls in an airtight container in the refrigerator.
They can generally be kept refrigerated for up to one week when properly stored.
For the best texture, allow them to sit at room temperature for several minutes before serving if you prefer a softer peanut butter center.
Freezing
These candies can also be frozen.
Arrange them in a freezer-safe airtight container, separating layers with parchment paper to prevent them from sticking together.
They can be frozen for up to 2 months.
When ready to serve, transfer them to the refrigerator and allow them to thaw gradually.
Serving Ideas
Christmas peanut butter balls are perfect for:
- Christmas cookie trays
- Holiday dessert tables
- Cookie exchanges
- Family gatherings
- Christmas parties
- Homemade food gifts
- School and workplace celebrations
- Holiday gift boxes
- Dessert platters
- After-dinner treats
They also make a beautiful addition to a mixed candy tray alongside chocolate truffles, fudge, cookies, and other homemade Christmas sweets.
Make-Ahead Instructions
These peanut butter balls are particularly convenient for holiday preparation because they can be made ahead of time.
Prepare the peanut butter centers, shape them into balls, and chill them. They can be kept refrigerated until you are ready to dip them.
You can also prepare the fully chocolate-coated candies in advance and store them in an airtight container.
Making them a few days before a Christmas gathering can reduce the amount of work required on the day of the celebration.
Troubleshooting
The mixture is too soft
Add powdered sugar gradually until the mixture becomes firm enough to roll. Chilling the mixture can also help.
The mixture is too dry
The peanut butter may not have blended sufficiently with the butter. Work the mixture gently until it comes together.
The chocolate is too thick
Add a small amount of shortening or coconut oil and stir thoroughly.
The chocolate is not setting
Place the coated candies in the refrigerator for 20 to 30 minutes. A cool environment will help the coating firm.
The peanut butter balls fall apart while dipping
They probably need additional chilling. Return them to the refrigerator before continuing.
Conclusion
Classic Christmas Peanut Butter Balls are the kind of homemade candy that proves a special holiday dessert does not have to be complicated.
With only a handful of basic ingredients, you can create creamy peanut butter centers, coat them in smooth chocolate, and finish them with festive decorations. The preparation is straightforward, the ingredients are familiar, and the finished candies are easy to store and share.
They are especially wonderful during the holiday season because they can be prepared ahead of time and arranged beautifully on a Christmas dessert tray.
Whether you are making them for your family, preparing a homemade gift, or filling a cookie-exchange box, these chocolate-covered peanut butter balls are a classic combination that belongs in any collection of Christmas treats.
For Peanut Butter Lovers
If you love the combination of peanut butter and chocolate, these little candies are an especially satisfying holiday treat. The chocolate coating provides a delicate snap while the center remains rich, creamy, and sweet.
They are small enough to enjoy as a bite-sized dessert, but flavorful enough to feel like a special Christmas confection.
For many families, recipes like this become part of the holiday tradition: the same simple ingredients, the same familiar preparation, and a full container of homemade treats waiting in the refrigerator.
That is what makes Christmas baking so memorable. Sometimes the recipes that require the least effort become the ones everyone asks you to make again.