
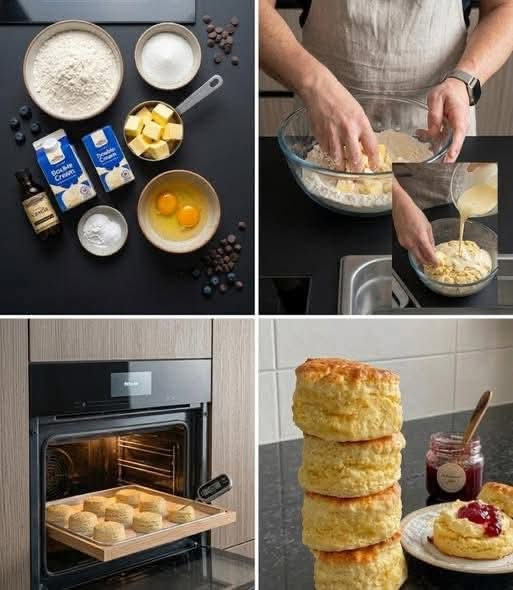
Classic Homemade Scones
Introduction
Classic homemade scones are one of those simple baked treats that can make an ordinary morning feel special. They are lightly sweet, tender inside, delicately crisp around the edges, and wonderfully buttery. Made with a handful of basic pantry ingredients, these scones are easy enough for a beginner baker while still producing the comforting flavor of a traditional homemade pastry.
The secret to good scones is keeping the butter cold and handling the dough gently. Unlike bread dough, scone dough should not be kneaded extensively. The less you work the dough, the more tender and delicate the finished scones will be.
These scones are delicious served warm with butter, jam, honey, whipped cream, or clotted cream. They are also perfect alongside tea, coffee, or a relaxed weekend breakfast.
Ingredients
For the Scones
- 2 cups all-purpose flour
- 1/4 cup granulated sugar
- 1 tablespoon baking powder
- 1/2 teaspoon salt
- 1/2 cup cold unsalted butter, cut into small cubes
- Approximately 1/2 to 3/4 cup cold milk, added gradually
Optional Additions
For different variations, you can also add:
- 1 teaspoon vanilla extract
- 1/2 cup raisins or dried cranberries
- 1/2 cup chocolate chips
- 1 teaspoon ground cinnamon
- 1 teaspoon lemon or orange zest
For Finishing
- A little milk or cream for brushing
- Granulated sugar for sprinkling, optional
- Butter, jam, honey, or cream for serving
Instructions
Step 1: Prepare the Oven
Preheat your oven to 400°F (200°C). Line a baking sheet with parchment paper or lightly grease it.
A properly preheated oven is important because the baking powder begins working as soon as the dough is mixed. A hot oven helps the scones rise quickly and develop lightly golden edges.
Step 2: Combine the Dry Ingredients
Place the flour, sugar, baking powder, and salt in a large mixing bowl.
Whisk everything together until evenly combined. This step distributes the baking powder and salt throughout the flour, helping the scones rise evenly.
Step 3: Add the Cold Butter
Add the cold cubed butter to the flour mixture.
Using your fingertips, a pastry cutter, or two knives, work the butter into the flour until the mixture resembles coarse crumbs.
Do not completely blend the butter into the flour. Small pieces of butter are desirable because they melt during baking and create tender layers throughout the scones.
Step 4: Add the Milk
Gradually pour in the cold milk while gently mixing with a fork or wooden spoon.
Start with about 1/2 cup and add more only if necessary. The dough should come together and feel soft, but it should not be wet or sticky.
Avoid overmixing. Once the flour has mostly been incorporated, stop mixing.
Step 5: Form the Dough
Transfer the dough onto a lightly floured work surface.
Gently bring it together with your hands. Pat the dough into a round approximately 1 inch thick.
Do not knead the dough like bread. A few gentle folds are enough to bring everything together.
Step 6: Cut the Scones
Use a sharp knife to cut the dough into 6 to 8 wedges.
Alternatively, you can use a round biscuit or cookie cutter to create traditional round scones.
If using a cutter, press straight down rather than twisting. Twisting can seal the edges and prevent the scones from rising properly.
Step 7: Prepare for Baking
Place the scones on the prepared baking sheet, leaving a little space between them.
Brush the tops lightly with milk or cream. If desired, sprinkle a small amount of sugar over the tops for a lightly crisp and sweet finish.
Step 8: Bake
Place the baking sheet in the preheated oven.
Bake for approximately 12 to 16 minutes, or until the scones have risen and the tops and edges are lightly golden.
The exact baking time may vary depending on the size and thickness of the scones.
Step 9: Cool and Serve
Remove the scones from the oven and allow them to cool for several minutes.
Serve them warm or at room temperature with butter, jam, honey, whipped cream, or clotted cream.
Method
The traditional method for making scones is based on keeping the ingredients cool and handling the dough as little as possible.
First, the dry ingredients are mixed together. Cold butter is then rubbed into the flour until coarse crumbs form. Milk is gradually added to create a soft dough.
The dough is gently shaped and cut before being baked in a hot oven. During baking, the cold butter melts and creates tenderness, while the baking powder produces the characteristic rise.
This method creates scones that are soft and delicate inside with lightly crisp edges.
Important Tips for Perfect Scones
Keep the Butter Cold
Cold butter is one of the most important parts of the recipe. If the butter becomes warm while preparing the dough, the scones can become heavier and less tender.
If your kitchen is warm, you can place the prepared scones in the refrigerator for 10 to 15 minutes before baking.
Do Not Overwork the Dough
Overmixing develops gluten in the flour, which can make the scones tough.
Mix only until the ingredients come together.
Do Not Add Too Much Milk
Start with a smaller amount of milk and add more gradually. Different types and brands of flour absorb different amounts of liquid.
The finished dough should be soft but manageable.
Use a Hot Oven
A properly heated oven gives the scones a strong initial rise and helps create a lightly golden exterior.
Do Not Make Them Too Thin
For tall, tender scones, keep the dough approximately 1 inch thick before cutting.
History of Scones
Scones are strongly associated with British and Scottish baking traditions and have been enjoyed for generations. The exact origin of the word and the earliest form of the food are debated, but scone-like baked goods have a long history in Britain.
Traditional scones became especially associated with afternoon tea, where they were served with preserves and cream. Over time, different regions and families developed their own versions.
Some scones are plain, while others contain raisins, currants, dried fruit, spices, or other ingredients. American versions are often somewhat sweeter and may be finished with glazes or additional toppings.
Despite these differences, the basic idea remains the same: a simple flour-based dough enriched with butter and baked until tender and golden.
Formation of the Scones
The formation of a good scone begins with the interaction between flour, butter, liquid, and baking powder.
When cold butter is incorporated into the flour, small pieces remain throughout the dough. As the scones bake, the butter melts and creates pockets of tenderness.
The baking powder releases gas during baking, helping the dough expand. Because the dough is not heavily kneaded, the gluten structure remains relatively delicate, producing the characteristic tender texture.
The result is a pastry that is firm enough to hold its shape while remaining soft and crumbly inside.
Serving Ideas
Freshly baked scones can be served in many ways.
For a traditional presentation, split a warm scone in half and serve it with butter and strawberry or raspberry jam.
For a richer version, add clotted cream or softly whipped cream.
Honey, lemon curd, apple butter, or homemade fruit preserves also pair beautifully with plain scones.
For breakfast, serve them alongside fresh fruit and coffee or tea.
Variations
Raisin Scones
Add 1/2 cup raisins or currants to the dry ingredients before adding the milk.
Cinnamon Scones
Add 1 teaspoon ground cinnamon to the flour mixture for a warm, lightly spiced flavor.
Orange Scones
Add 1 teaspoon finely grated orange zest for a bright citrus variation.
Cranberry Scones
Fold in 1/2 cup dried cranberries for a sweet-tart version.
Chocolate Chip Scones
Add 1/2 cup chocolate chips to the dough for a richer dessert-style scone.
Storage
Scones are best enjoyed fresh on the day they are baked.
Store leftover scones in an airtight container at room temperature for up to 2 days. They can be gently reheated in the oven before serving.
For longer storage, allow the baked scones to cool completely and freeze them in an airtight freezer-safe container.
You can also freeze unbaked shaped scones. Arrange them on a tray, freeze until firm, then transfer them to a freezer bag or container. Bake directly from frozen, adding a few extra minutes to the baking time.
Conclusion
Classic homemade scones prove that delicious baking does not require complicated ingredients or elaborate techniques. With flour, sugar, baking powder, salt, cold butter, and milk, you can create a beautiful homemade pastry that is tender, buttery, and satisfying.
The most important lessons are simple: keep the butter cold, add the liquid gradually, avoid overworking the dough, and bake the scones in a properly heated oven.
Whether served for breakfast, afternoon tea, a family gathering, or simply as a homemade treat, these scones are a timeless recipe worth keeping.
For Scone Lovers
For anyone who loves traditional homemade baking, these scones are an excellent recipe to keep in your collection. They can be enjoyed plain or transformed with dried fruit, spices, citrus zest, or chocolate.
There is something particularly comforting about breaking open a warm scone and spreading it with butter and jam. The crisp exterior, tender center, and rich buttery flavor make these simple pastries a favorite for both everyday mornings and special occasions.
Once you master the basic recipe, you can easily create your own family version and experiment with different flavors and toppings.