
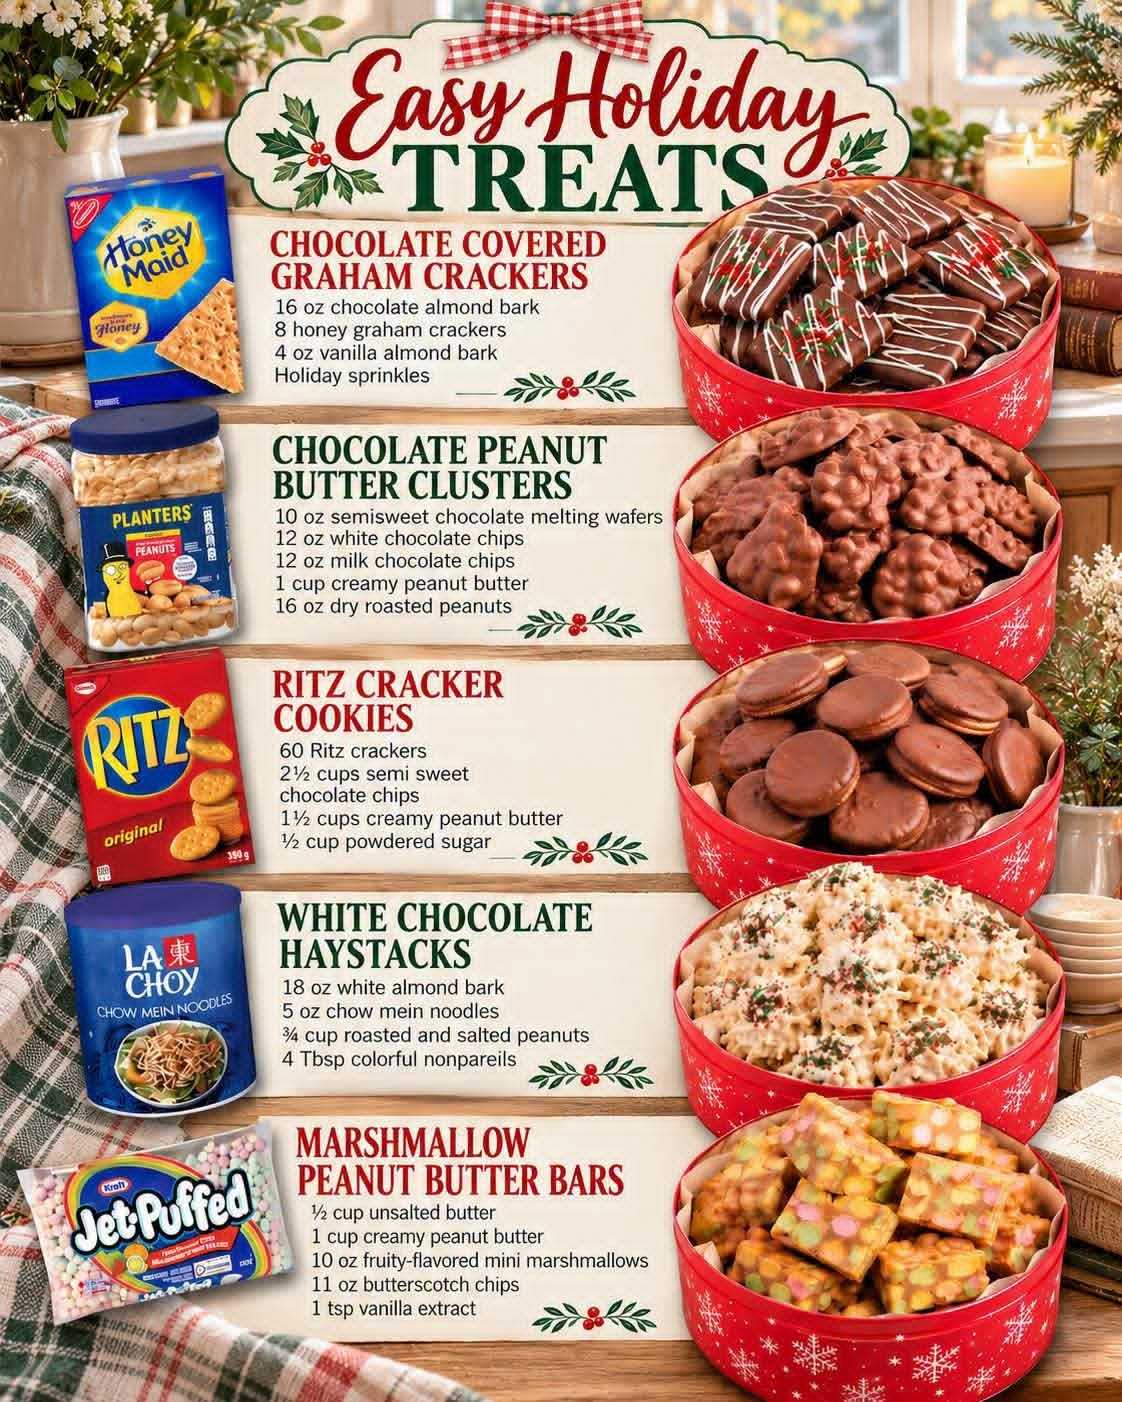
5 Easy Christmas Treat Recipes: Homemade Holiday Candy and No-Bake Desserts
Introduction
The holiday baking season is one of the most wonderful times of the year. Kitchens fill with the sweet aroma of chocolate, peanut butter, toasted peanuts, and homemade treats prepared for family gatherings, Christmas parties, cookie exchanges, and thoughtful homemade gifts. While traditional holiday baking often involves mixing dough, rolling cookies, and spending hours in the oven, some of the most delicious Christmas treats require very little effort.
This collection features five irresistible holiday favorites: Chocolate-Covered Graham Crackers, Chocolate Peanut Butter Clusters, Ritz Cracker Cookies, White Chocolate Haystacks, and Marshmallow Peanut Butter Bars. Each recipe combines simple ingredients to create a different texture and flavor, from crisp chocolate-coated crackers to crunchy peanut clusters and soft, chewy marshmallow bars.
These recipes are perfect for beginners and experienced home cooks alike. Most require no oven, making them especially convenient during the busy holiday season. You can prepare them ahead of time, arrange them on a festive dessert platter, package them in decorative tins, or share them with neighbors, friends, coworkers, and loved ones.
Whether you are planning a Christmas dessert table or simply want something sweet to enjoy with a cup of coffee or hot chocolate, these five homemade treats are wonderful additions to your holiday recipe collection.
Recipe 1: Chocolate-Covered Graham Crackers
Introduction
Chocolate-covered graham crackers are a simple but elegant holiday treat that combines the honeyed flavor of graham crackers with a smooth chocolate coating. A drizzle of white chocolate and a sprinkling of colorful holiday decorations transform ordinary crackers into attractive homemade candies.
They are especially useful when you need a quick dessert for a Christmas party or a homemade gift that looks beautiful without requiring complicated baking techniques.
Ingredients
- 16 ounces chocolate almond bark
- 8 honey graham crackers, broken in half to make 16 squares
- 4 ounces vanilla almond bark
- Holiday sprinkles, optional
Instructions
- Line a baking sheet with parchment paper or wax paper and set it aside.
- Break the graham crackers carefully into 16 reasonably even squares.
- Chop the chocolate almond bark into smaller pieces if necessary. Place it in a microwave-safe bowl.
- Microwave the chocolate in 20- to 30-second intervals, stirring after each interval until completely melted and smooth. Avoid overheating.
- Dip each graham cracker square into the melted chocolate, turning it with a fork until all sides are coated.
- Lift the cracker out of the chocolate and gently tap the fork against the side of the bowl to remove excess coating.
- Place each coated cracker on the prepared baking sheet.
- Melt the vanilla almond bark in a separate microwave-safe bowl using short intervals and frequent stirring.
- Drizzle the melted white coating over the chocolate-covered crackers using a spoon or a piping bag.
- Add holiday sprinkles while the chocolate is still wet.
- Allow the crackers to set at room temperature in a cool room or refrigerate them briefly until the coating becomes firm.
- Once completely set, transfer the crackers to an airtight container.
Method
The secret to making beautiful chocolate-covered graham crackers is to keep the chocolate coating smooth and avoid introducing water into the melted chocolate. Even a small amount of water can cause some chocolate coatings to seize.
Using a fork makes dipping easier and helps remove excess chocolate. If the coating becomes too thick while working, gently warm it again in short intervals.
For a more professional appearance, let the first chocolate layer set before adding a decorative drizzle if you prefer a layered finish. For the traditional look, add sprinkles immediately after drizzling so they adhere properly.
History and Formation
Graham crackers became popular in the United States during the nineteenth century. Their mild sweetness and crisp texture made them useful for snacks and desserts. Chocolate dipping is a later confectionery-style adaptation that turns simple crackers into a sweet treat.
The finished crackers form through the combination of a crunchy honey-flavored center and a firm chocolate shell. The optional white chocolate drizzle adds visual contrast and another layer of sweetness.
Serving Suggestions
Serve these crackers on a Christmas cookie tray alongside fudge, shortbread, and chocolate truffles. They can also be arranged in small gift boxes separated by parchment paper.
For variation, use dark chocolate, milk chocolate, or a mixture of chocolate and white coating. Crushed peppermint candies can replace the holiday sprinkles for a mint-inspired version.
Recipe 2: Chocolate Peanut Butter Clusters
Introduction
Chocolate peanut butter clusters are rich, crunchy homemade candies that combine the deep flavor of chocolate with creamy peanut butter and roasted peanuts. They are easy to prepare in batches and make excellent additions to holiday candy trays.
The combination of different chocolates creates a rounded sweetness, while the peanuts provide a satisfying crunch. Because the mixture is shaped into individual portions rather than baked, the preparation is straightforward and suitable for busy holiday kitchens.
Ingredients
- 10-ounce bag semisweet or dark chocolate melting wafers
- 12-ounce bag white chocolate chips
- 12-ounce bag milk chocolate chips
- 1 cup creamy peanut butter
- 16-ounce jar dry roasted peanuts
Instructions
- Line two baking sheets with parchment paper or wax paper.
- Measure the chocolate melting wafers, white chocolate chips, milk chocolate chips, peanut butter, and roasted peanuts.
- Place the semisweet or dark chocolate wafers in a large microwave-safe bowl.
- Add the milk chocolate chips and microwave in 20- to 30-second intervals, stirring frequently until melted.
- In a separate bowl, melt the white chocolate chips carefully using short microwave intervals. White chocolate can scorch easily, so stir often.
- Stir the creamy peanut butter into the melted dark and milk chocolate mixture until smooth.
- Add the roasted peanuts and mix until they are evenly coated.
- If desired, fold in a small amount of melted white chocolate to create a marbled appearance, or reserve the white chocolate for drizzling.
- Drop spoonfuls of the mixture onto the prepared baking sheets, leaving a little space between each cluster.
- Drizzle the remaining melted white chocolate over the clusters if desired.
- Refrigerate for approximately 30 to 60 minutes, or until the candies are completely firm.
- Transfer the finished clusters to an airtight container and keep them in a cool place.
Method
The best technique for making these clusters is to melt the chocolate slowly and stir it frequently. This produces a smooth mixture that coats the peanuts evenly.
If you want distinct chocolate flavors, keep the white chocolate separate and use it as a decorative topping. If you prefer a sweeter, creamier candy, stir some of the white chocolate directly into the peanut butter mixture.
For consistent portions, use a small cookie scoop or tablespoon. Make the clusters approximately the same size so they set at a similar rate.
History and Formation
Chocolate and peanut butter have long been popular partners in American confectionery. Homemade chocolate nut clusters are a traditional style of candy because they require relatively few ingredients and can be prepared without specialized equipment.
These clusters form when the melted chocolate and peanut butter surround the peanuts. As the mixture cools, the chocolate firms and holds the nuts together, creating a candy with a crisp exterior and crunchy center.
Serving Suggestions
Arrange the clusters in mini paper candy cups for an attractive holiday presentation. They also make excellent homemade gifts when packed in small tins or food-safe gift boxes.
For additional flavor, try lightly salted peanuts, roasted almonds, or a mixture of different nuts. If you want a less sweet result, use dark chocolate melting wafers and reduce the amount of white chocolate.
Recipe 3: Ritz Cracker Cookies
Introduction
Ritz cracker cookies are a classic example of how simple pantry ingredients can become a memorable homemade treat. Buttery, salty crackers are sandwiched around a creamy peanut butter filling, then dipped in melted chocolate to create a sweet-and-salty cookie with a satisfying crunch.
These treats are especially convenient during the holidays because they require no traditional cookie dough and no oven. They are also easy to prepare with children under appropriate supervision, making them a fun family activity.
Ingredients
- 60 Ritz crackers
- 1½ cups creamy peanut butter
- ½ cup powdered sugar
- 2½ cups semisweet chocolate chips
Instructions
- Line a baking sheet with parchment paper.
- Place the creamy peanut butter in a mixing bowl.
- Add the powdered sugar and stir until the mixture is smooth and thick enough to spread.
- Arrange 30 crackers on the prepared baking sheet with their flat sides facing upward.
- Spread a small amount of peanut butter filling over each cracker, leaving a narrow border around the edges.
- Top each filled cracker with another cracker to create a sandwich.
- Press gently so the filling spreads evenly without breaking the crackers.
- Place the chocolate chips in a microwave-safe bowl.
- Microwave in 20- to 30-second intervals, stirring between each interval until the chocolate is melted and smooth.
- Dip each sandwich into the melted chocolate, using a fork to turn it and coat all sides.
- Lift each sandwich out and allow excess chocolate to drip back into the bowl.
- Return the coated sandwiches to the parchment-lined baking sheet.
- If desired, drizzle extra chocolate over the tops or add a small decorative topping.
- Refrigerate for 20 to 40 minutes, or until the chocolate has completely set.
- Store in an airtight container in the refrigerator.
Method
The most important step is preparing a filling that is thick enough to stay inside the crackers. Powdered sugar helps the peanut butter hold its shape and gives the center a smooth, candy-like consistency.
Use a fork or dipping tool to coat the sandwiches without squeezing them. If the chocolate becomes too thick, warm it gently again. Avoid allowing water or steam to enter the bowl.
For neat results, let excess chocolate drip away before placing each sandwich on the baking sheet. A second drizzle of chocolate can hide small imperfections and give the cookies a polished appearance.
History and Formation
Cracker sandwiches filled with peanut butter are a familiar American snack combination. The homemade chocolate-dipped version brings together the salty, buttery character of crackers with a sweet filling and a chocolate shell.
The structure is simple: two crisp crackers hold a layer of peanut butter filling, while the chocolate coating seals the outside. Once chilled, the chocolate firms and the filling remains creamy, producing a delicious contrast of textures.
Serving Suggestions
Serve these cookies chilled or slightly cool, depending on your preferred texture. They are excellent for Christmas cookie exchanges, dessert platters, and homemade gift boxes.
You can use milk chocolate for a sweeter finish or dark chocolate for a richer contrast. For an extra festive appearance, drizzle the finished cookies with white chocolate and add finely crushed peppermint candy.
Recipe 4: White Chocolate Haystacks
Introduction
White chocolate haystacks are crunchy, sweet treats made by combining melted white almond bark with crispy chow mein noodles and roasted peanuts. Their irregular shape resembles little bundles of hay, giving them their traditional name.
These no-bake candies are ideal for holiday entertaining because they are quick to prepare, easy to portion, and visually attractive when arranged in small clusters. Their combination of creamy white chocolate, crisp noodles, and salty peanuts creates a wonderful balance of textures.
Ingredients
- 18 ounces white almond bark
- 5 ounces chow mein noodles, approximately 3 cups
- ¾ cup roasted and salted peanuts
- 4 tablespoons colorful nonpareils
Instructions
- Line a large baking sheet with parchment paper or wax paper.
- Break the chow mein noodles into smaller pieces if they are unusually long, taking care not to crush them completely.
- Place the white almond bark in a large microwave-safe bowl.
- Microwave in 20- to 30-second intervals, stirring between intervals until the coating is completely melted and smooth.
- Add the chow mein noodles and roasted peanuts to the bowl.
- Fold the ingredients together gently until the noodles and peanuts are evenly coated.
- Use two spoons to drop small mounds of the mixture onto the prepared baking sheet.
- Shape each mound loosely into a little haystack. Avoid pressing too firmly because the airy texture gives the candy its character.
- Sprinkle the nonpareils over the clusters while the coating is still wet.
- Leave the haystacks at room temperature until firm, or refrigerate them briefly to speed up the process.
- Once set, remove the candies from the parchment paper and place them in an airtight container.
Method
The key to successful haystacks is maintaining the crispness of the noodles. Fold them into the melted coating gently rather than stirring aggressively.
White almond bark is convenient because it is designed for candy coating and generally sets more firmly than ordinary white chocolate. Follow the melting instructions on the package and avoid overheating.
Work in small batches if the coating begins to harden before all the clusters are shaped. A gentle rewarming will make it easier to coat the remaining ingredients.
History and Formation
Haystack candies are part of a long tradition of simple homemade confections made by coating crunchy ingredients in melted chocolate or candy coating. Different versions use chow mein noodles, coconut, cereal, nuts, or combinations of these ingredients.
Their familiar appearance comes from the irregular strands of noodles held together by the melted coating. As the coating cools, it hardens around the ingredients, creating a crisp, crunchy candy that can be picked up and eaten easily.
Serving Suggestions
Place the haystacks in small paper candy liners and arrange them among chocolate cookies and other Christmas sweets. Their white coating and colorful decorations make them particularly attractive on a winter-themed dessert tray.
For variations, replace some of the peanuts with roasted almonds, add shredded coconut, or drizzle the finished clusters with dark chocolate. Store them in a cool, dry place to preserve their crunch.
Recipe 5: Marshmallow Peanut Butter Bars
Introduction
Marshmallow peanut butter bars are soft, chewy, sweet, and full of nostalgic flavor. Creamy peanut butter and butterscotch chips create a rich base, while fruity mini marshmallows add colorful pockets of sweetness throughout each slice.
These bars are perfect for anyone who wants a homemade holiday dessert without the work of preparing traditional cookie dough. They are easy to cut into squares and can be served at Christmas parties, family gatherings, school celebrations, and potlucks.
The combination of peanut butter, butterscotch, and marshmallows produces a distinctive flavor that stands out among more traditional chocolate-based holiday treats.
Ingredients
- ½ cup unsalted butter
- 1 cup creamy peanut butter
- 11 ounces butterscotch chips
- 1 teaspoon vanilla extract
- 10 ounces fruity-flavored mini marshmallows
Instructions
- Line a 9-by-13-inch baking pan with parchment paper, leaving some overhang to make removing the bars easier.
- Cut the butter into smaller pieces and place it in a large saucepan.
- Add the creamy peanut butter and butterscotch chips.
- Warm the mixture over low heat, stirring constantly until the butter and chips melt into a smooth mixture.
- Remove the saucepan from the heat as soon as the mixture is smooth. Do not allow it to boil.
- Stir in the vanilla extract.
- Allow the mixture to cool for several minutes until it is warm rather than hot. This step is essential because very hot peanut butter mixture can melt the marshmallows.
- Add the fruity mini marshmallows and fold gently until they are distributed throughout the mixture.
- Transfer the mixture to the prepared baking pan.
- Spread it evenly into the corners using a lightly buttered spatula.
- Refrigerate for approximately 2 to 3 hours, or until the bars are firm enough to cut.
- Lift the chilled mixture from the pan using the parchment paper.
- Cut into squares with a sharp knife, wiping the blade between cuts for neater edges.
- Store the bars in an airtight container in the refrigerator.
Method
Low, gentle heat is essential for this recipe. Butterscotch chips can become grainy or scorched if overheated, so patience is more important than speed.
The mixture should cool slightly before the marshmallows are added. If it is too hot, the marshmallows may melt and lose their individual shapes. If it cools too much, the mixture may become difficult to stir and spread.
For clean slices, chill the bars thoroughly and use a sharp knife. If the mixture sticks to the blade, lightly grease the knife before cutting.
History and Formation
Peanut butter bars and marshmallow confections are popular examples of American home-style sweets that use melted ingredients instead of traditional baking methods. Butterscotch adds a caramel-like flavor that pairs naturally with peanut butter.
The bars form as the melted butter, peanut butter, and butterscotch mixture cools and firms around the marshmallows. The result is a sliceable confection with a rich, chewy base and soft, colorful marshmallow pieces.
Serving Suggestions
Cut the bars into small squares because their flavor is rich and sweet. Place them in mini paper liners for holiday dessert trays or pack them into food-safe containers for sharing.
For a variation, use plain mini marshmallows instead of fruity ones, or add a small handful of chopped roasted peanuts for extra crunch. You can also drizzle the chilled bars with melted chocolate for a more decadent finish.
Helpful Tips for All Five Holiday Treats
1. Prepare Your Workspace
Before melting any chocolate or candy coating, line your trays with parchment paper and measure all the ingredients. Since several of these recipes begin setting as they cool, preparation makes the process much easier.
2. Melt Chocolate Slowly
Use short microwave intervals and stir frequently. Chocolate and candy coatings can scorch when heated for too long, even if they do not look fully melted at first. Residual heat will often finish melting the remaining pieces as you stir.
3. Keep Water Away from Chocolate
Make sure bowls, spoons, and other utensils are dry. Water can cause some melted chocolate to seize and become thick or grainy.
4. Allow Treats to Set Completely
Do not stack the candies while their coatings are soft. Let them firm up first so they maintain their shape and do not stick together.
5. Store Each Treat Properly
Store the chocolate-covered crackers, chocolate peanut butter clusters, Ritz cracker cookies, and white chocolate haystacks in airtight containers in a cool environment. Refrigeration is useful in warm rooms, but allow chilled chocolate treats to warm slightly in their closed container before opening to reduce condensation.
The marshmallow peanut butter bars should be refrigerated for best texture and quality. Because homemade treats vary in moisture content and ingredients, use conservative storage times and refrigerate anything that becomes soft, damp, or otherwise questionable.
6. Make Them Allergy-Aware
Peanuts are present in several recipes, and all five treats may contain ingredients manufactured in facilities that process common allergens. Check package labels carefully, especially when preparing food for gifts or gatherings. These recipes are not suitable for anyone with a peanut allergy unless reformulated using appropriate safe substitutes and precautions.
7. Plan a Holiday Candy Tray
For a beautiful dessert platter, arrange the five treats in separate sections. Place the white chocolate haystacks next to the chocolate-covered graham crackers, add the peanut butter clusters in the center, and fill the remaining spaces with Ritz cracker cookies and marshmallow peanut butter bars.
Mixing different shapes, colors, and textures creates an attractive display without requiring elaborate decoration.
Make-Ahead and Gift-Giving Guide
These treats are especially useful for holiday preparation because most can be made in advance.
- Chocolate-covered graham crackers: Prepare ahead and store in a cool, dry place in an airtight container.
- Chocolate peanut butter clusters: Chill until firm, then keep sealed in a cool environment.
- Ritz cracker cookies: Refrigerate in layers separated by parchment paper.
- White chocolate haystacks: Keep airtight and dry to preserve their crisp texture.
- Marshmallow peanut butter bars: Refrigerate until serving or gifting, and keep chilled when necessary.
For gifts, use clean, food-safe tins, boxes, or treat bags. Separate different candies with parchment paper so they do not stick together or transfer flavors. If the recipient has dietary restrictions or allergies, include a clear ingredient list.
Conclusion
Holiday desserts do not need to be complicated to be memorable. With a handful of accessible ingredients, these five recipes transform chocolate, crackers, peanuts, chow mein noodles, peanut butter, butterscotch, and marshmallows into delicious homemade treats.
Chocolate-covered graham crackers provide a crisp chocolate shell, chocolate peanut butter clusters offer rich nutty crunch, Ritz cracker cookies deliver the irresistible combination of sweet and salty, white chocolate haystacks bring a light and crunchy texture, and marshmallow peanut butter bars add a soft, chewy finish.
Together, they offer a variety of flavors and textures for Christmas celebrations, homemade gifts, cookie exchanges, and family gatherings. Prepare one recipe for a simple afternoon treat or make all five to create an impressive holiday candy assortment.
The best part is that most of the work involves melting, mixing, shaping, and chilling rather than complicated baking. That leaves you more time to enjoy the season and share something homemade with the people you love.
For Holiday Dessert Lovers
If you love homemade Christmas candy, no-bake desserts, chocolate treats, and easy recipes that bring people together, this collection deserves a place in your holiday kitchen.
Save these recipes for your Christmas baking plans, share them with friends who enjoy homemade sweets, and choose your favorite to prepare first. Whether you prefer crunchy chocolate candies, salty peanut butter sandwiches, or chewy marshmallow bars, there is something here for every holiday dessert lover.
A festive dessert table does not have to be expensive or difficult. Sometimes the sweetest holiday memories begin with a few simple ingredients, a little time in the kitchen, and a plate of treats shared with family and friends.