
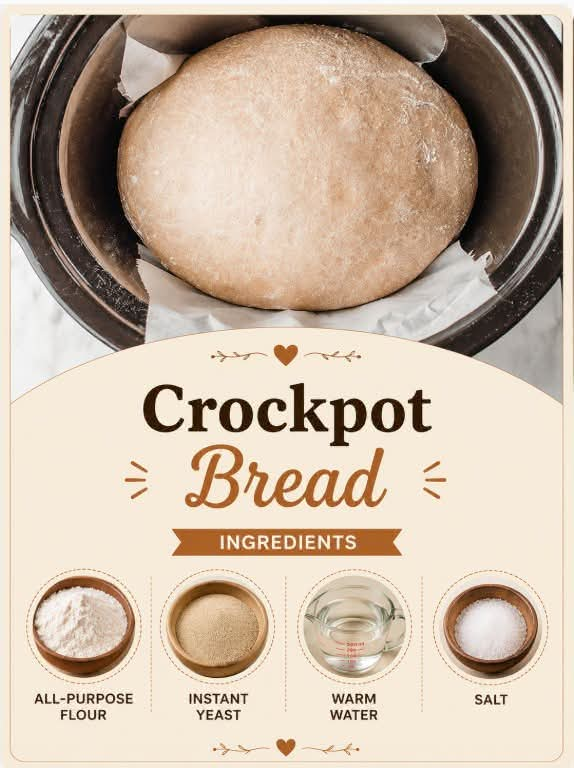
Easy Crockpot Bread: Homemade Slow Cooker Bread with Just Four Basic Ingredients
Introduction
There is something truly special about the smell of freshly baked bread filling the kitchen. A warm loaf with a golden crust, a soft interior, and a delicious homemade flavor can make even the simplest meal feel comforting and memorable. The best part is that you do not need an expensive bread machine or a traditional oven to enjoy homemade bread. With this easy Crockpot Bread recipe, your slow cooker can help you create a beautiful loaf using just four basic ingredients.
This recipe is perfect for beginners, busy families, and anyone who loves fresh bread but wants a simpler baking method. All-purpose flour, instant yeast, warm water, and salt come together to form a soft, rustic loaf that pairs wonderfully with soups, stews, salads, pasta, and family dinners.
Slow cooker bread is especially convenient when you want to keep your oven free for other dishes. Although the crust will be softer and paler than traditional oven-baked bread, the inside can be tender, fluffy, and satisfying. For a more golden and crispy exterior, you can finish the loaf under the oven broiler for a few minutes.
Whether you are making bread for a cozy weekend breakfast or serving it alongside a hearty homemade meal, this simple Crockpot Bread recipe is an easy way to bring homemade goodness to your table.
Ingredients
This recipe uses four inexpensive pantry staples.
Main Ingredients
- 3 cups all-purpose flour
- 2 teaspoons instant yeast
- 1 teaspoon salt
- 1 to 1¼ cups warm water
Ingredient Notes
All-purpose flour: Regular all-purpose flour works well for this recipe. Measure the flour carefully, spooning it into the measuring cup and leveling it off rather than packing it tightly.
Instant yeast: Instant yeast helps the dough rise and gives the bread its light, airy texture. It can be mixed directly into the flour without being activated separately.
Warm water: Use water that feels comfortably warm, approximately 100–110°F (38–43°C). Water that is too hot may damage the yeast and prevent the dough from rising properly.
Salt: Salt improves the flavor of the bread and helps control yeast activity. Do not leave it out, as the finished loaf may taste bland.
Equipment Needed
- A slow cooker or Crockpot
- A large mixing bowl
- A wooden spoon or sturdy spatula
- Measuring cups and spoons
- Parchment paper
- A clean kitchen towel
- A wire cooling rack
Preparation Time
- Preparation: 15 minutes
- First rise: 60–90 minutes
- Second rise: 20–30 minutes
- Slow cooking: Approximately 2–3 hours
- Cooling: 20–30 minutes
The exact cooking time depends on your slow cooker, its size, and how evenly it distributes heat.
Instructions
Step 1: Combine the Dry Ingredients
In a large mixing bowl, combine the all-purpose flour, instant yeast, and salt. Stir until the ingredients are evenly distributed.
Mixing the dry ingredients first helps ensure that the yeast and salt are spread throughout the flour.
Step 2: Add the Warm Water
Pour 1 cup of warm water into the flour mixture. Stir with a wooden spoon until a rough dough begins to form.
If the dough looks too dry or there is loose flour remaining at the bottom of the bowl, add additional water one tablespoon at a time.
The dough should feel slightly tacky and soft but should not be extremely wet or soupy. Depending on the flour and the humidity in your kitchen, you may need a little more or less water.
Step 3: Knead the Dough
Transfer the dough to a lightly floured work surface.
Knead for approximately 8–10 minutes, folding the dough over itself and pushing it away with the heel of your hand. Continue until it becomes smoother and more elastic.
If the dough sticks excessively to your hands, sprinkle the work surface with a small amount of flour. Avoid adding too much, because excess flour can make the bread dense.
You can also use a stand mixer fitted with a dough hook if you prefer.
Step 4: Let the Dough Rise
Place the dough in a lightly greased bowl and cover it with a clean kitchen towel.
Leave it in a warm, draft-free place for approximately 60–90 minutes, or until it has doubled in size.
The rising time depends on the temperature of your kitchen. In a cooler room, the dough may need additional time.
This first rise allows the yeast to produce gas, creating the structure that makes the bread light and fluffy.
Step 5: Shape the Loaf
Once the dough has doubled in size, gently press it down to release some of the trapped air.
Transfer it to a lightly floured surface and shape it into a round or oval loaf that will fit comfortably inside your slow cooker.
Avoid making the loaf too large or too tall. It needs enough room to expand during the second rise and cooking process.
Step 6: Prepare the Crockpot
Line the bottom of the slow cooker with parchment paper, making sure the paper does not obstruct the lid or come into contact with heating elements.
Place the shaped dough on the parchment paper.
Cover the slow cooker with its lid and allow the dough to rise for another 20–30 minutes, if needed, until it looks slightly puffy.
Step 7: Cook the Bread
Cover the slow cooker with its lid and cook on HIGH for approximately 2–3 hours.
Begin checking the bread after about 2 hours because slow cookers vary considerably. The bread is ready when the center is fully cooked and the internal temperature reaches approximately 190–200°F (88–93°C).
The top of the loaf will usually remain pale because a slow cooker does not brown bread in the same way an oven does.
If the center is still doughy, continue cooking and check again in 15–20-minute intervals.
Avoid lifting the lid repeatedly during the early part of cooking, since heat and moisture will escape.
Step 8: Create a Golden Crust
If you prefer a crustier loaf, carefully remove the cooked bread from the slow cooker using the parchment paper as a guide.
Place it on a baking sheet and transfer it to a preheated oven at 400°F (200°C) for approximately 5–10 minutes, watching closely until the outside becomes lightly golden.
This optional step adds color and a slightly crisp exterior while keeping the inside soft.
Step 9: Cool Before Slicing
Transfer the finished loaf to a wire rack and allow it to cool for at least 20–30 minutes.
Cutting into bread while it is extremely hot can compress the interior and make it seem gummy.
Once the loaf has cooled slightly, slice it with a serrated bread knife and serve.
Cooking Method
The secret to successful Crockpot Bread is understanding how slow cooking differs from conventional baking.
An oven surrounds bread with dry heat, which encourages the crust to brown and become crisp. A slow cooker traps heat and moisture beneath its lid, creating a humid environment that cooks the loaf while keeping the crust relatively soft.
For the best results, follow these guidelines:
- Use the right amount of water to create a soft, workable dough.
- Allow the dough to rise properly before cooking.
- Shape the loaf so that it fits comfortably inside the slow cooker.
- Use parchment paper to help prevent sticking.
- Cook until the center is fully baked rather than relying on the color of the top.
- Remove the bread promptly when it is done to prevent the bottom from becoming excessively dark or dry.
- Use the optional oven-finishing step if you want a crispier crust.
A clean kitchen towel placed under the lid can sometimes help absorb condensation, but only use this technique if the towel can be secured safely away from the heating elements and hot surfaces. Never allow fabric to hang near an open flame or other heat source. The towel is optional; the bread can be made without it.
The History of Homemade Bread
Bread has been an important part of human food traditions for thousands of years. Early breads were often simple mixtures of ground grains and water cooked on hot stones or over fires. As baking techniques developed, people discovered the benefits of fermentation and began making leavened breads that were softer and more flavorful.
Yeast became an essential ingredient in many traditional bread recipes because it produces carbon dioxide as it ferments sugars in the dough. These tiny gas bubbles expand and create the airy texture associated with familiar loaves of bread.
Over time, breadmaking became part of everyday life in homes around the world. Families developed their own recipes, using local grains, different types of flour, and methods passed from one generation to another.
Modern kitchens have introduced many convenient ways to prepare bread, including bread machines, no-knead recipes, and slow cooker methods. Crockpot Bread follows the same basic principles of traditional breadmaking while adapting the cooking process to a countertop appliance.
Although it is not a replacement for every traditional baking technique, it offers a practical alternative for home cooks who enjoy experimenting with simple ingredients and convenient equipment.
The Formation of Bread: What Happens Inside the Dough?
The transformation from flour and water into a loaf of bread involves several important processes.
Gluten Development
When flour is combined with water and kneaded, proteins in the flour form gluten. This elastic network helps trap the gas produced by the yeast.
Proper kneading gives the dough enough strength to expand during rising without losing its structure.
Yeast Fermentation
Instant yeast consumes available sugars in the dough and releases carbon dioxide. The gas becomes trapped within the gluten network, causing the dough to expand.
Fermentation also develops flavor, giving homemade bread its familiar aroma and taste.
Rising and Expansion
During the first rise, the dough increases in volume as gas accumulates inside it. The second rise allows the shaped loaf to relax and expand before cooking.
If the dough does not rise enough, the bread may be dense. If it rises too much and loses its structure, the loaf may collapse or develop a weak texture.
Heat and Setting
As the slow cooker heats the dough, the gas bubbles expand and the bread’s structure begins to set. Starches gelatinize, proteins firm up, and moisture gradually redistributes throughout the loaf.
Because a slow cooker retains moisture, the surface usually remains soft rather than developing the dry, browned crust associated with oven baking.
Cooling and Texture
After cooking, the loaf continues to settle as it cools. This helps the crumb become firm enough to slice cleanly.
Allowing sufficient cooling time is an important final step in producing bread with a pleasant texture.
Tips for Perfect Crockpot Bread
Check your yeast. If the yeast is old or has been stored improperly, the dough may not rise well.
Avoid very hot water. Excessively hot water can damage the yeast and interfere with fermentation.
Do not add too much flour. A slightly tacky dough generally produces a softer loaf than a very stiff dough.
Be patient with rising. Dough rises according to its temperature and yeast activity, not simply according to the clock.
Know your slow cooker. Some models cook much hotter than others. Start checking early and use an instant-read thermometer when possible.
Keep the lid on. Repeatedly opening the slow cooker allows heat to escape and can extend the cooking time.
Use parchment paper. It makes removing the loaf easier and helps reduce sticking.
Let the bread cool. Cooling helps prevent a gummy texture when slicing.
Delicious Ways to Serve Crockpot Bread
One of the best things about homemade bread is how easily it fits into everyday meals.
For Breakfast
Serve warm slices with butter, honey, fruit preserves, or peanut butter. Toasted slices also make a satisfying base for scrambled eggs or avocado.
With Soups and Stews
Pair the bread with tomato soup, vegetable soup, chicken soup, lentil soup, or a hearty beef stew. Its soft texture makes it ideal for soaking up flavorful broth.
For Lunch
Use the slices to prepare sandwiches with cheese, eggs, roasted vegetables, chicken, or your favorite fillings.
With Dinner
Serve the loaf alongside roasted chicken, pasta, casseroles, salads, or grilled vegetables. A little butter and a sprinkle of herbs can turn a simple slice into a delicious side dish.
For a Simple Snack
Toast a slice and spread it with butter or olive oil. You can also rub a warm slice with a cut clove of garlic for an easy savory accompaniment.
Easy Variations
Once you have mastered the basic recipe, you can experiment with a few simple additions.
Garlic and Herb Bread: Add 1 teaspoon of garlic powder and 1–2 teaspoons of dried Italian herbs to the flour mixture.
Rosemary Bread: Mix in 1–2 teaspoons of dried rosemary for a fragrant loaf that pairs beautifully with soups.
Whole-Wheat Blend: Replace up to 1 cup of the all-purpose flour with whole-wheat flour. You may need a little additional water, and the finished loaf will be denser.
Seeded Bread: Add 2 tablespoons of sesame seeds, sunflower seeds, or pumpkin seeds to the dough.
Cheese Bread: Fold in approximately ½ cup of grated cheddar or another firm cheese after the dough has come together.
Olive Bread: Add ⅓ cup of chopped, well-drained olives for a savory variation.
Keep additions moderate so that the dough retains enough structure to rise properly.
Storage and Reheating
Allow the loaf to cool completely before storing it.
- Room temperature: Store in a bread bag or airtight container for approximately 2–3 days.
- Refrigerator: Refrigeration can make bread go stale more quickly, so room-temperature storage is generally preferable if the loaf will be eaten within a few days.
- Freezer: Slice the cooled loaf, place the slices in a freezer-safe bag, and freeze for up to 2–3 months for best quality.
To reheat, toast individual slices or warm them briefly in the oven. Frozen slices can usually go straight into the toaster.
Discard bread if you notice mold or an unusual smell. Do not simply cut away visible mold, because it can spread beyond the surface.
Frequently Asked Questions
Can I make bread in a Crockpot without an oven?
Yes. The slow cooker can cook the loaf completely when the correct cooking time and temperature are achieved. The bread will generally have a softer, paler crust than oven-baked bread.
Do I need to activate instant yeast first?
No. Instant yeast can be mixed directly into the dry ingredients. Just make sure your yeast is fresh and your water is not too hot.
Why is my Crockpot Bread doughy in the middle?
It may need more cooking time, or the loaf may be too large for your slow cooker. Check the internal temperature and continue cooking in short intervals until the center is fully baked.
Why is the top of my bread pale?
The moist, enclosed environment of a slow cooker does not promote the same browning as a conventional oven. Finishing the loaf in a hot oven is an easy way to achieve a golden crust.
Can I prepare the dough ahead of time?
Yes. You can prepare the dough and refrigerate it for a slow rise, provided it is covered properly. Allow it to warm and finish rising as needed before cooking. The timing will vary depending on how cold the dough is.
Can I use bread flour instead of all-purpose flour?
Yes. Bread flour can produce a slightly chewier loaf because it generally contains more protein. You may need to adjust the water slightly to achieve a soft, workable dough.
How do I know when the bread is done?
The center should be fully set, not wet or doughy. An internal temperature of approximately 190–200°F (88–93°C) is a useful guide for this type of loaf.
Conclusion
Crockpot Bread is a wonderful example of how a few simple ingredients can become something comforting and delicious. With all-purpose flour, instant yeast, warm water, and salt, you can prepare a homemade loaf without needing a traditional oven for the main cooking process.
The slow cooker makes this recipe convenient, especially when you want to prepare fresh bread while keeping your kitchen routine simple. The finished loaf has a soft interior, a rustic homemade appearance, and a mild flavor that complements almost any meal.
Remember that the most important steps are allowing the dough to rise, checking that the center is fully cooked, and giving the loaf time to cool before slicing. Once you become familiar with your slow cooker’s performance, this recipe can become a dependable addition to your collection of homemade breads.
Serve it warm with butter, alongside your favorite soup, or as the foundation for a delicious sandwich. Homemade bread does not have to be complicated to be satisfying.
For the Love of Homemade Bread
There is a special kind of happiness in serving bread you have made yourself. The ingredients are simple, the preparation is rewarding, and the aroma makes the kitchen feel welcoming.
This Crockpot Bread recipe is ideal for anyone who appreciates traditional comfort food without unnecessary complications. It is budget-friendly, adaptable, and suitable for sharing with family and friends.
Whether you are a first-time breadmaker or an experienced home cook looking for a convenient alternative to oven baking, this simple loaf is worth trying. Enjoy it fresh, experiment with your favorite herbs and seeds, and make it part of your family’s everyday meals.
The beauty of homemade bread is not only in the finished loaf but also in the simple pleasure of creating something delicious from scratch.