
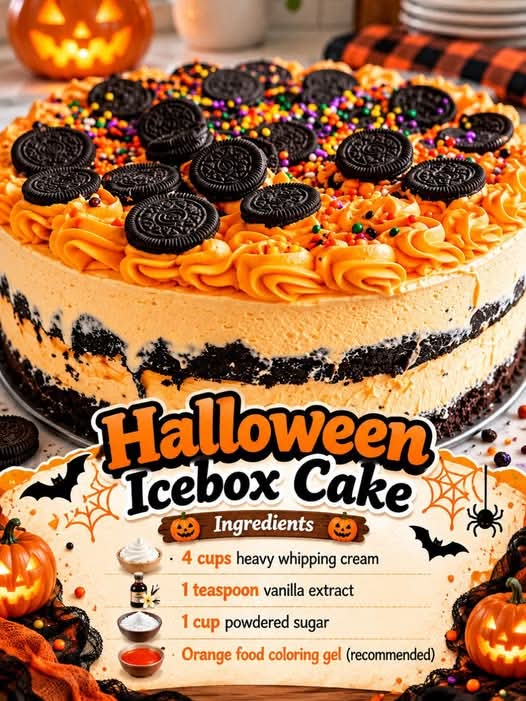
Halloween Icebox Cake – A Creamy, No-Bake Halloween Dessert

Introduction
Halloween Icebox Cake is a delicious, creamy, no-bake dessert that brings festive colors and irresistible flavors to your Halloween celebration. Made with fluffy homemade whipped cream, a hint of vanilla, a touch of sweetness, and bright orange food coloring, this dessert is both beautiful and easy to prepare.
The secret to a wonderful icebox cake is allowing it to rest in the refrigerator for several hours. During this time, the cream softens the cookies or chocolate wafers layered between it, creating a cake-like texture without ever turning on the oven.
This Halloween version is especially delightful because its vibrant orange cream gives it a spooky seasonal appearance. You can decorate it with chocolate sandwich cookies, Halloween sprinkles, candy eyes, or chocolate drizzle to make it even more festive.
Whether you’re hosting a Halloween party, preparing treats for children, or simply looking for an easy dessert to share with family and friends, this Halloween Icebox Cake is a wonderful choice.
Ingredients

1. Heavy Whipping Cream – 4 cups
The main ingredient that creates a rich, fluffy, creamy filling. Use cold heavy whipping cream for the best volume and texture.

2. Vanilla Extract – 1 teaspoon
Adds a warm, sweet aroma and enhances the flavor of the whipped cream.

3. Powdered Sugar – 1 cup
Sweetens the cream while helping it maintain a smooth, delicate texture.

4. Orange Food Coloring Gel – As Needed
Gives the cream its signature Halloween orange color. Gel coloring is recommended because a small amount produces a strong color without adding much liquid.
Additional Ingredients for Layering and Decoration
The four ingredients above make the orange whipped cream. To turn it into a complete icebox cake, you will also need:
- 30–40 chocolate wafer cookies or thin chocolate sandwich cookies, depending on your dish.
- 10–15 chocolate sandwich cookies, crushed or roughly chopped, for decoration (optional).
- Halloween sprinkles in orange, black, purple, or green (optional).
- Chocolate sauce or melted chocolate for drizzling (optional).
- Candy eyes or small Halloween candies (optional).
Instructions
Step 1: Prepare Your Equipment
Place a large mixing bowl and the beaters of your electric mixer in the refrigerator for about 15–20 minutes. Cold equipment helps the cream whip more efficiently.
Choose an 8-by-8-inch or similar-sized baking dish, loaf pan, or springform pan. If you want to remove the cake neatly before serving, line the dish with parchment paper.
Step 2: Whip the Heavy Cream
Pour the cold heavy whipping cream into the chilled mixing bowl.
Beat on medium speed until the cream begins to thicken. Gradually add the powdered sugar and vanilla extract.
Continue beating until the cream forms medium-to-stiff peaks. When you lift the beaters, the whipped cream should hold its shape without becoming grainy.
Avoid overwhipping, as the cream can become lumpy and begin turning into butter.
Step 3: Add the Halloween Orange Color
Add a small amount of orange gel food coloring to the whipped cream.
Gently fold it in with a spatula or mix briefly on low speed until the color is evenly distributed.
Add more coloring a little at a time until you achieve your preferred shade of Halloween orange. A bright orange creates a traditional pumpkin-inspired appearance, while a softer orange gives the cake a more delicate look.
Step 4: Create the First Layer
Spread a thin layer of orange whipped cream across the bottom of your prepared dish.
Arrange the chocolate wafer cookies or chocolate sandwich cookies in a single layer over the cream. Break a few cookies into smaller pieces if necessary to fill any gaps.
The chocolate cookies provide a rich contrast to the sweet orange cream.
Step 5: Add the Creamy Layers
Spread a generous layer of orange whipped cream over the cookies, covering them completely.
Add another layer of chocolate cookies, followed by another layer of whipped cream.
Repeat the process until the dish is filled or you have used all your ingredients. Finish with a smooth layer of orange whipped cream on top.
For the best result, make sure the cookies are covered with cream so they soften evenly in the refrigerator.
Step 6: Decorate the Cake
Sprinkle crushed chocolate cookies over the top, or create a decorative pattern with chocolate sauce.
Add Halloween sprinkles, candy eyes, or small pieces of chocolate to give the cake a festive appearance.
You can also pipe small swirls of orange whipped cream around the edges for a more elegant presentation.
For a pumpkin-inspired design, arrange chocolate cookie crumbs in the center and add a small chocolate piece to resemble a pumpkin stem.
Step 7: Refrigerate Until Set
Cover the dish carefully with plastic wrap or a lid.
Refrigerate for at least 6–8 hours, preferably overnight. This resting time allows the cookies to absorb moisture from the whipped cream and soften into a tender, cake-like consistency.
Do not skip this step. The chilling time is what transforms separate layers of cookies and cream into a cohesive icebox cake.
Step 8: Slice and Serve
Remove the cake from the refrigerator just before serving.
Use a sharp knife to cut neat slices, wiping the knife between cuts if needed. Serve the cake chilled while the cream is firm and the cookie layers are soft.
For the best presentation, decorate with a few extra Halloween sprinkles or a light drizzle of chocolate sauce immediately before serving.
Methods of Preparation
1. The Whipping Method
The whipping method incorporates air into the heavy cream, creating a light and fluffy filling. Keeping the cream cold and adding the powdered sugar gradually helps achieve a smooth texture.
2. The Layering Method
Alternating chocolate cookies with orange whipped cream creates distinct layers of flavor and texture. The cookies absorb moisture during refrigeration, becoming soft enough to resemble cake.
3. The Refrigeration Method
Unlike a traditional baked cake, an icebox cake sets in the refrigerator. The cold temperature helps the whipped cream remain firm while the cookies soften.
4. The Decorative Method
The orange cream provides the Halloween theme, while chocolate cookies, sprinkles, and candy decorations add contrast. Simple decorations are often enough to make this dessert look impressive.
History of Icebox Cake
Icebox cakes became popular in the United States during the early twentieth century, when refrigeration began becoming more common in households.
Before modern refrigerators were widely available, families relied on iceboxes to keep food cool. Desserts that could be assembled without baking and left to chill were convenient alternatives to traditional oven-baked cakes.
Early icebox cake recipes often combined thin wafers, whipped cream, and other simple ingredients. As the dessert rested, the wafers absorbed moisture from the cream and developed a soft texture similar to cake.
Over time, home cooks created countless variations using chocolate cookies, graham crackers, pudding, fruit, and flavored creams.
The Halloween Icebox Cake is a seasonal variation of this classic idea. Orange coloring, chocolate layers, and spooky decorations transform a simple chilled dessert into a festive centerpiece for autumn gatherings.
Formation and Texture
The beauty of this dessert comes from the way its ingredients work together.
- The cream layer: Whipped cream creates a light, smooth filling that balances the richness of the chocolate cookies.
- The cookie layer: Thin chocolate wafers provide structure and a deep cocoa flavor.
- The chilling process: Moisture gradually moves from the cream into the cookies, softening them and helping the layers hold together.
- The orange color: Gel food coloring gives the cream its seasonal appearance without significantly changing its consistency.
- The finished cake: After chilling overnight, the dessert becomes easier to slice and offers a soft, creamy texture with a gentle chocolate crunch or tenderness, depending on the cookies used.
The result is a dessert that looks like a carefully assembled cake but requires no baking.
Tips for the Best Halloween Icebox Cake
Use very cold cream. Cold cream whips more easily and holds its shape better.
Choose the right cookies. Thin chocolate wafers are excellent because they soften evenly. Thicker sandwich cookies may produce a slightly firmer texture.
Add food coloring gradually. Gel coloring is concentrated, so start with a little and increase the amount until you achieve the desired orange shade.
Do not rush the chilling time. Six to eight hours is a good minimum, but overnight refrigeration usually produces the best texture.
Avoid overwhipping. Stop when the cream holds firm peaks. Overwhipped cream can become grainy and difficult to spread.
Decorate just before serving. Add delicate candies and extra sprinkles near serving time for the freshest appearance.
Keep the cake refrigerated. Because it contains whipped cream, do not leave it at room temperature for extended periods.
Delicious Variations
1. Chocolate Orange Icebox Cake
Add a thin layer of chocolate ganache between the cream and cookie layers for a richer dessert with a chocolate-orange flavor combination.

2. Pumpkin Spice Version
Add a small amount of pumpkin pie spice to the whipped cream for a warm autumn flavor. Use a light hand so the spices do not overpower the vanilla.

3. Cookies and Cream Version
Fold a small amount of crushed chocolate sandwich cookies into part of the whipped cream for extra chocolate flavor and texture.

4. Spooky Party Version
Decorate the top with orange, purple, and black sprinkles, candy eyes, and chocolate cookie crumbs. This variation is especially fun for Halloween parties.
Serving Suggestions
Halloween Icebox Cake pairs beautifully with a variety of treats and drinks.
- Serve with hot coffee or tea for adults.
- Pair with cold milk for children.
- Add fresh strawberries or raspberries for a fruity contrast.
- Serve alongside brownies, sugar cookies, or other Halloween treats at a party.
- Present individual slices on dark plates to highlight the bright orange layers.
For a party, you can prepare the cake the night before and decorate it shortly before guests arrive. This makes dessert preparation much easier on the day of the celebration.
Storage Instructions
Refrigerator: Store the cake covered in the refrigerator and enjoy it within 2–3 days for the best texture and quality.
Freezer: You can freeze individual portions in a tightly covered, freezer-safe container for up to one month for a firmer, semifrozen dessert. Thaw briefly in the refrigerator before serving, keeping in mind that whipped cream may change texture after freezing.
Food safety: Keep the cake refrigerated at 40°F (4°C) or below. Avoid leaving it out for more than two hours, or one hour when the temperature is above 90°F (32°C).
Conclusion
Halloween Icebox Cake is proof that a memorable dessert does not need to be complicated. With four simple ingredients for the orange whipped cream, a few chocolate cookies, and enough time in the refrigerator, you can create a beautiful no-bake treat that looks festive and tastes wonderfully creamy.
Its soft layers, sweet vanilla flavor, chocolate-cookie contrast, and bright orange color make it a natural addition to Halloween celebrations. Best of all, you can prepare it ahead of time, leaving you free to enjoy the festivities with family and friends.
Whether you choose a simple decoration or a spooky Halloween design, this icebox cake is an easy dessert worth making again every autumn.
For the Lovers of Easy Halloween Desserts
If you love desserts that combine simple ingredients with impressive results, this Halloween Icebox Cake deserves a place in your recipe collection. It is ideal for chocolate lovers, whipped-cream fans, busy home cooks, and anyone who enjoys preparing seasonal treats without turning on the oven.
Make it for a Halloween party, a family movie night, a school celebration, or a cozy autumn weekend. You can change the cookies, experiment with the decorations, and create a different version every year.
The best part is watching ordinary cookies and cream transform into a soft, delicious cake while resting in the refrigerator.
Recipe at a Glance
- Preparation time: 20–30 minutes
- Chilling time: 6–8 hours or overnight
- Cooking time: None
- Difficulty: Easy
- Estimated servings: 8–12
- Best occasion: Halloween parties, autumn gatherings, and family desserts
Final Recipe Reminder
For the best Halloween Icebox Cake, whip the cream until firm, layer it generously with chocolate cookies, and allow enough time for everything to chill. Finish with festive decorations just before serving, and keep the cake refrigerated until it is time to enjoy.
This creamy, colorful, no-bake dessert is a simple way to make Halloween a little sweeter.