
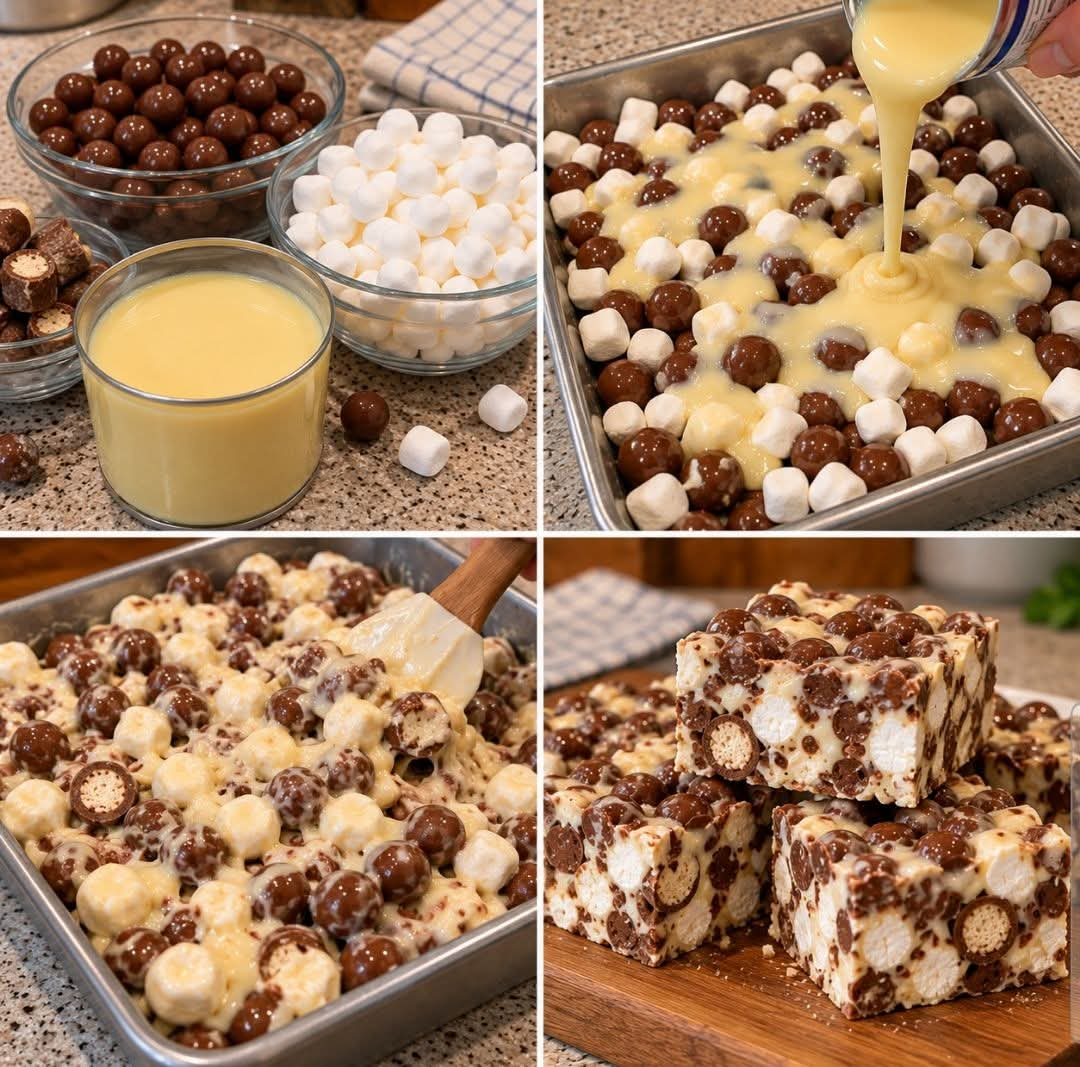
Malted Milk Ball Chocolate Crunch Bars
Introduction
If you love the irresistible combination of chocolate, creamy sweetness, and crunchy malted milk balls, this dessert is sure to become one of your favorite homemade treats. Malted Milk Ball Chocolate Crunch Bars are wonderfully sweet, rich, crunchy, and incredibly easy to prepare using just five basic ingredients.
The secret to this delicious dessert is using whole, uncrushed malted milk balls. Their crisp centers and chocolate coatings create delightful pockets of crunch throughout every bite. Combined with melted chocolate, butter, and a few simple ingredients, they transform into a sweet treat that looks impressive but requires very little effort.
These bars are perfect for family gatherings, holiday dessert tables, potlucks, birthday parties, bake sales, or an evening when you want something sweet without spending hours in the kitchen. They are also a wonderful recipe to prepare with children because the ingredients are simple and the preparation is straightforward.
The best part is that you do not need complicated baking techniques or expensive ingredients. With only five ingredients, a sheet pan, and a little patience while the mixture sets, you can create a delicious dessert that chocolate lovers will want to make again and again.
Ingredients
Preparation: 15 minutes · Chilling: 1–2 hours · Makes approximately 16–24 bars
The following is a practical five-ingredient version of this dessert. Since the original post does not provide exact measurements, these quantities are a suggested recipe rather than a verified transcription of the original.
- 3 cups whole malted milk chocolate balls, such as malted milk chocolate candies
- 2 cups semisweet chocolate chips
- 1 cup creamy peanut butter
- 4 tablespoons unsalted butter
- 2 cups crispy rice cereal
Optional for serving: a small pinch of flaky sea salt.
Instructions
Step 1: Prepare the Sheet Pan
Line an approximately 9-by-13-inch baking pan with parchment paper, leaving a little extra paper over the edges. This will make it easier to lift the finished dessert out of the pan.
Lightly grease the parchment paper if necessary to prevent sticking.
Measure the malted milk balls and set them aside. Keep them whole so they retain their crunchy texture and chocolate coating.
Step 2: Melt the Chocolate Mixture
Place the semisweet chocolate chips, peanut butter, and butter in a large microwave-safe bowl.
Heat the mixture in 20- to 30-second intervals, stirring well after each interval. Continue until the chocolate is melted and the mixture is smooth and glossy.
Alternatively, place the ingredients in a heatproof bowl over a saucepan of gently simmering water. Stir until everything melts together.
Do not allow water or steam to enter the chocolate mixture, as this can affect its texture.
Step 3: Add the Crispy Rice Cereal
Allow the melted chocolate mixture to cool for a minute or two, then gently fold in the crispy rice cereal.
Stir until the cereal is evenly coated. The cereal adds a light crunch that complements the firmer malted milk balls.
Step 4: Fold in the Whole Malted Milk Balls
Add the whole malted milk balls to the chocolate mixture.
Using a sturdy spatula, fold them in gently until they are distributed throughout the mixture. Try not to crush or break them, because keeping them whole gives the finished bars their distinctive crunchy texture.
Reserve a small handful to scatter over the top if you want a more decorative finish.
Step 5: Spread the Mixture in the Pan
Transfer the mixture to the prepared sheet pan.
Use the spatula to spread it evenly into the corners. Press gently to help the mixture hold together, but avoid crushing the malted milk balls.
If desired, place the reserved malted milk balls across the surface and press them lightly into the chocolate.
Step 6: Chill Until Firm
Place the pan in the refrigerator for approximately one to two hours, or until the chocolate mixture is completely firm.
For quicker setting, you can place the pan in the freezer for approximately 25–40 minutes. Check that the center has hardened before cutting.
Step 7: Cut and Serve
Once firm, lift the dessert out of the pan using the parchment paper.
Place it on a cutting board and use a sharp knife to cut it into squares or rectangular bars. For cleaner cuts, warm the knife slightly and wipe it between slices.
Arrange the bars on a serving platter and enjoy.
Methods of Preparation
1. The No-Bake Method
The no-bake method is the easiest way to make these chocolate crunch bars. Melt the chocolate, peanut butter, and butter, fold in the cereal and whole malted milk balls, then chill until firm.
This method is especially convenient during warm holiday baking seasons when you want a homemade dessert without turning on the oven.
2. The Double-Boiler Method
For more controlled melting, use a double boiler. Gently heat the chocolate mixture over simmering water, stirring frequently.
This approach helps prevent the chocolate from overheating and is particularly useful when preparing a larger batch.
3. The Refrigerator-Set Method
Refrigeration allows the chocolate and peanut butter mixture to firm up while holding the crunchy ingredients in place. It produces bars that are easier to cut and serve.
Keep the bars chilled until shortly before serving, particularly in a warm room.
4. The Freezer-Set Method
If you are short on time, use the freezer to speed up the setting process. Once the bars are firm, transfer them to the refrigerator or cut and serve them.
Avoid leaving them in the freezer for too long if you want to prevent excessive hardness.
The History of Malted Milk Ball Treats
Malted milk has a long history in food preparation. Malted milk powder, made using malted grains and milk ingredients, became popular in the late nineteenth century. Its distinctive toasted, creamy flavor later found its way into milkshakes, chocolate drinks, candies, and other desserts.
Malted milk balls became especially recognizable as a confection featuring a crunchy malted center surrounded by a chocolate coating. Their combination of airy crispness and rich chocolate made them popular as a snack on their own and as an ingredient in homemade sweets.
Over time, home cooks began incorporating chocolate candies into brownies, cookies, ice cream toppings, dessert bars, and other easy treats. No-bake chocolate bars became especially appealing because they could be prepared with pantry ingredients and chilled rather than baked.
This particular five-ingredient combination is a modern homemade dessert variation inspired by that tradition. Without the original recipe card, its exact origin and creation date cannot be confirmed.
Formation: What Makes These Bars So Delicious?
The success of these bars comes from the way the ingredients work together.
The chocolate creates a rich, sweet base that holds the ingredients together once chilled.
The peanut butter adds a creamy texture and a roasted nutty flavor that balances the sweetness of the chocolate.
The butter helps produce a smooth, cohesive mixture that becomes firm when cooled.
The crispy rice cereal adds a delicate crunch and makes the texture lighter rather than completely dense.
The whole malted milk balls provide the signature flavor and texture. Their chocolate coating blends with the surrounding mixture, while their crisp malted centers offer little bursts of crunch.
Together, these ingredients create a dessert with multiple textures: smooth chocolate, creamy peanut butter, airy cereal, and crunchy malted candy.
Tips for Perfect Malted Milk Ball Bars
- Keep the malted milk balls whole. This is the defining feature of the recipe, so fold them in gently.
- Use good-quality chocolate chips. The chocolate is the main flavor of the bars, so choose a variety you enjoy eating.
- Avoid overheating the chocolate. Heat slowly and stir frequently for a smooth mixture.
- Let the mixture cool slightly before adding the candies. Excessively hot chocolate can soften the candy coatings and affect the crunch.
- Do not overpack the pan. Spread the mixture evenly and press only enough to help the bars hold together.
- Chill completely before slicing. Cutting too early can make the bars fall apart.
- Use parchment paper. It makes removing and serving the bars much easier.
Delicious Variations
Chocolate Peanut Butter Malted Bars
Use milk chocolate chips instead of semisweet chocolate chips for a sweeter, creamier flavor. This variation is perfect for anyone who enjoys classic chocolate and peanut butter candy combinations.
Double Chocolate Crunch Bars
Replace some of the semisweet chocolate chips with dark chocolate chips. The darker chocolate provides a richer taste that contrasts nicely with the sweet malted milk balls.
Salted Chocolate Malt Bars
Sprinkle a small amount of flaky sea salt over the surface before chilling. The salt enhances the chocolate flavor and balances the sweetness.
Holiday Malted Milk Bars
Decorate the top with festive sprinkles or colored candy pieces before the mixture sets. Cut into small squares for holiday parties, cookie trays, and homemade edible gifts.
Extra-Crunchy Malted Bars
Increase the crispy rice cereal slightly, reducing it if necessary to keep the mixture cohesive. This creates a lighter bar with more crisp texture in every bite.
How to Store the Bars
Refrigerator: Store the bars in an airtight container in the refrigerator for approximately one week for best quality.
Freezer: Place the bars in a freezer-safe container with parchment paper between the layers. Freeze for up to two months for best quality.
Serving: Allow refrigerated bars to sit at room temperature for about 5–10 minutes before serving so the chocolate is easier to bite into.
Avoid leaving the bars in direct sunlight or in a hot room, as the chocolate can soften.
Serving Suggestions
These bars are delicious on their own, but they can also be served in several other ways.
- Serve alongside coffee, tea, or a glass of cold milk.
- Add small squares to a holiday dessert platter.
- Crumble a bar over vanilla ice cream for a crunchy chocolate topping.
- Wrap individual pieces in parchment paper for lunchbox treats.
- Arrange them on a dessert table with brownies, cookies, and other homemade sweets.
Because the bars are rich, cutting them into smaller portions is often ideal, especially when serving them after a large meal.
Frequently Asked Questions
Can I make these bars without peanut butter?
Yes. You can try a smooth sunflower seed butter or another suitable creamy alternative. The texture may vary, so make sure the mixture remains thick enough to hold together.
Can I crush the malted milk balls instead?
You can, but the texture will be different. Keeping them whole creates larger pockets of crunch, while crushed candies distribute the malted flavor more evenly.
Do these bars need to be baked?
No. This version is a no-bake dessert. The chocolate mixture firms up in the refrigerator.
Why are my bars too soft?
They may need more chilling time, or the chocolate mixture may contain too much liquid or too little chocolate. Refrigerate them longer before cutting.
Why are my bars difficult to cut?
They may be too cold. Let them rest at room temperature for a few minutes, then use a sharp knife to cut through the chocolate.
Can I make them ahead of time?
Absolutely. Prepare them a day before serving and keep them refrigerated in an airtight container.
Conclusion
Malted Milk Ball Chocolate Crunch Bars are proof that a simple dessert can deliver extraordinary flavor without complicated preparation. With five basic ingredients, a few minutes of mixing, and some time in the refrigerator, you can create a homemade treat that combines creamy chocolate, nutty peanut butter, crispy cereal, and crunchy malted milk candies.
They are easy enough for an ordinary weekday but delicious enough to serve at special gatherings. Whether you prepare them for your family, share them with friends, or add them to a festive dessert table, these bars offer a wonderful combination of convenience and indulgence.
Once you make a batch, you may find yourself keeping the ingredients on hand for the next chocolate craving.
For the Lovers of Chocolate and Crunchy Desserts
If you love desserts that are easy to prepare and packed with chocolate flavor, this recipe deserves a place in your collection. The whole malted milk balls make every square a little different, giving you creamy sweetness in one bite and a satisfying crunch in the next.
Serve them chilled, share them with the people you love, and enjoy the pleasure of a homemade dessert that requires very little effort.
A simple recipe, five ingredients, and a whole lot of chocolate goodness.