
Mini Apple Pies
Introduction
Mini Apple Pies are a charming individual version of one of the most beloved homemade desserts. They combine buttery, flaky pastry with tender apples, warm cinnamon, nutmeg, brown sugar, and a hint of vanilla. Each little pie has a golden crust and a comforting apple filling that tastes like classic homemade apple pie in a perfectly portioned size.
These pies are ideal for family gatherings, afternoon tea, holidays, bake sales, birthday parties, potlucks, or simply when you want a small homemade dessert. The individual portions also make them easy to serve, and the lattice crust gives them a beautiful traditional appearance.
Ingredients
For the Crust
- 2 ½ cups all-purpose flour
- 1 cup cold unsalted butter, cut into small cubes
- ¼ cup granulated sugar
- ½ teaspoon salt
- 6–8 tablespoons ice-cold water
For the Apple Filling
- 4 medium apples, peeled, cored, and diced
- ½ cup brown sugar
- 1 teaspoon ground cinnamon
- ¼ teaspoon ground nutmeg
- 1 tablespoon lemon juice
- 1 tablespoon cornstarch
- 1 teaspoon vanilla extract
For the Pastry Finish
- 1 large egg, beaten
- 1 tablespoon milk
- Powdered sugar, for dusting
Choosing the Apples
For the best flavor and texture, use apples that hold their shape reasonably well during baking. Granny Smith apples provide a pleasant tartness, while Honeycrisp, Pink Lady, Braeburn, or a combination of sweet and tart apples can create a more balanced filling.
Using a combination of apples is especially delicious because different varieties soften at slightly different rates, giving the filling a more interesting texture.
Instructions
1. Prepare the Pastry
Place the flour, granulated sugar, and salt in a large mixing bowl. Whisk briefly to distribute the ingredients evenly.
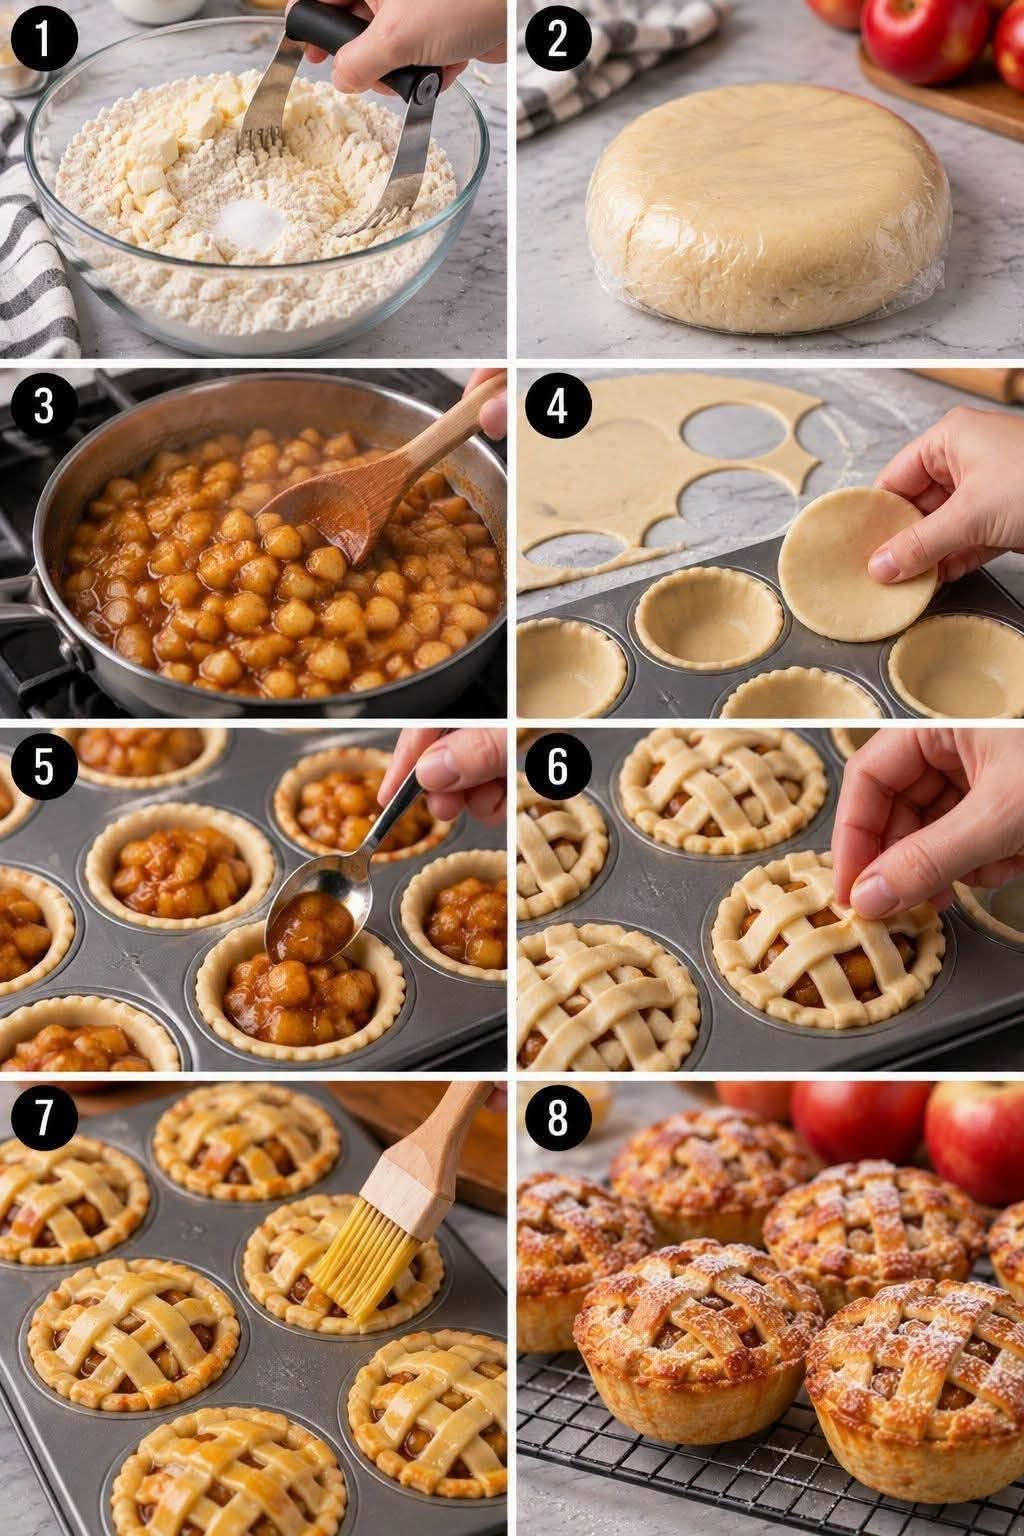
Add the cold cubed butter. Using a pastry cutter or your fingertips, work the butter into the flour until the mixture resembles coarse crumbs with some small pieces of butter still visible.
The remaining pieces of cold butter are important because they help create a flaky pastry.
2. Add the Water
Gradually add the ice-cold water, beginning with 6 tablespoons. Gently mix until the dough starts coming together.
If the dough still appears too dry, add another tablespoon of water at a time. Avoid adding more water than necessary.
The dough should hold together when pressed but should not be wet or sticky.
3. Chill the Dough
Turn the dough onto a lightly floured surface and gently bring it together into a disk. Do not knead it like bread dough.
Wrap it tightly and refrigerate for approximately 30 minutes.
Chilling allows the butter to firm up and gives the dough time to relax, making it easier to roll and helping prevent excessive shrinking during baking.
Method for the Apple Filling
1. Prepare the Apples
Peel, core, and dice the apples into small, fairly uniform pieces. Smaller pieces work especially well for mini pies because they fit neatly into the small pastry shells.
Place the apples in a saucepan.
2. Add the Flavorings
Add the brown sugar, cinnamon, nutmeg, lemon juice, cornstarch, and vanilla extract.
Stir everything together until the apples are evenly coated.
3. Cook the Filling
Place the saucepan over medium heat and cook for approximately 5–7 minutes, stirring occasionally.
The apples should become slightly tender while still retaining some texture. The mixture should also become thicker as the cornstarch activates.
Do not completely cook the apples at this stage because they will continue cooking inside the pies.
Remove the filling from the heat and allow it to cool completely.
Cooling the filling before assembling the pies is important because hot filling can soften the pastry and make it difficult to work with.
Forming the Mini Pies
1. Roll the Dough
Remove the chilled pastry from the refrigerator.
Lightly flour your work surface and roll the dough to approximately 3–4 mm thick.
Use a round cookie cutter, biscuit cutter, or another suitable round object to cut circles slightly larger than your mini pie tins.
2. Line the Pie Tins
Lightly grease the mini pie tins.
Carefully place one pastry circle into each tin. Gently press the dough against the bottom and sides, making sure there are no large air pockets.
Leave a little pastry extending above the edge so you have enough dough to seal the top crust.
3. Fill the Pies
Spoon the cooled apple filling into each pastry shell.
Do not overfill the pies. Leave a little room near the top because the filling can bubble as it bakes.
4. Create the Lattice Crust
Gather the remaining pastry and roll it out again.
Cut the dough into narrow strips. Arrange the strips across each pie in a crisscross pattern to create a traditional lattice.
Trim away excess pastry around the edges and gently press the edges together to seal the pies.
5. Prepare the Egg Wash
Combine the beaten egg with 1 tablespoon of milk.
Brush the egg wash gently over the exposed pastry.
The egg wash helps the crust develop a beautiful golden-brown appearance during baking.
Baking Method
Preheat the oven to 190°C (375°F).
Place the mini pies on a baking sheet. This makes them easier to handle and also helps catch any filling that may bubble over during baking.
Bake for approximately 25–30 minutes, or until the pastry is golden brown and the apple filling is bubbling gently.
If the edges begin browning too quickly, loosely cover them with a small amount of aluminum foil.
Once baked, remove the pies from the oven and allow them to cool for several minutes before serving.
Finishing the Pies
Once the pies have cooled slightly, dust them lightly with powdered sugar.
They can be served warm, at room temperature, or chilled.
For an extra-special dessert, serve each mini apple pie with a scoop of vanilla ice cream, a spoonful of whipped cream, or a drizzle of caramel sauce.
History of Apple Pie
Apple pie has become strongly associated with American and European home baking, but its history is much older than the modern American version.
Recipes for apple-filled pastries appeared in Europe centuries ago, with early versions developing in medieval England and other parts of Europe. These historical pies were not always sweetened in the same way modern apple pies are, and pastry was sometimes used primarily as a container for the filling.
As sugar became more accessible and culinary traditions evolved, apple pies developed into the sweet, spiced desserts familiar today.
The tradition traveled with European settlers and became deeply established in American home cooking. Over generations, apple pie became associated with family gatherings, holidays, celebrations, and traditional homemade baking.
Mini apple pies are a natural modern adaptation of this classic dessert, keeping the familiar flavors while transforming the large family pie into individual servings.
Why These Mini Pies Work So Well
The success of these pies comes from the contrast between textures.
The pastry should be crisp and flaky on the outside, while the apple filling remains soft, juicy, and warmly spiced.
The brown sugar provides a deeper caramel-like sweetness, cinnamon gives the filling its familiar warmth, nutmeg adds subtle depth, and lemon juice prevents the filling from tasting overly sweet.
Cornstarch helps thicken the apple juices so the filling stays inside the pastry instead of becoming excessively watery.
Tips for Perfect Mini Apple Pies
Keep the butter and water cold when preparing the pastry.
Do not overwork the dough. Excessive mixing can produce a tougher crust.
Chill the pastry before rolling it.
Allow the cooked apple filling to cool completely before assembling the pies.
Do not overfill the pastry shells.
Make sure the lattice edges are properly sealed.
Always place the mini pies on a baking sheet before putting them into the oven.
Allow the pies to cool for several minutes after baking so the filling can settle.
For a more decorative finish, sprinkle a small amount of cinnamon sugar over the egg-washed pastry before baking.
Serving Suggestions
These mini apple pies are delicious on their own, but several simple additions can make them even more special.
Serve them warm with vanilla ice cream for a classic combination.
Add caramel sauce for a richer dessert.
Serve them with whipped cream for a lighter presentation.
Pair them with coffee or tea for an afternoon treat.
For holidays, arrange the individual pies on a large serving platter and dust them lightly with powdered sugar just before serving.
Storage
Allow the pies to cool completely before storing.
Store them in an airtight container at room temperature for up to 2 days, or refrigerate them for several days.
They can also be reheated gently in the oven until warmed through. Reheating in the oven helps restore some of the pastry’s crispness better than microwaving.
For longer storage, baked mini pies can be frozen after cooling completely. Wrap them individually and place them in a freezer-safe container.
Conclusion
Mini Apple Pies are a wonderful way to enjoy the comforting flavors of traditional apple pie in a smaller, individual format. The buttery pastry, tender cinnamon apples, brown sugar, and delicate lattice topping create a dessert that feels both nostalgic and elegant.
They are simple enough for everyday baking but attractive enough for holidays, parties, family dinners, and special occasions. The recipe can also be adapted with different apple varieties, spices, toppings, or serving accompaniments.
For Apple Pie Lovers
Anyone who loves traditional apple pie will appreciate these miniature versions. They have all the familiar qualities of a classic homemade pie while offering the convenience of individual portions.
They are especially enjoyable when served warm, when the pastry is crisp and the apple filling is fragrant and tender.
For an especially comforting presentation, place a warm mini apple pie on a dessert plate, add a scoop of vanilla ice cream, and finish with a light drizzle of caramel sauce.
These little pies are the kind of dessert that brings together buttery pastry, sweet apples, warm spices, and homemade comfort in every bite.