
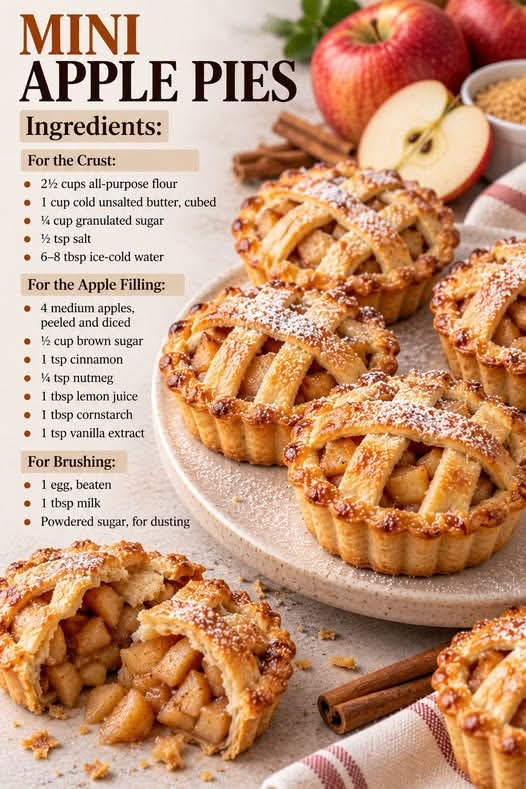
Mini Apple Pies
Introduction
Mini Apple Pies are everything people love about a classic homemade apple pie, transformed into individual little desserts that are perfect for sharing. Each pie has a tender, buttery crust wrapped around a warm apple filling flavored with cinnamon, sugar, and just the right touch of spice.
These miniature pies are especially wonderful during autumn, Thanksgiving, Christmas, family gatherings, bake sales, potlucks, afternoon tea, or whenever you want a comforting homemade dessert without making one large pie.
The best part is that everyone gets their own little pie. The crust becomes beautifully golden and crisp around the edges while the apples soften into a sweet, fragrant filling. Serve them warm with vanilla ice cream, whipped cream, caramel sauce, or simply enjoy them as they are.
Ingredients
For the Crust
- 2 1/2 cups all-purpose flour
- 1 cup cold unsalted butter, cubed
- 1/4 cup granulated sugar
- 1/2 teaspoon salt
- 6–8 tablespoons ice-cold water
For the Apple Filling
- 4 medium apples, peeled, cored, and finely diced
- 1/3 cup granulated sugar
- 1/4 cup packed brown sugar
- 1 1/2 teaspoons ground cinnamon
- 1/4 teaspoon ground nutmeg
- 1 tablespoon lemon juice
- 1 teaspoon vanilla extract
- 2 tablespoons all-purpose flour or cornstarch
- Pinch of salt
For Finishing
- 1 egg
- 1 tablespoon water
- 1–2 tablespoons coarse or granulated sugar, optional
- Extra cinnamon, optional
Equipment
- Large mixing bowls
- Rolling pin
- Round cookie cutter or drinking glass
- Muffin tin or mini pie pans
- Pastry brush
- Fork
- Sharp knife
- Baking sheet
Instructions
Step 1: Prepare the Pie Crust
Place the flour, granulated sugar, and salt in a large mixing bowl. Whisk them together until evenly combined.
Add the cold cubed butter. Using a pastry cutter or your fingertips, work the butter into the flour until the mixture resembles coarse crumbs with a few larger pieces of butter still visible.
Those small pieces of butter are important because they help create a flaky, tender crust when the pies bake.
Begin adding the ice-cold water one tablespoon at a time. Gently mix after each addition until the dough begins to come together.
Do not add all the water automatically. You only need enough to bring the dough together.
Turn the dough onto a lightly floured surface and gently knead it just a few times. Divide it into two portions, flatten each portion into a disk, wrap them, and refrigerate for at least 30 minutes.
Step 2: Make the Apple Filling
While the dough chills, prepare the filling.
Peel, core, and finely dice the apples. Smaller pieces work particularly well for mini pies because they soften quickly and fit neatly inside the small crusts.
Place the apples in a bowl and add the granulated sugar, brown sugar, cinnamon, nutmeg, lemon juice, vanilla extract, flour or cornstarch, and salt.
Stir thoroughly until every apple piece is coated.
Allow the mixture to sit for about 10 minutes. The sugar will draw some moisture from the apples and create a naturally flavorful filling.
For an especially soft filling, you can cook the apple mixture in a saucepan over medium heat for approximately 5–7 minutes, stirring frequently. Allow it to cool before filling the pies.
Step 3: Prepare the Oven
Preheat the oven to 375°F (190°C).
Lightly grease a standard muffin tin if you are using one.
The muffin tin is an easy way to create beautifully shaped individual pies with sturdy sides and a generous amount of filling.
Step 4: Roll Out the Dough
Remove one chilled dough disk from the refrigerator.
Place it on a lightly floured surface and roll it out to approximately 1/8-inch thickness.
Using a round cutter or glass, cut circles large enough to fit into the muffin cups with enough dough extending slightly above the edges.
Gently press each dough circle into the muffin tin.
Do not stretch the dough aggressively, because stretched dough can shrink during baking.
Gather the scraps, gently press them together, chill them if necessary, and roll them again for the tops.
Step 5: Fill the Mini Pies
Spoon the prepared apple filling into each crust.
Do not pack the apples too tightly. Fill each pie generously, leaving a little space at the top.
The apples will soften and settle during baking.
If there is a lot of liquid in the bottom of the filling bowl, use a slotted spoon to avoid adding excessive moisture to the crust.
Step 6: Add the Tops
Roll out the remaining dough and cut circles for the pie tops.
Place a dough circle over each filled pie.
Press the edges gently with your fingers or the tines of a fork to seal the crust.
Cut a small slit or decorative opening in the center of each pie. This allows steam to escape while the apples cook.
For a more decorative presentation, you can cut the dough into strips and create a small lattice crust instead.
Step 7: Brush and Finish
Beat one egg with one tablespoon of water.
Brush the tops of the pies lightly with the egg wash.
Sprinkle with a little granulated or coarse sugar if desired.
A small dusting of cinnamon can also be added before baking.
Step 8: Bake
Place the muffin tin in the preheated oven.
Bake for approximately 25–35 minutes, or until the crusts are deeply golden and the apple filling is bubbling.
The exact baking time will depend on the size of your pies and the type of pan being used.
Watch the crust during the final minutes. It should look crisp and golden rather than pale.
Step 9: Cool
Remove the pies from the oven and allow them to cool in the pan for approximately 10–15 minutes.
Carefully loosen the edges with a thin knife if necessary.
Transfer the mini apple pies to a cooling rack and allow them to cool further.
The filling will thicken as it cools, making the pies easier to eat.
Method
The secret to successful Mini Apple Pies is keeping the pastry cold and handling it gently.
Cold butter creates pockets of fat throughout the dough. As the pies bake, the butter melts and contributes to the flaky texture of the crust.
The apples should be cut into relatively small pieces so that they become tender before the crust becomes overbaked.
The combination of granulated sugar and brown sugar gives the filling both sweetness and depth. Cinnamon provides the familiar apple-pie flavor, while nutmeg adds warmth without overpowering the apples.
Lemon juice is also important because it balances the sweetness and helps brighten the apple flavor.
If using particularly juicy apples, adding flour or cornstarch to the filling helps absorb some of the released liquid and produces a thicker filling.
Choosing the Best Apples
Several varieties work beautifully in mini apple pies.
Granny Smith apples provide a pleasantly tart flavor and hold their shape well.
Honeycrisp apples offer sweetness and a crisp texture.
Golden Delicious apples become tender and naturally sweet when baked.
Pink Lady or Braeburn apples can also provide a wonderful balance of sweetness and acidity.
You can even combine two varieties to create a more complex apple flavor.
History of Apple Pie
Apple pie has become one of the most recognizable comfort-food desserts in American cooking, although versions of baked fruit pies existed in Europe long before the dessert became closely associated with American cuisine.
Apples were incorporated into pies in European cooking, and settlers brought their baking traditions to North America. Over time, American cooks adapted those traditions to locally available ingredients and developed the familiar apple pie flavors of cinnamon, sugar, butter, and tender baked apples.
Individual pies have also been popular because they are practical for gatherings. Instead of slicing one large dessert, individual portions can be prepared, served, transported, and shared easily.
Mini Apple Pies continue that tradition while adding a charming presentation and convenient serving size.
Formation of the Mini Apple Pies
The formation of these little pies follows the same basic structure as a traditional apple pie.
First comes the bottom pastry, which forms a buttery container for the filling.
Next comes the apple mixture, which is layered inside the pastry and seasoned with warm spices.
Finally, the second layer of pastry is placed over the apples and sealed around the edges.
As the pies bake, the butter in the pastry melts, the flour structure sets, and the crust develops a golden color.
At the same time, the apples soften and release their juices. The sugar melts into those juices, while the cinnamon, nutmeg, lemon, and vanilla create the familiar aroma of freshly baked apple pie.
The result is a small dessert with contrasting textures: crisp and flaky pastry on the outside and soft, juicy apples inside.
Tips for Perfect Mini Apple Pies
Keep the butter cold
Cold butter is one of the most important ingredients for flaky pastry. If the dough becomes warm while you are working with it, place it back in the refrigerator for several minutes.
Do not overwork the dough
Mix and knead the dough only enough for it to come together. Overworking it can produce a tougher crust.
Avoid overly wet filling
Apples naturally release liquid when mixed with sugar. If the filling looks extremely wet, use a slotted spoon when transferring it into the crust.
Leave room for bubbling
Do not completely seal the top without creating a vent. Steam needs somewhere to escape.
Let the pies cool
Fresh from the oven, the filling will be extremely hot and loose. Cooling allows the juices to thicken.
Serving Suggestions
Mini Apple Pies can be served warm, at room temperature, or chilled.
For a classic dessert, serve one warm pie with a scoop of vanilla ice cream.
For an extra-special presentation, drizzle the pies with caramel sauce and add a small spoonful of whipped cream.
You can also dust them lightly with powdered sugar once they have cooled.
For breakfast or an afternoon treat, serve a mini pie with coffee, tea, or warm milk.
They are also excellent for holiday dessert tables because guests can simply pick up an individual pie without needing plates and large serving utensils.
Make-Ahead Method
The dough can be prepared a day in advance and stored in the refrigerator.
The apple filling can also be prepared several hours ahead of baking. Keep it covered and refrigerated until ready to use.
You can assemble the mini pies ahead of time and refrigerate them before baking. When ready, brush them with egg wash and bake according to the recipe.
For longer storage, baked mini pies can be cooled completely and stored in an airtight container.
Storage
Store leftover Mini Apple Pies in an airtight container.
They can be kept at room temperature for a short period when properly covered, although refrigeration is preferable for longer storage because of the fruit filling.
To reheat, place the pies in a preheated oven or toaster oven for several minutes. This helps restore some of the crispness of the pastry.
Microwaving is convenient, but the crust will generally become softer.
Variations
Caramel Apple Mini Pies
Add a small spoonful of thick caramel sauce to the apple filling before adding the top crust.
Apple Pecan Mini Pies
Add finely chopped toasted pecans to the filling for extra crunch.
Apple Cranberry Mini Pies
Add dried cranberries to the apple mixture for a sweet-tart holiday variation.
Maple Apple Mini Pies
Replace part of the granulated sugar with pure maple syrup and add a small pinch of cinnamon.
Crumble-Topped Mini Apple Pies
Skip the top pastry and cover the apple filling with a buttery oat crumble before baking.
Conclusion
Mini Apple Pies bring all the comfort of a traditional homemade apple pie into a small, individual dessert.
The buttery crust, tender cinnamon apples, brown sugar, and warm spices create a combination that feels familiar and comforting from the very first bite. They are simple enough for an ordinary afternoon but special enough for holidays, parties, family dinners, and celebrations.
Their small size also makes them especially inviting. Instead of cutting slices from a large pie, everyone gets their own golden little dessert filled with warm apples.
Whether served with vanilla ice cream, caramel sauce, whipped cream, or enjoyed completely on their own, these Mini Apple Pies are the kind of homemade treat that disappears quickly from the dessert table.
For Apple Pie Lovers
If you love classic apple pie, these mini versions are an easy way to enjoy those familiar flavors in a fun individual format.
They are buttery, fragrant, warmly spiced, and filled with tender apples. The crust provides a delicate crunch while the filling stays soft and juicy inside.
They are also a wonderful recipe to make with family because children and adults can help cut the pastry, fill the little crusts, seal the edges, and decorate the tops.
There is something special about pulling a tray of golden Mini Apple Pies from the oven and filling the kitchen with the smell of baked apples and cinnamon.
This is a dessert made for sharing, celebrating, and creating the kind of simple food memories that stay with you long after the last pie has disappeared.