
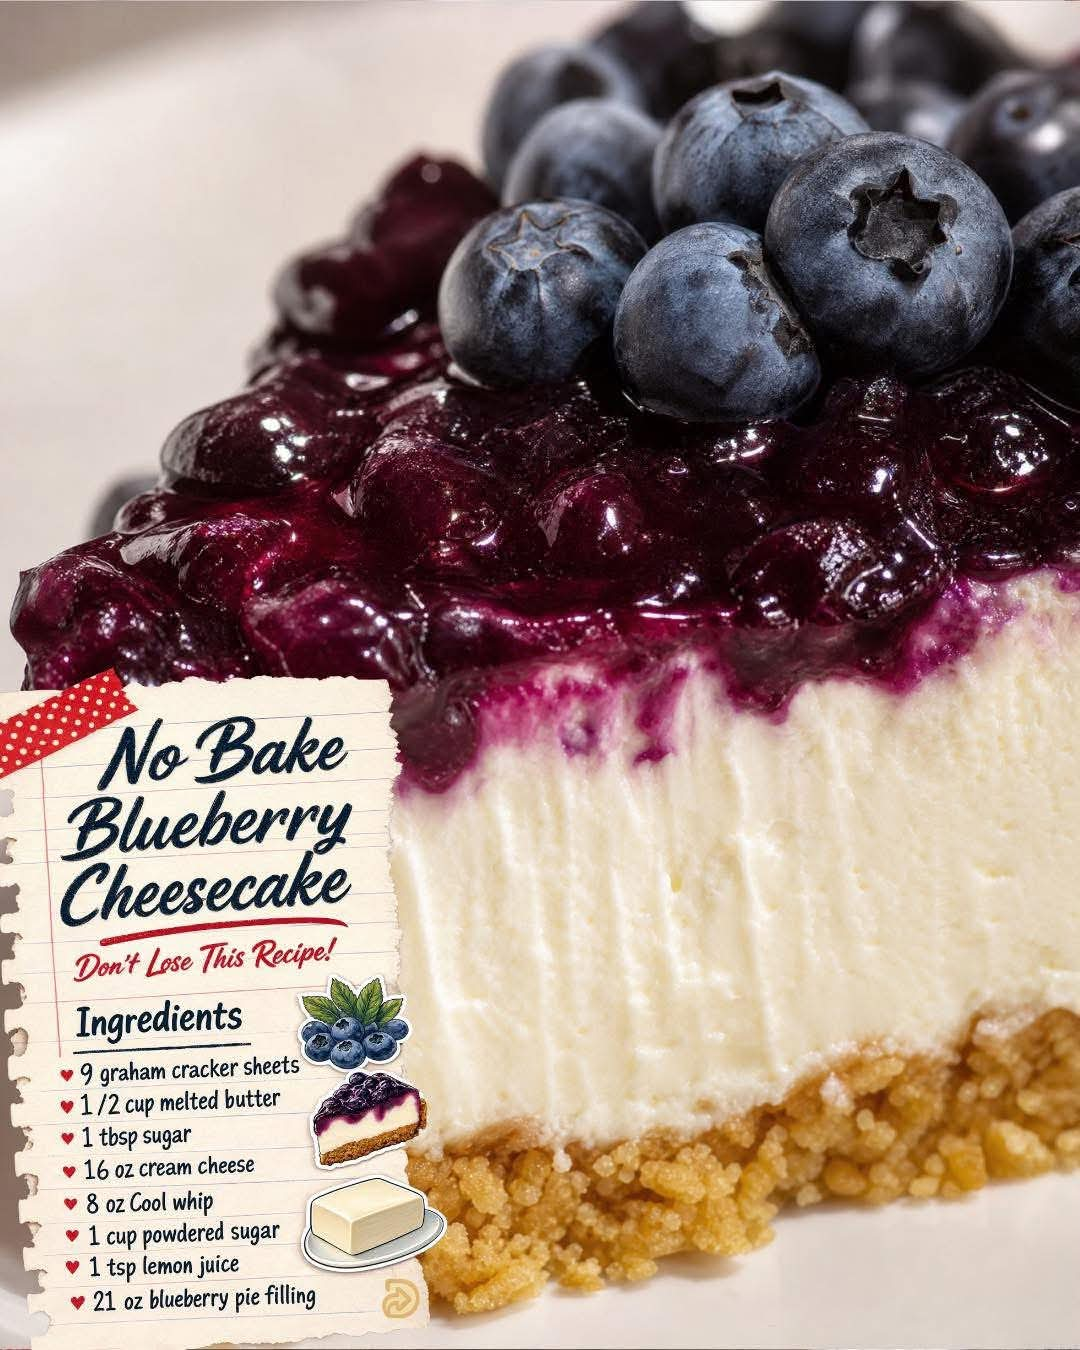
No-Bake Blueberry Cheesecake
Introduction
No-Bake Blueberry Cheesecake is one of those classic desserts that proves you do not need to turn on the oven to make something beautiful, creamy, and completely irresistible. With a buttery graham cracker crust, a smooth cheesecake filling, and a generous layer of sweet blueberry pie filling, this dessert is simple enough for a weekday treat but pretty enough for birthdays, holidays, family gatherings, and dinner parties.
One of the best things about this cheesecake is how little preparation it requires. The crust comes together with only graham crackers, melted butter, and a little sugar. The filling is made by blending softened cream cheese with powdered sugar and lemon juice before folding in fluffy whipped topping. Once assembled, the refrigerator does most of the work.
The small step that makes a big difference is chilling the graham cracker crust before adding the filling. This short rest allows the melted butter to firm up and helps the crust hold together much better when the cheesecake is eventually sliced.
For the best texture, give the finished cheesecake plenty of time to chill. Four hours is the minimum recommended time, but allowing it to rest overnight produces an even firmer and cleaner slice.
Ingredients
For the Graham Cracker Crust
- 9 graham cracker sheets
- 1/2 cup unsalted butter, melted
- 1 tablespoon granulated sugar
For the Cheesecake Filling
- 16 ounces cream cheese, softened to room temperature
- 1 cup powdered sugar
- 1 teaspoon fresh lemon juice
- 8 ounces whipped topping, thawed
For the Blueberry Topping
- 21 ounces blueberry pie filling
Equipment
- 9-inch springform pan or deep pie dish
- Food processor or rolling pin
- Mixing bowls
- Electric hand mixer or stand mixer
- Rubber spatula
- Measuring cups and spoons
- Refrigerator
Instructions
Step 1: Prepare the Graham Cracker Crumbs
Break the graham cracker sheets into smaller pieces and place them in a food processor. Pulse until they become fine, even crumbs.
If you do not have a food processor, place the crackers in a sealed plastic bag and crush them thoroughly with a rolling pin or the bottom of a heavy glass.
Fine crumbs are important because they create a crust that presses together evenly and slices more cleanly.
Step 2: Make the Crust
Place the graham cracker crumbs in a bowl and add the granulated sugar.
Pour in the melted butter and stir until every crumb is evenly coated. The mixture should resemble damp sand and should hold together when pressed between your fingers.
Transfer the mixture to a 9-inch springform pan or pie dish.
Using the bottom of a measuring cup, glass, or the back of a spoon, firmly press the crumbs into an even layer across the bottom of the pan. If desired, press some of the mixture slightly up the sides.
Take your time during this step. A firmly packed crust is much less likely to crumble when the cheesecake is sliced.
Step 3: Chill the Crust
Place the prepared crust in the refrigerator while you prepare the cheesecake filling.
Chill it for approximately 15 to 30 minutes.
This short chilling period allows the melted butter to firm up and helps the crust become more stable. It is a simple step, but it makes a noticeable difference in the finished cheesecake.
Step 4: Prepare the Cream Cheese Filling
Make sure the cream cheese is softened before mixing. Room-temperature cream cheese produces a much smoother filling and makes it easier to eliminate lumps.
Place the softened cream cheese in a large mixing bowl.
Beat until smooth and creamy.
Gradually add the powdered sugar and continue beating until the mixture is completely smooth.
Add the lemon juice and mix again until well incorporated.
The lemon juice adds a small amount of acidity that balances the sweetness while giving the cheesecake filling a fresher flavor.
Step 5: Fold in the Whipped Topping
Add the thawed whipped topping to the cream cheese mixture.
Instead of beating vigorously, gently fold the whipped topping into the cream cheese mixture using a rubber spatula.
Continue folding until the filling is evenly combined and fluffy.
Avoid overmixing because the goal is to maintain the light, airy texture of the filling.
Step 6: Assemble the Cheesecake
Remove the chilled crust from the refrigerator.
Spoon the cheesecake filling over the crust.
Spread it gently with a spatula, working from the center toward the edges.
Smooth the surface as evenly as possible.
Make sure the filling reaches the edges of the crust so that every slice contains a good balance of buttery crust and creamy cheesecake.
Step 7: Chill the Cheesecake
Cover the cheesecake and place it in the refrigerator.
Chill for at least 4 hours.
For the firmest texture and cleanest slices, refrigerate it overnight.
Do not rush this step. Because this is a no-bake cheesecake, refrigeration is what allows the filling to firm up enough to slice properly.
Step 8: Add the Blueberry Topping
Once the cheesecake has thoroughly chilled, spoon the blueberry pie filling over the top.
Spread it gently into an even layer.
You can cover the entire surface or leave a small border of cheesecake filling visible around the edges for a more finished presentation.
For the cleanest appearance, add the blueberry topping shortly before serving.
Method
The method behind this dessert is based on three simple layers: a chilled crumb crust, a creamy no-bake cheesecake filling, and a fruit topping.
The crust gets its structure from melted butter. When the butter cools and firms, it binds the graham cracker crumbs together.
The filling relies on softened cream cheese for richness and structure, powdered sugar for sweetness, lemon juice for balance, and whipped topping for a light and fluffy texture.
Finally, the blueberry pie filling provides a sweet fruit layer that contrasts beautifully with the creamy cheesecake.
Because there is no baking involved, the refrigerator becomes the most important part of the preparation. The longer the assembled cheesecake chills, the more stable the filling becomes.
History of No-Bake Cheesecake
Cheesecake itself has a long history, with early versions of cheese-based cakes appearing in ancient civilizations. Over the centuries, different cultures developed their own versions using fresh cheese, eggs, honey, sugar, and various flavorings.
The modern American-style cheesecake became especially popular as cream cheese became widely available. Eventually, simpler refrigerator desserts began appearing that eliminated the need for baking.
No-bake cheesecakes became popular because they were easy to prepare, required relatively few ingredients, and could be made ahead of time. They became especially useful for summer gatherings when people wanted a chilled dessert without heating the kitchen.
Blueberry became a natural companion for cheesecake because the sweet-tart flavor of blueberries complements the rich cream cheese filling exceptionally well.
Today, no-bake blueberry cheesecake remains a popular dessert for family dinners, potlucks, holidays, birthdays, and summer celebrations.
Formation of the Cheesecake
The finished cheesecake is formed in three distinct layers.
The first layer is the graham cracker crust. The crumbs are mixed with melted butter and sugar, then compressed firmly into the pan. Refrigeration allows the butter to solidify and hold the crumbs together.
The second layer is the creamy cheesecake filling. Softened cream cheese is combined with powdered sugar and lemon juice before whipped topping is gently incorporated. This creates a filling that is rich but considerably lighter than a traditional baked cheesecake.
The final layer is the blueberry topping. The prepared blueberry pie filling adds color, sweetness, fruit flavor, and a glossy finish.
When all three layers are properly chilled, the cheesecake becomes firm enough to cut while remaining soft and creamy when eaten.
Tips for the Best No-Bake Blueberry Cheesecake
Use softened cream cheese. Cold cream cheese can leave small lumps in the filling.
Chill the crust before adding the filling. This helps the crust set and makes the finished dessert easier to slice.
Do not skip the lemon juice. Even a small amount helps balance the sweetness and keeps the cheesecake from tasting overly heavy.
Fold in the whipped topping gently. Overmixing can reduce the fluffy texture of the filling.
Give the cheesecake enough refrigerator time. Four hours is the minimum, but overnight chilling is ideal.
Use a sharp knife for slicing. For especially clean slices, dip the knife in warm water, wipe it dry, and then make each cut.
Add the blueberry topping after the cheesecake has set. This keeps the topping looking fresh and makes serving easier.
Serving Suggestions
Serve each slice cold and straight from the refrigerator.
For a more elegant presentation, add a small spoonful of whipped topping to each slice.
You can also garnish the cheesecake with fresh blueberries and a very small amount of lemon zest.
A few fresh mint leaves can provide a beautiful contrast for special occasions, although they are completely optional.
This cheesecake pairs especially well with coffee, tea, lemonade, or a cold glass of milk.
Storage
Keep the cheesecake covered and refrigerated.
It is best enjoyed within several days for the freshest flavor and texture.
If preparing it for a gathering, making it the night before is an excellent option. The overnight rest gives the crust and filling additional time to firm up.
Because the dessert contains cream cheese and whipped topping, it should not be left at room temperature for extended periods.
Why Cheesecake Lovers Will Love It
Cheesecake lovers will appreciate the rich cream cheese flavor without the heaviness of a traditional baked cheesecake.
The graham cracker crust adds buttery sweetness and a satisfying crunch, while the creamy center provides a soft contrast.
The blueberry topping brings a bright fruit flavor that cuts through the richness of the filling.
It is also an excellent recipe for anyone who wants an impressive dessert without complicated baking techniques. There is no water bath, no oven temperature to monitor, and no worrying about cracks on the surface.
For Blueberry Dessert Lovers
If you love blueberry desserts, this cheesecake delivers everything you want in one simple recipe.
The blueberry topping is sweet and fruity, while the lemon-infused cheesecake filling gives it a slightly tangy contrast. The graham cracker crust completes the combination with its buttery, toasted flavor.
It is the kind of dessert that looks like it took much more effort than it actually did.
Make-Ahead Method
This is an especially good make-ahead dessert.
Prepare the crust and chill it. Make the filling and spread it over the crust. Cover the cheesecake and refrigerate it overnight.
The following day, add the blueberry pie filling just before serving.
Making the cheesecake ahead of time not only saves preparation time on the day of an event but also gives the filling plenty of time to firm up.
Conclusion
No-Bake Blueberry Cheesecake is a simple, creamy, dependable dessert that deserves a place in every dessert collection.
The combination of buttery graham cracker crust, smooth cream cheese filling, and sweet blueberry topping creates a classic flavor that is difficult to resist. The most important secret is patience: chill the crust before adding the filling, then give the finished cheesecake at least four hours in the refrigerator.
For the best results, prepare it the day before you plan to serve it. By the time dessert arrives, the crust will be firm, the filling will be beautifully set, and the blueberry topping will provide the perfect finishing touch.
This is the kind of recipe that is easy enough for beginners, convenient enough for busy cooks, and delicious enough that guests will ask for the recipe.