
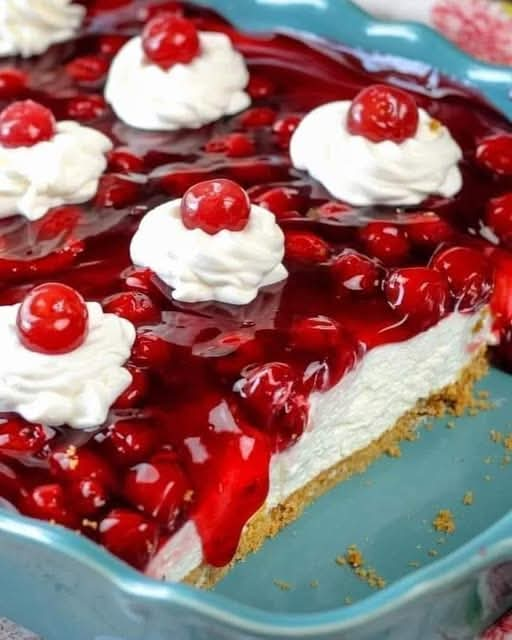
No-Bake Cherry Cheesecake
A Creamy, Dreamy Dessert with a Buttery Graham Cracker Crust
Introduction
No-Bake Cherry Cheesecake is a classic dessert that combines a crunchy graham cracker crust, a smooth and creamy cheesecake filling, and a beautiful layer of sweet cherry pie topping. It is the perfect dessert for anyone who loves the rich taste of cheesecake but wants something simple to prepare without turning on the oven.
This easy cherry cheesecake is made with just a handful of familiar ingredients, including cream cheese, powdered sugar, vanilla extract, whipped topping, graham cracker crumbs, butter, and cherry pie filling. The result is a light, fluffy, sweet, and slightly tangy dessert that tastes wonderful after a family dinner or at a holiday gathering.
One of the best things about this recipe is that it can be prepared ahead of time. After a few hours in the refrigerator, the crust firms up, the filling becomes wonderfully chilled, and the cherry topping settles beautifully over the creamy cheesecake layer. For the best flavor and texture, letting it chill overnight is highly recommended.
Whether you are preparing dessert for Thanksgiving, Christmas, a birthday celebration, a summer barbecue, or an ordinary weekend at home, this no-bake cherry cheesecake is an easy and delicious choice.
Preparation Information
- Preparation time: 20 minutes
- Chilling time: At least 2 hours
- Total time: Approximately 2 hours and 20 minutes
- Serving size: 9 squares
- Baking required: No
- Difficulty level: Easy
Ingredients
For the Graham Cracker Crust
- 7 tablespoons unsalted butter
- 1 1/2 cups graham cracker crumbs, approximately 9 whole graham crackers
- 3 tablespoons granulated sugar
- Nonstick cooking spray for the baking dish
For the Creamy Cheesecake Filling
- 8 ounces cream cheese, softened to room temperature
- 1 cup powdered sugar
- 1 teaspoon pure vanilla extract
- 1 container whipped topping, 8 ounces, thawed
For the Cherry Topping
- 1 can cherry pie filling, 21 ounces
Instructions
Step 1: Prepare the Baking Dish
Lightly coat an 8-by-8-inch baking dish with nonstick cooking spray. Make sure the bottom and corners are lightly covered to help the dessert release more easily when serving.
Set the prepared dish aside while you make the crust.
Step 2: Make the Graham Cracker Crust
Place the unsalted butter in a medium microwave-safe bowl. Microwave for approximately 30 seconds, or until the butter has completely melted. If necessary, heat it in additional short intervals.
Add the graham cracker crumbs and granulated sugar to the melted butter. Stir thoroughly until all the crumbs are evenly coated and the mixture resembles damp sand.
Transfer the crumb mixture into the prepared baking dish. Use the back of a spoon, the bottom of a measuring cup, or your fingers to press the crumbs firmly and evenly across the bottom of the dish.
Pay particular attention to the corners and edges so the crust holds together when the cheesecake is cut.
Place the dish in the refrigerator while you prepare the filling. This helps the butter begin to firm up and gives the crust a better texture.
Step 3: Beat the Cream Cheese
Place the softened cream cheese in a large mixing bowl.
Using an electric hand mixer or stand mixer, beat the cream cheese until it becomes smooth, creamy, and free of lumps. Stop occasionally to scrape down the sides of the bowl with a spatula.
Softened cream cheese is essential for achieving a silky filling. If the cream cheese is too cold, it may leave small lumps that are difficult to remove later.
Step 4: Add the Powdered Sugar and Vanilla
Add the powdered sugar to the cream cheese. Begin mixing at a low speed to prevent the sugar from scattering, then increase the speed and beat until the mixture is smooth.
Pour in the pure vanilla extract and mix again until fully incorporated.
The filling should now be sweet, creamy, and fragrant with vanilla.
Step 5: Fold in the Whipped Topping
Add the thawed whipped topping to the cream cheese mixture.
Mix at low speed or gently fold with a spatula until the ingredients are combined. Avoid overmixing, as excessive mixing can reduce the light, airy texture of the whipped topping.
Scrape the sides and bottom of the bowl to ensure that the filling is evenly blended.
The finished mixture should be fluffy, smooth, and thick enough to spread over the crust.
Step 6: Assemble the Cheesecake Layer
Remove the chilled crust from the refrigerator.
Spoon the cheesecake filling over the graham cracker crust. Spread it evenly using an offset spatula or the back of a spoon.
Work gently so that the crust remains intact beneath the filling. Smooth the surface from edge to edge, making sure the cheesecake layer has a consistent thickness.
Step 7: Add the Cherry Pie Filling
Open the can of cherry pie filling and stir it gently if necessary to distribute the cherries throughout the thick sauce.
Spoon the cherry filling over the cheesecake layer. Carefully spread it across the surface without pressing too firmly into the creamy filling underneath.
Make sure the cherries and their glossy sauce reach the edges for an attractive appearance and a delicious combination of flavors in every slice.
Step 8: Refrigerate Until Firm
Cover the baking dish with plastic wrap or a suitable lid.
Refrigerate for at least 2 hours before serving. For the best results, refrigerate the cheesecake overnight.
The chilling time allows the filling to become firmer and the flavors to blend together. It also helps the graham cracker crust hold its shape when cut.
Step 9: Slice and Serve
Once thoroughly chilled, remove the cheesecake from the refrigerator.
Cut it into 9 squares using a sharp knife. For neater slices, wipe the knife clean between cuts.
Serve the squares cold, allowing the rich cream cheese filling, buttery crust, and sweet cherry topping to shine in every bite.
Detailed Preparation Method
The secret to a successful no-bake cherry cheesecake is creating three distinct layers that work together perfectly.
The crust provides a firm, buttery foundation. The cream cheese filling offers a smooth, rich flavor balanced by the lightness of the whipped topping. Finally, the cherry pie filling adds fruity sweetness, a little tartness, and a beautiful glossy finish.
For the crust, the melted butter acts as the binding ingredient. When chilled, the butter solidifies and helps hold the graham cracker crumbs together. Pressing the crumbs firmly into the dish is important because a loose crust may crumble when the dessert is sliced.
For the filling, room-temperature cream cheese is the best starting point. Beating it before adding the other ingredients creates a smooth base. Powdered sugar dissolves easily into the cream cheese, while vanilla adds warmth and depth. The whipped topping lightens the mixture and creates the soft, mousse-like consistency that makes this dessert so enjoyable.
The cherry topping should be spread gently. Keeping the layers separate creates an attractive presentation and allows the bright cherry flavor to complement, rather than overwhelm, the creamy filling.
Finally, patience is essential. Although the ingredients can be assembled quickly, the cheesecake needs sufficient refrigeration time to develop its best texture.
The History of Cherry Cheesecake
Cheesecake has a long culinary history, with early forms of cheese-based cakes appearing in ancient Greece. Over the centuries, different cultures developed their own versions using local cheeses, sweeteners, and baking methods.
Modern American cheesecake became especially popular with the widespread use of cream cheese. Its rich texture and mild flavor made it a favorite ingredient for both baked and chilled desserts.
Cherry cheesecake became a beloved combination because the fruit’s sweet-tart flavor pairs naturally with the richness of cream cheese. Cherry toppings also provide a colorful finish that makes cheesecake appealing for celebrations and special occasions.
No-bake cheesecake recipes became popular as home cooks looked for convenient desserts that required less preparation and no oven time. Graham cracker crusts, whipped toppings, and ready-made fruit fillings made these desserts especially accessible to busy families.
This no-bake version reflects that tradition of simple home cooking. It brings together familiar ingredients to create a dessert that looks impressive without requiring complicated techniques.
Formation and Texture: What Makes This Cheesecake Special?
The structure of this dessert depends on the way its three layers work together.
The Buttery Crust
The graham cracker crust provides a pleasant crunch and a lightly sweet, toasted flavor. The butter binds the crumbs together as it cools, creating a base that supports the soft filling.
The Creamy Center
The cream cheese gives the filling its characteristic cheesecake flavor. Powdered sugar adds sweetness, vanilla enhances the aroma, and whipped topping introduces airiness.
Because this recipe uses whipped topping rather than eggs and does not require baking, its texture is softer and lighter than that of a traditional baked cheesecake. It is best served well chilled.
The Glossy Cherry Layer
The cherry pie filling contributes juicy fruit, sweetness, and a gentle tartness. Its bright red color contrasts beautifully with the pale cheesecake filling and golden crust.
Together, these layers create a balanced dessert with contrasting textures and flavors.
Important Tips for the Best Results
- Use softened cream cheese. Let it sit at room temperature until it is easy to mix. This helps prevent lumps in the filling.
- Press the crust firmly. A compact crust is less likely to fall apart when the cheesecake is cut.
- Chill the crust before filling. Even a short time in the refrigerator helps the melted butter begin to set.
- Use thawed whipped topping. Follow the package instructions for thawing and avoid using it while frozen.
- Do not overmix the filling. Gentle mixing helps preserve the light texture.
- Spread the cherry topping carefully. Use the back of a spoon to distribute the cherries without disturbing the cream cheese layer.
- Allow enough chilling time. Two hours is the minimum, but overnight refrigeration generally gives the best results.
- Keep the cheesecake refrigerated. Because it contains cream cheese and whipped topping, it should not be left at room temperature for extended periods.
- Use a sharp knife for clean slices. Wipe the blade between cuts for a neater presentation.
- Make it ahead. Preparing the cheesecake the night before serving saves time and makes it an excellent dessert for parties.
Delicious Variations
Strawberry Cheesecake
Replace the cherry pie filling with strawberry pie filling for a sweet, fruity alternative. Fresh sliced strawberries can also be added just before serving.
Blueberry Cheesecake
Use blueberry pie filling for a deep purple-blue topping that pairs wonderfully with the vanilla cheesecake layer.
Mixed Berry Cheesecake
Combine a berry pie filling with a few fresh raspberries or blueberries for extra color and fruity flavor.
Chocolate Cherry Cheesecake
Sprinkle mini chocolate chips over the cheesecake filling before adding the cherry topping. Chocolate and cherries create a rich, dessert-shop-inspired combination.
Lemon Cherry Cheesecake
Add a little finely grated lemon zest to the cream cheese filling. The citrus aroma provides a refreshing contrast to the sweet cherries.
Almond Cherry Cheesecake
Add a small amount of almond extract to the filling in place of some of the vanilla. Almond and cherry flavors complement one another beautifully, so use the extract sparingly.
Serving Suggestions
Serve chilled squares of cherry cheesecake on dessert plates after a family meal or holiday dinner.
For an extra-special presentation, add a small swirl of whipped topping and a fresh cherry to each portion. A light dusting of graham cracker crumbs can also provide a decorative finish.
This dessert pairs nicely with freshly brewed coffee, tea, or a glass of cold milk. It is also a wonderful addition to a dessert table alongside brownies, cookies, fruit salads, and other no-bake treats.
For gatherings, keep the cheesecake in its baking dish until shortly before serving. This makes transportation and storage easier while helping the layers remain intact.
Storage Instructions
Refrigerator: Cover the cheesecake tightly and refrigerate for up to 3–4 days for best quality. Keep it chilled between servings.
Freezer: You can freeze individual portions in a freezer-safe container for up to 1 month for best quality. The texture of the whipped topping and cherry filling may change slightly after thawing.
To serve frozen portions, thaw them in the refrigerator until soft enough to enjoy. Avoid thawing the cheesecake on the counter for extended periods.
Make-ahead preparation: Prepare the dessert the day before your event and let it chill overnight. Add any fresh decorative toppings just before serving.
Frequently Asked Questions
Can I make cherry cheesecake without baking?
Yes. This recipe is designed to be made without an oven. The crust is pressed into the dish, the filling is mixed, and the assembled dessert is refrigerated until chilled.
Why is my cheesecake filling too soft?
The filling may be too soft if the cream cheese was not properly softened and blended, the whipped topping was not prepared correctly, or the cheesecake did not chill long enough. Give it additional refrigeration time before slicing.
Can I use homemade cherry pie filling?
Absolutely. Homemade cherry filling is an excellent option. Allow it to cool completely before spreading it over the cheesecake layer.
Can I use a different crust?
Yes. A crushed vanilla wafer crust or chocolate cookie crust can work well. Keep the total crumb quantity similar and adjust the butter if necessary to achieve a mixture that holds together when pressed.
Can I make this dessert in advance?
Yes. Making it the night before is one of the best ways to prepare it. The filling becomes colder and firmer, and the crust has time to set.
How do I cut clean squares?
Make sure the cheesecake is thoroughly chilled. Use a sharp knife, cut straight down, and wipe the blade between each slice.
Is this the same as traditional baked cheesecake?
No. This version is lighter and fluffier because it uses whipped topping and does not contain the eggs or baking process commonly associated with traditional baked cheesecake.
Conclusion
This No-Bake Cherry Cheesecake is proof that a delicious homemade dessert does not need to be complicated. With a buttery graham cracker crust, a smooth and fluffy cream cheese filling, and a generous layer of sweet cherry topping, every square offers a delightful combination of flavor and texture.
The simple ingredients make it approachable for beginner cooks, while the attractive layers make it suitable for birthdays, potlucks, family dinners, holidays, and special celebrations.
Best of all, the recipe can be prepared ahead of time, leaving you free to enjoy your gathering instead of spending hours in the kitchen.
Once you have tried this creamy cherry dessert, you may find yourself returning to it whenever you need an easy, dependable, crowd-pleasing treat.
For Cheesecake Lovers
If you love desserts that combine creamy fillings, buttery crusts, and fruity toppings, this recipe deserves a place in your collection. It is easy to customize, simple to serve, and delicious straight from the refrigerator.
Cherry lovers will appreciate the generous fruit topping, while cheesecake fans will enjoy the smooth vanilla filling and crisp graham cracker base.
Make a batch for your family, share it with friends, or prepare it for your next celebration. Cut it into neat squares, serve it cold, and enjoy a classic dessert that brings a little sweetness to any occasion.
Final Recipe Summary
No-Bake Cherry Cheesecake
- Crust: Butter, graham cracker crumbs, and granulated sugar.
- Filling: Cream cheese, powdered sugar, vanilla extract, and whipped topping.
- Topping: Cherry pie filling.
- Preparation: Mix, layer, and refrigerate.
- Chilling time: At least 2 hours, preferably overnight.
- Storage: Refrigerate leftovers promptly.
A creamy, fruity, and wonderfully simple dessert that is ready to become a family favorite.