
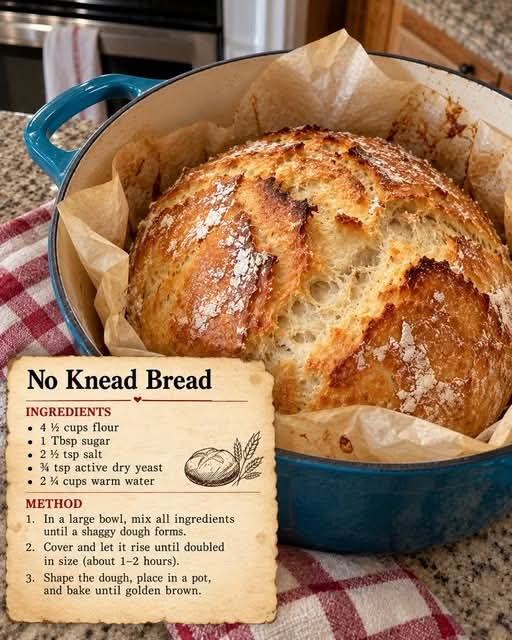
No-Knead Bread: The Easy Homemade Artisan Bread with a Crispy Golden Crust
Introduction
There is nothing quite like the smell of freshly baked homemade bread filling your kitchen. Imagine slicing into a beautiful golden loaf with a wonderfully crispy crust, a soft and fluffy interior, and a delicious homemade flavor that tastes as though it came straight from a traditional artisan bakery.
This No-Knead Bread recipe is perfect for beginners and experienced home bakers alike. The secret is simple: you do not need to knead the dough by hand. Instead, a long resting period allows the yeast to develop flavor and naturally strengthen the dough, creating a loaf with a lovely texture and an appealing, rustic appearance.
With just a few everyday ingredients, a mixing bowl, and a Dutch oven, you can prepare delicious homemade bread without complicated techniques or special baking skills. Simply mix the ingredients, allow the dough to rise, shape it gently, and let the oven do the rest.
Whether you serve it with butter at breakfast, alongside a bowl of homemade soup, or as part of a family dinner, this easy No-Knead Bread is a recipe worth keeping.
Ingredients

For one large loaf
- 4½ cups all-purpose flour
- 1 tablespoon granulated sugar
- 2½ teaspoons salt
- ¾ teaspoon active dry yeast
- 2¼ cups warm water
- A little extra flour for shaping
- Parchment paper for baking
Understanding the ingredients
All-purpose flour: Provides the structure of the bread. Bread flour can also be used for a slightly chewier texture.
Sugar: Gives the yeast a readily available source of food and can help encourage fermentation and browning.
Salt: Enhances the flavor and helps regulate yeast activity.
Active dry yeast: Creates the bubbles that make the dough rise and develop its airy texture.
Warm water: Hydrates the flour and activates the yeast. The water should feel comfortably warm, not hot; approximately 100–110°F (38–43°C) is suitable for active dry yeast.
Parchment paper: Makes it easier to transfer the soft dough into the hot Dutch oven.
Instructions

Step 1: Combine the dry ingredients
In a large mixing bowl, add the flour, sugar, salt, and active dry yeast. Stir thoroughly with a wooden spoon or spatula until everything is evenly distributed.

Step 2: Add the warm water
Pour the warm water into the dry ingredients. Mix until all the flour is moistened and a sticky, rough dough forms. The dough should look shaggy and uneven rather than smooth. There is no need to knead it.

Step 3: Allow the dough to rise
Cover the bowl with a lid, plastic wrap, or a clean kitchen towel. Leave it in a warm, draft-free place for 2–3 hours, or until it has approximately doubled in size and looks bubbly. Cooler rooms may require additional rising time.

Step 4: Shape the loaf
Lightly flour your work surface and turn the dough out carefully. With floured hands or a dough scraper, gently fold the edges toward the center to form a round loaf. Avoid adding too much extra flour, as this can make the finished bread dry.

Step 5: Let the dough rest
Place the shaped loaf on a piece of parchment paper. Cover it loosely and let it rest for approximately 30 minutes while the oven heats.

Step 6: Preheat the oven and Dutch oven
Place a lidded Dutch oven inside your oven and preheat to 450°F (230°C). Allow the pot to heat thoroughly. Carefully handle the pot and lid with oven mitts because they will become extremely hot.

Step 7: Bake with the lid on
Carefully transfer the dough, using the parchment paper, into the hot Dutch oven. Cover with the lid and bake for 30 minutes. The trapped steam helps the loaf expand and develop a crisp crust.

Step 8: Finish baking uncovered
Remove the lid carefully and bake for another 10–15 minutes, until the crust is deeply golden brown and crisp. If you prefer a darker crust, allow it to bake a little longer while watching closely.

Step 9: Cool before slicing
Remove the bread from the Dutch oven and place it on a wire rack. Allow it to cool for at least 30 minutes before cutting. Cooling helps the interior finish setting and prevents a gummy texture.
Method of Preparation
The no-knead method relies on time rather than intensive handwork. When flour and water are mixed, the flour absorbs the liquid, and gluten-forming proteins gradually develop a network that gives bread its structure.
As the dough rests, the yeast produces carbon dioxide, creating bubbles that expand the dough. Fermentation also contributes to the bread’s aroma and flavor. Gentle shaping organizes the dough before baking without requiring vigorous kneading.
The Dutch oven provides an especially helpful baking environment. Its heavy walls retain heat, while the lid traps steam released from the dough. This steam delays crust formation during the initial stage of baking, allowing the loaf to expand. Once the lid is removed, moisture escapes and the crust becomes crisp and golden.
The result is a rustic loaf with a crunchy exterior, a tender interior, and a homemade flavor that pairs beautifully with both sweet and savory foods.
Recipe History
No-knead bread is part of a long tradition of simple home breadmaking. For centuries, people have made bread from basic ingredients such as flour, water, salt, and yeast or naturally fermented dough. Traditional bakers often relied on resting and fermentation to develop flavor and texture.
Modern no-knead bread became particularly popular among home bakers in the 2000s, when a widely shared method demonstrated how a wet dough, long fermentation, and a covered pot could produce bakery-style bread with very little hands-on work.
The technique helped make artisan-style bread more accessible to people who did not have a stand mixer, professional oven, or years of baking experience. Today, it remains a favorite because it combines simplicity with impressive results.
Formation and Texture of the Bread
The beauty of this bread comes from the way its structure develops at each stage.
- During mixing: The flour absorbs water and forms a rough, sticky dough.
- During fermentation: Yeast produces gas, making the dough expand and develop flavor.
- During shaping: Gentle folding helps create a rounded loaf with enough surface tension to hold its shape.
- During covered baking: Heat and steam allow the dough to rise and expand before the crust fully sets.
- During uncovered baking: The surface dries and browns, creating a crunchy, golden crust.
- During cooling: The crumb stabilizes, making the bread easier to slice cleanly.
A properly baked loaf should have a crisp crust, a soft center, and an irregular pattern of air pockets. The exact size of those pockets depends on the dough’s hydration, fermentation, flour, and handling.
Cooking Time and Recipe Details
Preparation time
10 minutes
Rising time
2–3 hours
Resting time
30 minutes
Baking time
40–45 minutes
Yield
1 large loaf
Serving size
10–12 slices
Total elapsed time is approximately 3½–5 hours, depending on rising and cooling time.
Helpful Tips for Perfect No-Knead Bread
1. Measure the flour carefully. Too much flour can make the dough stiff. For the most consistent results, weigh the flour if possible; 4½ cups can vary considerably depending on how it is measured.
2. Keep the dough sticky. A wet, shaggy dough is normal for this recipe. Do not keep adding flour in an attempt to make it smooth.
3. Watch the dough, not just the clock. Rising time depends on room temperature and yeast activity. Look for an expanded, bubbly dough rather than relying only on a timer.
4. Preheat the Dutch oven thoroughly. A properly heated pot encourages good oven spring and crust development.
5. Use oven mitts and sturdy tools. The Dutch oven and its lid become dangerously hot. Keep the pot on a stable, heatproof surface.
6. Let the bread cool. Cutting it too early can compress the crumb and make the center seem wet.
7. Adjust the crust to your taste. A shorter uncovered bake produces a lighter crust, while a longer bake creates a darker, crunchier finish.
Delicious Ways to Serve No-Knead Bread

Warm bread with butter
Serve a slice while still slightly warm with butter, olive oil, or your favorite spread.

Soup and stew
Pair it with tomato soup, lentil soup, vegetable stew, or a hearty family casserole.

Olive oil and herbs
Dip slices into olive oil seasoned with herbs and a little garlic for a simple appetizer.

Breakfast toast
Toast leftover slices and serve with jam, honey, eggs, or cheese.
Storage and Freezing
Allow the loaf to cool completely before storing it.
- At room temperature: Keep it in a bread bag or paper bag for around 2 days for the best crust and texture. A sealed container helps retain softness but may soften the crust.
- For longer storage: Slice the bread and freeze it in a freezer-safe bag for up to 3 months for best quality.
- To reheat: Warm slices in a toaster, or refresh a larger piece in a 350°F (175°C) oven until heated through.
Avoid refrigerating the loaf, as refrigeration can make bread stale more quickly.
Frequently Asked Questions
Can I make this bread without a Dutch oven?
Yes. You can use a heavy oven-safe pot with a lid, provided it is rated for 450°F (230°C). Alternatively, bake on a preheated baking tray, using a separate oven-safe method to introduce steam if appropriate. The crust may be different.
Why is my dough very sticky?
This recipe uses a relatively high amount of water. Sticky dough is expected. Use lightly floured hands and a dough scraper to shape it.
Can I prepare the dough overnight?
Yes. You can use a longer, cooler fermentation, but the yeast quantity and timing may need adjustment. For an overnight rise, refrigerating the dough is generally more predictable than leaving it in a warm room for many hours.
Why did my bread turn out dense?
Possible reasons include insufficient rising, inactive yeast, too much flour, or handling that deflated the dough excessively. Make sure the dough has visibly expanded before shaping.
How do I know when the bread is done?
The crust should be deeply golden brown and crisp. The loaf should feel light for its size. For an additional check, the center should reach approximately 200–210°F (93–99°C).
Conclusion
This No-Knead Bread recipe proves that homemade bread does not have to be complicated. With five basic ingredients, minimal preparation, and a little patience, you can create a beautiful artisan-style loaf with a crispy golden crust and a soft, fluffy center.
The long resting period does most of the work, while the Dutch oven helps produce that satisfying bakery-style finish. Once you have tried this method, you may find yourself making homemade bread regularly for breakfast, lunch, dinner, and every occasion in between.
For Bread Lovers
If you love the smell of fresh bread, the sound of a crunchy crust, and the comfort of serving something homemade to family and friends, this recipe deserves a place in your kitchen.
Save it for your next baking day, share it with someone who loves homemade bread, and enjoy every slice fresh from your own oven.
A simple recipe, a little patience, and a delicious loaf worth sharing.