
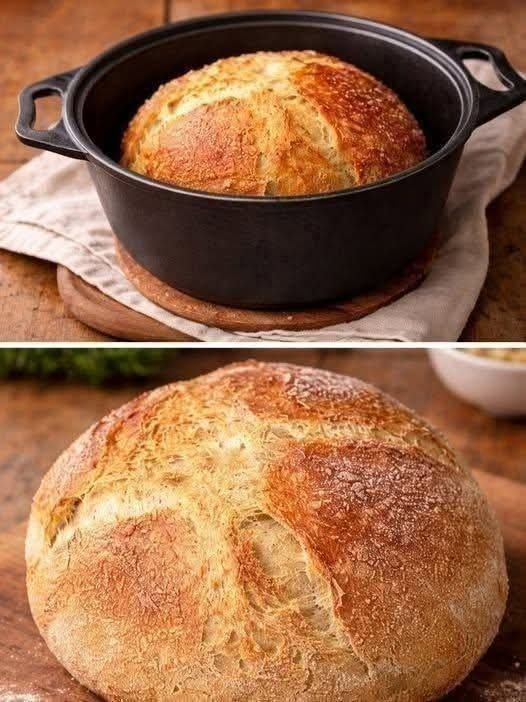
No-Knead, No-Egg, No-Butter Homemade Bread
Introduction
There is something wonderfully comforting about homemade bread, especially when it can be prepared with a few inexpensive pantry ingredients and almost no effort. This simple no-knead bread is a perfect example. You do not need a mixer, eggs, butter, or special bread-making equipment. You simply mix the ingredients, allow the dough to rest, shape it gently, and bake.
The result is a rustic loaf with a beautifully crisp exterior and a soft, airy interior. It is excellent for breakfast, sandwiches, toast, soups, stews, or simply eating warm with your favorite spread.
This recipe is particularly useful when you want fresh bread without spending much money. It is also a wonderful beginner recipe because there is no complicated kneading technique to learn.
Ingredients
For the Bread
- 3 cups all-purpose flour
- 1 1/2 cups warm water
- 2 teaspoons instant yeast
- 1 teaspoon salt
- 1 teaspoon sugar
- 1 tablespoon vegetable oil, optional
For the Baking
- A little flour for dusting
- A small amount of oil for greasing the baking surface if necessary
- Extra flour or cornmeal for the bottom of the loaf, optional
Instructions
Step 1: Prepare the Yeast Mixture
Place the warm water in a large mixing bowl. The water should feel comfortably warm rather than hot.
Add the sugar and yeast. Stir gently and allow the mixture to stand for approximately 5 minutes if using active dry yeast. If using instant yeast, you can mix it directly with the flour instead.
Step 2: Combine the Dry Ingredients
In a separate bowl, combine the flour and salt.
Gradually add the flour mixture to the water and yeast. Stir with a wooden spoon, spatula, or sturdy spoon until everything comes together.
The dough should look soft and somewhat sticky. Do not worry if it does not look smooth.
Step 3: No Kneading Required
This is the easiest part of the recipe. There is no need to knead the dough.
Simply mix until there are no large areas of dry flour remaining. The dough should be rough and sticky.
Cover the bowl tightly with plastic wrap, a lid, or a clean kitchen towel.
Step 4: Let the Dough Rise
Leave the covered dough in a warm place for approximately 1 to 2 hours, or until it has noticeably increased in size.
For even better flavor, you can place the dough in the refrigerator and allow it to rise slowly overnight. The longer fermentation develops a deeper, more satisfying bread flavor.
Step 5: Shape the Dough
Lightly flour your work surface.
Transfer the dough onto the floured surface. Sprinkle a little flour over the top to make it easier to handle.
Do not knead it. Simply fold the dough over itself a few times and gently shape it into a round or oval loaf.
Place the shaped dough on a piece of parchment paper or a lightly floured baking surface.
Cover it and allow it to rest for another 20 to 30 minutes.
Step 6: Prepare the Oven
Preheat the oven to 220°C (425°F).
If you are using a Dutch oven or heavy oven-safe pot with a lid, place it in the oven while it preheats. A hot baking vessel helps create the crisp crust associated with rustic homemade bread.
Step 7: Bake the Bread
Carefully place the dough into the hot Dutch oven or onto your prepared baking tray.
If desired, use a sharp knife to make one or two shallow cuts across the top of the dough. This allows the bread to expand more naturally during baking.
Cover and bake for approximately 25 minutes.
Remove the lid and continue baking for another 10 to 20 minutes, until the bread is beautifully browned and sounds hollow when tapped underneath.
If you are baking without a covered pot, bake the loaf for approximately 30 to 40 minutes, watching carefully toward the end.
Step 8: Cool Before Slicing
Remove the bread from the oven and place it on a wire rack.
Allow it to cool for at least 30 minutes before slicing.
Although it may be tempting to cut into the bread immediately, allowing it to cool helps the interior finish setting and gives you a better texture.
Method
The secret behind this bread is time rather than physical effort.
Traditional bread recipes often require kneading to develop gluten. With this method, the dough contains enough water and is given sufficient resting time for gluten development to happen naturally.
The yeast gradually ferments the dough, producing carbon dioxide. Those bubbles become trapped within the developing gluten structure, causing the dough to rise.
During baking, the heat expands the trapped gases and creates the characteristic open texture of rustic bread.
The high baking temperature also helps create a crisp, golden crust while keeping the center soft.
History of No-Knead Bread
Bread has been made for thousands of years using remarkably simple ingredients: flour, water, salt, and natural fermentation.
Long before modern stand mixers and specialized bread machines, people relied on fermentation and resting time to transform simple flour and water into satisfying loaves.
No-knead bread became particularly popular because it brought this traditional approach into modern kitchens. Instead of spending considerable time working the dough by hand, home bakers could mix everything together and allow time to do most of the work.
The method is especially appealing because it demonstrates an important principle of bread making: good bread does not necessarily require complicated equipment or extensive physical effort.
Formation and Texture
The formation of this bread happens in several stages.
First, the flour absorbs the water. As the dough rests, the flour continues hydrating and the gluten-forming proteins begin developing.
The yeast then consumes available sugars and produces carbon dioxide and other fermentation byproducts. The carbon dioxide becomes trapped in the dough, creating air pockets.
As the dough ferments, it becomes lighter and more elastic.
During baking, the loaf undergoes rapid expansion. This is sometimes called oven spring. The crust begins forming as moisture evaporates from the surface, while the interior continues cooking and setting.
The final result is a loaf with a crisp exterior and a soft, tender center.
Helpful Tips for Perfect Bread
Do Not Add Too Much Flour
Sticky dough is normal for no-knead bread. Adding excessive flour can make the finished loaf dense and dry.
Use just enough flour to make the dough manageable when shaping.
Use Warm, Not Hot, Water
Very hot water can damage the yeast. Lukewarm or comfortably warm water is ideal.
Give the Dough Enough Time
The rising time can vary depending on the temperature of your kitchen. A cool room may require more time, while a warm room may speed up fermentation.
Look at the dough rather than relying only on the clock. It should become visibly larger and airy.
Do Not Rush the Cooling
Fresh bread continues to finish cooking internally after it leaves the oven. Cutting it too early can result in a gummy interior.
Try an Overnight Rise
For more developed flavor, mix the dough in the evening, cover it, and refrigerate it overnight. The following day, allow it to sit at room temperature briefly before shaping and baking.
Variations
Garlic and Herb Bread
Add dried oregano, rosemary, thyme, garlic powder, or a combination of your favorite herbs to the flour.
Seeded Bread
Add sunflower seeds, pumpkin seeds, sesame seeds, or flaxseeds to the dough.
Whole-Wheat Version
Replace part of the all-purpose flour with whole-wheat flour. Because whole-wheat flour absorbs more water, you may need to adjust the amount of liquid slightly.
Rustic Dinner Loaf
Shape the dough into a smaller round loaf and serve it alongside soup, stew, roasted vegetables, or a family dinner.
Sandwich Bread
Instead of making a round loaf, shape the dough into a log and bake it in a loaf pan for a more traditional sandwich-bread shape.
Serving Ideas
Fresh homemade bread can be served in countless ways.
Serve thick slices with breakfast alongside eggs, cheese, fruit, or yogurt.
Toast slices and top them with avocado, tomatoes, cottage cheese, or your favorite spread.
Use the bread to make sandwiches for lunch.
Serve warm slices alongside soup, chili, stew, pasta, or roasted vegetables.
You can also cut leftover bread into cubes and use them for homemade croutons or breadcrumbs.
How to Store the Bread
Once completely cool, store the bread in a bread bag, paper bag, or airtight container at room temperature.
For the best texture, enjoy it within a couple of days.
If you have more bread than you can eat, slice it and freeze the slices in a freezer-safe bag. Individual slices can be removed as needed and toasted directly from frozen.
Conclusion
This no-knead homemade bread proves that delicious bread does not have to be complicated or expensive.
With basic ingredients, a little patience, and a hot oven, you can create a beautiful loaf without eggs, without butter, and without spending time kneading dough.
The simplicity is what makes this recipe so special. Mix the ingredients, let time work its magic, shape the dough gently, and bake.
Once you make it successfully, you may find yourself wondering why you ever needed to buy bread so often.
For Bread Lovers
This recipe is perfect for anyone who loves the smell of freshly baked bread but does not want a complicated process. It is especially useful for beginners, busy families, and anyone looking for an economical homemade alternative.
The best part is that the recipe can become your basic bread formula. Once you are comfortable with the dough, you can experiment with herbs, seeds, whole grains, roasted garlic, onions, or other additions.
A warm slice straight from the oven is simple, comforting, and satisfying. Sometimes the most memorable homemade foods are the ones made from the fewest ingredients.