
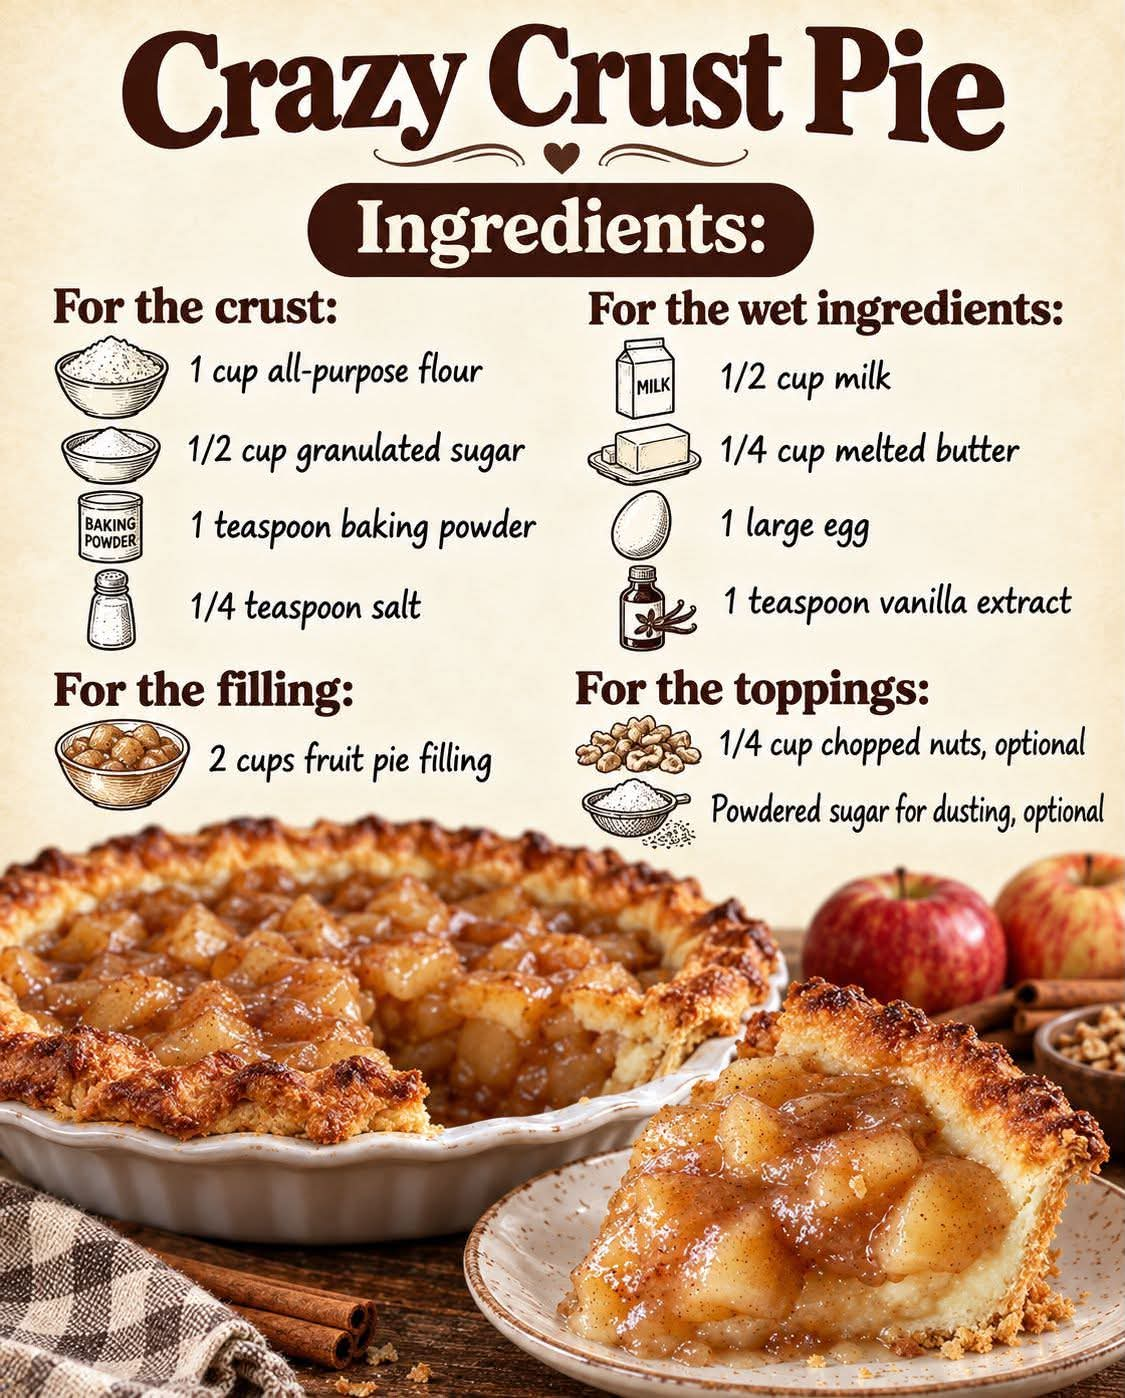
Old-Fashioned Crazy Crust Pie: A Nostalgic Homemade Dessert


Introduction
There is something truly special about old-fashioned recipes passed down from our mothers and grandmothers. They remind us of childhood afternoons, warm kitchens, and the wonderful smell of homemade desserts baking in the oven. Crazy Crust Pie is one of those comforting vintage recipes that brings back memories of simpler times.
My mom used to make something she called Crazy Crust Pie, but she never wrote down the recipe. I am so glad to have found this recipe because it brings back those beautiful memories of watching a homemade pie come together in the kitchen.
What makes Crazy Crust Pie so unique is its unusual preparation method. Instead of preparing a traditional pie crust, rolling it out, and carefully fitting it into a pie plate, you make a simple batter and spread it into the pan. The fruit filling is added, and the crust forms around it as the pie bakes.
The result is a delicious dessert with a golden, tender crust, sweet fruit filling, and a comforting homemade flavor. It is easy enough for beginner bakers and wonderful for family dinners, holidays, potlucks, and weekend treats.
Ingredients
This recipe uses simple pantry ingredients and your favorite fruit pie filling.
For the crazy crust
- 1 cup all-purpose flour
- 3/4 cup granulated sugar
- 1 teaspoon baking powder
- 1/4 teaspoon salt
- 1 large egg
- 1/2 cup milk
- 1/4 cup unsalted butter, melted
- 1 teaspoon vanilla extract
For the fruit filling
- 1 can (21 ounces) cherry, apple, peach, or blueberry pie filling
- 1/2 teaspoon ground cinnamon, optional for apple or peach filling
- 1 teaspoon lemon juice, optional for a brighter fruit flavor
For the topping
- 2 tablespoons melted butter
- 1 tablespoon granulated sugar
- 1/4 teaspoon ground cinnamon, optional
Note: This is a practical homemade version of Crazy Crust Pie. Family recipes vary, and the exact ingredients in your mother’s original version may have been different.
Instructions
Step 1: Prepare the oven and pan
Preheat your oven to 350°F (175°C).
Lightly grease a 9-inch pie plate or a similar-sized baking dish with butter or nonstick cooking spray. Greasing the dish helps prevent the crust from sticking and makes serving easier.
Place the pie plate on a baking sheet if you want to make cleanup easier in case the fruit filling bubbles over during baking.
Step 2: Mix the dry ingredients
In a medium mixing bowl, combine the flour, granulated sugar, baking powder, and salt.
Whisk the ingredients together until evenly distributed. This step helps the baking powder spread throughout the flour, allowing the crust to rise and bake more evenly.
Step 3: Prepare the batter
In a separate bowl, whisk together the egg, milk, melted butter, and vanilla extract.
Pour the wet ingredients into the dry ingredients. Stir gently until a smooth, thick batter forms.
Avoid overmixing. A few small lumps are perfectly fine, and gentle mixing helps keep the finished crust tender.
The batter should be thicker than ordinary pancake batter but soft enough to spread into the prepared pie plate.
Step 4: Spread the batter into the pie plate
Pour the batter into the greased pie plate.
Use a spatula to spread it evenly across the bottom. Depending on the family variation, some of the batter may also be spread slightly up the sides of the plate.
Do not worry if the batter does not look like a traditional pie crust. That is the charm of Crazy Crust Pie. The batter will change as it bakes and form a tender, golden crust around the filling.
Step 5: Add the fruit filling
Spoon the fruit pie filling over the batter.
Spread it gently, leaving a small border around the edges when possible. This allows the batter to rise and bake around the fruit as the pie cooks.
If using apple or peach filling, sprinkle the cinnamon over the fruit. A little lemon juice can also brighten the flavor of sweeter fillings.
Do not stir the fruit filling into the batter. Keeping the layers separate helps create the characteristic fruit-and-crust texture.
Step 6: Add the buttery topping
Drizzle the melted butter over the top of the filling and exposed batter.
Sprinkle with the additional sugar. If you enjoy warm, spiced desserts, add a little cinnamon as well.
This topping helps create a lightly crisp, golden finish while adding a delicious buttery aroma.
Step 7: Bake the pie
Place the pie in the preheated oven and bake for approximately 40–50 minutes.
The exact baking time depends on your oven, the depth of the dish, and the type of fruit filling used.
Look for these signs of doneness:
- The exposed crust is golden brown.
- The batter has risen and set around the fruit.
- The center no longer looks wet or raw.
- The filling is bubbling gently around the edges.
If the top browns too quickly, loosely cover it with aluminum foil for the remainder of the baking time.
Step 8: Allow the pie to cool
Remove the pie from the oven and place it on a wire rack.
Allow it to cool for at least 20–30 minutes before slicing. The fruit filling will be extremely hot immediately after baking, and cooling gives it time to settle.
Serve the pie slightly warm for a comforting homemade dessert, or allow it to cool completely for neater slices.
Methods of Preparation
The easy batter method
The defining feature of this version is its simple batter crust. Instead of rolling pastry, you mix the ingredients in a bowl and spread the batter into the baking dish.
This method saves time and eliminates the need for special pastry-making skills. It is particularly helpful when you want a homemade pie without the extra work of preparing a traditional crust.
The fruit layering method
The fruit filling is placed on top of the batter rather than mixed throughout it. As the pie bakes, the batter rises and cooks around the filling, creating a rustic dessert with different textures in every bite.
For the best result, distribute the fruit evenly and avoid adding excessive liquid beyond what is already in the pie filling.
The golden topping method
Brushing or drizzling melted butter over the top encourages browning and adds richness. A small sprinkle of sugar creates a delicate sweetness and an attractive finish.
For an extra hint of warmth, cinnamon works beautifully with apple and peach fillings.
The cooling method
Cooling is an important part of the recipe. Cutting into the pie immediately may cause the filling to run and the crust to break apart.
A short resting period helps the filling settle while keeping the crust tender.
History of Crazy Crust Pie
Crazy Crust Pie belongs to the tradition of practical, home-style American baking, where cooks developed clever ways to make familiar desserts with everyday ingredients.
Many vintage household recipes emphasize convenience, affordability, and flexibility. Instead of relying on elaborate pastry techniques, these recipes use simple mixtures of flour, sugar, eggs, milk, and butter to create satisfying desserts.
The name “Crazy Crust” reflects the unusual way the crust is prepared compared with a conventional pie. Rather than rolling pastry separately and shaping it around the filling, the crust begins as a batter and develops its structure during baking.
Recipes with this name and similar preparation methods have appeared in different home-cooking traditions, and the ingredients can vary from one household to another.
For many families, the real history of Crazy Crust Pie is personal. It is the recipe a mother made after dinner, the dessert served at Sunday gatherings, or the sweet treat brought to a neighbor’s house.
That is why rediscovering a recipe like this can feel like finding a little piece of family history.
Formation and Texture of Crazy Crust Pie
The magic of Crazy Crust Pie happens as the batter bakes.
The baking powder releases gas, helping the batter rise. The egg contributes structure, while the flour forms the framework that holds the crust together. Milk adds moisture, and melted butter provides richness and tenderness.
At the same time, the fruit filling heats up and releases some of its juices. The surrounding batter cooks into a soft, golden crust, creating a contrast between the tender pastry-like exterior and the sweet fruit center.
The finished dessert is rustic rather than perfectly uniform. Some bites may contain more fruit, while others have more golden crust. That variety is part of its appeal.
For a better result, measure the ingredients accurately, spread the batter evenly, and bake until the center is fully set.
The Best Fruit Fillings to Use

Cherry Crazy Crust Pie
Sweet cherries provide a bright color and a pleasant balance of sweetness and tartness. This is an excellent choice for holidays, family dinners, and anyone who loves classic cherry desserts.

Apple Crazy Crust Pie
Apple filling with cinnamon gives the pie a warm, nostalgic flavor. It is especially lovely during autumn and pairs perfectly with vanilla ice cream.

Peach Crazy Crust Pie
Peaches bring a soft, juicy texture and a sunny sweetness. A small pinch of cinnamon or nutmeg makes this variation especially comforting.

Blueberry Crazy Crust Pie
Blueberries add a deep fruity flavor and beautiful color. A little lemon juice enhances their natural tartness and balances the sweetness.
Tips for Perfect Results
- Measure carefully: Too much flour can make the crust dense, while too much liquid can prevent it from setting properly.
- Choose a suitable dish: A 9-inch pie plate works well for this quantity of batter.
- Do not overmix: Stir only until the ingredients are combined.
- Spread the filling evenly: This helps the pie bake consistently.
- Watch the edges: Fruit filling can bubble during baking, so a baking sheet is useful.
- Allow time to cool: This helps the filling settle and makes serving easier.
- Try different flavors: Cherry, apple, peach, and blueberry are all delicious options.
Serving Suggestions
Crazy Crust Pie is wonderful served warm, at room temperature, or chilled.
For a simple presentation, serve each slice on a dessert plate with a cup of coffee, tea, or cold milk.
For a more indulgent dessert, add a scoop of vanilla ice cream or a spoonful of freshly whipped cream. A light dusting of powdered sugar can also make the pie look beautiful when serving guests.
For holidays and potlucks, bake the pie in a decorative dish and allow it to cool before transporting it. It is an easy dessert to share without the complicated preparation required for traditional pastry pies.
Storage and Make-Ahead Instructions
At room temperature: Because this recipe contains a moist fruit filling, it is best not to leave the finished pie out for extended periods. Follow the storage guidance for the specific filling used.
In the refrigerator: Once cooled, cover the pie and refrigerate for up to 3–4 days as a general guideline.
To reheat: Warm individual slices in a low oven until heated through. You can also use a microwave for a quick serving, although the crust may become softer.
To make ahead: Prepare and bake the pie a day before serving, refrigerate it after cooling, and warm it gently before serving if desired.
Frequently Asked Questions
Why is it called Crazy Crust Pie?
The name refers to its unusual crust-making technique. The crust starts as a simple batter rather than separately rolled pastry.
Can I use homemade fruit filling?
Yes. Homemade apple, cherry, peach, or blueberry filling can work well. Make sure the filling is thick enough that excess liquid does not prevent the crust from setting.
Can I use fresh fruit instead of canned filling?
Yes, but fresh fruit usually needs to be sweetened and cooked or thickened appropriately. Simply replacing canned pie filling with raw fruit may produce a watery result.
How do I know when the pie is done?
The crust should be golden, the batter should be set, and the filling should bubble gently. If the center is still wet, continue baking and check again after a few minutes.
Can I make it with a different flavor?
Absolutely. Try cherry, blueberry, apple, peach, or another thick fruit filling you enjoy.
Conclusion
Old-Fashioned Crazy Crust Pie is a wonderful reminder that the most memorable desserts do not have to be complicated. With a handful of everyday ingredients, a simple batter, and your favorite fruit filling, you can make a warm, comforting pie that looks inviting and tastes homemade.
Whether you remember your mother preparing it years ago or are discovering it for the first time, this recipe offers a lovely way to bring traditional home baking back into your kitchen.
Serve it after Sunday dinner, share it at a family gathering, or make it on an ordinary afternoon when you want something sweet. Every slice offers golden crust, fruity filling, and the comforting feeling of a recipe worth passing down.
For the Lovers of Old-Fashioned Desserts
If you love vintage recipes, homemade fruit pies, and simple desserts that remind you of your childhood, Crazy Crust Pie deserves a place in your recipe collection.
It is easy to customize, simple to prepare, and perfect for sharing with the people you love.
Some recipes are more than a list of ingredients. They are memories of the people who made them, the kitchens where they were prepared, and the moments spent enjoying them together.
Recipe details
- Preparation time: 10–15 minutes
- Baking time: 40–50 minutes
- Cooling time: 20–30 minutes
- Total time: Approximately 1 hour 10 minutes to 1 hour 35 minutes
- Yield: 6–8 servings
- Oven temperature: 350°F (175°C)
- Difficulty: Easy
- Best for: Family desserts, potlucks, holidays, and nostalgic baking