
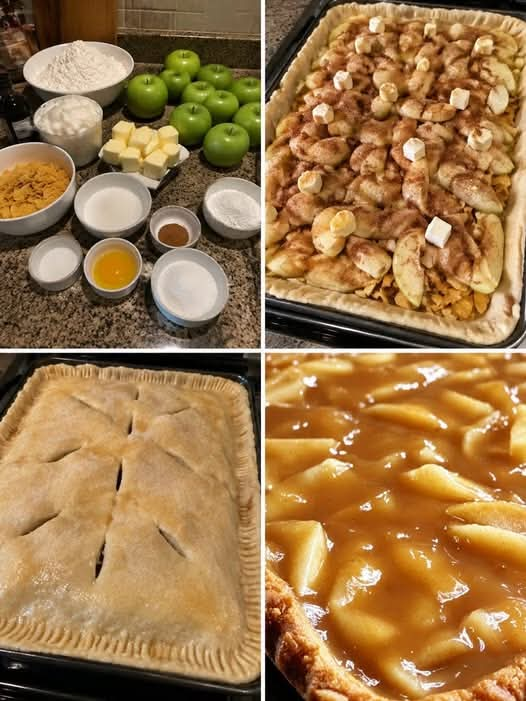
Old-Fashioned Flat Apple Pie
Introduction
There is something truly special about an old-fashioned apple pie made from scratch. With its golden, flaky crust, tender cinnamon-spiced apples, and sweet homemade filling, Flat Apple Pie is a comforting dessert that brings back memories of family gatherings, Sunday dinners, and the wonderful smell of freshly baked pastries filling the kitchen.
Unlike a traditional deep-dish apple pie, a flat apple pie is made with a thinner layer of apple filling enclosed between layers of pastry or folded into a flat shape. It is easy to slice, convenient to serve, and perfect for sharing with family and friends. Some versions are baked in a rectangular pan, while others are prepared as individual flat pastries.
This homemade version begins with a rich, tender pastry made from flour, salt, shortening, and egg yolk. The apple filling adds natural sweetness, a delicate cinnamon aroma, and a soft texture that complements the crisp crust beautifully.
Whether you serve it warm after dinner, enjoy a slice with your afternoon coffee, or prepare it for a holiday celebration, this Flat Apple Pie is a timeless dessert worth making again and again.
Ingredients
For the homemade pastry
- 3 3/4 cups all-purpose flour
- 3/4 teaspoon salt
- 1 1/2 cups vegetable shortening
- 1 egg yolk
- 5–8 tablespoons cold water, added gradually as needed
For the apple filling
- 5–6 medium apples, peeled, cored, and thinly sliced
- 3/4 cup granulated sugar, adjusted to taste
- 2 tablespoons all-purpose flour or cornstarch
- 1 1/2 teaspoons ground cinnamon
- 1/4 teaspoon ground nutmeg, optional
- 1 tablespoon lemon juice
- 1 teaspoon vanilla extract
- 2 tablespoons butter, cut into small pieces
For the topping
- 1 tablespoon milk or beaten egg, for brushing
- 1–2 tablespoons granulated sugar, for sprinkling
- A pinch of cinnamon, optional
Instructions
Step 1: Prepare the pastry dough
In a large mixing bowl, combine the all-purpose flour and salt. Stir well to distribute the salt evenly throughout the flour.
Add the vegetable shortening. Using a pastry cutter, two forks, or your fingertips, work the shortening into the flour until the mixture resembles coarse crumbs. Some small pieces of shortening should remain, as they help create a tender, flaky crust.
In a small bowl, lightly beat the egg yolk with 5 tablespoons of cold water. Pour the mixture into the flour gradually, stirring gently until the dough begins to come together.
Add more cold water, one tablespoon at a time, only if the dough is too dry. Avoid adding too much water because this can make the pastry tough.
Divide the dough into two portions, with one portion slightly larger than the other if you are using a rectangular baking pan. Shape each portion into a flat disc, wrap it, and refrigerate for approximately 30 minutes.
Step 2: Prepare the apples
Wash, peel, core, and thinly slice the apples. Try to keep the slices relatively uniform so they cook evenly during baking.
Place the apples in a large bowl. Add the granulated sugar, flour or cornstarch, cinnamon, nutmeg if desired, lemon juice, and vanilla extract.
Toss everything together until the apple slices are evenly coated. Let the mixture rest for about 5–10 minutes while you prepare the crust.
The sugar draws out some of the apples’ natural juices, while the flour or cornstarch helps thicken the filling during baking.
Step 3: Roll out the bottom crust
Preheat the oven to 375°F (190°C).
Lightly flour a clean work surface and remove the larger portion of chilled dough from the refrigerator.
Roll it into a thin rectangle or oval, depending on the shape of your baking pan. Aim for a thickness of approximately 1/8 inch.
Transfer the pastry carefully to a lightly greased or parchment-lined rimmed baking sheet. Leave enough pastry around the edges to help seal the pie.
If the dough tears slightly, gently press it together with your fingers. Homemade pastry does not need to look perfect to bake beautifully.
Step 4: Add the apple filling
Spread the prepared apple mixture evenly over the pastry, leaving a border of approximately 1 inch around the edges.
Arrange the apples in a relatively thin, even layer. Avoid piling the filling too high, because a flat apple pie is meant to have a balanced proportion of fruit and crust.
Dot the apples with small pieces of butter. This adds richness and helps create a flavorful filling.
If the apples have released a large amount of liquid, leave some of that liquid behind in the bowl rather than pouring it all onto the pastry.
Step 5: Add the top crust
Roll out the second portion of dough to fit over the apples. Carefully place it over the filling.
Trim any excess pastry, then press the edges together with your fingers or a fork to seal them.
If you prefer a more rustic flat pie, you can leave the center exposed and fold the pastry edges inward over the apples instead.
Cut several small slits in the top crust to allow steam to escape during baking. These openings help prevent the pastry from becoming soggy.
Brush the top lightly with milk or beaten egg. Sprinkle with granulated sugar and a little cinnamon if desired.
Step 6: Bake the pie
Place the baking sheet in the preheated oven and bake for approximately 35–45 minutes, or until the pastry is golden brown and the apples are tender.
The exact baking time will depend on the thickness of the pastry, the variety of apples, and your oven.
Look for a crisp, golden crust and bubbling filling around the edges. If the pastry begins to brown too quickly, loosely cover the top with aluminum foil for the remaining baking time.
Remove the pie from the oven and allow it to rest for at least 15–20 minutes before slicing. This resting period helps the filling settle and makes serving easier.
Step 7: Slice and serve
Cut the Flat Apple Pie into squares or rectangles using a sharp knife.
Serve it slightly warm for the best combination of tender apples and flaky pastry. For an extra-special dessert, add a scoop of vanilla ice cream, a spoonful of whipped cream, or a drizzle of caramel sauce.
The pie is also delicious at room temperature, making it ideal for picnics, potlucks, family celebrations, and afternoon snacks.
Methods of Preparation
Traditional pastry method
The traditional method uses shortening rubbed into flour before the liquid ingredients are added. This technique helps create a tender pastry with a delicate, crumbly texture.
Keep the shortening and water cold, and handle the dough as little as possible. Excessive mixing can develop too much gluten, resulting in a tougher crust.
Thin-layer apple method
The defining feature of a flat apple pie is its relatively thin layer of fruit. Thinly sliced apples spread evenly across the pastry cook more quickly and create a balanced dessert that is easy to cut into portions.
Choose firm baking apples that hold their shape, such as Granny Smith, Braeburn, or Honeycrisp. A mixture of tart and sweet apples can also produce a more complex flavor.
Rustic folded method
For a simpler presentation, roll the dough into a large circle or rectangle, place the apples in the center, and fold the edges over the filling. Leave part of the fruit visible in the middle.
This style is sometimes closer to a rustic apple galette. It requires less precise shaping and gives the dessert a charming homemade appearance.
Sheet-pan method
For a larger family gathering, prepare the pie on a rimmed baking sheet. Spread the apples in an even layer and cover them with a second pastry sheet.
Once baked and cooled slightly, the pie can be cut into convenient squares. This version is especially useful when you need several servings without preparing individual pies.
The History of Flat Apple Pie
Apple pie has a long history in European and North American cooking. Apples were used in baked pastries for centuries, and recipes evolved as different regions developed their own pastry techniques and flavor combinations.
Early apple pies were not always the sweet, cinnamon-rich desserts familiar today. Historical versions varied in their pastry ingredients, seasonings, and fillings. As sugar became more widely available, sweet apple pies became increasingly popular.
In American home cooking, apple pie became closely associated with family meals, seasonal harvests, community gatherings, and holiday traditions. Home bakers developed many variations, including deep-dish pies, hand pies, slab pies, and thin apple pastries baked in shallow pans.
Flat Apple Pie fits naturally into this tradition of practical home baking. Its broad, relatively thin shape makes it easier to cut into multiple servings, while its simple ingredients make it suitable for everyday family desserts.
Recipes passed down through families often differ in the type of fat used, the amount of sugar, and whether the pastry is covered completely or folded around the fruit. This version combines a shortening-based crust with a classic cinnamon apple filling to create a comforting, old-fashioned result.
Although there is no single universally established origin for the name “Flat Apple Pie,” the general idea reflects the resourcefulness of home bakers who wanted a delicious apple dessert that could feed a crowd without requiring individual pastry molds.
Formation and Texture
The beauty of a good Flat Apple Pie comes from the way its ingredients work together.
The flour provides the structure of the pastry. Shortening coats some of the flour particles, limiting gluten development and helping produce a tender crust. The egg yolk contributes richness and helps the dough come together, while cold water supplies the moisture needed to form a workable pastry.
During baking, the water in the dough turns to steam, and the pastry firms as its structure sets. Keeping the fat cold before baking helps preserve a delicate texture.
The apple filling changes as it heats. The fruit softens, its natural juices mingle with the sugar, and the cinnamon releases its warm aroma. The flour or cornstarch absorbs some of the liquid, helping create a filling that holds together when sliced.
The final result should have a lightly crisp exterior, a tender interior, and a sweet apple center with a gentle hint of spice.
For the best texture, slice the apples thinly, avoid excess liquid in the filling, and allow the pie to rest before cutting.
Helpful Tips for the Best Flat Apple Pie
Keep the pastry cold. Chilled dough is easier to handle and helps produce a tender crust. If it becomes too soft while rolling, refrigerate it for 10–15 minutes.
Choose the right apples. Firm apples are generally best because they soften without completely losing their shape.
Do not overload the filling. A thinner layer of apples is easier to bake evenly and better suits the flat-pie style.
Measure the water carefully. Add it gradually until the dough holds together. Too much water can make the pastry difficult to handle.
Prevent a soggy bottom. Drain excess apple liquid before spreading the filling, and bake on a preheated oven rack in the middle of the oven.
Let the pie cool slightly. Cutting immediately after baking may cause the filling to run. A short resting period helps it set.
Adjust the sweetness. Tart apples may need more sugar, while naturally sweet apples may need less.
Variations to Try
Brown Sugar Cinnamon Flat Apple Pie
Replace part of the granulated sugar with packed brown sugar. Its molasses notes create a deeper, warmer flavor that pairs beautifully with cinnamon.
Apple and Raisin Flat Pie
Add 1/3 cup of raisins to the filling. The raisins contribute extra sweetness and a pleasant chewy texture.
Caramel Apple Flat Pie
After baking, drizzle the cooled pie with caramel sauce. The buttery caramel complements the cinnamon apples and adds a dessert-shop finish.
Apple Walnut Flat Pie
Add 1/3 cup of chopped walnuts or pecans to the filling. The nuts contribute crunch and a subtle toasted flavor.
Lemon-Spiced Apple Pie
Increase the lemon juice slightly and add a little finely grated lemon zest. This variation provides a brighter flavor that balances the sweetness of the apples.
Storage and Reheating
Allow the pie to cool completely before storing it.
Cover and refrigerate leftovers in an airtight container for up to 4 days. For longer storage, freeze individual portions or the whole cooled pie, well wrapped, for up to 2–3 months for best quality.
To reheat, place a slice in a preheated oven at 325°F (165°C) for approximately 8–12 minutes, or until warmed through. Reheating in the oven helps restore some of the pastry’s crispness.
A microwave can also be used for a quick serving, although the crust will usually become softer.
If serving the pie with ice cream or whipped cream, add the topping just before eating.
Serving Suggestions
Flat Apple Pie is delicious on its own, but it can also be served with several simple accompaniments.
- Vanilla ice cream for a classic warm-and-cold dessert.
- Freshly whipped cream for a light, creamy finish.
- Caramel sauce for a richer, sweeter treat.
- A dusting of powdered sugar for an elegant presentation.
- A cup of coffee, black tea, or warm spiced tea for an afternoon snack.
- Plain yogurt for a simple accompaniment at breakfast or brunch.
For gatherings, arrange the slices on a serving platter and sprinkle them lightly with cinnamon sugar. The simple presentation makes the pie suitable for casual dinners as well as festive occasions.
Conclusion
Flat Apple Pie is a wonderful reminder that the best homemade desserts do not need complicated ingredients or elaborate decorations. With flour, shortening, egg yolk, fresh apples, sugar, and a few warm spices, you can create a pastry that is crisp, tender, fragrant, and satisfying.
Its thin shape makes it easy to serve, its apple filling brings familiar comfort, and its homemade crust gives every slice a special touch. Whether you prepare it for a weekend family dinner, a holiday table, or an ordinary afternoon when you want something sweet, this recipe is a lovely addition to any home baker’s collection.
Take your time with the pastry, choose flavorful apples, and allow the pie to cool slightly before serving. The result is a simple, old-fashioned dessert that invites everyone to gather around the table for another slice.
For the Lovers of Homemade Apple Desserts
If you love apple desserts, flaky pastries, and traditional family recipes, Flat Apple Pie deserves a place in your kitchen. It is a versatile recipe that welcomes personal touches, from extra cinnamon to a handful of raisins or a drizzle of caramel.
Make it your own, share it with the people you love, and enjoy the pleasure of serving a homemade dessert made with care. Sometimes, the simplest recipes are the ones that create the sweetest memories.
Final Recipe at a Glance
- Preparation time: 30 minutes
- Chilling time: 30 minutes
- Baking time: 35–45 minutes
- Total time: Approximately 1 hour 35 minutes to 1 hour 45 minutes
- Oven temperature: 375°F (190°C)
- Yield: Approximately 12–16 squares, depending on the size of the pan and portions
This recipe uses the four original pastry ingredients—flour, salt, shortening, and egg yolk—and adds cold water to bring the dough together, along with a classic apple filling to complete the dessert.