
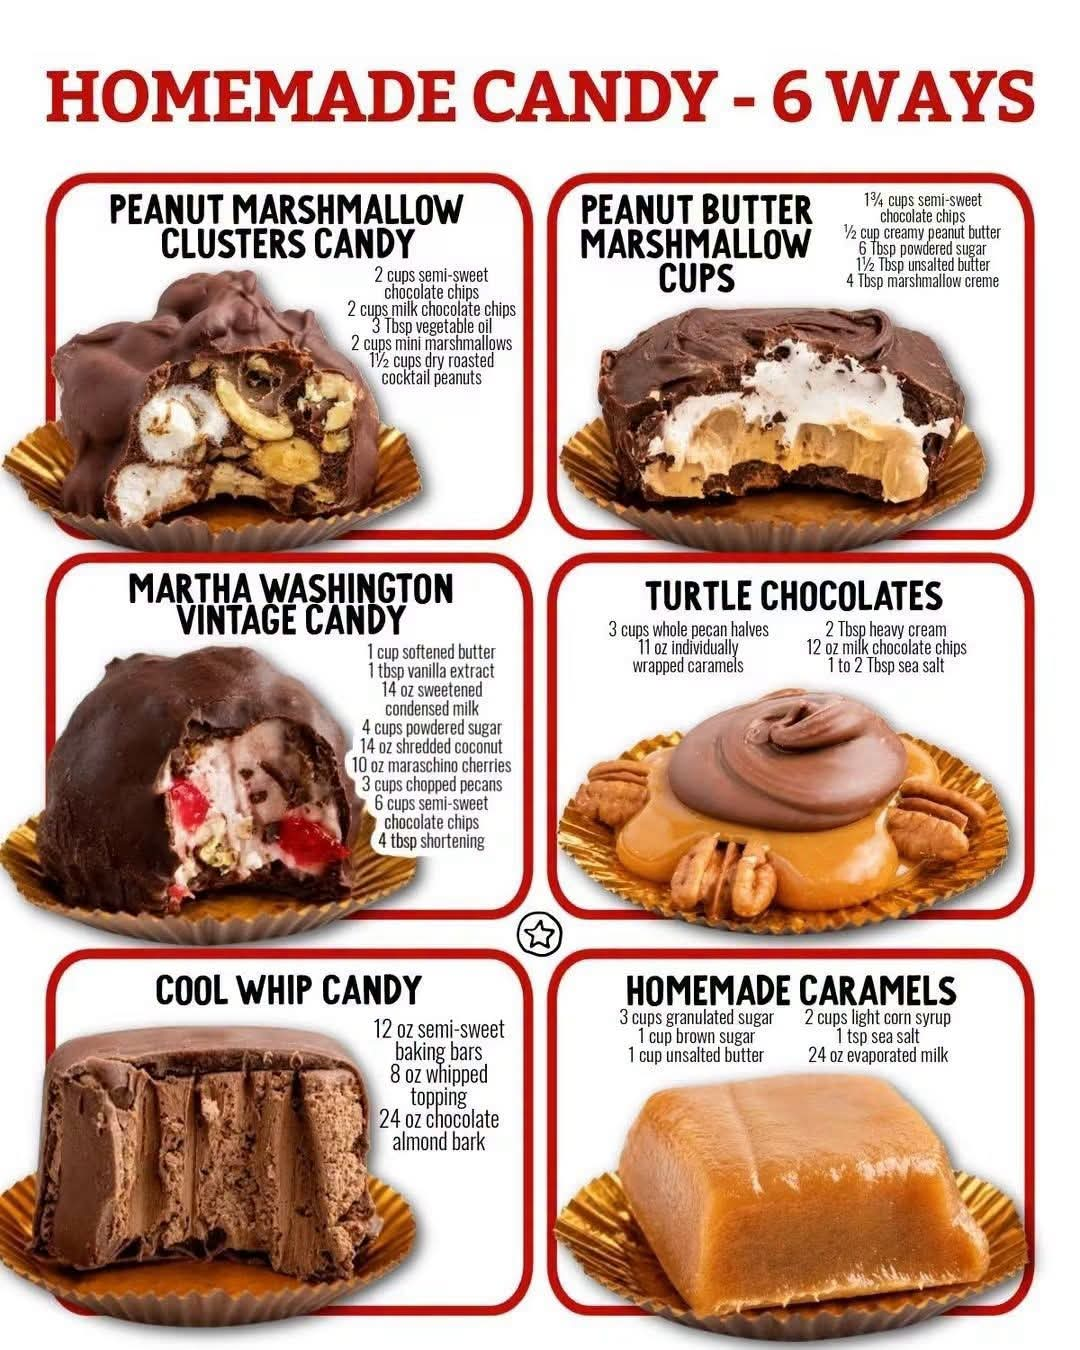
Six Homemade Christmas Candy Recipes
Introduction
There is something especially comforting about homemade candy during the Christmas season. A kitchen filled with the smell of melted chocolate, toasted pecans, buttery caramel, coconut, and peanut butter immediately creates the feeling of a traditional holiday gathering.
This collection brings together six classic-style candy recipes that are ideal for Christmas trays, cookie exchanges, family gatherings, parties, homemade gifts, or simply keeping a sweet treat available for everyone to enjoy. Each recipe has its own personality: some are creamy and chocolatey, some are chewy and caramel-rich, while others combine crunchy nuts with soft marshmallow or coconut.
The beauty of homemade candy is that it does not need to be complicated. With good-quality ingredients, careful temperature control when necessary, and a little patience, you can create an impressive assortment of candies right in your own kitchen.
1. Peanut Marshmallow Clusters Candy
Introduction
Peanut marshmallow clusters are one of the easiest candies to prepare. The combination of smooth chocolate, crunchy roasted peanuts, and soft miniature marshmallows creates a wonderful contrast in every bite.
These clusters are particularly convenient during the holidays because they require no traditional candy thermometer and can be prepared in batches.
Ingredients
- 2 cups semi-sweet chocolate chips
- 2 cups milk chocolate chips
- 3 tablespoons vegetable oil
- 2 cups miniature marshmallows
- 1 1/2 cups dry-roasted cocktail peanuts
Instructions
- Line a large baking sheet with parchment paper or wax paper.
- Place the semi-sweet chocolate chips and milk chocolate chips in a large microwave-safe bowl.
- Add the vegetable oil.
- Microwave in 20- to 30-second intervals, stirring thoroughly after each interval.
- Continue until the chocolate is completely smooth.
- Allow the chocolate to cool for a few minutes so it is warm rather than extremely hot.
- Gently fold in the miniature marshmallows and roasted peanuts.
- Stir carefully until everything is coated with chocolate.
- Drop spoonfuls of the mixture onto the prepared baking sheet.
- Refrigerate for approximately 30 to 60 minutes, or until firm.
- Transfer the finished clusters to an airtight container.
Method
The important part of this recipe is melting the chocolate slowly. Excessive heat can cause chocolate to seize or become thick and grainy. Gentle heating combined with frequent stirring produces a smoother coating.
The marshmallows should be folded in after the chocolate has cooled slightly. This helps them maintain their shape and prevents them from becoming overly soft.
Formation
The candy forms as individual spoonfuls of chocolate-coated peanuts and marshmallows. Once chilled, the chocolate becomes firm while the marshmallows remain soft and chewy.
Serving
Arrange the clusters on a Christmas candy platter or place them in small paper candy cups. They also make attractive homemade gifts when packed in clear bags or small boxes.
2. Peanut Butter Marshmallow Cups
Introduction
Peanut butter and chocolate are a classic combination, and adding marshmallow creme creates an especially soft and creamy center.
These homemade cups resemble miniature confectionery treats but have the advantage of being prepared fresh in your own kitchen.
Ingredients
Chocolate Shell
- 1 3/4 cups semi-sweet chocolate chips, divided
- 1/2 cup creamy peanut butter
- 6 tablespoons powdered sugar
- 1 1/2 tablespoons unsalted butter, softened
- 4 tablespoons marshmallow creme
Instructions
- Line a mini muffin pan with paper candy liners.
- Melt 3/4 cup of the chocolate chips gently in the microwave or over a double boiler.
- Stir until completely smooth.
- Spoon a small amount of chocolate into each liner.
- Using the back of a small spoon, spread the chocolate slightly up the sides of the liner.
- Refrigerate until the chocolate shell is firm.
- In another bowl, combine the peanut butter, powdered sugar, and softened butter.
- Mix until smooth and creamy.
- Fold in the marshmallow creme.
- Place a small amount of the peanut butter mixture into each chocolate shell.
- Melt the remaining chocolate chips.
- Spoon the melted chocolate over each cup, completely covering the filling.
- Refrigerate until completely firm.
Method
The candy is built in layers. The first chocolate layer creates the shell, the peanut butter-marshmallow mixture becomes the center, and the final chocolate layer seals everything together.
Keep the filling slightly below the rim of each cup so the final chocolate layer can completely cover it.
Formation
As the chocolate cools, it hardens around the creamy peanut butter center. The result is a small candy cup with a firm chocolate exterior and soft, sweet filling.
Serving
Serve chilled or allow the cups to sit at room temperature for several minutes before eating. They are particularly attractive when arranged among other homemade Christmas candies.
3. Martha Washington Vintage Candy
Introduction
Martha Washington candy is a vintage-style confection traditionally associated with coconut, cherries, pecans, and chocolate. It is especially popular on old-fashioned holiday candy trays because it combines several classic Southern-style ingredients in one bite.
The creamy coconut mixture, chopped cherries, crunchy pecans, and chocolate coating create a rich candy that is excellent for making ahead.
Ingredients
- 1 cup unsalted butter, softened
- 1 tablespoon vanilla extract
- 1 can sweetened condensed milk, 14 ounces
- 4 cups powdered sugar
- 14 ounces sweetened shredded coconut
- 10-ounce jar maraschino cherries, drained and chopped
- 3 cups chopped pecans
- 6 cups semi-sweet chocolate chips
- 4 tablespoons shortening
Instructions
- Line several baking sheets with parchment paper.
- Beat the softened butter until smooth.
- Add the vanilla extract and sweetened condensed milk.
- Gradually add the powdered sugar, mixing until incorporated.
- Add the shredded coconut.
- Fold in the chopped maraschino cherries and pecans.
- Mix until the ingredients are evenly distributed.
- Cover the mixture and refrigerate until firm enough to handle.
- Scoop portions of the mixture and roll them into small balls.
- Place the balls on parchment-lined baking sheets.
- Refrigerate again until firm.
- Melt the chocolate chips with the shortening until smooth.
- Dip each coconut ball into the melted chocolate.
- Allow excess chocolate to drip away.
- Return each candy to the parchment paper.
- Allow the chocolate coating to set completely.
Method
Chilling is important because the coconut mixture is naturally soft. A cold mixture is much easier to shape and dip.
The shortening helps create a smoother chocolate coating and makes dipping easier.
Formation
Each candy begins as a rich coconut-pecan-cherry center. After chilling, the center is shaped into a ball and covered completely with chocolate.
The contrasting colors of coconut, red cherries, and dark chocolate make these candies particularly attractive for holiday platters.
Serving
Allow the candies to rest briefly at room temperature before serving. Store them in a cool place in a tightly sealed container, with parchment separating layers if necessary.
4. Homemade Turtle Chocolates
Introduction
Turtle chocolates are famous for their combination of pecans, caramel, and chocolate. The name comes from the traditional appearance of pecan pieces extending outward beneath a layer of caramel and chocolate, resembling a little turtle.
They are a wonderful homemade gift because they look sophisticated while using only a handful of ingredients.
Ingredients
- 3 cups pecan halves
- 11 ounces individually wrapped caramels
- 2 tablespoons heavy cream
- 12 ounces milk chocolate chips or dark chocolate chips
- 1 to 2 tablespoons sea salt, optional
Instructions
- Line a baking sheet with parchment paper.
- Arrange groups of pecan halves on the baking sheet.
- Place approximately four or five pecan halves together for each turtle.
- Unwrap the caramels and place them in a saucepan with the heavy cream.
- Heat over low to medium-low heat, stirring frequently.
- Continue until the caramel becomes smooth and pourable.
- Spoon a small amount of caramel over each pecan cluster.
- Allow the caramel to cool and become slightly firm.
- Melt the chocolate chips gently until smooth.
- Spoon chocolate over each caramel-covered pecan cluster.
- Sprinkle lightly with sea salt if desired.
- Allow the candies to cool completely.
- Refrigerate briefly if necessary to speed up the setting process.
Method
The pecans should be arranged before adding the caramel because once the caramel is added, shaping becomes more difficult.
Warm caramel should be handled carefully because it can cause serious burns. Keep the heat moderate and avoid touching it directly.
Formation
The pecans form the base and give the candy its characteristic shape. The caramel creates a chewy middle, while chocolate forms the final layer.
A small amount of sea salt balances the sweetness and enhances the roasted nut and chocolate flavors.
Serving
Turtles are excellent on dessert boards, holiday candy trays, and gift boxes. They can also be individually wrapped for homemade Christmas presents.
5. Cool Whip Candy
Introduction
Cool Whip candy is an exceptionally simple chocolate confection made from whipped topping, chocolate, and candy coating. Its soft interior and firm chocolate exterior make it different from traditional hard candies.
This is a useful recipe when you want something quick that can be prepared ahead of a holiday gathering.
Ingredients
- 12 ounces semi-sweet baking chocolate, broken into small pieces
- 8 ounces frozen whipped topping, thawed
- 24 ounces chocolate almond bark or candy coating
Instructions
- Line an 8-inch or 9-inch square pan with parchment paper.
- Melt the semi-sweet baking chocolate carefully.
- Allow it to cool slightly.
- Fold the melted chocolate into the thawed whipped topping.
- Stir until the mixture is evenly combined.
- Spread the mixture into the prepared pan.
- Refrigerate until firm.
- Remove the chilled mixture from the pan.
- Cut it into small squares.
- Melt the chocolate almond bark according to its package directions.
- Dip each candy square into the coating.
- Place the coated candies on parchment paper.
- Allow the coating to harden completely.
Method
The whipped topping gives the center its soft, creamy texture. The chocolate coating provides a firmer exterior.
The mixture should remain cold while you work with it. If it becomes too soft to cut or dip, return it to the refrigerator for a short time.
Formation
The candy develops a two-texture structure: a creamy chocolate center surrounded by a firm candy coating.
Serving
These candies are best served in small portions because they are rich. Arrange them in miniature paper liners for an elegant holiday presentation.
6. Homemade Caramels
Introduction
Homemade caramels are one of the most traditional candies for Christmas. They have a rich buttery flavor, a deep brown-sugar sweetness, and a soft chewy texture.
Unlike the other recipes in this collection, this candy requires careful temperature control. A candy thermometer is strongly recommended for consistent results.
Ingredients
- 3 cups granulated sugar
- 1 cup brown sugar
- 1 cup unsalted butter, softened
- 2 cups light corn syrup
- 1 teaspoon sea salt
- 24 ounces evaporated milk
Instructions
- Line a large baking dish with parchment paper and lightly butter the parchment.
- In a heavy-bottomed saucepan, combine the granulated sugar, brown sugar, butter, corn syrup, and sea salt.
- Heat over medium heat, stirring until the butter melts and the sugars dissolve.
- Gradually add the evaporated milk while stirring continuously.
- Continue cooking over medium heat.
- Stir frequently to prevent the mixture from scorching on the bottom.
- Attach a candy thermometer to the saucepan.
- Continue cooking until the caramel reaches approximately 245°F to 248°F (118°C to 120°C), depending on the desired final texture.
- Remove from the heat immediately.
- Carefully pour the hot caramel into the prepared pan.
- Allow it to cool completely at room temperature.
- Refrigerate briefly if necessary for easier cutting.
- Cut the caramel into small squares.
- Wrap individual pieces in wax paper or candy wrappers.
Method
The key to successful caramels is controlling the final cooking temperature. Lower temperatures generally produce softer caramels, while higher temperatures create firmer chews.
Do not leave the caramel unattended while cooking. Stir carefully and watch for scorching.
Formation
During cooking, water evaporates while sugar, butter, and milk concentrate. This creates the thick, chewy structure characteristic of caramel.
Once the mixture cools, it becomes firm enough to cut while retaining its soft, chewy texture.
Serving
Homemade caramels can be served individually or included in a larger Christmas candy assortment. They also make excellent gifts when individually wrapped and placed in decorative boxes.
Methods for Creating a Beautiful Christmas Candy Tray
A homemade candy assortment becomes especially appealing when several different textures and shapes are presented together.
Start with a large serving platter or shallow tray. Arrange the larger candies first, then fill the empty spaces with smaller pieces.
Combine:
- Peanut marshmallow clusters for crunch and chewiness
- Peanut butter marshmallow cups for creamy filling
- Martha Washington candy for coconut and pecan flavor
- Turtle chocolates for caramel and nuts
- Cool Whip candy for a soft chocolate center
- Homemade caramels for classic buttery sweetness
Use small paper candy cups to keep individual pieces separated and make serving easier.
Storage Method
Most of these candies should be kept in airtight containers in a cool, dry location. Candies containing soft fillings may benefit from refrigeration, especially if your kitchen is warm.
Separate layers with parchment or wax paper to prevent chocolate coatings from sticking together.
For gifting, allow refrigerated candies to sit briefly in their packaging before opening the container so condensation does not collect directly on the chocolate.
The History of Homemade Christmas Candy
Homemade candy has long been associated with holiday celebrations. Before modern supermarkets offered endless varieties of packaged sweets, families often prepared special candies at home for Christmas.
Chocolate clusters, nut candies, caramel, coconut confections, and peanut butter treats became popular because many of them could be produced in large batches from pantry ingredients.
Candy-making also became a social activity. Families could work together preparing mixtures, shaping candies, dipping chocolates, and packaging finished treats for neighbors and relatives.
Vintage recipes such as coconut-and-cherry candies and turtle chocolates remain popular because they combine familiar ingredients with traditional holiday memories.
The Formation and Technique Behind These Candies
Although all six recipes belong to the same general category, their textures are created in different ways.
Chocolate Clusters
Melted chocolate becomes firm as it cools. Nuts and marshmallows provide contrasting textures.
Peanut Butter Cups
Chocolate forms a shell around a soft peanut butter and marshmallow filling.
Coconut-Cherry Candy
Butter, condensed milk, powdered sugar, coconut, cherries, and pecans create a dense center that is chilled and coated in chocolate.
Turtle Chocolates
Pecans create the foundation, caramel supplies chewiness, and chocolate forms the top coating.
Cool Whip Candy
Whipped topping creates a soft interior while the candy coating creates a firm exterior.
Caramels
Cooking concentrates the sugar and dairy mixture until it reaches the temperature necessary for a chewy candy texture.
Tips for Successful Homemade Candy
Use fresh ingredients and good-quality chocolate whenever possible.
Work patiently when melting chocolate. Gentle heat is much safer than high heat.
Keep water away from melted chocolate because even a small amount can cause it to seize.
For caramel, use a heavy saucepan and a reliable candy thermometer.
Prepare parchment-lined trays before beginning so you can work efficiently once the candy is ready.
Keep finished candies protected from heat and humidity.
When giving candy as a gift, package different varieties separately when their textures or storage requirements differ.
Make smaller pieces when preparing a large assortment. This allows everyone to sample several varieties without making the candy tray overwhelmingly rich.
Conclusion
These six homemade Christmas candies offer a wonderful combination of traditional flavors, textures, and simple preparation methods. From chocolate-covered pecans and chewy caramels to creamy peanut butter cups and coconut-cherry centers, each recipe brings something different to the holiday table.
The best part of homemade candy is not only the finished treat but also the process of making it. Preparing candy can become part of the holiday tradition itself: melting chocolate, stirring caramel, shaping clusters, dipping centers, and filling containers for friends and family.
Whether you prepare one recipe or make all six for a complete Christmas candy collection, these sweets are made for sharing and creating memories.
For Candy Lovers
For anyone who loves old-fashioned holiday sweets, this collection provides plenty of variety. Chocolate lovers can reach for the turtle chocolates or Cool Whip candy. Peanut butter fans will enjoy the marshmallow cups. Those who prefer nuts and coconut can choose the Martha Washington candy, while traditional caramel lovers have a rich homemade option.
A mixed candy tray containing all six varieties turns a simple dessert table into a festive homemade confectionery display. These candies are perfect for Christmas gatherings, cookie exchanges, family celebrations, holiday parties, and thoughtful homemade gifts.
The combination of chocolate, peanuts, pecans, coconut, cherries, marshmallow, peanut butter, and buttery caramel ensures that there is something for nearly every sweet-tooth at the table.