
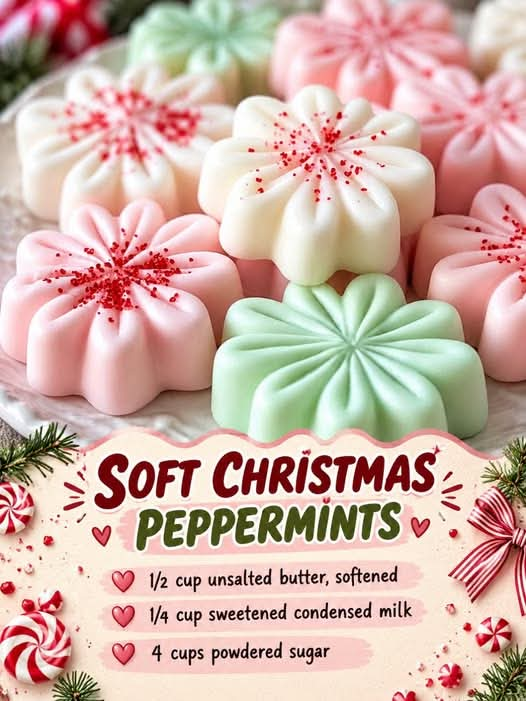
Soft Christmas Peppermints: A Classic Homemade Holiday Candy
Introduction
Soft Christmas Peppermints are a beautiful, old-fashioned holiday treat that brings a refreshing peppermint flavor and a delicate, melt-in-your-mouth texture to the Christmas season. Made with just a handful of simple ingredients, these homemade candies are sweet, creamy, and wonderfully minty.
Unlike traditional hard peppermints, these soft candies have a tender, smooth consistency that makes them especially enjoyable after a holiday meal. Their pleasant peppermint flavor pairs perfectly with hot chocolate, coffee, tea, and other festive desserts.
One of the best things about this recipe is that it requires no oven, no candy thermometer, and no complicated cooking techniques. The buttery mixture is combined with sweetened condensed milk, powdered sugar, and peppermint extract to create a soft dough that can be shaped into small candies and decorated for the holidays.
Whether you are preparing a Christmas candy platter, filling homemade gift boxes, or making special treats with your family, these Soft Christmas Peppermints are an easy and delicious addition to your holiday traditions.
Ingredients
Preparation time: 20–30 minutes
Chilling time: 1–2 hours
Yield: Approximately 50–70 small candies, depending on size
Main Ingredients
- ½ cup unsalted butter, softened: Gives the peppermints their rich, creamy flavor and tender texture.
- ¼ cup sweetened condensed milk: Adds sweetness, moisture, and a smooth consistency that helps bind the ingredients together.
- 4 cups powdered sugar: Forms the base of the candy dough and gives the peppermints their delicate sweetness.
- 1 teaspoon peppermint extract: Provides the refreshing mint flavor that makes these candies perfect for Christmas.
Optional Decorations
- Red or green gel food coloring for festive holiday colors.
- Granulated sugar for lightly coating the candies.
- Crushed peppermint candy for an extra minty finish.
- A small amount of powdered sugar for dusting the work surface.
The original recipe is delicious in its simple white form, but adding traditional red and green colors can make the candies look especially festive on a Christmas dessert table.
Instructions
Step 1: Prepare the Butter
Place the softened unsalted butter in a large mixing bowl. Beat it with an electric mixer or a sturdy wooden spoon until it becomes smooth, creamy, and easy to spread.
The butter should be soft enough to mix easily but should not be melted. Melted butter can make the candy mixture greasy and difficult to shape.
Step 2: Add the Condensed Milk
Pour the sweetened condensed milk into the bowl with the softened butter. Mix thoroughly until the two ingredients form a smooth, creamy mixture.
Scrape down the sides of the bowl as needed to ensure that everything is evenly combined.
Step 3: Add the Peppermint Extract
Stir in the peppermint extract. Mix well so the refreshing mint flavor is distributed throughout the mixture.
Peppermint extract can be strong, so measure carefully. If you prefer a milder flavor, you can start with slightly less and adjust to taste before adding all the powdered sugar.
Step 4: Gradually Add the Powdered Sugar
Add the powdered sugar one cup at a time, mixing after each addition. As the sugar is incorporated, the creamy mixture will gradually become thicker and develop into a soft candy dough.
When the dough becomes too stiff for the mixer, switch to a sturdy spoon or use clean hands to knead it gently.
Continue until the dough is soft, smooth, and holds its shape without sticking excessively to your fingers.
If the mixture is too sticky, add a little more powdered sugar, one tablespoon at a time. If it becomes too dry or crumbly, add a small amount of condensed milk, about half a teaspoon at a time.
Step 5: Divide and Color the Dough
If you want traditional Christmas-colored peppermints, divide the dough into two or three portions.
Leave one portion white. Add a tiny amount of red gel food coloring to another portion and knead until the color is evenly distributed. You can repeat the process with green coloring if desired.
Use gel coloring sparingly because too much liquid can soften the dough.
For a classic appearance, keep the candies white with small red or green accents. For a more colorful candy platter, make separate batches of red, green, and white peppermints.
Step 6: Shape the Candies
Lightly dust your work surface with powdered sugar.
Take a small piece of dough and roll it between your palms to form a ball about the size of a small marble. Place it on a parchment-lined baking sheet.
Gently flatten each ball with your fingertips or the back of a fork to create a traditional peppermint shape. You can also use a small candy mold to create decorative designs.
For a striped effect, roll small pieces of differently colored dough together before shaping them.
Continue until all the dough has been used, leaving a little space between each candy.
Step 7: Let the Peppermints Set
Place the shaped candies on a parchment-lined tray and refrigerate them for approximately one to two hours, or until they feel firm enough to handle.
For a slightly drier exterior, you can transfer them to an airtight container after chilling and allow them to rest in the refrigerator overnight.
These are soft candies rather than hard boiled peppermints, so they should remain tender instead of becoming brittle.
Step 8: Serve and Enjoy
Arrange the finished peppermints on a holiday serving platter, in small paper candy cups, or inside decorative Christmas tins.
Serve them after dinner, alongside hot cocoa, or as part of a homemade holiday candy assortment.
For gifting, place the candies in a food-safe container with parchment paper between layers to help prevent sticking.
Methods for Making Perfect Soft Christmas Peppermints
1. The Creaming Method
The creaming method begins by beating softened butter until smooth before adding the condensed milk. This helps create a more uniform mixture and contributes to the candies’ creamy texture.
Although these candies are not baked, starting with properly softened butter makes a noticeable difference in how easily the ingredients combine.
2. The Gradual Mixing Method
Adding powdered sugar gradually is important. If all the sugar is added at once, it can become difficult to mix evenly and may create lumps.
One cup at a time gives you greater control over the consistency, allowing you to stop when the dough becomes firm enough to shape.
3. The Hand-Kneading Method
Once the mixture becomes thick, gently knead it with clean hands until smooth. Avoid excessive kneading, which can warm the butter and make the dough softer.
If the dough becomes too warm or sticky, refrigerate it for 10–15 minutes before continuing.
4. The Decorative Shaping Method
These peppermints can be shaped in several ways:
- Small flattened rounds for a traditional peppermint look.
- Tiny balls for bite-sized candy treats.
- Red-and-white twists for a festive striped appearance.
- Green and white molded candies for a Christmas-inspired presentation.
- Fork-pressed rounds with a simple decorative pattern.
Keep the pieces similar in size so they chill evenly and are easy to serve.
5. The Chilling Method
Chilling helps the butter firm up and allows the candies to hold their shape. This step is especially useful if your kitchen is warm.
For the best texture, chill the candies until firm but allow them to sit briefly at room temperature before serving if you prefer a softer bite.
History of Christmas Peppermints
Peppermint has a long association with sweets, after-dinner treats, and winter celebrations. Mint-flavored candies became popular in many countries as confectionery production developed and peppermint flavoring became more widely available.
Traditional hard peppermint candies are known for their crisp texture and refreshing flavor. Over time, home cooks and candy makers developed softer versions using ingredients such as butter, sugar, cream, and condensed milk.
Homemade soft peppermints are especially appealing because they do not require the high-temperature sugar cooking used for hard candy. Their simple ingredients and easy preparation make them accessible to home cooks who want to create holiday sweets without specialized equipment.
Today, soft peppermint candies appear in many forms, from creamy after-dinner mints to colorful homemade Christmas confections. Recipes vary from family to family, with some using cream cheese, others using butter, and many incorporating food coloring or decorative molds.
This particular recipe uses butter and sweetened condensed milk to produce a simple, sweet peppermint dough that can be shaped by hand. Although the exact history of this specific version is not established, it follows the broader tradition of making homemade candies for sharing during the holiday season.
Formation and Texture: What Makes These Candies Special?
The formation of Soft Christmas Peppermints depends on the balance between fat, moisture, sugar, and flavoring.
Butter provides richness and tenderness. Because butter softens at room temperature and firms when chilled, it helps determine how easily the candies can be shaped and how they feel when eaten.
Sweetened condensed milk supplies sweetness and moisture while helping the ingredients come together. Its thick consistency makes it useful in no-bake candy mixtures.
Powdered sugar creates the structure of the dough. Its fine texture allows it to blend smoothly with the butter and condensed milk, producing a mixture that can be rolled and molded.
Peppermint extract delivers the distinctive cooling mint flavor. Even a small quantity can make the candies taste bright and refreshing.
When these ingredients are mixed correctly, the result is a soft, moldable candy dough. Refrigeration firms the butter and helps the shapes hold together.
The finished candies should be tender, sweet, and easy to bite. They are not intended to have the crunchy texture of traditional hard peppermint sweets.
Tips and Tricks for the Best Results
- Use softened, not melted, butter. This helps the dough remain smooth and manageable.
- Measure the powdered sugar carefully. Too little may leave the mixture sticky, while too much can make the candies dry.
- Choose peppermint extract rather than mint extract for the familiar peppermint flavor associated with Christmas candy.
- Use gel food coloring. It generally adds less moisture than liquid food coloring.
- Keep your hands cool. Warm hands can soften the butter in the dough.
- Chill sticky dough before shaping. A short rest in the refrigerator can make a big difference.
- Make the candies small. Small pieces are easier to serve and look attractive on a holiday platter.
- Taste before shaping. Adjust the peppermint flavor while the dough is still easy to mix.
- Avoid excessive moisture. Adding too much condensed milk can make the dough difficult to handle.
- Allow time for chilling. Properly chilled candies are easier to package and transport.
Delicious Variations

1. Classic White Peppermints
Keep the dough uncolored and shape it into small, smooth rounds. This elegant version is ideal for holiday dinners, wedding-style candy trays, and simple homemade gifts.

2. Red-and-White Christmas Peppermints
Divide the dough, color one portion red, and combine tiny pieces of both colors to create festive swirls. These candies look beautiful in clear gift bags.

3. Green Christmas Mints
Use green gel coloring to create a bright holiday variation. A few green candies mixed with white and red ones make a colorful Christmas candy assortment.

4. Sparkling Sugar Peppermints
Roll the shaped candies very lightly in granulated sugar before chilling. This adds a delicate sparkle and a slight sugary finish.
Storage and Make-Ahead Instructions
Because these peppermints contain butter and sweetened condensed milk, they should be stored in the refrigerator rather than left at room temperature for extended periods.
- Refrigerator: Store in an airtight container, separating layers with parchment paper. For best quality, enjoy within about one week.
- Freezer: Freeze in a well-sealed, freezer-safe container for up to two months for best quality. Separate layers with parchment paper and thaw in the refrigerator.
- Make-ahead preparation: Prepare and shape the candies a day or two before your holiday gathering, then keep them chilled until serving.
- Serving: Place only the quantity you plan to serve on the table, keeping the remaining candies refrigerated.
Storage times are practical quality guidelines; always discard candies that develop an unusual smell, appearance, or texture.
Serving Ideas for Christmas Gatherings
Soft Christmas Peppermints are versatile enough to serve in several ways.
- Add them to a Christmas candy platter with fudge, chocolate truffles, and sugar cookies.
- Arrange them in miniature paper cups for an elegant holiday dessert table.
- Serve them alongside coffee, tea, or hot chocolate after dinner.
- Place them in small food-safe tins as homemade gifts for friends and neighbors.
- Include them in a cookie exchange or a family Christmas baking box.
- Use red, green, and white candies to decorate a festive dessert display.
For a coordinated holiday gift, combine a small selection of these peppermints with homemade cookies and individually wrapped fudge.
Common Mistakes to Avoid
The dough is too sticky. Add powdered sugar gradually or refrigerate the mixture for 10–15 minutes before shaping.
The dough is too crumbly. Mix it more thoroughly first. If necessary, add a few drops of sweetened condensed milk at a time until it holds together.
The candies lose their shape. The butter may be too warm. Chill the dough and work in small batches.
The peppermint flavor is too strong. Measure the extract accurately. Peppermint extract is concentrated, and adding more does not always improve the taste.
The colors become uneven. Use a small amount of gel coloring and knead each portion thoroughly before shaping.
The candies stick together in storage. Chill them until firm and separate the layers with parchment paper.
Conclusion
Soft Christmas Peppermints are a simple, charming, and delicious way to bring homemade sweetness to the holiday season. With only four main ingredients, this no-bake recipe transforms butter, sweetened condensed milk, powdered sugar, and peppermint extract into tender candies that are easy to shape and customize.
Their refreshing mint flavor makes them a lovely addition to Christmas dessert tables, while their red, green, and white variations make them ideal for festive gift boxes and family celebrations.
Best of all, you do not need advanced candy-making skills or special equipment to prepare them. With a little mixing, shaping, and chilling, you can create a batch of homemade peppermint candies that looks beautiful and tastes wonderful.
Prepare them for your next Christmas gathering, share them with friends, or make them part of a new family holiday tradition.
For the Love of Homemade Christmas Candy
There is something special about making Christmas candy at home. The familiar scent of peppermint, the simple process of shaping each piece, and the sight of a colorful candy platter all contribute to the warmth of the holiday season.
These soft peppermints are perfect for anyone who loves traditional sweets without the fuss of complicated recipes. Children can help shape the candies with clean hands, while adults can experiment with colors and decorative finishes.
Whether you keep them classic and white or make a festive assortment of red, green, and white, each batch offers a small opportunity to create something thoughtful and delicious.
The greatest joy comes from sharing them: placing a little tin on a neighbor’s doorstep, serving them after a family meal, or watching guests reach for one more peppermint before leaving the table.
Homemade treats do not have to be complicated to be memorable. Sometimes, four simple ingredients are enough to create a sweet little tradition that returns year after year.
Recipe reminder: Keep these candies refrigerated, use peppermint extract sparingly, and add powdered sugar gradually until the dough is soft but easy to shape.