
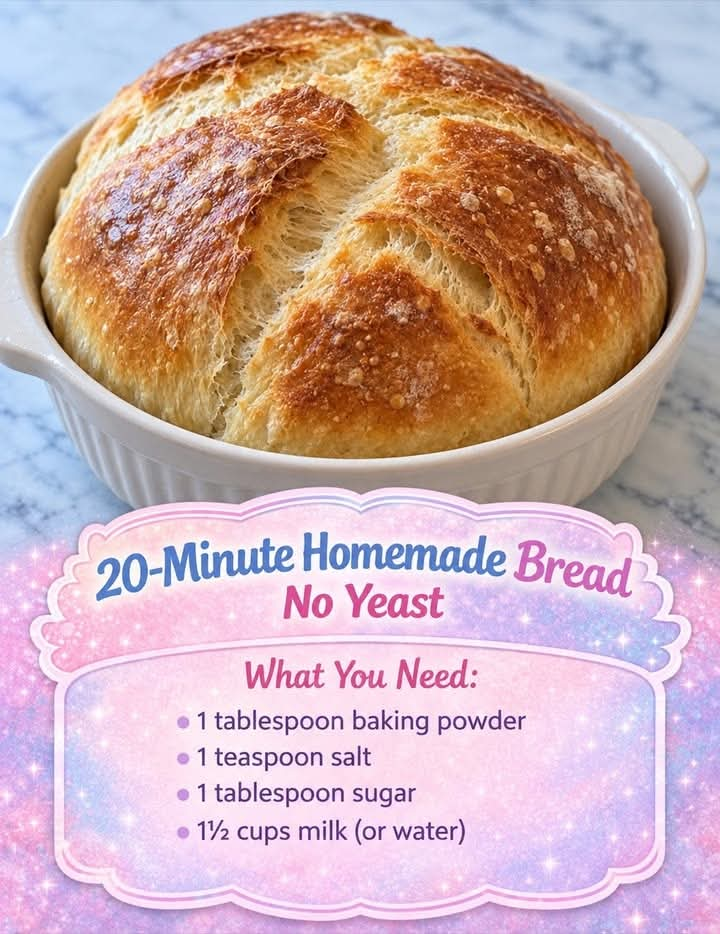
15-Minute No-Knead Homemade Bread
Introduction
There is something incredibly comforting about the smell of freshly baked bread filling the kitchen. Warm, crusty on the outside and soft on the inside, homemade bread can turn even the simplest meal into something special.
This quick homemade bread recipe is designed for those moments when you want fresh bread without spending hours waiting for dough to rise. There is no kneading, no complicated technique, no bread machine, and no lengthy preparation. Simply mix the ingredients, shape the dough, and bake.
The result is a rustic loaf with a golden crust and a tender, satisfying center. It is perfect for breakfast, sandwiches, soups, stews, dinner, or simply spreading with butter while the bread is still warm.
Ingredients
For the Bread
- 2 cups all-purpose flour
- 1 tablespoon baking powder
- 1 teaspoon salt
- 1 tablespoon granulated sugar
- 3/4 cup warm milk
- 1/4 cup warm water
- 2 tablespoons melted butter or olive oil
- 1 large egg
For the Top
- 1 tablespoon melted butter
- Optional sesame seeds, poppy seeds, or dried herbs
Instructions
Step 1: Prepare the Oven
Preheat your oven to 425°F (220°C). Place a baking sheet or cast-iron skillet inside while the oven heats if you want a particularly crisp bottom crust.
Lightly grease a small loaf pan, baking dish, or oven-safe skillet.
Step 2: Combine the Dry Ingredients
In a large mixing bowl, add the flour, baking powder, salt, and sugar.
Whisk everything together thoroughly so the baking powder and salt are evenly distributed throughout the flour.
Step 3: Add the Wet Ingredients
In a separate bowl, whisk together the warm milk, warm water, melted butter, and egg.
Pour the wet mixture into the dry ingredients.
Step 4: Mix the Dough
Using a wooden spoon or spatula, gently mix everything together until a soft, slightly sticky dough forms.
Do not overmix. The goal is simply to bring the ingredients together. A few small lumps are perfectly acceptable.
Because this is a quick bread, there is no need for traditional kneading or a long fermentation period.
Step 5: Shape the Bread
Lightly flour your hands and transfer the dough onto a lightly floured surface.
Shape it gently into a round or oval loaf. Avoid working the dough too much.
Place the shaped dough into the prepared pan or onto a baking sheet.
Step 6: Finish the Top
Brush the surface with melted butter.
For extra flavor and texture, sprinkle the top with sesame seeds, poppy seeds, or a small amount of dried herbs.
Using a sharp knife, make one or two shallow cuts across the top. This gives the loaf a rustic appearance and allows the bread to expand as it bakes.
Step 7: Bake
Place the bread into the fully preheated oven.
Bake for approximately 12 to 15 minutes, or until the surface is golden brown and the bread feels firm when lightly tapped.
If the loaf needs more color, continue baking for another 2 to 5 minutes.
The exact baking time will depend on the size and thickness of your loaf.
Step 8: Rest Briefly
Remove the bread from the oven and let it rest for several minutes before slicing.
Although it may be tempting to cut into it immediately, allowing the bread to cool slightly helps the interior finish setting.
Serve warm with butter, cheese, jam, honey, soup, or your favorite spread.
Method
The secret to this recipe is keeping the process simple.
Traditional yeast bread usually requires mixing, kneading, proofing, shaping, and another rise before baking. This recipe takes a different approach by using baking powder as the leavening agent.
The baking powder reacts with moisture and heat, producing bubbles that help the dough rise during baking. Because there is no yeast fermentation, there is no need to wait for the dough to double in size.
The dough should remain soft and slightly sticky. Adding too much flour can make the finished bread dense and dry, so resist the temptation to keep adding flour while shaping.
For the best texture, mix only until the ingredients are combined.
Formation of the Bread
The formation process is very simple.
First, the dry ingredients are evenly combined. The warm liquid ingredients are then added, bringing the flour together into a soft dough.
Instead of kneading the dough for several minutes, it is handled gently and shaped immediately. The dough is formed into a compact round or oval loaf and transferred directly to the baking surface.
During baking, heat activates the baking powder while the moisture in the dough creates steam. The loaf expands, the outside becomes golden and crusty, and the inside develops a soft, tender crumb.
The melted butter brushed over the surface adds richness and encourages a beautifully browned crust.
A Brief History of Quick Homemade Bread
Bread is one of the oldest prepared foods in human history. For thousands of years, people have mixed grains with water and baked the resulting dough over hot stones, clay surfaces, hearths, and eventually ovens.
Early breads were often flat because reliable leavening methods were not always available. Over time, bakers discovered that naturally fermented dough could create lighter loaves. Yeast-based bread eventually became an important part of many food cultures.
Quick breads developed as another practical solution. Instead of relying on yeast and lengthy fermentation, bakers could use chemical leaveners such as baking soda or baking powder.
This made it possible to prepare fresh bread much more quickly, especially when time was limited.
Modern quick breads continue this tradition of convenience. They are especially useful when you want homemade bread but do not want to plan several hours ahead.
Tips for the Best Results
Use warm rather than hot milk and water. Extremely hot liquids can affect the other ingredients, while lukewarm liquids blend more easily.
Do not overmix the dough. Excessive mixing can make the bread heavier and less tender.
Do not add excessive flour. The dough should be soft and slightly sticky rather than stiff.
Make sure the oven is fully preheated before baking. A properly heated oven helps the bread rise quickly and develop its crust.
For a crispier crust, bake the loaf on a preheated baking sheet or cast-iron skillet.
For a softer crust, brush the hot bread with butter immediately after removing it from the oven.
Allow leftovers to cool completely before storing them in an airtight container or bread bag.
Serving Ideas
This homemade bread is incredibly versatile.
Serve thick slices with butter for a simple breakfast.
Use it to make sandwiches filled with roasted chicken, turkey, cheese, vegetables, or eggs.
Serve warm slices alongside tomato soup, vegetable soup, chili, stew, or creamy pasta.
For breakfast, spread it with butter and honey, fruit preserves, or peanut butter.
You can also toast leftover slices and serve them with eggs, avocado, cheese, or your favorite breakfast toppings.
Storage
Fresh bread is best enjoyed on the day it is baked.
Once completely cool, store leftover bread in an airtight container or sealed bread bag at room temperature for up to a couple of days.
For longer storage, slice the bread and freeze it in a well-sealed freezer bag. Individual slices can be removed as needed and reheated in a toaster or oven.
Avoid refrigerating homemade bread unless necessary, as refrigeration can cause bread to lose its soft texture more quickly.
Variations
Garlic Herb Bread
Add 1 teaspoon of garlic powder and 1 teaspoon of dried Italian herbs to the dough. Brush the finished loaf with melted butter mixed with a little minced garlic.
Cheddar Bread
Fold approximately 1/2 to 1 cup of shredded cheddar cheese into the dough before shaping.
Herb and Cheese Bread
Add shredded cheese and dried rosemary, thyme, or oregano for a savory loaf that pairs beautifully with soups and roasted meats.
Seeded Bread
Sprinkle sesame seeds, sunflower seeds, pumpkin seeds, or poppy seeds over the top before baking.
Sweet Breakfast Bread
For a lightly sweet version, increase the sugar slightly and add a teaspoon of vanilla extract. Serve warm with butter, honey, or fruit preserves.
Common Mistakes to Avoid
The most common mistake is adding too much flour. A very stiff dough may produce a dense loaf.
Another mistake is overmixing. Since this is intended to be a quick and tender bread, mix just until everything comes together.
Do not skip preheating the oven. The immediate exposure to high heat is important for good expansion and browning.
Finally, avoid slicing the bread while it is extremely hot. Give it a few minutes to settle so the crumb has time to finish setting.
Conclusion
Homemade bread does not always have to mean hours of preparation, complicated techniques, or a bread machine.
This quick no-knead loaf offers a simple way to put warm bread on the table with minimal effort. The outside develops a beautiful golden crust while the inside stays soft and tender.
It is the kind of recipe that is especially useful when you need bread quickly or simply want the satisfaction of making something homemade.
Once you make it yourself and experience that first warm slice with melted butter, it becomes easy to understand why homemade bread can be so much more satisfying than a store-bought loaf.
For Bread Lovers
This recipe is perfect for anyone who loves fresh bread but does not always have time for traditional yeast recipes.
Bread lovers can enjoy it plain, toasted, buttered, or paired with almost any meal. It is simple enough for beginners, adaptable enough for experienced home cooks, and quick enough to make whenever the craving for warm bread appears.
The best part is that you can change the flavor every time by adding herbs, cheese, seeds, garlic, or other favorite ingredients.
Fresh bread does not have to be complicated. Sometimes the simplest loaf is the one that disappears from the table first.