
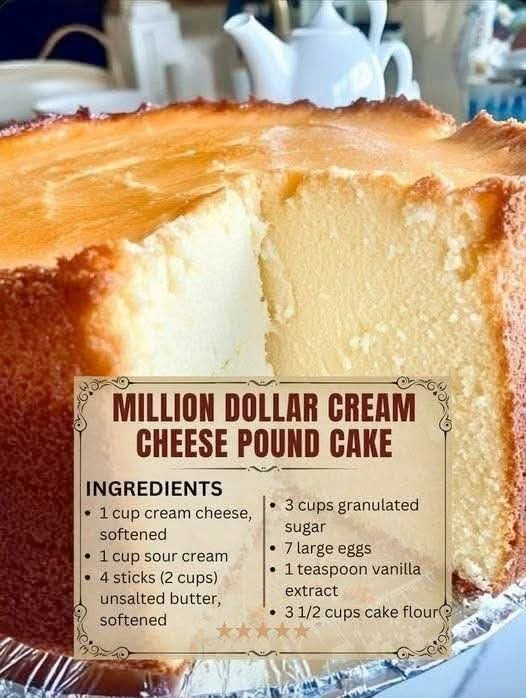
Million Dollar Cream Cheese Pound Cake
The Richest, Buttery Dessert You’ll Ever Bake
Introduction
There are certain cakes that never go out of style, and a classic cream cheese pound cake is one of them. This Million Dollar Cream Cheese Pound Cake earns its name from its wonderfully rich texture, buttery flavor, and luxurious crumb. Made with generous amounts of butter, cream cheese, sugar, eggs, and flour, it is simple in ingredients but impressive in every bite.
The cream cheese gives the cake a tender, velvety texture while the butter provides that unmistakable pound-cake richness. The result is a golden cake with a delicate crust, a moist interior, and a subtle vanilla aroma.
This is the kind of dessert that works beautifully for holidays, family gatherings, afternoon coffee, birthdays, church gatherings, bake sales, or simply when you want something special to enjoy at home.
Ingredients
For the Cake
- 1 1/2 cups unsalted butter, softened
- 1 package (8 ounces) cream cheese, softened
- 3 cups granulated sugar
- 6 large eggs, preferably at room temperature
- 3 cups all-purpose flour
- 1 teaspoon vanilla extract
- 1 small pinch of salt
For Preparing the Pan
- Softened butter or shortening, for greasing
- A little flour, for dusting the pan
Optional Serving Ideas
Although this cake is delicious on its own, you can serve it with:
- Fresh strawberries
- Blueberries or raspberries
- Whipped cream
- Powdered sugar
- Vanilla glaze
- Fresh peaches
- Ice cream
- Warm fruit sauce
History of Pound Cake
Pound cake is one of the oldest and most recognizable styles of cake. Traditional pound cakes were famously made with equal amounts of four basic ingredients: butter, sugar, eggs, and flour. The name “pound cake” comes from this original method of using approximately one pound of each ingredient.
Over time, bakers began adapting the classic formula by changing the proportions and adding ingredients such as vanilla, citrus zest, sour cream, and cream cheese. Cream cheese became a particularly popular addition because it creates a softer and richer cake while contributing a pleasant tanginess.
The Million Dollar Cream Cheese Pound Cake is a modern interpretation of this classic tradition. It keeps the luxurious butter-and-egg foundation of pound cake while adding cream cheese for extra richness and tenderness.
Why Cream Cheese Makes This Cake Special
Cream cheese does more than add flavor. It contributes fat and moisture to the batter, helping create the dense but tender texture that people love in a good pound cake.
The butter brings a deep, rich flavor, while the cream cheese adds a slight tang that balances the sweetness of the sugar. The eggs help provide structure, and the flour gives the cake its body.
The key is to avoid overmixing after the flour has been added. Too much mixing can develop excess gluten and make the finished cake heavier or tougher than desired.
Instructions
Step 1: Prepare the Ingredients
Take the butter, cream cheese, and eggs out of the refrigerator ahead of time and allow them to come close to room temperature.
Room-temperature ingredients blend together much more easily and help produce a smooth, uniform batter.
Preheat your oven to 325°F (165°C).
Grease a large Bundt pan or tube pan thoroughly with butter or shortening. Dust lightly with flour, then tap out any excess.
Because this is a rich cake, careful preparation of the pan is important to help prevent sticking.
Step 2: Cream the Butter and Cream Cheese
Place the softened butter and cream cheese in a large mixing bowl.
Using an electric mixer, beat them together on medium speed until smooth, creamy, and completely combined.
This step is important because it creates the foundation of the cake. Scrape the sides and bottom of the bowl occasionally to make sure everything is evenly incorporated.
Step 3: Add the Sugar
Gradually add the granulated sugar while continuing to beat the butter and cream cheese mixture.
Beat for several minutes until the mixture becomes lighter, smoother, and somewhat fluffy.
Properly creaming the butter, cream cheese, and sugar helps incorporate air into the mixture and contributes to the cake’s final texture.
Do not rush this stage.
Step 4: Add the Eggs
Add the eggs one at a time.
After adding each egg, mix just until it is incorporated before adding the next one.
Scrape down the sides of the bowl as necessary.
Adding the eggs gradually helps keep the batter smooth and prevents the mixture from becoming uneven.
Step 5: Add the Flour and Salt
In a separate bowl, combine the all-purpose flour and salt.
Reduce the mixer speed to low.
Gradually add the flour mixture to the wet ingredients, mixing only until the flour disappears.
Avoid beating the batter excessively at this stage.
Step 6: Add the Vanilla
Add the vanilla extract and mix briefly until evenly distributed throughout the batter.
The batter should be thick, smooth, and rich.
Step 7: Fill the Pan
Spoon the batter into the prepared Bundt or tube pan.
Spread it evenly around the pan and gently smooth the surface with a spatula.
Tap the pan very lightly on the counter once or twice to help eliminate any large air pockets.
Do not aggressively bang the pan, as this can remove too much of the air incorporated during mixing.
Step 8: Bake
Place the cake in the preheated 325°F (165°C) oven.
Bake until the cake is deeply golden and a long wooden skewer or cake tester inserted into the thickest portion comes out clean or with a few moist crumbs.
Because ovens and pans vary, begin checking toward the end of the expected baking period rather than relying solely on a specific time.
A large pound cake commonly takes approximately 1 hour 15 minutes to 1 hour 30 minutes, but the exact baking time can vary.
Step 9: Cool the Cake
Remove the cake from the oven and allow it to rest in the pan for approximately 10 to 15 minutes.
Then carefully loosen the edges if necessary and invert the cake onto a serving plate or cooling rack.
Allow it to cool completely before slicing.
Trying to cut the cake while it is still very hot can cause the delicate crumb to break apart.
The Best Method for a Perfect Pound Cake
The secret to a beautiful pound cake is not complicated. It is mostly about technique.
Use Softened Butter and Cream Cheese
The butter and cream cheese should be softened but not melted.
If they are too cold, they will not cream properly. If they are melted, the batter can lose the structure needed for a beautifully textured cake.
Cream Thoroughly
Spend enough time beating the butter, cream cheese, and sugar together.
This is one of the most important stages of the recipe.
Add Eggs Slowly
Adding eggs individually gives the batter time to absorb each one properly.
Do Not Overmix the Flour
Once the flour is incorporated, stop mixing.
Overmixing can make the cake less tender.
Bake at a Moderate Temperature
Pound cake benefits from a steady, moderate oven temperature. A temperature around 325°F allows the center to cook while helping prevent the outside from becoming excessively dark before the interior is finished.
Formation and Texture
A properly baked Million Dollar Cream Cheese Pound Cake should have a beautiful golden-brown exterior with a fine, tender crumb inside.
The crust should have a slight firmness, while the center should remain moist and buttery.
When sliced, the cake should hold its shape without crumbling excessively. Each bite should have a rich buttery flavor followed by the subtle tang of cream cheese and vanilla.
The texture is dense compared with a light sponge cake, but it should never feel dry or heavy.
How to Know When It Is Done
There are several signs that your pound cake is ready.
The top should be golden brown and firm.
The cake should have pulled slightly away from the sides of the pan.
A wooden skewer inserted into the center should come out clean or with a few moist crumbs.
You can also gently press the center with a fingertip. It should spring back rather than remain deeply indented.
Avoid opening the oven repeatedly during baking because this can cause unnecessary temperature fluctuations.
Serving Suggestions
This cake is wonderful served plain because the flavor is already rich and buttery.
For a simple presentation, dust the cooled cake with powdered sugar.
For a more luxurious dessert, serve a slice with fresh berries and whipped cream.
You can also add a spoonful of vanilla ice cream alongside a slightly warmed slice of cake.
For summer gatherings, fresh peaches and strawberries pair beautifully with the richness of the cream cheese pound cake.
For holidays, a light vanilla glaze can make the cake look especially elegant.
Storage
Allow the cake to cool completely before storing it.
Keep it covered at room temperature for a few days, provided the environment is cool and dry.
For longer storage, refrigerate the cake in an airtight container or tightly wrapped.
You can also freeze individual slices. Wrap them securely and place them in a freezer-safe container or bag.
When you are ready to enjoy them, allow the slices to thaw before serving.
Tips for Success
- Use room-temperature ingredients for a smoother batter.
- Measure the flour carefully and avoid packing it tightly into the measuring cup.
- Cream the butter, cream cheese, and sugar thoroughly.
- Add the eggs one at a time.
- Scrape the mixing bowl frequently.
- Mix the flour only until incorporated.
- Grease and flour the Bundt pan carefully.
- Bake at a moderate temperature.
- Allow the cake to rest before removing it from the pan.
- Cool completely before slicing for the cleanest pieces.
Variations
Lemon Cream Cheese Pound Cake
Add finely grated lemon zest to the batter for a bright citrus flavor. A simple lemon glaze can be drizzled over the cooled cake.
Orange Cream Cheese Pound Cake
Add fresh orange zest and a little orange extract for a fragrant citrus version.
Almond Cream Cheese Pound Cake
Replace a portion of the vanilla flavoring with almond extract for a classic bakery-style flavor.
Berry-Topped Pound Cake
Serve slices with fresh strawberries, blueberries, raspberries, and lightly sweetened whipped cream.
Chocolate Version
For a chocolate variation, part of the flour can be replaced with unsweetened cocoa powder, adjusting the dry ingredients appropriately.
A Cake for Every Occasion
One of the best qualities of this cake is its versatility.
It can be served as a simple family dessert or dressed up for a special celebration. It is equally welcome on a holiday dessert table, at a birthday gathering, during afternoon tea, or alongside a cup of coffee after dinner.
Its rich texture also makes it an excellent choice for entertaining because the cake can be prepared ahead of time and sliced when needed.
Conclusion
Million Dollar Cream Cheese Pound Cake is a celebration of classic baking at its finest. With butter, cream cheese, sugar, eggs, flour, vanilla, and a touch of salt, the ingredient list is wonderfully simple, yet the finished cake is rich, tender, buttery, and deeply satisfying.
The combination of cream cheese and butter creates a luxurious texture that makes every slice feel special. Whether you serve it plain, dusted with powdered sugar, topped with berries, or accompanied by whipped cream and ice cream, this pound cake is sure to become a favorite.
It is the kind of recipe worth keeping in your collection and sharing with the people you love.
If you love rich, buttery homemade cakes, this is one recipe you’ll want to make again and again. Comment “Yummy” if you’d like more classic recipes like this.
2-Ingredient Banana Donut Balls
Introduction
These 2-Ingredient Banana Donut Balls are a wonderfully simple homemade treat that proves you do not need a long ingredient list to make something delicious. With just ripe bananas and self-rising flour, you can create soft, fluffy little donut bites with a lightly crisp exterior and a tender, naturally sweet center.
Once cooked, the warm donut balls can be brushed with melted butter and coated in cinnamon sugar for a classic finish. They are ideal for breakfast, brunch, afternoon snacks, bake sales, or a quick dessert when you want something homemade without spending hours in the kitchen.
The recipe is especially useful when you have a few very ripe bananas waiting to be used. The natural sweetness and moisture of the bananas help create a soft texture, while self-rising flour provides the structure and leavening needed to make the bites puff beautifully as they cook.
Ingredients
For the Donut Balls
- 2 large ripe bananas, approximately 1 cup mashed
- 1 1/2 cups self-rising flour, plus a little extra if needed
Optional Finish
Although the basic dough requires only two ingredients, you can finish the cooked donut balls with:
- 2 tablespoons melted butter
- 1/2 cup granulated sugar
- 1 teaspoon ground cinnamon
You can also dust them with powdered sugar or serve them with honey, maple syrup, chocolate sauce, or caramel sauce.
Instructions
Step 1: Prepare the Bananas
Peel the bananas and place them in a medium mixing bowl. Mash them thoroughly with a fork until they become mostly smooth.
A few tiny pieces of banana are perfectly fine and can add extra flavor and moisture to the finished donut balls.
For the best natural sweetness, use bananas that are very ripe and have plenty of brown spots on the peel.
Step 2: Add the Flour
Add the self-rising flour gradually to the mashed bananas.
Stir with a wooden spoon or spatula until the ingredients come together and form a soft, slightly sticky dough.
Do not overmix. The goal is simply to combine the banana and flour. Overworking the dough can make the donut balls heavier and less tender.
If the dough is extremely sticky and difficult to handle, add a small amount of additional flour, about one tablespoon at a time. Avoid adding too much flour because it can make the finished donut balls dense.
Step 3: Shape the Donut Balls
Lightly flour your hands or lightly grease them with a little oil.
Pinch off small portions of dough and gently roll them between your palms to form small balls.
Try to keep the pieces approximately the same size so they cook evenly.
Do not make them too large. Small balls cook more quickly and develop a pleasant golden exterior while remaining soft inside.
Step 4: Cook the Donut Balls
Heat enough neutral cooking oil in a deep, heavy saucepan or deep fryer for the donut balls to float comfortably.
Heat the oil to approximately 350°F (175°C).
Carefully place a few donut balls into the hot oil, making sure not to overcrowd the pan.
Fry them for several minutes, turning them gently as needed so that they brown evenly on all sides.
They should become golden brown on the outside and cooked through in the center.
If they brown too quickly, reduce the heat slightly. If they remain pale and absorb excessive oil, the oil may not be hot enough.
Step 5: Drain
Once golden and cooked through, remove the donut balls carefully with a slotted spoon.
Place them on a plate lined with paper towels or on a wire rack to allow excess oil to drain.
Let them cool for a few minutes before adding the topping.
Cinnamon Sugar Finish
For a classic cinnamon-sugar coating, combine the granulated sugar and cinnamon in a shallow bowl.
Brush each warm donut ball lightly with melted butter.
Immediately roll the donut balls in the cinnamon-sugar mixture until they are evenly coated.
The butter helps the cinnamon sugar adhere while adding a rich, buttery flavor.
The Method Behind the Recipe
The simplicity of this recipe comes from the way the two main ingredients work together.
The ripe bananas provide moisture, natural sweetness, flavor, and tenderness. As the bananas become more ripe, their starches break down and their natural sugars become more pronounced, making them particularly useful in quick homemade desserts.
Self-rising flour contains flour, baking powder, and salt. This means the basic recipe does not require separate leavening ingredients.
When the dough enters the hot oil, the moisture in the banana creates steam while the leavening ingredients help the dough expand. The result is a small, fluffy interior surrounded by a golden exterior.
The key is to handle the dough gently and maintain a consistent cooking temperature.
History and Inspiration
Bananas have been used in homemade baking for generations because they are inexpensive, naturally sweet, and excellent for adding moisture to cakes, breads, fritters, and other treats.
Simple fried dough recipes also have a long history in many cultures. Different countries and communities have developed their own versions of fried dough, fritters, beignets, doughnuts, and sweet dumplings.
Banana donut balls are a modern, simplified interpretation of these comforting traditions. Instead of preparing a traditional yeast-raised donut dough, this version uses ripe bananas and self-rising flour to create a quick dough that can be shaped into small bites.
The recipe has become especially popular among home cooks because it combines convenience with the familiar flavors of banana, butter, cinnamon, and sugar.
Formation and Texture
The formation of the donut balls is important for achieving the right texture.
The dough should be soft but manageable. Too much flour produces a stiff dough and can result in heavy donut balls. Too little flour can make the dough difficult to shape and cause it to spread or absorb too much oil.
Small, evenly sized balls are best because they cook more consistently.
During frying, the outside of each ball develops a golden crust while the inside remains soft and tender. Allowing the cooked balls to drain properly prevents them from becoming excessively greasy.
Tips for the Best Banana Donut Balls
Use very ripe bananas for the strongest banana flavor and natural sweetness.
Measure the mashed banana reasonably accurately because bananas vary considerably in size.
Add flour gradually rather than adding all of it at once.
Do not overmix the dough.
Keep the donut balls relatively small so the centers cook completely.
Maintain the oil around 350°F (175°C) and avoid overcrowding the pan.
Fry in batches when necessary.
Drain the cooked donut balls before coating them.
For the best cinnamon-sugar coating, toss them while they are still warm.
Serving Suggestions
These banana donut balls are delicious while warm and freshly coated with cinnamon sugar.
For a dessert platter, serve them alongside:
- Chocolate dipping sauce
- Caramel sauce
- Maple syrup
- Honey
- Vanilla glaze
- Powdered sugar
- Peanut butter sauce
- Fresh berries
- Sliced bananas
They can also be served with coffee, tea, hot chocolate, or a glass of cold milk.
Storage
These donut balls are best enjoyed fresh and warm.
If you have leftovers, allow them to cool completely before placing them in an airtight container. They can be kept at room temperature for a short period, although their exterior will gradually lose some of its crispness.
To refresh them, warm them gently in an oven or air fryer until heated through.
If you plan to prepare them ahead, it is generally better to cook them close to serving time for the best texture.
A Favorite for Banana Lovers
For anyone who loves banana desserts, this recipe offers plenty of flavor with remarkably little preparation. The ripe banana provides a naturally fruity sweetness, while cinnamon sugar adds warmth and a familiar bakery-style finish.
The small size also makes these treats particularly enjoyable because they are easy to share. They work equally well as a family breakfast treat, an afternoon snack, or a simple dessert after dinner.
Conclusion
2-Ingredient Banana Donut Balls are a wonderful example of simple home baking. With ripe bananas and self-rising flour forming the foundation, you can create warm, fluffy, golden bites without complicated preparation.
The optional butter and cinnamon-sugar coating takes them from simple to irresistible, giving every bite a buttery sweetness and warm cinnamon flavor.
Whether you are trying to use up ripe bananas or simply looking for an easy homemade treat, these donut balls are a recipe worth keeping. Their simplicity, comforting flavor, and tender texture make them a delicious addition to any recipe collection.