
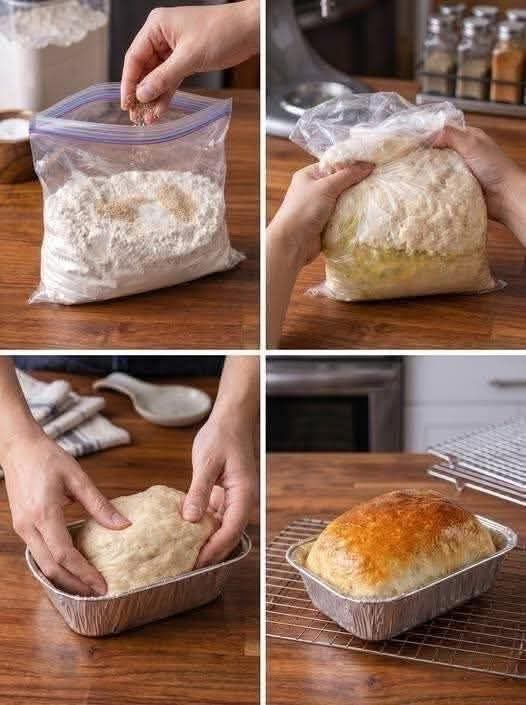
Bread in a Bag — Soft, Fluffy Homemade Bread Without a Mixer
Introduction
Making homemade bread does not have to mean covering the kitchen in flour or spending a long time kneading dough by hand. Bread in a Bag is a simple and fun method that lets you mix, knead, and develop the dough inside a sturdy food-safe bag.
The result is a soft, fluffy loaf with a lightly golden crust and a tender interior. It is an excellent recipe for beginners, children learning to bake, or anyone who wants fresh homemade bread without using a stand mixer.
The best part is the minimal cleanup. Instead of working directly on a countertop, most of the mixing and kneading happens inside the bag.
Ingredients
For one medium loaf:
- 3 cups all-purpose flour
- 3 teaspoons granulated sugar
- 1 packet instant or rapid-rise yeast, approximately 2 1/4 teaspoons
- 1 1/4 teaspoons salt
- 3 tablespoons olive oil
- 1 cup warm water, approximately 105–110°F (40–43°C)
For finishing:
- A little olive oil or melted butter for brushing the loaf
- Extra flour, only if the dough becomes unusually sticky
Equipment
- One large, sturdy food-safe resealable plastic bag
- Measuring cups and spoons
- 8 x 4-inch or 9 x 5-inch loaf pan
- Clean kitchen towel
- Oven
Choose a bag large enough to allow the dough to expand. Do not seal the bag completely while the dough is rising.
Instructions
1. Prepare the Bag
Open the large food-safe bag and place it in a bowl or container with the opening folded over the sides. This makes it easier to add the ingredients without the bag tipping over.
Add the flour, sugar, instant yeast, and salt.
Seal the bag while leaving enough air inside for the ingredients to move around. Gently shake the bag until the dry ingredients are evenly distributed.
2. Add the Wet Ingredients
Open the bag and pour in the warm water and olive oil.
The water should feel comfortably warm, not hot. Very hot water can damage the yeast and prevent the bread from rising properly.
Seal the bag again, leaving some air inside, and gently squeeze and massage the ingredients together.
At first, the mixture will look uneven and sticky. Continue working the bag until the flour has absorbed most of the liquid.
3. Knead the Dough Inside the Bag
Once the ingredients have formed a rough dough, continue squeezing, folding, and pressing the dough through the bag.
Knead for approximately 5 to 8 minutes.
You are looking for a dough that becomes smoother and more elastic. If it is extremely sticky, add flour one tablespoon at a time. Avoid adding too much flour because a stiff dough can produce a dense loaf.
If the bag becomes difficult to work with, transfer the dough to a lightly floured surface and finish kneading by hand.
4. First Rise
Leave the dough inside the bag and place it somewhere warm.
Allow it to rise for approximately 45 to 60 minutes, or until it has noticeably increased in size.
The exact rising time depends on the temperature of your kitchen. A warmer environment will generally make the dough rise faster, while a cool kitchen may require additional time.
5. Shape the Dough
Lightly grease your loaf pan.
Remove the risen dough from the bag and place it on a lightly floured surface.
Gently press the dough to remove some of the large air bubbles. Shape it into a smooth loaf by folding the edges toward the center and rolling the dough into a log.
Place the shaped dough seam-side down into the prepared loaf pan.
6. Second Rise
Cover the loaf loosely with a clean kitchen towel.
Allow it to rise for another 30 to 45 minutes.
The dough should become noticeably puffy and should rise toward or slightly above the rim of the loaf pan.
Do not let it overproof. If the dough becomes extremely swollen and begins collapsing, it may have risen for too long.
7. Prepare the Oven
While the dough is completing its second rise, preheat the oven to 375°F (190°C).
Place the oven rack in the center position.
For an attractive crust, lightly brush the top of the risen dough with olive oil or melted butter.
8. Bake
Place the loaf in the preheated oven.
Bake for approximately 30 to 35 minutes, or until the bread is golden brown and sounds hollow when gently tapped.
If the top begins browning too quickly, loosely cover it with aluminum foil during the final portion of baking.
9. Cool the Bread
Remove the loaf from the oven and allow it to rest in the pan for approximately 10 minutes.
Carefully remove the bread from the pan and place it on a wire rack.
Allow it to cool for at least 30 to 45 minutes before slicing.
Although it can be tempting to cut into freshly baked bread immediately, cooling allows the interior to finish setting and makes it easier to obtain neat slices.
The Method Behind Bread in a Bag
The simplicity of this recipe comes from combining several basic bread-making processes in one container.
The yeast consumes available sugars and produces carbon dioxide. That gas becomes trapped within the developing gluten network, causing the dough to expand during fermentation.
Kneading helps develop gluten proteins in the flour. Gluten gives the dough elasticity and allows it to stretch around the gas bubbles produced by the yeast.
The first rise develops flavor and structure. The second rise allows the shaped loaf to become light and airy before it enters the oven.
During baking, the dough undergoes a rapid expansion known as oven spring. Heat causes gases to expand, yeast activity briefly increases, and the structure of the dough eventually sets. The surface then develops its characteristic golden-brown crust.
History of Homemade Bread
Bread is one of humanity’s oldest prepared foods. Early forms were made from simple mixtures of grains and water and were cooked on hot stones or other heated surfaces.
Over centuries, bread-making became increasingly sophisticated. The discovery and use of fermentation allowed bakers to produce lighter, more flavorful loaves.
Yeast-based bread eventually became a central part of many food traditions around the world. Different regions developed their own methods, shapes, grains, and baking techniques.
The modern Bread in a Bag method is less a historical bread tradition than a convenient contemporary approach to traditional yeast bread-making. It takes the familiar process of mixing and kneading dough and places much of the work inside a resealable bag, making homemade bread more accessible to beginners.
Formation and Texture
The formation of this loaf begins when flour comes into contact with water. Proteins in the flour combine with water and, through mixing and kneading, develop into gluten.
The olive oil contributes tenderness and helps create a softer crumb. Sugar provides a small amount of sweetness and also gives the yeast an accessible source of food.
The yeast is responsible for fermentation. As it produces carbon dioxide, tiny pockets of gas become trapped throughout the dough.
During the first rise, these pockets expand. Shaping redistributes the dough and creates a more uniform structure. During the second rise, the shaped loaf expands again.
Finally, baking transforms the soft dough into a firm loaf with a golden crust and a light, tender interior.
Important Tips for Success
Use warm rather than hot water
Water that is too hot can interfere with yeast activity. Aim for comfortably warm water.
Measure the flour carefully
Too much flour can make the bread heavy. If possible, use a kitchen scale. If measuring with cups, spoon flour into the cup and level it rather than packing it down.
Do not rush the rising process
The dough needs time to ferment and develop. Rising time can vary depending on room temperature.
Avoid excessive flour
A slightly tacky dough is usually preferable to an overly dry dough. Add additional flour gradually only when necessary.
Give the loaf enough time to cool
Cutting bread while it is extremely hot can result in a gummy or compressed interior.
Check the finished loaf
A properly baked loaf should have a golden-brown exterior and feel firm. The bottom should sound hollow when tapped.
Serving Ideas
This homemade bread is versatile enough for almost any meal.
Serve warm slices with butter for breakfast, use it for sandwiches at lunch, or serve it alongside soups and stews.
It can also be toasted and topped with:
- Butter and honey
- Jam or preserves
- Peanut butter
- Avocado
- Eggs
- Cheese
- Roasted vegetables
- Turkey or chicken
- Tuna salad
The loaf can also be sliced and used to make French toast, grilled cheese sandwiches, garlic toast, or homemade breadcrumbs.
Storage
Once completely cool, store the bread in an airtight container or bread bag at room temperature.
For the best texture, enjoy it within a few days.
If you will not finish the loaf quickly, slice it and freeze the slices in a freezer-safe bag. Individual slices can be removed as needed and warmed or toasted directly from frozen.
Conclusion
Bread in a Bag is a wonderful introduction to homemade yeast bread because it removes much of the intimidation from the process. There is no stand mixer, complicated equipment, or messy countertop covered with dough.
The technique is simple: combine the ingredients, knead inside the bag, allow the dough to rise, shape it, let it rise again, and bake.
The finished loaf is soft, fluffy, lightly golden, and satisfying in a way that store-bought bread often cannot match. Once you master this basic recipe, you can begin experimenting with herbs, seeds, cheese, garlic, whole grains, or other favorite additions.
For Bread Lovers
This recipe is especially enjoyable for people who love the smell of freshly baked bread but do not want an elaborate baking project.
There is something comforting about pulling a warm loaf from the oven, letting it cool, and cutting the first slice. The simple ingredients become something completely different through fermentation, kneading, rising, and baking.
Whether you are an experienced baker or making homemade bread for the first time, Bread in a Bag is an easy recipe worth keeping in your kitchen collection.
Final Method at a Glance
- Combine flour, sugar, yeast, and salt in a large food-safe bag.
- Add warm water and olive oil.
- Seal and knead the mixture inside the bag for 5 to 8 minutes.
- Let the dough rise for 45 to 60 minutes.
- Shape the dough and place it in a greased loaf pan.
- Allow it to rise again for 30 to 45 minutes.
- Brush the top with olive oil or melted butter if desired.
- Bake at 375°F (190°C) for 30 to 35 minutes.
- Cool before slicing.
- Serve and enjoy fresh homemade bread.
Banana Bred Cinnamon Rolls
Introduction
Banana Bread Cinnamon Rolls combine two classic homemade favorites into one soft, fragrant, and irresistible baked treat. These rolls take the comforting flavor of traditional banana bread and combine it with the buttery cinnamon-sugar layers that make cinnamon rolls so beloved.
The secret to making these rolls especially flavorful is using very ripe bananas. Bananas with brown spots are naturally sweeter, softer, and more intensely flavored, making them perfect for baking. Mashed bananas are incorporated directly into the dough, giving the rolls a tender texture and a delicious banana aroma.
Inside each roll is a generous layer of softened butter, brown sugar, and cinnamon. As the rolls bake, the filling melts into the dough, creating sweet, buttery cinnamon swirls throughout every slice. A smooth cream cheese glaze adds a creamy and slightly tangy finish.
These Banana Bread Cinnamon Rolls are perfect for breakfast, brunch, holidays, family gatherings, weekend baking, or simply using up a few ripe bananas sitting on the kitchen counter.
Ingredients
For the Dough
- 1 cup mashed ripe bananas, about 2 to 3 bananas
- 1/4 cup granulated sugar
- 1/2 cup warm milk
- 2 1/4 teaspoons active dry yeast
- 1 large egg
- 4 tablespoons unsalted butter, melted
- 1 teaspoon vanilla extract
- 1/2 teaspoon salt
- 3 1/2 to 4 cups all-purpose flour
For the Cinnamon Filling
- 1/2 cup unsalted butter, softened
- 3/4 cup packed brown sugar
- 2 tablespoons ground cinnamon
- 1/4 teaspoon salt
- 1 teaspoon vanilla extract
- 1/2 cup chopped walnuts or pecans, optional
For the Cream Cheese Glaze
- 4 ounces cream cheese, softened
- 2 tablespoons unsalted butter, softened
- 1 cup powdered sugar
- 1 teaspoon vanilla extract
- 2 to 3 tablespoons milk
- Pinch of salt
Optional Toppings
- Chopped toasted pecans
- Chopped walnuts
- Thinly sliced bananas
- A light dusting of cinnamon
- Additional powdered sugar
Instructions
Step 1: Prepare the Bananas
Peel the ripe bananas and place them in a large bowl. Mash them thoroughly with a fork or potato masher until mostly smooth.
A few tiny pieces of banana are perfectly fine and can provide little bursts of banana flavor throughout the finished rolls.
Measure exactly 1 cup of mashed banana and set it aside.
Step 2: Prepare the Yeast
Pour the warm milk into a large mixing bowl. The milk should be warm to the touch but not hot.
Add the active dry yeast and a small portion of the granulated sugar. Stir gently and allow the mixture to stand for approximately 5 to 10 minutes.
The mixture should become slightly foamy. This indicates that the yeast is active and ready to use.
If there is no bubbling or foaming, the yeast may be inactive and should be replaced before continuing.
Step 3: Make the Banana Dough
Add the mashed bananas, remaining granulated sugar, egg, melted butter, vanilla extract, and salt to the yeast mixture.
Stir thoroughly until the ingredients are evenly combined.
Begin adding the flour gradually, approximately 1/2 cup at a time. Mix after each addition.
Continue adding flour until a soft dough begins to form.
The dough should be soft and slightly tacky but should not be extremely sticky. Avoid adding too much flour because a stiff dough can result in heavy and dense cinnamon rolls.
Step 4: Knead the Dough
Transfer the dough to a lightly floured work surface.
Knead the dough for approximately 7 to 10 minutes.
As you knead, the dough should become smoother, softer, and more elastic.
If using a stand mixer, place the dough hook on the mixer and knead on low to medium speed until the dough becomes smooth and elastic.
Place the kneaded dough into a lightly greased bowl. Turn the dough once so that the surface is lightly coated with oil or butter.
Cover the bowl with plastic wrap or a clean kitchen towel.
Step 5: First Rise
Place the covered bowl in a warm, draft-free area.
Allow the dough to rise for approximately 1 to 1 1/2 hours, or until it has doubled in size.
The exact time will depend on the temperature of your kitchen. In a warmer environment, the dough may rise more quickly.
Do not rush this step. Allowing the yeast dough enough time to rise helps create soft and fluffy rolls.
Method for the Cinnamon Filling
Step 6: Prepare the Filling
While the dough is rising, prepare the cinnamon filling.
Place the softened butter in a small bowl.
Add the brown sugar, ground cinnamon, salt, and vanilla extract.
Mix until the ingredients form a smooth, spreadable mixture.
If you are using walnuts or pecans, chop them finely and set them aside.
For an especially rich filling, allow the butter to soften naturally at room temperature rather than melting it completely.
Forming the Cinnamon Rolls
Step 7: Roll Out the Dough
Once the dough has doubled in size, gently press it down to release some of the excess air.
Transfer the dough to a lightly floured work surface.
Using a rolling pin, roll the dough into a rectangle approximately 16 inches long by 12 inches wide.
Try to keep the thickness as even as possible so the finished rolls bake uniformly.
Step 8: Add the Cinnamon Filling
Spread the cinnamon-butter mixture evenly across the surface of the dough.
Leave a small border around the edges so the filling does not squeeze out excessively when the dough is rolled.
If using chopped walnuts or pecans, sprinkle them evenly over the filling.
Make sure the filling reaches nearly every part of the dough so each finished roll has plenty of cinnamon flavor.
Step 9: Roll the Dough Into a Log
Starting from one of the long sides, carefully roll the dough into a log.
Roll it firmly enough to create defined layers, but do not roll so tightly that the dough becomes compressed.
Once you reach the opposite edge, gently pinch the seam closed.
Place the seam underneath the log.
Step 10: Cut the Rolls
Using a sharp knife, gently cut the log into approximately 12 equal pieces.
You can also use unflavored dental floss to cut the rolls. Slide the floss underneath the log, bring the ends upward, cross them over the top, and pull to create a clean cut.
Arrange the rolls cut-side up in a greased 9-by-13-inch baking dish.
Leave a small amount of space between the rolls because they will expand during the second rise and baking.
Step 11: Second Rise
Cover the baking dish loosely with plastic wrap or a clean kitchen towel.
Allow the rolls to rise for another 30 to 45 minutes.
They should become noticeably larger and softer, with many of the rolls beginning to touch.
This second rise helps create the light, fluffy texture associated with excellent homemade cinnamon rolls.
Baking Method
Step 12: Bake the Rolls
Preheat the oven to 350°F (175°C).
Place the baking dish in the center of the preheated oven.
Bake for approximately 25 to 32 minutes, or until the rolls are lightly golden brown and the centers are cooked through.
Keep a close eye on them during the final few minutes.
Because bananas add moisture to the dough, baking time can vary slightly depending on the size of the rolls and your oven.
Avoid overbaking. The rolls should be soft and tender rather than dry.
Remove the baking dish from the oven and allow the rolls to cool for approximately 10 minutes before adding the cream cheese glaze.
Method for the Cream Cheese Glaze
Step 13: Prepare the Glaze
Place the softened cream cheese and softened butter in a mixing bowl.
Beat until completely smooth and creamy.
Add the powdered sugar, vanilla extract, and pinch of salt.
Mix until well combined.
Gradually add the milk, one tablespoon at a time, until the glaze reaches the desired consistency.
For a thick frosting, use less milk.
For a thinner glaze that melts beautifully over the warm rolls, add slightly more milk.
Step 14: Finish the Rolls
Spread the cream cheese glaze generously over the warm cinnamon rolls.
Allow the glaze to melt slightly into the cinnamon swirls.
If desired, sprinkle the tops with chopped toasted pecans or walnuts.
Serve the rolls warm.
History and Inspiration
Banana bread and cinnamon rolls have both become beloved parts of home baking traditions.
Banana bread became especially popular in American home kitchens during the twentieth century as a practical and delicious way to use overripe bananas. Instead of throwing away bananas that had become too soft to eat, home bakers discovered that their increased sweetness and moisture made them excellent for baking.
Cinnamon rolls have a much longer history, with variations of sweet, spiced rolled breads appearing throughout European baking traditions. Over time, cinnamon rolls became especially popular in North American bakeries and home kitchens.
Banana Bread Cinnamon Rolls are a modern combination of these two comforting traditions.
Rather than baking bananas into a loaf and preparing cinnamon rolls separately, this recipe incorporates mashed bananas directly into a yeast-based dough. The banana dough is then rolled with butter, brown sugar, and cinnamon just like a traditional cinnamon roll.
The result is a pastry with the familiar flavor of banana bread and the soft, layered structure of a cinnamon roll.
The Formation of the Rolls
The unique texture of these rolls comes from the combination of several ingredients and techniques.
The yeast provides the dough with its light and airy structure. As the dough rises, the yeast produces gas that becomes trapped within the gluten structure of the dough.
The mashed bananas contribute moisture, natural sweetness, and a distinctive fruity flavor.
Butter enriches the dough and contributes to its tender texture.
The cinnamon filling creates the signature spiral structure. Brown sugar melts together with butter during baking, creating a sweet, caramel-like layer around the cinnamon.
The second rise allows the shaped rolls to become lighter before they enter the oven.
During baking, the dough expands further while the butter and brown sugar filling melts into the layers.
Finally, the cream cheese glaze provides a smooth, creamy contrast to the warm cinnamon and banana flavors.
Tips for Perfect Banana Bread Cinnamon Rolls
Use Very Ripe Bananas
The best bananas for this recipe are soft and heavily speckled or brown. They contain more natural sweetness and have a stronger banana flavor.
Measure the Banana Carefully
Too much mashed banana can change the moisture level of the dough. For the most consistent results, measure out 1 cup.
Add Flour Gradually
Do not automatically add the entire 4 cups of flour.
Start with approximately 3 1/2 cups and add more only if necessary. The dough should remain soft.
Do Not Kill the Yeast
The milk should be warm, not hot. Excessively hot milk can damage the yeast and prevent the dough from rising properly.
Give the Dough Time
A slow or complete rise is important for creating soft rolls. If your kitchen is cool, the dough may require additional time.
Do Not Overfill
Although a generous amount of cinnamon filling is delicious, spreading it too thickly can make the filling spill out when the dough is rolled.
Use Dental Floss for Clean Cuts
Unflavored dental floss is an excellent way to cut cinnamon rolls without pressing down on the dough.
Do Not Overbake
The rolls should be lightly golden and cooked through but still soft. Overbaking can make them dry.
Serving Suggestions
Serve these Banana Bread Cinnamon Rolls warm from the oven with a generous layer of cream cheese glaze.
They pair beautifully with coffee, tea, hot milk, or a cold glass of milk.
For brunch, serve them alongside fresh fruit, yogurt, scrambled eggs, or a breakfast casserole.
For a special dessert, serve a warm cinnamon roll with a scoop of vanilla ice cream.
To add extra texture, sprinkle toasted pecans or walnuts over the cream cheese glaze.
You can also drizzle the finished rolls with a little caramel sauce for an even richer dessert.
Storage
Allow leftover rolls to cool completely before storing.
Because the rolls contain cream cheese glaze, store them in an airtight container in the refrigerator.
They can generally be refrigerated for up to 4 days.
To serve, warm an individual roll in the microwave for approximately 15 to 25 seconds.
For best texture, avoid overheating because excessive microwave time can make the dough chewy.
Freezing Method
For longer storage, the rolls can be frozen.
For the best results, freeze the baked rolls without the cream cheese glaze.
Allow the rolls to cool completely, then wrap them individually in plastic wrap or place them in a freezer-safe airtight container.
Freeze for up to approximately 2 to 3 months for the best quality.
Thaw overnight in the refrigerator or allow them to thaw at room temperature.
Warm gently before serving and prepare fresh cream cheese glaze for the top.
Make-Ahead Method
These rolls can also be prepared the night before.
Prepare the dough, allow it to complete its first rise, roll it out, add the filling, and shape the rolls.
Place the rolls into the greased baking dish.
Cover the dish tightly and place it in the refrigerator overnight.
The following morning, remove the dish from the refrigerator.
Allow the rolls to sit at room temperature for approximately 45 to 90 minutes, or until they become noticeably puffy.
Bake according to the recipe instructions.
Prepare the cream cheese glaze while the rolls are baking, then spread it over the warm rolls.
This method makes them especially convenient for weekend breakfasts and holiday mornings.
Banana Bread Lovers
If you are a banana bread lover, these cinnamon rolls offer a completely different way to enjoy those familiar flavors.
Instead of a traditional loaf, you get soft yeast dough filled with buttery cinnamon and brown sugar. The banana flavor runs through the dough, creating a tender and aromatic pastry.
They are an excellent choice when you have ripe bananas available and want to make something more exciting than ordinary banana bread.
Cinnamon Roll Lovers
For anyone who already loves classic cinnamon rolls, this recipe adds an extra layer of flavor without losing the qualities that make cinnamon rolls so comforting.
The soft dough, buttery filling, brown sugar, cinnamon swirls, and cream cheese glaze remain at the heart of the recipe.
The banana simply makes the dough more flavorful and tender.
A Family-Favorite Baking Recipe
There is something special about homemade cinnamon rolls filling the kitchen with the smell of warm cinnamon, melted butter, brown sugar, and freshly baked dough.
Adding banana makes these rolls even more comforting.
They are the kind of recipe that can become part of a family’s weekend baking tradition. They are wonderful for serving to guests, taking to a brunch, preparing for holidays, or enjoying around the kitchen table with a cup of coffee.
The combination of ripe bananas, cinnamon, brown sugar, butter, and cream cheese creates a dessert-like breakfast that feels both familiar and special.
Conclusion
Banana Bread Cinnamon Rolls are the perfect marriage of two classic homemade favorites.
The banana-enriched dough is soft, tender, and fragrant. The buttery brown sugar and cinnamon filling creates beautiful swirls throughout every roll, while the cream cheese glaze adds a creamy and slightly tangy finish.
This recipe is also a wonderful way to use very ripe bananas that might otherwise be overlooked.
Whether you prepare them for breakfast, brunch, a holiday gathering, an afternoon treat, or simply because you are craving something homemade, these Banana Bread Cinnamon Rolls are a delicious recipe worth making again and again.
Once you pull the warm rolls from the oven and spread the cream cheese glaze over the top, the combination of banana bread and classic cinnamon roll flavors comes together into one irresistible homemade treat.
Butterscotch Caramel Puppy Chow
Introduction
Butterscotch Caramel Puppy Chow is an irresistibly crunchy, sweet snack made with crisp cereal coated in a smooth mixture of butterscotch, caramel, and peanut butter, then finished with a generous coating of powdered sugar. It is one of those simple recipes that requires very little preparation but delivers a dessert-like flavor that feels special enough for holidays, parties, movie nights, bake sales, and family gatherings.
The combination of buttery caramel and warm butterscotch gives this puppy chow a deep, nostalgic sweetness, while the crunchy cereal keeps every bite light and crisp. Peanut butter adds richness and helps create a smooth coating that clings beautifully to the cereal.
This recipe can be prepared in a large batch and stored for several days, making it especially useful when you need an easy treat that can be made ahead of time.
Ingredients
For the Puppy Chow
- 9 cups Rice Chex or similar crispy square cereal
- 1 cup butterscotch chips
- 1/2 cup smooth creamy peanut butter
- 1/4 cup unsalted butter
- 1/3 cup caramel sauce
- 1 teaspoon vanilla extract
- 1/4 teaspoon salt
- 2 cups powdered sugar
Optional Additions
For an extra-special version, you can add:
- 1/2 cup caramel bits
- 1/2 cup chopped pecans or walnuts
- 1/2 cup mini pretzels
- 1/2 cup toffee bits
- 1/2 cup butterscotch chips
- A small pinch of flaky sea salt
Instructions
Step 1: Prepare the Cereal
Place the cereal in a very large mixing bowl. Choose a bowl that gives you plenty of room to stir without crushing the cereal.
If you are adding pretzels or nuts, you can mix them with the cereal at this stage.
Set the bowl aside while you prepare the coating.
Step 2: Melt the Butterscotch Mixture
Place the butterscotch chips, peanut butter, and butter in a medium microwave-safe bowl.
Heat for 30 seconds, then stir well.
Continue heating in 15- to 20-second intervals, stirring thoroughly after each interval, until everything is melted and smooth.
Do not overheat the mixture. Butterscotch chips can become thick or seize if they are exposed to excessive heat.
Step 3: Add the Caramel
Once the butterscotch mixture is smooth, stir in the caramel sauce, vanilla extract, and salt.
Mix until the caramel is completely incorporated and the coating is smooth and glossy.
The salt is important because it balances the sweetness and makes the caramel and butterscotch flavors stand out.
Step 4: Coat the Cereal
Slowly pour the warm butterscotch caramel mixture over the cereal.
Using a large rubber spatula or wooden spoon, gently fold the cereal from the bottom toward the top.
Continue mixing until most of the cereal pieces are lightly and evenly coated.
Work gently because vigorous stirring can break the cereal.
Step 5: Add the Powdered Sugar
Transfer the coated cereal into a large food-safe container or two large resealable bags.
Add the powdered sugar.
Seal the container or bags and gently shake until the powdered sugar covers the cereal pieces.
If using bags, leave some air inside so the mixture has room to move around.
Step 6: Cool the Puppy Chow
Spread the finished puppy chow onto parchment paper or a large baking sheet.
Allow it to cool completely.
As it cools, the coating will firm up and the individual cereal pieces will become crunchy again.
Step 7: Add the Finishing Touches
Once completely cool, gently break apart any large clusters.
For a more luxurious caramel flavor, sprinkle the finished puppy chow with toffee pieces, chopped pecans, or a small amount of flaky sea salt.
You can also drizzle a little additional caramel over the top, although this may make the snack softer if too much is used.
Method
The key to excellent Butterscotch Caramel Puppy Chow is controlling the temperature of the coating and handling the cereal gently.
Begin with fresh, crisp cereal. Stale cereal will not provide the same satisfying crunch.
Melt the butterscotch chips, butter, and peanut butter slowly. The mixture should become smooth without becoming excessively hot.
The caramel sauce is added after melting because it gives the coating its distinctive caramel flavor while helping maintain a smooth consistency.
When coating the cereal, fold rather than aggressively stir. The square cereal pieces are delicate, and keeping them intact gives the finished snack its characteristic crunchy texture.
Finally, powdered sugar is added after the cereal has been coated. It creates the familiar puppy chow appearance and prevents the pieces from sticking together too much.
Formation and Texture
The finished puppy chow should have a delicate, crunchy texture on the inside with a sweet, buttery coating on the outside.
The butterscotch provides a rich cooked-sugar flavor, while the caramel adds warmth and depth. Peanut butter contributes a creamy nuttiness that prevents the dessert from tasting like pure sugar.
The powdered sugar forms a soft outer layer that contrasts beautifully with the crisp cereal underneath.
If you prefer larger clusters, allow the coated cereal to cool without disturbing it too much. If you prefer individual pieces, spread it into a thin layer and gently separate the cereal as it cools.
A Little History
Puppy chow, also commonly known as muddy buddies, is a popular homemade snack made by coating crispy cereal with a sweet mixture and powdered sugar.
The exact origin of the name and recipe is difficult to establish because versions of this treat have circulated through American home kitchens, community cookbooks, holiday gatherings, and family recipe collections for decades.
Traditional versions often combine cereal with chocolate and peanut butter before coating it with powdered sugar. Over time, home bakers began creating variations using white chocolate, butterscotch, caramel, cookies, candy pieces, pretzels, and nuts.
Butterscotch Caramel Puppy Chow is a natural variation of this classic snack, replacing the usual chocolate-centered flavor with the rich combination of caramel and butterscotch.
Tips for the Best Results
Use fresh cereal for maximum crunch.
Melt the butterscotch chips slowly and stir frequently.
Do not boil the coating.
Add the caramel sauce only after the butterscotch mixture has become smooth.
Let the puppy chow cool completely before storing it.
If the finished mixture seems too sweet, add roasted nuts or pretzels to provide a salty contrast.
For a stronger caramel flavor, use a thick caramel sauce rather than a very thin caramel syrup.
For extra crunch, add toffee bits after the puppy chow has cooled.
Storage
Store the finished puppy chow in an airtight container at room temperature.
It is best enjoyed within several days while the cereal remains crisp.
Keep moisture away from the container because humidity can soften the cereal and powdered sugar coating.
You can also divide the puppy chow into small treat bags or containers for parties, school events, holiday gift baskets, and homemade food gifts.
Serving Ideas
Butterscotch Caramel Puppy Chow makes an excellent snack for movie nights and family gatherings.
It can also be served at:
- Holiday parties
- Birthday celebrations
- Potlucks
- Bake sales
- Game nights
- Cookie exchanges
- Christmas gatherings
- Fall parties
- Dessert tables
- Homemade gift baskets
For a beautiful presentation, place the puppy chow in a large serving bowl and sprinkle a few toffee pieces and chopped pecans over the top.
Variations
Salted Caramel Version
Add a small amount of flaky sea salt after the puppy chow has cooled. The salty finish creates a delicious contrast with the sweet caramel coating.
Butterscotch Pecan Version
Add 1/2 cup finely chopped toasted pecans to the cereal before coating it. The nuts pair especially well with butterscotch.
Pretzel Caramel Version
Add mini pretzels to the cereal mixture for a sweet-and-salty snack with additional crunch.
Toffee Version
Stir 1/2 cup toffee bits into the cooled puppy chow for extra buttery caramel flavor.
Holiday Version
Add festive sprinkles after coating the cereal for a colorful party snack.
Make-Ahead Method
This recipe is particularly convenient because it can be prepared ahead of time.
Prepare the puppy chow according to the recipe and allow it to cool completely. Store it in an airtight container until needed.
For parties, you can prepare it the day before and portion it into individual serving bags shortly before serving.
If preparing it as a gift, place the puppy chow in decorative food-safe bags or containers and seal tightly.
Troubleshooting
If the coating is too thick, allow it to cool slightly and stir thoroughly. If necessary, a very small amount of additional melted butter can help loosen it.
If the cereal becomes soggy, the coating may have been too hot, too thick, or applied too heavily. Make sure the cereal is coated evenly rather than completely saturated.
If the puppy chow sticks together in large pieces, break the clusters apart once completely cool.
If the finished snack tastes overly sweet, add salted nuts or pretzels to balance the flavor.
Conclusion
Butterscotch Caramel Puppy Chow proves that an incredibly simple combination of cereal, butterscotch, caramel, peanut butter, and powdered sugar can become an unforgettable homemade treat.
It is crunchy, buttery, creamy, caramel-rich, and wonderfully nostalgic. The recipe requires no complicated baking techniques and can easily be adapted with nuts, pretzels, toffee, or sea salt.
Whether served in a large bowl for a family movie night or packaged into small bags as homemade gifts, this sweet snack is easy to make and even easier to love.
For the Lovers of Butterscotch and Caramel
If you love the classic combination of buttery butterscotch and rich caramel, this puppy chow is made for you. Every handful delivers crisp cereal surrounded by a creamy coating, followed by the soft sweetness of powdered sugar.
It is the kind of treat that disappears quickly from the serving bowl, so making a double batch is a very good idea for parties and holidays.
The best part is its simplicity: no oven, no complicated decorating, and no advanced baking skills are required. Just melt, coat, shake, cool, and enjoy.
Final Method Summary
- Measure the cereal into a large bowl.
- Melt the butterscotch chips, peanut butter, and butter slowly.
- Stir in caramel sauce, vanilla, and salt.
- Pour the mixture over the cereal.
- Fold gently until coated.
- Transfer to a large container or resealable bags.
- Add powdered sugar and shake gently.
- Spread onto parchment paper.
- Cool completely.
- Break apart large clusters.
- Add optional nuts, pretzels, toffee, or sea salt.
- Store in an airtight container and serve.
3-Minute Chocolate Fudge
Introduction
When you want something rich, chocolatey, and homemade without spending hours in the kitchen, this 3-Minute Chocolate Fudge is a perfect choice. With only three main ingredients and a few minutes of preparation, you can create smooth, creamy fudge that tastes like it took much longer to make.
The combination of sweetened condensed milk and semi-sweet chocolate chips produces a wonderfully rich texture, while vanilla extract adds a gentle depth of flavor. This recipe is especially convenient during holidays, family gatherings, parties, bake sales, or whenever you need a quick homemade sweet treat.
The hardest part is usually waiting for the fudge to set before cutting it into pieces.
Ingredients
- 1 can sweetened condensed milk, approximately 14 ounces
- 3 cups semi-sweet chocolate chips
- 1 teaspoon vanilla extract
Optional Additions
For different variations, you can also add:
- 1/2 cup chopped walnuts or pecans
- 1/2 cup mini marshmallows
- 1/4 teaspoon salt
- 1/2 teaspoon instant coffee or espresso powder for a deeper chocolate flavor
- Shredded coconut
- Crushed cookies
- Chopped dried cherries or cranberries
Instructions
Step 1: Prepare the Pan
Line an 8-inch square baking pan with parchment paper, leaving some parchment hanging over the sides. This makes it much easier to lift the finished fudge from the pan.
Lightly grease the parchment if desired.
Step 2: Melt the Chocolate
Place the semi-sweet chocolate chips and sweetened condensed milk in a microwave-safe bowl.
Microwave on medium power for about 30 seconds. Remove the bowl and stir thoroughly.
Continue heating in 15- to 20-second intervals, stirring well after each interval, until the chocolate is almost completely melted and the mixture is smooth.
The chocolate should not be overheated. The remaining small pieces will usually melt from the heat of the mixture as you continue stirring.
Step 3: Add the Vanilla
Immediately stir in the vanilla extract.
If you are using nuts, coconut, marshmallows, or another addition, fold them into the mixture at this stage.
Stir until everything is evenly incorporated and the fudge mixture becomes thick, glossy, and smooth.
Step 4: Transfer to the Pan
Quickly spread the warm fudge mixture into the prepared pan.
Use a spatula to smooth the surface. Work fairly quickly because the fudge begins to thicken as it cools.
Step 5: Chill
Place the pan in the refrigerator for approximately 1 to 2 hours, or until the fudge is firm.
For an even firmer texture, allow it to chill longer.
Step 6: Cut and Serve
Once completely set, lift the fudge from the pan using the parchment paper.
Place it on a cutting board and cut it into small squares with a sharp knife.
For cleaner cuts, wipe the knife between slices.
Traditional Preparation Method
The traditional stovetop method is also simple.
Place the sweetened condensed milk and chocolate chips in a saucepan over low heat. Stir continuously until the chocolate has melted and the mixture is completely smooth.
Remove the saucepan from the heat and immediately stir in the vanilla extract.
Pour the mixture into the prepared pan, smooth the top, and refrigerate until firm.
Low heat is important because chocolate can scorch easily. Gentle heating and frequent stirring help create a smooth finished fudge.
Why This Fudge Sets
The magic of this recipe comes from the relationship between the chocolate and sweetened condensed milk.
Chocolate contains cocoa solids and cocoa butter, which firm up as the mixture cools. Sweetened condensed milk contributes sweetness, richness, and moisture while helping create the characteristic creamy texture of quick fudge.
Once the mixture is refrigerated, the chocolate firms and transforms the warm, glossy mixture into sliceable pieces of fudge.
A Little History of Fudge
Fudge became popular in the United States during the late 19th century and was particularly associated with homemade sweets and candy-making traditions.
Early fudge recipes were generally made by cooking sugar, butter, milk, and chocolate or other flavorings to a specific temperature. The mixture then had to be cooled and beaten to develop the proper texture.
Modern condensed-milk fudge simplified the process considerably. Instead of carefully controlling the temperature of a sugar syrup, home cooks could combine sweetened condensed milk with chocolate and melt the ingredients together.
This shortcut helped make homemade fudge much easier and more reliable, especially for busy families and holiday baking.
Formation and Texture
Good fudge should be firm enough to hold its shape while remaining soft and creamy when eaten.
The finished texture should not be watery or crumbly. Instead, each piece should have a smooth, dense consistency with a rich chocolate flavor.
For softer fudge, avoid excessive heating and do not overcook the mixture.
For firmer fudge, allow it to chill thoroughly before cutting.
Helpful Tips
Use good-quality chocolate chips for the best flavor because chocolate is the main ingredient.
Do not boil the chocolate mixture. Excessive heat can cause chocolate to become grainy or separated.
Stir thoroughly after each microwave interval. Chocolate can retain its shape even when it is already very warm, so stirring is essential.
Cut the fudge only after it has completely set.
For a festive appearance, sprinkle chopped nuts or crushed cookies over the top before refrigerating.
Store the fudge in an airtight container with parchment paper between layers.
Storage
The finished fudge can be stored in an airtight container at room temperature for several days, provided the environment is cool.
For longer storage, refrigerate it in a tightly sealed container.
You can also freeze properly wrapped fudge for longer-term storage. Thaw it in the refrigerator or allow it to come to room temperature before serving.
Serving Ideas
This fudge is delicious on its own, but it can also be served alongside coffee, tea, hot chocolate, or a glass of cold milk.
For holidays, arrange small squares on a dessert tray alongside cookies and other homemade sweets.
It also makes a simple homemade gift. Place several pieces in a small food-safe box or container and separate the layers with parchment paper.
Variations
Chocolate Walnut Fudge
Fold 1/2 cup of finely chopped walnuts into the melted mixture before transferring it to the pan.
Chocolate Pecan Fudge
Add 1/2 cup toasted chopped pecans for a rich, nutty variation.
Cookies and Cream Fudge
Fold crushed chocolate or sandwich cookies into the mixture before chilling.
Coconut Chocolate Fudge
Add 1/2 cup shredded coconut for a tropical twist.
Mocha Fudge
Add 1/2 teaspoon instant espresso powder along with the vanilla extract. The coffee enhances the chocolate flavor without making the fudge taste strongly like coffee.
Conclusion
This 3-Minute Chocolate Fudge is proof that a delicious homemade dessert does not have to require a long ingredient list or complicated candy-making techniques.
With sweetened condensed milk, semi-sweet chocolate chips, and vanilla extract, you can create a rich and creamy chocolate treat in just a few minutes of active preparation. Once chilled, the mixture transforms into beautiful little squares that are perfect for sharing.
It is an especially useful recipe to keep on hand for unexpected guests, holiday celebrations, family gatherings, or those moments when a serious chocolate craving appears.
For Fudge Lovers
If you love rich, old-fashioned chocolate desserts, this is the kind of recipe worth keeping close. It is quick enough for a busy weekday, simple enough for beginner bakers, and delicious enough to serve at a celebration.
Save this recipe so you do not lose it. Sometimes the simplest recipes become the ones everyone asks you to make again and again.
Thank you for enjoying and sharing homemade recipes.