
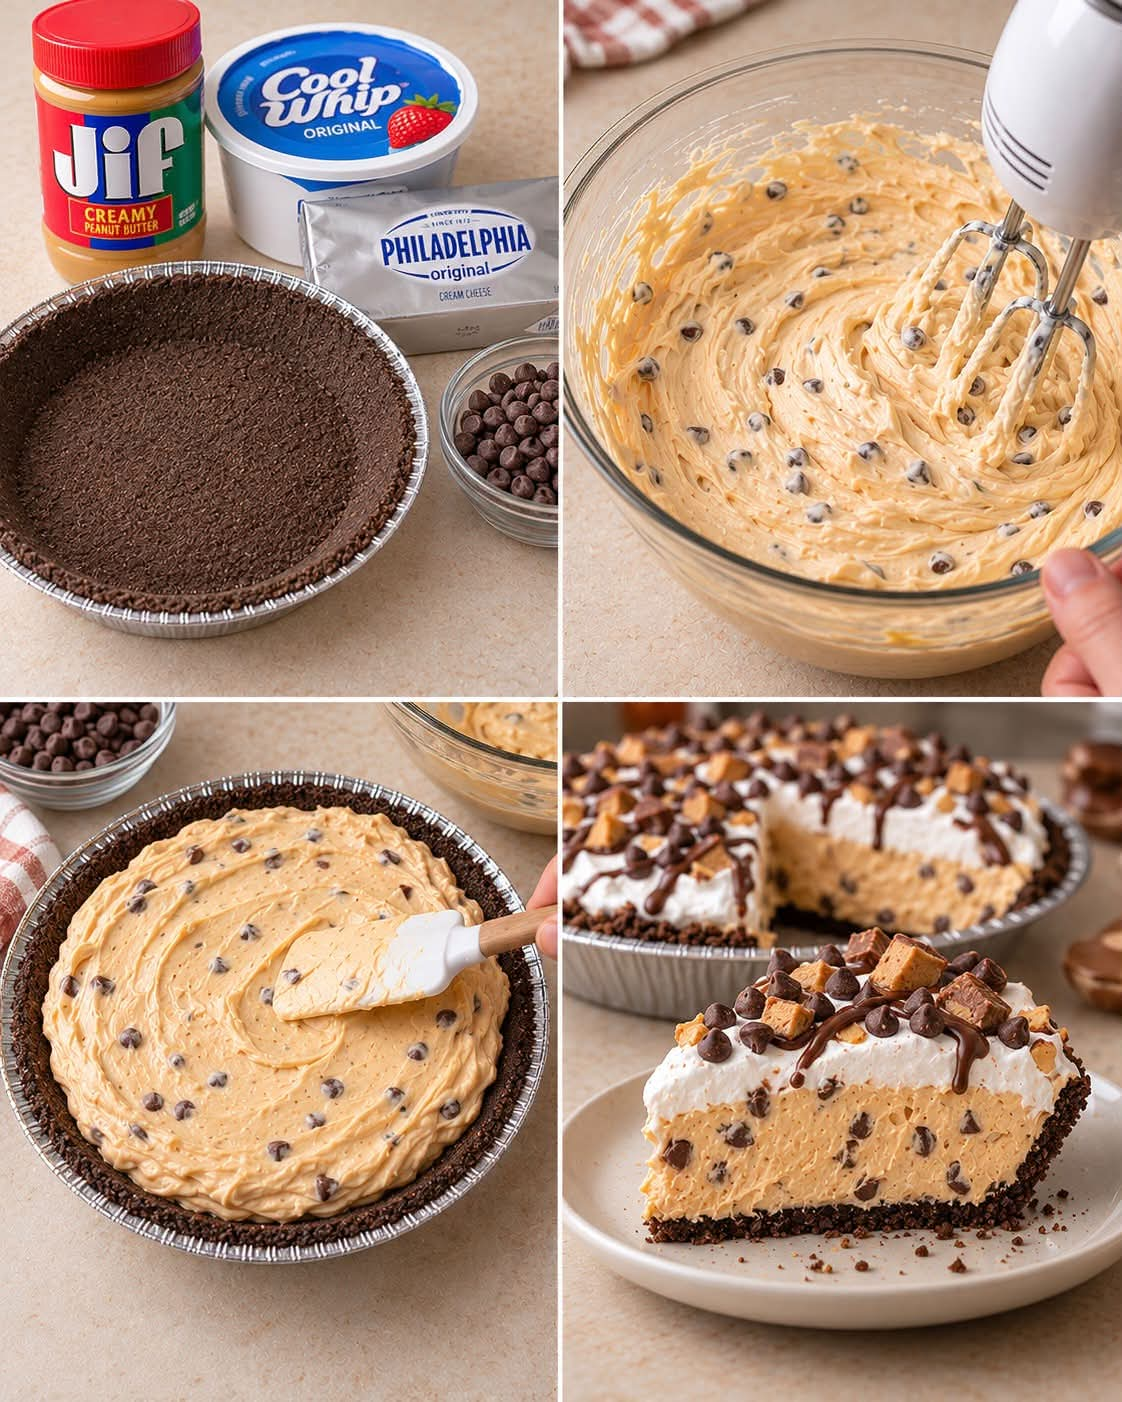
5-Ingredient Chocolate Chip Peanut Butter Pie: A Creamy No-Bake Dessert
Introduction
If you love the irresistible combination of chocolate and peanut butter, this 5-Ingredient Chocolate Chip Peanut Butter Pie is a dessert you will want to make again and again. With its crunchy chocolate cookie crust, smooth peanut butter filling, creamy texture, and generous sprinkling of chocolate chips, this pie delivers everything a dessert lover could wish for without requiring an oven.
One of the best things about this recipe is its simplicity. You only need five main ingredients, a mixing bowl, a spoon or electric mixer, and a little patience while the pie chills in the refrigerator. There is no complicated baking process, no need to prepare a homemade crust, and no long list of ingredients to measure.
The filling combines creamy peanut butter and softened cream cheese to create a rich, velvety base. Thawed whipped topping makes the mixture light and fluffy, while mini chocolate chips add little bursts of chocolate throughout every slice. All of this is nestled inside a prepared chocolate cookie crust that provides a delicious crunchy contrast to the soft filling.
This pie is perfect for family dinners, birthday celebrations, potlucks, holiday gatherings, summer parties, or those evenings when you simply want something sweet without turning on the oven. Prepare it ahead of time, let it chill, and serve it cold for a dessert that looks impressive but takes very little effort.
Recipe Overview
- Recipe Name: 5-Ingredient Chocolate Chip Peanut Butter Pie
- Preparation Time: 15 minutes
- Chilling Time: At least 4 hours
- Total Time: Approximately 4 hours and 15 minutes
- Servings: 8 slices
- Difficulty: Easy
- Cooking Method: No-bake, refrigerator-chilled
- Flavor: Creamy peanut butter, chocolate, and sweet cream
- Texture: Fluffy filling, crunchy cookie crust, and chocolate chips in every bite
Ingredients
This recipe uses five main ingredients. Each one contributes to the flavor, texture, or structure of the finished pie.
1. Prepared Chocolate Cookie Pie Crust
Quantity: 1 prepared 9-inch chocolate cookie pie crust
The chocolate cookie crust creates a crunchy, chocolatey foundation for the creamy peanut butter filling. Its slightly crisp texture contrasts beautifully with the soft center.
A store-bought crust makes this recipe especially convenient. If you prefer a homemade crust, you can crush chocolate sandwich cookies, combine the crumbs with melted butter, and press the mixture into a pie plate before chilling it.
2. Creamy Peanut Butter
Quantity: 1 cup
Peanut butter provides the signature nutty flavor and rich consistency that make this pie so satisfying.
Regular creamy peanut butter works best because it blends smoothly with the cream cheese. For the most reliable texture, avoid natural peanut butter that separates into oil and solids, as it may make the filling softer or less consistent.
3. Cream Cheese
Quantity: 1 package (8 ounces), softened
Cream cheese gives the filling a smooth, rich texture and a gentle tang that balances the sweetness of the peanut butter and whipped topping.
Allow the cream cheese to soften at room temperature before mixing. This simple step helps prevent lumps and makes it much easier to achieve a silky filling.
4. Whipped Topping
Quantity: 1 container (8 ounces), thawed
Thawed whipped topping lightens the peanut butter mixture, giving it a fluffy, mousse-like texture without requiring you to whip heavy cream from scratch.
Fold it into the peanut butter and cream cheese mixture gently. Mixing too aggressively can deflate the filling and make it denser than desired.
5. Mini Chocolate Chips
Quantity: ¾ cup
Mini chocolate chips provide chocolate flavor throughout the pie and make a simple decorative topping.
Use ½ cup inside the filling and reserve the remaining ¼ cup for the top. Mini chips distribute more evenly than large chocolate chips, so every slice gets a little chocolate in each bite.
Instructions
Step 1: Prepare Your Ingredients
Remove the cream cheese from the refrigerator and allow it to soften. Thaw the whipped topping according to its package instructions.
Set the chocolate cookie crust on a flat tray or serving plate so it will be easy to move into the refrigerator once filled.
Measure the peanut butter and chocolate chips before you begin. Divide the chocolate chips into two portions: ½ cup for the filling and ¼ cup for decoration.
Step 2: Beat the Cream Cheese and Peanut Butter
Place the softened cream cheese in a large mixing bowl. Beat it with an electric mixer until smooth and creamy.
Add the peanut butter and continue beating until both ingredients are fully combined. Scrape down the sides and bottom of the bowl as needed to make sure no pockets of cream cheese remain.
The mixture should look thick, smooth, and evenly colored, without visible lumps.
If you do not have an electric mixer, you can use a sturdy whisk or wooden spoon, although the filling may require a little more effort to become completely smooth.
Step 3: Fold in the Whipped Topping
Add the thawed whipped topping to the peanut butter and cream cheese mixture.
Using a flexible spatula, gently fold the ingredients together. Scoop from the bottom of the bowl and lift the mixture over itself, rotating the bowl as you work.
Continue until the filling is evenly blended and fluffy. Avoid vigorous stirring because the goal is to preserve as much air as possible.
The finished filling should be thick enough to spread but light enough to feel creamy rather than heavy.
Step 4: Add the Chocolate Chips
Pour ½ cup of mini chocolate chips into the filling.
Fold gently until the chips are distributed throughout the mixture. Try not to overmix, as this can reduce the filling’s light texture.
Save the remaining ¼ cup of chocolate chips for the topping.
Step 5: Fill the Chocolate Cookie Crust
Spoon the peanut butter filling into the prepared 9-inch chocolate cookie crust.
Use a spatula to spread it evenly from the center toward the edges. Smooth the top, creating a gentle swirl or a flat surface, depending on your preferred presentation.
Make sure the filling reaches the edges of the crust so that each slice holds together nicely when cut.
Step 6: Decorate the Pie
Sprinkle the reserved chocolate chips evenly over the top.
For a more polished finish, you can concentrate a few extra chips around the edge or create a simple ring of chocolate chips around the center.
Keep the decoration simple if you want the creamy peanut butter filling to remain the star of the dessert.
Step 7: Refrigerate Until Firm
Carefully transfer the pie to the refrigerator.
Chill for at least 4 hours, or until the filling is firm enough to slice cleanly. If you have time, chilling it overnight can make the texture even more settled and easier to serve.
Do not skip this step. The refrigerator allows the cream cheese mixture and whipped topping to firm up, helping the pie hold its shape when cut.
Step 8: Slice and Serve
Once the pie is thoroughly chilled, cut it into 8 slices using a sharp knife.
For cleaner slices, dip the knife in warm water, wipe it dry, and repeat between cuts.
Serve the pie cold. Each slice should reveal the chocolate cookie crust beneath the fluffy peanut butter filling, with mini chocolate chips scattered throughout.
Methods of Preparation
The No-Bake Mixing Method
This recipe relies on combining ingredients rather than baking them. The cream cheese and peanut butter form the rich base, while the whipped topping adds volume and a lighter texture.
Because the ingredients are mixed directly in one bowl, preparation is quick and cleanup is minimal.
The Gentle Folding Method
Folding is important when incorporating whipped topping. Instead of stirring rapidly, use a spatula to lift the mixture from the bottom and fold it over the top.
This technique helps preserve the air in the whipped topping, creating a filling that feels lighter on the tongue.
The Refrigerator-Setting Method
Refrigeration is what transforms the soft filling into a sliceable pie. As the mixture cools, it becomes firmer and more stable.
The crust also remains easier to handle when the pie is thoroughly chilled. For the best results, keep the pie refrigerated until shortly before serving.
The Layering Method
Although this dessert does not require multiple baked layers, its appeal comes from the contrast between three elements:
- A crunchy chocolate cookie crust.
- A smooth, fluffy peanut butter filling.
- Chocolate chips mixed inside and sprinkled on top.
Each layer contributes a different texture, making the finished pie feel more elaborate than its simple preparation suggests.
The History and Inspiration Behind Peanut Butter Pie
Peanut butter desserts have long been popular in American home baking. Peanut butter became a familiar pantry ingredient during the twentieth century, and home cooks increasingly used it in cookies, bars, candies, frostings, and chilled desserts.
Cream pies and refrigerator desserts also became popular because they could be prepared ahead of time and served without complicated baking techniques. Combining peanut butter with cream cheese and whipped topping is a modern home-cooking approach that creates a rich but airy filling.
Chocolate and peanut butter became an especially beloved pairing in American sweets. The deep flavor of chocolate complements the roasted, nutty taste of peanut butter, while sweet cream ingredients soften the intensity of both.
This particular five-ingredient version is best understood as a convenient modern no-bake variation rather than a recipe with one established historical origin. Its popularity comes from the same qualities that make many family dessert recipes successful: familiar ingredients, simple preparation, and a flavor combination that appeals to a wide range of dessert lovers.
Understanding the Formation and Texture
The texture of this pie depends on how its five ingredients work together.
Why Cream Cheese Matters
Cream cheese provides body and structure. It also adds a mild tang that prevents the filling from tasting excessively sweet.
When softened and beaten properly, it blends smoothly with peanut butter and helps create a uniform filling.
Why Peanut Butter Creates Richness
Peanut butter contributes fat, flavor, and thickness. Its natural richness makes the pie taste indulgent even though the filling requires very little preparation.
Creamy peanut butter is particularly useful because it produces a more consistent texture than a separated natural variety.
Why Whipped Topping Makes the Filling Fluffy
Whipped topping introduces air into the mixture, making the filling lighter than a simple peanut butter and cream cheese blend.
Gentle folding helps preserve that airy texture. If the topping is stirred too aggressively, the filling can become denser.
Why Chilling Is Essential
The filling is soft immediately after mixing. Refrigeration allows it to become firmer, making it easier to cut and serve.
Four hours is a useful minimum, but the exact setting time can vary depending on your refrigerator, the temperature of the ingredients, and the particular whipped topping you use.
Why the Chocolate Cookie Crust Works So Well
The crust adds crunch and a slightly bitter chocolate note that balances the creamy, nutty filling.
The contrast between the firm crust and soft filling is one of the reasons this pie is so enjoyable.
Tips for Making the Perfect Peanut Butter Pie
Use softened cream cheese. Cold cream cheese is difficult to blend and may leave small lumps in the filling.
Choose creamy peanut butter. A conventional creamy variety usually produces the most consistent result.
Thaw the whipped topping properly. It should be soft enough to fold into the filling but still cold.
Fold gently. Preserve the whipped topping’s airiness for a light, fluffy texture.
Allow enough chilling time. Cutting the pie too early can cause the filling to slump or lose its shape.
Use a sharp knife. Warm and wipe the knife between slices for a neater presentation.
Keep the pie cold. Because this dessert contains cream cheese and whipped topping, it should remain refrigerated when not being served.
Avoid overfilling the crust. If your crust is shallower than expected, leave out any excess filling rather than forcing it all inside.
Delicious Variations to Try
Chocolate Peanut Butter Cup Pie
Replace some of the mini chocolate chips with chopped peanut butter cups. Sprinkle a few additional pieces over the top before chilling.
This variation creates a more candy-inspired dessert with extra peanut butter flavor.
Extra-Chocolate Peanut Butter Pie
Add a thin layer of chocolate ganache to the cookie crust before spooning in the filling. Allow the ganache to cool and set first.
You can also drizzle melted chocolate over the chilled pie just before serving.
Crunchy Peanut Butter Pie
For additional texture, fold a small amount of finely chopped roasted peanuts into the filling. Keep the quantity modest so the pie remains creamy and easy to slice.
Peanut Butter and Chocolate Swirl Pie
Reserve a little melted chocolate and gently swirl it across the top of the filling before refrigerating. Do not stir it deeply into the pie, as the contrast looks especially attractive on the surface.
Salted Peanut Butter Chocolate Pie
Sprinkle a tiny pinch of flaky sea salt over the top immediately before serving. The salt can balance the sweetness and emphasize the chocolate and peanut butter flavors.
Homemade Cookie Crust
If you cannot find a prepared chocolate cookie crust, crush approximately 24 chocolate sandwich cookies and combine the crumbs with about 4 tablespoons of melted butter. Press the mixture firmly into a 9-inch pie plate and refrigerate until set.
The exact amount may vary depending on the cookies used and whether their filling is included.
How to Store Chocolate Chip Peanut Butter Pie
Refrigerator Storage
Cover the pie and refrigerate it promptly. It is best enjoyed within 3 to 4 days for freshness and texture.
Keep it chilled when not serving, and do not leave it at room temperature for extended periods because the filling contains dairy ingredients.
Freezer Storage
You can freeze the pie for a firmer, almost frozen-dessert texture. Cover it tightly with freezer-safe wrapping and freeze until solid.
For the best quality, enjoy it within about 1 month. Thaw it in the refrigerator before serving if you prefer a softer, creamier texture. The texture of the whipped topping may change slightly after freezing and thawing.
For easier serving, you can also freeze individual slices in separate containers.
Frequently Asked Questions
Can I make this pie the day before serving?
Yes. This is an excellent make-ahead dessert. Preparing it the day before gives the filling plenty of time to chill and makes it convenient for parties and family gatherings.
Can I use homemade whipped cream instead of whipped topping?
Yes, but the texture and stability may differ. Use firmly whipped, unsweetened or lightly sweetened heavy cream, adjusting sweetness to taste. Homemade whipped cream may not hold its shape as long, so keep the pie refrigerated and serve it promptly.
Why is my filling too soft?
The pie may not have chilled long enough, the cream cheese may have been too warm, or the whipped topping may not have been properly thawed. Refrigerate it longer before slicing.
If the filling remains soft, the ingredients or product substitutions may have affected its structure.
Can I use crunchy peanut butter?
Yes. Crunchy peanut butter adds small pieces of peanuts and extra texture. The filling will be less smooth, but it can still be delicious.
Can I make this recipe without a prepared chocolate crust?
Absolutely. Use a homemade chocolate cookie crust or a prepared graham cracker crust. A chocolate crust gives the strongest chocolate flavor, while a graham cracker crust creates a slightly different sweet and buttery contrast.
Is this pie very sweet?
It is a rich dessert, and the sweetness depends partly on the peanut butter, whipped topping, and crust you choose. For a less sweet flavor, use a less-sweet cookie crust and avoid adding extra sugar to the filling.
How can I get perfect slices?
Make sure the pie is thoroughly chilled. Use a sharp knife warmed under hot water, wipe it dry, and clean it between slices.
Can I decorate it for a special occasion?
Yes. Add chocolate shavings, chopped peanut butter cups, a light chocolate drizzle, or a small border of whipped topping. Add delicate decorations close to serving time for the best appearance.
Serving Suggestions
This pie is rich, creamy, and satisfying, so a modest slice is often enough to finish a meal.
Serve it after a family dinner with coffee, tea, or a glass of cold milk. It also makes an excellent addition to a dessert table alongside fresh strawberries, vanilla ice cream, brownies, or simple butter cookies.
For a party, slice the pie in advance and arrange the portions on a chilled serving platter. Keep the remaining pie refrigerated until needed.
If you want to create a restaurant-style presentation, place each slice on a dessert plate and add a small chocolate drizzle beside it. A few chopped peanuts or chocolate curls can provide an attractive finishing touch.
Conclusion
This 5-Ingredient Chocolate Chip Peanut Butter Pie proves that a memorable dessert does not have to be complicated. With a prepared chocolate cookie crust, creamy peanut butter, softened cream cheese, whipped topping, and mini chocolate chips, you can create a dessert that looks beautiful and tastes wonderfully indulgent.
The preparation takes only about 15 minutes, and the refrigerator does the rest of the work. Once chilled, the pie offers a delicious combination of crunchy crust, fluffy peanut butter filling, and chocolate in every bite.
Whether you serve it at a holiday gathering, bring it to a potluck, prepare it for a birthday, or simply make it for your family on the weekend, this easy no-bake pie is a wonderful recipe to keep on hand.
Prepare it ahead of time, give it plenty of time to chill, and enjoy every creamy slice.
For Chocolate and Peanut Butter Lovers
If chocolate and peanut butter are two of your favorite dessert flavors, this pie deserves a place in your recipe collection. It brings together the rich taste of peanut butter, the sweetness of chocolate chips, and the creamy texture of a chilled filling in one simple dessert.
It is ideal for anyone who loves easy recipes, make-ahead treats, and classic flavor combinations without spending hours in the kitchen.
Try it once, and you may find yourself making it for family celebrations, holiday dinners, summer parties, and those moments when a chocolate craving calls for something extra special.