
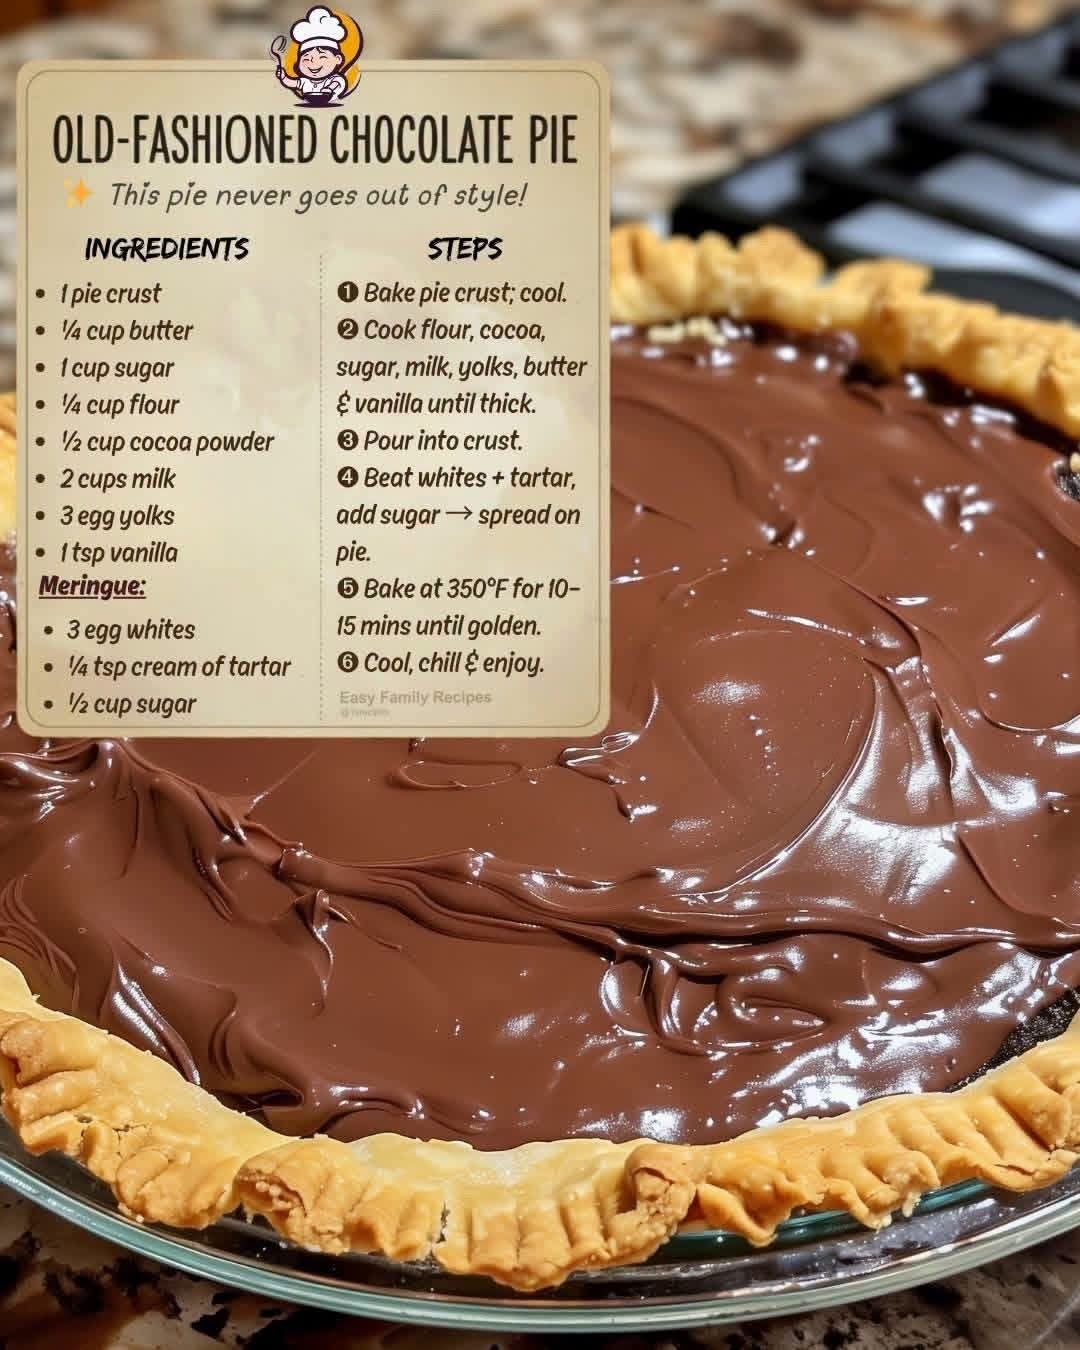
Grandma’s Classic Chocolate Pie
🍫🥧✨ Grandma’s Classic Chocolate Pie ✨🥧🍫
❤️ Introduction
There are desserts that taste delicious, and then there are desserts that taste like home. Grandma’s Chocolate Pie belongs in that second category.
This old-fashioned chocolate pie is wonderfully creamy, deeply chocolatey, and tucked inside a buttery, flaky crust. It is the kind of dessert that often appears at Sunday dinners, holiday tables, family reunions, and special celebrations. One bite can bring back memories of a grandmother standing in the kitchen, stirring a warm chocolate filling on the stove while the whole house fills with the comforting aroma of cocoa and vanilla.
The beauty of this pie is its simplicity. There are no complicated decorations or fancy techniques—just basic pantry ingredients transformed into a silky, luxurious dessert.
🍫🥧 Ingredients
For the Pie Crust
- 1 (9-inch) baked pie crust, completely cooled
- Homemade or store-bought crust may be used
For the Chocolate Filling
- 1 cup (200 g) granulated sugar
- 1/3 cup (30 g) unsweetened cocoa powder
- 1/4 cup (30 g) all-purpose flour
- 1/4 teaspoon salt
- 3 cups (720 ml) whole milk
- 4 large egg yolks
- 2 tablespoons (28 g) unsalted butter
- 2 teaspoons pure vanilla extract
For the Whipped Cream Topping
- 1 cup (240 ml) cold heavy whipping cream
- 2 tablespoons powdered sugar
- 1 teaspoon vanilla extract
Optional Garnishes
- Chocolate shavings
- Cocoa powder
- Mini chocolate chips
- Grated chocolate
- A light dusting of powdered sugar
- Fresh strawberries or raspberries
👩🍳 Instructions
Step 1: Prepare the Pie Crust
If using a homemade crust, bake it according to your favorite recipe and allow it to cool completely.
If using a prepared crust, simply make sure it is fully cooled before adding the chocolate filling.
A completely cooled crust helps keep the filling from becoming watery and helps preserve the crisp texture of the pastry.
Step 2: Combine the Dry Ingredients
In a medium saucepan, whisk together:
- Granulated sugar
- Cocoa powder
- Flour
- Salt
Whisk thoroughly so the cocoa and flour are evenly distributed.
This step is important because it helps prevent lumps from forming later.
Step 3: Add the Milk
Gradually whisk the whole milk into the dry mixture.
Continue whisking until everything is smooth.
Place the saucepan over medium heat.
Step 4: Temper the Egg Yolks
Place the egg yolks in a separate bowl and whisk them lightly.
Once the chocolate mixture is warm, slowly pour about 1 cup of the hot mixture into the egg yolks while whisking constantly.
This gently warms the eggs instead of exposing them directly to the hot liquid.
Slowly pour the egg mixture back into the saucepan while continuing to whisk.
🍫 The Chocolate Cooking Method
Continue cooking over medium heat, stirring constantly with a whisk or heat-resistant spatula.
The mixture will gradually become thicker.
This usually takes approximately 6–10 minutes, depending on your heat and saucepan.
Do not walk away while the filling is cooking. Constant stirring helps prevent scorching on the bottom of the pan.
When the filling becomes thick enough to coat the back of a spoon, it is ready.
Step 5: Add Butter and Vanilla
Remove the saucepan from the heat.
Immediately stir in:
- 2 tablespoons butter
- 2 teaspoons vanilla extract
Stir until the butter completely melts and the filling becomes smooth, glossy, and silky.
The butter adds richness while the vanilla enhances the chocolate flavor.
🥧 Step 6: Fill the Pie
Pour the warm chocolate filling into the cooled baked pie crust.
Use a spatula to gently smooth the top.
Allow the pie to cool at room temperature for about 20–30 minutes.
Then cover it loosely and place it in the refrigerator.
❄️ Step 7: Chill the Pie
Refrigerate the pie for at least 4 hours, preferably overnight.
Chilling allows the filling to become firm enough to slice beautifully.
For the cleanest slices, make sure the pie is thoroughly chilled before cutting.
☁️ Step 8: Make the Whipped Cream
Pour the cold heavy cream into a chilled mixing bowl.
Beat with an electric mixer until it begins to thicken.
Add the powdered sugar and vanilla.
Continue beating until soft-to-medium peaks form.
Do not overbeat, or the cream can become grainy.
✨ Step 9: Decorate
Spread or pipe the whipped cream over the chilled chocolate pie.
Finish with chocolate shavings, grated chocolate, or a light dusting of cocoa powder.
For a beautiful presentation, you can pipe small whipped-cream rosettes around the edge of the pie.
🔪 Step 10: Slice and Serve
Use a sharp knife to cut the pie into wedges.
For especially clean slices, dip the knife in hot water, wipe it dry, and then slice.
Repeat between slices.
Serve cold with plenty of whipped cream.
🕰️ A Little History
Chocolate cream pies are part of the long tradition of American cream pies, which became especially popular as home cooks developed ways to transform simple ingredients such as milk, eggs, sugar, flour, and cocoa into rich desserts.
Before modern convenience foods became common, many families prepared pudding-style pie fillings from scratch on the stovetop. Recipes were passed from one generation to another, often written on handwritten recipe cards or simply remembered.
That is part of what makes a recipe called “Grandma’s Chocolate Pie” so special. There isn’t necessarily one single original recipe. Every family may have its own version—some use cocoa, some use melted chocolate, some add cinnamon, and some top the pie with meringue instead of whipped cream.
The common thread is a creamy chocolate filling nestled inside a tender pastry crust.
❤️ The Formation of the Pie
The magic happens through several simple transformations.
1. Cocoa creates the chocolate foundation
Unsweetened cocoa powder provides the deep chocolate flavor.
2. Sugar balances the cocoa
Cocoa can taste naturally bitter, so sugar brings sweetness and balance.
3. Flour provides structure
The flour helps the filling thicken as it cooks.
4. Egg yolks create richness
Egg yolks contribute richness, color, and a smooth custard-like texture.
5. Milk creates creaminess
Whole milk gives the filling its soft and luxurious consistency.
6. Butter creates silkiness
Butter adds richness and gives the finished filling a beautiful glossy texture.
7. Vanilla brings everything together
A little vanilla doesn’t make the pie taste like vanilla—it helps deepen and round out the chocolate flavor.
👩🍳 Grandma’s Best Tips
❤️ Don’t rush the filling
Cook it gently over medium heat and stir constantly.
❤️ Use whole milk
Whole milk produces a richer and creamier filling than low-fat milk.
❤️ Don’t skip tempering the eggs
Adding hot filling gradually to the yolks prevents the eggs from scrambling.
❤️ Strain for an ultra-smooth filling
If you want an exceptionally silky pie, pour the cooked filling through a fine-mesh strainer before placing it into the crust.
❤️ Chill completely
A properly chilled pie is much easier to slice.
❤️ Don’t overbeat the whipped cream
Stop once you have soft, stable peaks.
🍫 Variations for Chocolate Lovers
Double Chocolate Pie
Add 2–3 ounces of finely chopped semisweet chocolate to the hot filling along with the butter.
Chocolate Espresso Pie
Add 1 teaspoon of instant espresso powder to the cocoa mixture. Coffee intensifies the chocolate flavor without making the pie taste strongly of coffee.
Chocolate Peanut Butter Pie
Spread a thin layer of creamy peanut butter over the cooled crust before adding the chocolate filling.
Chocolate Coconut Pie
Sprinkle toasted shredded coconut over the whipped cream.
Chocolate Strawberry Pie
Decorate the finished pie with sliced fresh strawberries and chocolate shavings.
🍽️ Serving Suggestions
Grandma’s Chocolate Pie is wonderful served simply, but you can make it extra special with:
- A generous spoonful of whipped cream
- Vanilla ice cream
- Chocolate sauce
- Caramel sauce
- Fresh berries
- Toasted nuts
- Chocolate curls
- A cup of coffee
- A glass of cold milk
For holidays and family dinners, serve each slice with a small cloud of whipped cream and a few curls of chocolate on top.
🧊 Storage
Keep the finished pie refrigerated.
Cover it loosely with plastic wrap or place it in a covered pie container.
It is best enjoyed within approximately 3–4 days for the freshest flavor and texture.
Because the pie contains milk and eggs, it should not be left sitting at room temperature for extended periods.
💕 For the Lovers of Old-Fashioned Desserts
This is the kind of recipe for people who believe the best desserts don’t need to be complicated.
It is for chocolate lovers.
It is for people who save handwritten recipes.
It is for families who gather around the dinner table.
It is for anyone who remembers sneaking into Grandma’s kitchen hoping there was one extra slice waiting in the refrigerator.
And most importantly, it is for anyone who believes that food can carry memories from one generation to another.
❤️ Grandma’s Secret
The greatest secret isn’t a special ingredient.
It is patience.
Take your time while cooking the filling. Whisk carefully. Let the pie cool. Give it enough time to chill.
Then serve it to people you love.
That is how a simple chocolate pie becomes something unforgettable.
🍫🥧 Conclusion
Grandma’s Chocolate Pie is more than a dessert. It is a celebration of simple ingredients, traditional cooking, family memories, and the irresistible combination of chocolate and cream.
With its tender crust, smooth chocolate filling, and fluffy whipped-cream topping, every bite is rich, comforting, and wonderfully nostalgic.
Whether you make it for a Sunday dinner, holiday gathering, birthday celebration, or simply because you are craving something chocolatey, this pie is sure to bring smiles around the table.
One slice is never enough! 🍫🥧❤️
👵❤️ From Grandma’s Kitchen to Your Table
Make it with love, serve it with joy, and don’t forget to save a slice for someone you love.
Enjoy every creamy, chocolatey bite! 🍫❤️🥧